Knowlege base

Avaya IP Office and Imagicle UC Suite specific configurations to enable Advanced Queuing and Attendant Console applications.

Article ID: 899
Last updated: 15 Apr, 2022

Applies to

Imagicle Customer Service solution on Avaya IP Office telephony environments

Scope

This article contains all required information for configuring Imagicle Advanced Queuing and call distribution + Imagicle Attendant Console in Avaya IP office telephony environments, with focus on SIP and CTI-based communications.

Avaya limitations

The following CTI-related actions from Imagicle Attendant Console are not supported, due to Avaya IP Office PBX limitations:

  • Blind transfer (SIP Trunk) is not supported. See below specific cases where Imagicle actually use it:
    • Overflow to a phone number upon closed queue, queue timeout or no available agents.
    • Imagicle Auto Attendant "Transfer to" behavior.
  • Native call parking is not supported. Imagicle Camp-On queue is implemented instead

Avaya IP Office Configurations

Imagicle solution for Avaya IP Office requires the installation, in the Imagicle UC Suite, of standard Avaya IP Office TAPI Service Provider (TSP). Please access to Avaya IP Office System Administrator page and download IP Office TSP from AppCenter:

Access to Imagicle UC Suite server via RDP session and copy downloaded .exe file in your Imagicle UC Suite's Desktop. Don't run the installer yet and follow below procedure.

Avaya TAPI Enablement

Open AvayaIPOffice Manager and select Edit ⇒ Security Settings ⇒ System ⇒ Switch name (your PBX)

Under "Unsecured Interfaces", you can find various access passwords and enablement flags.

Please check TAPI/DevLink3 flag and make sure you know the System Password, to be used in the Avaya TSP configuration. See below sample:

SIP Trunk toward UC Suite Configuration

Calls to Imagicle Advanced Queuing are transferred to Imagicle UC Suite through a SIP trunk defined in Avaya. This must be configured without encryption and without authentication, using UDP port 5062.

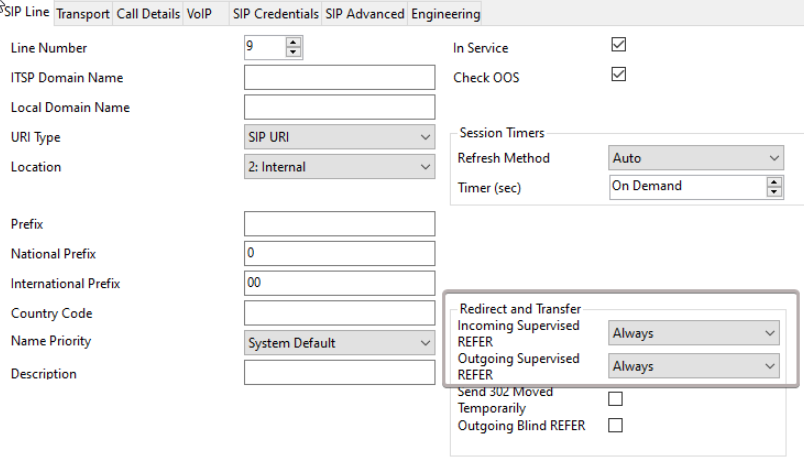
SIP trunk must have REFER signaling enabled, configured under "SIP Line" tab as per below sample:

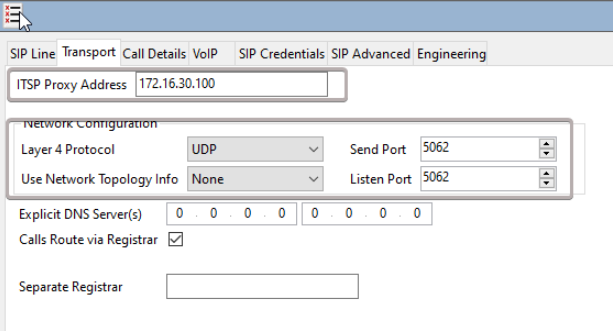
Under "Transport" tab, please add Imagicle UC Suite IP address and UDP Port 5062, as per below sample:

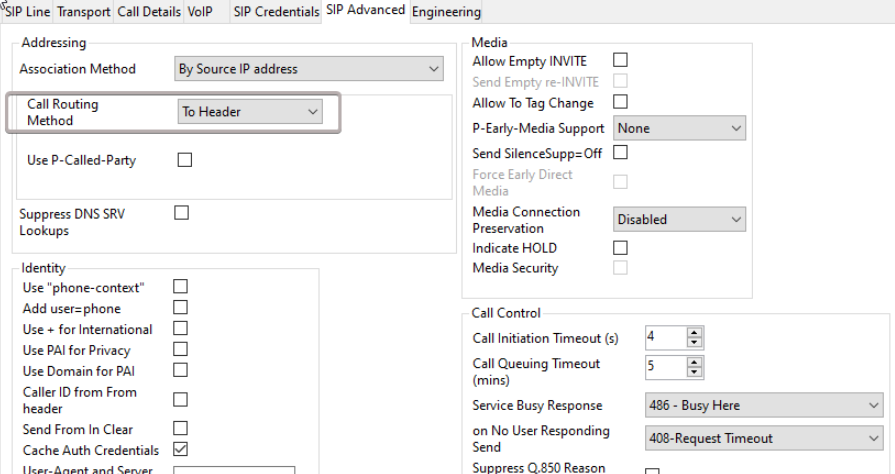
Under "SIP Advanced" tab, please set "Call Routing Method" as To Header. See below:

Please note that Avaya SIP license must allow for a number of simultaneous conversations equal to the number of Advanced Queuing channels.

For each queue defined in Advanced Queuing, a route must be added in Avaya IP Office. An additional route is also needed to manage the Camp-on Park, based on the chosen prefix.

You can download here an IP Office configuration file, to be intended as a reference sample.

Avaya TSP Installation and configuration on UC Suite

Please access to Imagicle UC Suite via RDP and run TAPI.exe installer, previously downloaded.

Once done, please access to Windows Control Panel and select "Phone and Modem" ⇒ Advanced tab ⇒ Select "Avaya IP Office TAPI2 Service Provider" and click on Configure. See below:

Enter the following data:

  • Switch IP Address: The IP address of Avaya IP Office PBX
  • Select "Third Party" button
  • Switch Password: enter here the System Password previously verified.

Leave all flags unchecked and hit OK to save.

On Phone and Modem panel, please Remove "Avaya IP Office TAPI2 Service Provider". Then hit "Add..." button and restore "Avaya IP Office TAPI2 Service Provider". See below:

This procedure is required for enabling Avaya TSP without having to reboot the Imagicle server.

To double check if TAPI monitoring is active, please launch the following application: C:\Program Files (x86)\StonevoiceAS\TroubleShooting\phone.exe

Avaya IP Office registered phone devices, with relevant internal numbers, should be listed on top, as above sample.

Article ID: 899
Last updated: 15 Apr, 2022
Revision: 8
Views: 324
Print Export to PDF Subscribe Share
This article was:  
Prev   Next
FAQ     Video