Contact Pictures Display on Jabber clients
Starting from Imagicle 2020.Winter.1 release, you can import contact pictures from your Active Directory or generic LDAP server, as explained here. You can leverage these pictures into your Jabber clients, allowing to display them while searching for users from standard Jabber "Contacts" button.
Configurations for CUCM <= rel. 12.0
Creating a new Jabber-config.xml
In case there are currently no Jabber config files uploaded to the Call manager a new config file needs to be created.
The configuration file for all Jabber clients must be created on a PC and uploaded on the CallManager. All Jabber clients will download and use the configuration file upon Jabber client reset and restart. The configuration file must include a section which defines UDS Directory settings pointing to the Application Suite server. There are possible ways to do it:
Recommended procedure
Log into IAS web interface as administrator. Navigate to the Admin ⇒ Jabber web page. The Jabber configuration file builder creates a jabber configuration file for you. Please make sure "Picture repository" is set to On.
.png)
Download the file and move to next step to upload the file to CuCM.
Manual procedure
Create a new XML file like the following:
<?xml version="1.0" encoding="utf-8"?> <config version="1.0"> <CUCM> <PhoneService_UseCredentialsFrom>presence</PhoneService_UseCredentialsFrom> </CUCM><!-- **************** IMAGICLE PICTURE REPOSITORY ********************** --><!-- If you are already using a customized jabber-config.xml file, --><!-- please merge only this section to your current file --><Directory><DirectoryServerType>UDS</DirectoryServerType> <UdsPhotoUriWithToken>https://<Imagicle_IP>:443/jabber/picturerepository/%%uid%%.jpg</UdsPhotoUriWithToken></Directory><!-- ************* End of Imagicle Picture Repository section ************ --><Policies> <EnableSIPURIDialing>true</EnableSIPURIDialing> </Policies> </config>
Replace <Imagicle_IP> with the Imagicle Application Suite server IP address or DNS name.
To create a new XML file, create a new file with Notepad, Notepad++ or your favourite text editor and save it in UTF-8 format with this name:
Jabber-config.xml
Modifying an existing Jabber-config.xml file
If you are already using a customized Jabber configuration file, add the following lines, just before the </config> tag.
<!-- **************** IMAGICLE PICTURE REPOSITORY ********************** --><!-- If you are already using a customized jabber-config.xml file, --><!-- please merge only this section to your current file --><Directory><DirectoryServerType>UDS</DirectoryServerType> <UdsPhotoUriWithToken>https://<Imagicle_IP>:443/jabber/picturerepository/%%uid%%.jpg</UdsPhotoUriWithToken></Directory><!-- ************* End of Imagicle Picture Repository section ************ -->
Replace <Imagicle_IP> with the Imagicle Application Suite server IP address or DNS name.
Notes
- the file format must be UTF-8.
- in the jabber-config file, the protocol keywords 'http' or 'https' of the URLs must be written lowercase.
- %%uid%% will be replaced with the CuCM End User "User ID" value. The same value must also match Imagicle users "PBX Username" field.
Upload the Jabber configuration file to the CuCM
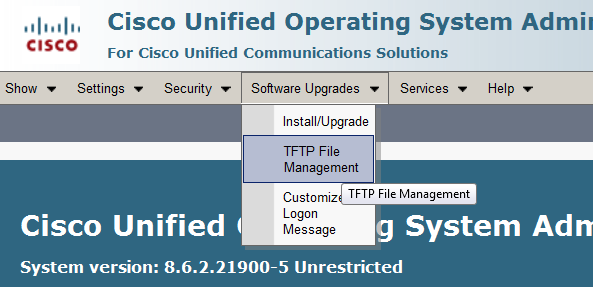
Log onto the CuCM "Operating system interface" and select "Software upgrades", then "TFTP File Management".
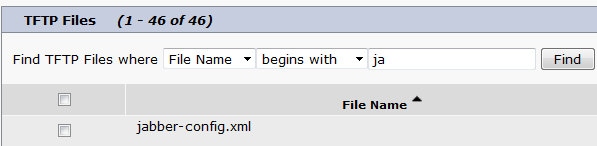
Locate the current jabber-config-xml file and delete it.
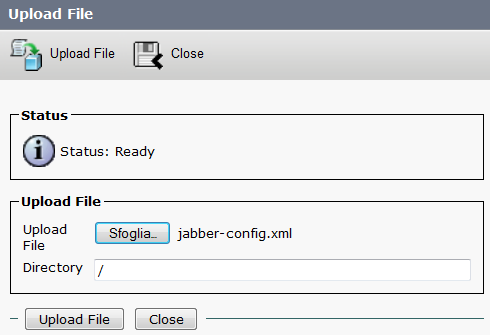
Upload the file you created or edited, entering root folder "/" as destination path.
When the file upload is complete, you should be able to see your jabber-config.xml file in your CuCM TFTP files list.
Restart the CuCM TFTP service
Please restart CuCm TFTP service. Log onto CuCM Serviceability and select Tools ⇒ Control Center - Feature Services. In the CM Services list, please select Cisco Tftp and press the Restart button.
Restart the Cisco Jabber client
To let the Jabber client download the new configuration, pls. reset and restart it.
Additional configurations for MRA access
This feature is also available to users connecting to Cisco network through MRA/Expressway, providing a specific HTTP(s) inbound rule is added in Expressway-C server:
https://<Imagicle_IP>:443/jabber/picturerepository
Match Type → Prefix and URL
Configurations for CUCM >= rel. 12.5
Configure UC Service(s) for each Jabber client type
CuCM 12.5 allows to create multiple UC Services, related to specific Jabber configurations to associate to different Jabber clients type. Pls. access to this feature by logging into "Cisco Unified CM Administration" web portal and select User Management ⇒ User Settings ⇒ UC service
Click on Add New to create a new UC Service Type "Jabber Client Configuration (jabber-config.xml)". The fields you need to populate are the following:
- DirectoryServerType = UDS
- UdsPhotoUriWithToken =
https://<Imagicle_IP>:443/jabber/picturerepository/%%uid%%.jpg</UdsPhotoUriWithToken>
Replace <Imagicle_IP> with the Imagicle Application Suite server IP address or DNS name.
See below screenshot sample:

On same UC Service, you can also configure Imagicle Gadgets, as described here.
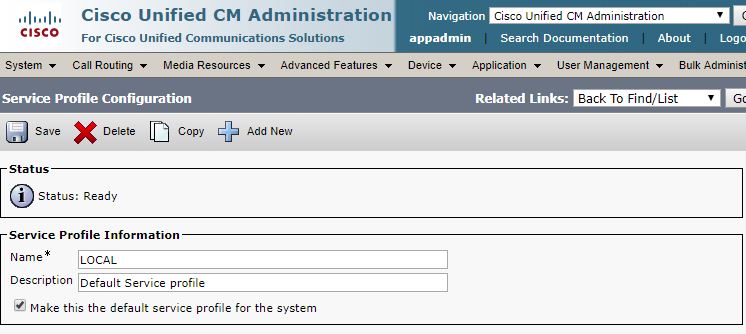
Once required UC Service has been defined, please configure it into the CuCM Service Profile associated to each End User. You can add up to three different UC Services into each Service Profile. See sample below:

|
||

| This article was: |
| Prev | Next | |
| Synchronize Users against Cisco Webex Control Hub | Synchronize Users against Azure AD Source |