Imagicle Users List
All company users who should leverage Imagicle UCX Suite applications must be included into the Imagicle Users' database.
Imagicle users list includes all internal company's employees, with relevant name, surname, phone extension and several other particulars to be optionally populated, manually or from a provisioning source.
Please remember that:
All Imagicle applications include in UCX Suite share the same Imagicle users list
A user within the list can be associated to an extension number, an "alias" extension, a voicemail number and a fax number.
Each of above phone numbers must be unique. E.g. the phone number 303 must appear only once in the users list, either as primary extension, voicemail or fax number.
If you need to associate more than one extension to the same named user, you must create additional users with same name and surname.
Usually, users in Imagicle DB represent physical employees, but you may want to create virtual users to control specific devices. For example you could create a "showroom" user which is associated to a phone deployed in company's show room.
So the users list is where you should start, while configuring the Imagicle UCX Suite. Several options available for users' provisioning:
Adding them manually, one by one. This is explained in the next chapter within this article.
Importing them from an Excel/CSV file
Synchronizing the list with an external source.
If you need to manually edit above users, you can do that by login in to web portal with administrator credentials. Please remember that modifying a user imported from an external source is useless, because all changes are reverted to previous state after next users' synch.
Manually Adding or Editing Users
Through the User Management link in the Admin menu you can add or remove users from you system, edit the details and modify the permissions.
Click on the link on the top of the “User management” page to create a new user. Press the Modify "pencil" icon to edit user details. Click the Delete "waste bin" icon to permanently remove a single user or the “Delete from database” button (on the bottom of the page) to remove multiple selected users, i.e. all the users you filtered through the "Customize search criteria" panel.
User Details
In this web page you can edit all the user's details at once. Some of the information shared between applications (login information, IP telephony data, personal information..) while other fields must be filled only if a specific application is licensed.
Then you need to fill the other parameters depending on the application you are going to configure.
Please refer to the basic configuration section of each application for a detailed description of the relevant fields and their meaning.
Login information
When adding or editing a user, the only mandatory fields are username and password. Other login information may be required by some application.
Username: unique identifier for the UCX Suite user, case-insensitive. It is requested when logging in to web portal using local authentication. Only alphanumeric and underscore characters are allowed.
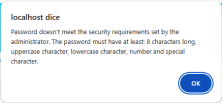
Password: password requested when logging in the UCX Suite web interface, using above local username. The password is case sensitive and it must satisfy the following complex password policy:
At least a capital letter
At least a lowercase letter
At least one number
At least one special character
At least 8 characters
If the password does not comply with above rules, the following error message pops-up:
Pin: personal PIN for VoiceMail and Phone Lock applications.
Remote Authentication Username: useful for authentication against an external source. This field is typically populated upon users' provisioning from a supported source.
Single sign-on id: this is the user ID to be compiled if Single Sign-On feature is enabled, based on SAML or OpenID Connect standards. If compiled, the user can only log into Imagicle applications through SSO, hence there is not a fallback method. If you still want user to login without SSO, please do not compile this field.
If Active Directory Username and Domain are filled, the user authentication is redirected to an AD/LDAP server. The Domain field must include a DNS name which can be resolved by Imagicle UCX Suite. In this case the standard Username and Password are ignored. The domain password is stored on the Domain Controller only.
In the Active Directory Username you must enter the AD/LDAP username without the domain, e.g. "john.smith". In the domain field, the DNS Domain name, e.g. "mydomain.com".
If either Active Directory Username or Domain are blank, the user logs in through local Username and Password. You can mix users leveraging AD authentication and local UCX Suite authentication within same UCX Suite instance.
To allow users login through LDAP authentication, the UCX Suite server does not need to be joined to the domain. if LDAP authentication fails, please make sure that domain name is reachable from Imagicle instance by issuing the command "Ping mydomain.com".
Personal Information
First Name, Last Name, Email, Mobile Business Number, User Address, and Home Phone, are reported on Digital Fax cover pages, Attendant Console internal contacts (colleagues) and Contact Manager web search
Preferred language: controls the language of the Web interface and of the Attendant Console for the user. Valid values are EN, IT, FR, DE, ES, AR, PL. Different users may have different languages.
Department: affects the way the user can access Contact Manager directories and Call Analytics data. Please check the relevant section of this guide
Cost Center: affects the way the user can access to Call Analytics data. Please check the relevant section of this guide
IP Telephony
First Extension Number: The first extension number is used by Imagicle applications to match the phone device to an employee. It can be filled with a directory internal number (short or +E.164) or with a SIP URI.
First extension number alias: Optional alternative directory number, SIP URI or PSTN number (DID) assigned to the user. This is useful to correctly correlate recordings performed through SIPREC-enabled Media Gateways, or to monitor user's phone traffic on an alternative directory number, without consuming an additional Call Analytics user's license.
PBX username: this field needs to be filled with Calling Platform's own username.
Partition: Only required for Cisco UCM telephony environments. Please refer to Imagicle Call Analytics section.
As a general rule, when a telephony event is raised, Imagicle UCX Suite services match the user owning relevant extension number/SIP URI.
For Cisco UCM environments only: if Extension mobility is enabled (through Contact Manager's "Manage Service" page), the phone device associated to the user is the one the user is logged onto. The EM username must match the PBX username field.