How to enable custom fields
Applies to:
UCX Suite, any version
Description:
Enable and customize custom fields
Enabling the UCX Suite Custom Fields
Access to Imagicle UCX Suite server via RDP and edit file:
C:\Program Files (x86)\StonevoiceAS\Apps\Speedy\Settings\CustomFields.config.xml
Add the required lines for each internal and/or external custom field to be enabled (see sample below).
<?xml version="1.0" encoding="utf-8"?>
<configuration>
  ...
  <!-- External phone-type Custom field -->
  <preference key="EnableFieldExternalCustom1"  value="true" />
  <preference key="LabelExternalCustom1"        value="Assistant Number" />
  <preference key="FieldTypeCustom1"            value="Telephone" />

  <!-- External string-type Custom field -->
  <preference key="EnableFieldExternalCustom2"  value="true" />
  <preference key="LabelExternalCustom2"        value="Assistant Name" />
  <preference key="FieldTypeCustom2"            value="String" />
...
  <!-- Internal string-type Custom field -->
  <preference key="EnableFieldInternalCustom1"  value="true" />
  <preference key="LabelInternalCustom1"        value="Manager Name" />
  <preference key="FieldTypeCustom1"            value="String" />

  <!-- Internal phone-type Custom field -->
  <preference key="EnableFieldInternalCustom2"  value="true" />
  <preference key="LabelInternalCustom2"        value="Manager Number" />
  <preference key="FieldTypeCustom2"            value="Telephone" />
  ...
  <!-- Add the following two lines to show enabled custom fields in web portal -->
  <preference key="InternalHiddenColumns" value="Businessphone,Companyname,Custom10,Custom3,Custom4,Custom5,Custom6,Custom7,Custom8,Custom9,Fax,FaxAlias,Homephone,HomePhoneAlias,Mobileprivate,MobilePrivateAlias,MobileBusinessAlias,BusinessPhoneAlias,Postaladdress,CostCenter"/>
  <preference key="ExternalHiddenColumns" value="Custom10,Custom3,Custom4,Custom5,Custom6,Custom7,Custom8,Custom9,Homephone,HomePhoneAlias,FaxAlias,Mobileprivate,MobilePrivateAlias,MobileBusinessAlias,BusinessPhoneAlias,Postaladdress,Primaryextnumber,Username,Department,CostCenter"/>
  ...
</configuration>
Save and close the file
Restart CTI service from this menu item: UCX Console ⇒ Manage Service
You can have the same custom field enabled for Internal (UCX Suite users) and External (Contact Manager) contacts, providing they share same field type (both String or Telephone).
"Telephone" custom field type is associated to a phone number that can be dialed by UCX Console and IP Phones.
How to enable and display custom fields in UCX Console
Internal custom: "Colleagues" tab, by checking relevant custom field from "Show" pull-down menu
External custom: "Contacts" tab, by checking relevant custom field from "Show" pull-down menu
How to enable and display custom fields in IP Phones
Edit file: C:\Program Files (x86)\StonevoiceAS\Apps\Speedy\Settings\SpeedyPhoneService.config.xml
Add the following lines between "configuration" statements:
<preference key="Speedy.contacts.DisplayPhones" value="Custom1" />
<preference key="SearchFormFields.field.label.Custom.GetFrom" value="External" />
Save and close file
Please remember that "Telephone" type custom fields are displayed in the list of contact's associated phone numbers and they can selected to trigger an outgoing calls. "String" type custom fields are displayed while selecting "Details" softkey.
Edit the label name for Internal custom fields in UCX Suite's user management web portal (optional)
Edit file: C:\Program Files (x86)\StonevoiceAS\Locale\EN\users.dat.asp
"EN" is the language folder in use. You can change data for other languages, too: IT, FR, ES, DE, AR
Pls. change below lines as required.
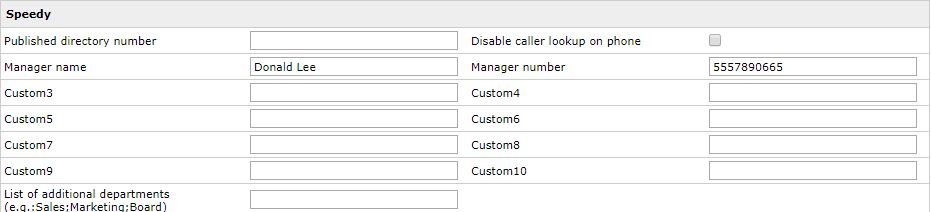
strUsersField_user_Custom1              = "Manager name"
strUsersField_user_Custom2              = "Manager number"
strUsersField_user_Custom3              = "Label_name_custom_field_3"
strUsersField_user_Custom4              = "Label_name_custom_field_4"
strUsersField_user_Custom5              = "Label_name_custom_field_5"
strUsersField_user_Custom6              = "Label_name_custom_field_6"
strUsersField_user_Custom7              = "Label_name_custom_field_7"
strUsersField_user_Custom8              = "Label_name_custom_field_8"
strUsersField_user_Custom9              = "Label_name_custom_field_9"
strUsersField_user_Custom10             = "Label_name_custom_field_10"
Save and close file
See below a screenshot from user's data, with new custom labels:
Please remember that above labels change is lost after an Imagicle release update. You must edit users.dat.asp again, to restore custom labels.