Jabber Gadgets Setup
Imagicle Gadgets for Cisco Jabber integrate Imagicle UCX Suite's applications into Jabber clients. For example, a Jabber user in your system can search internal and external contacts directories, send faxes, check their calls list and remaining budget, and so on.
User's access to the company data is limited by his/her access permissions to Imagicle UCSuite.
Although the Imagicle Gadgets for Jabber are free, accessing Imagicle UCX Suite's applications requires them to be licensed, activated and correctly configured in the Imagicle UCX Suite.
NOTE: If your UCX Suite is in a version prior to 2023.Winter.1, gadget URLs are different. If you need to configure previous gadget URLs, please contact Imagicle Support for details.
Architecture
A Cisco Jabber gadget is actually a web page which seamlessly integrates with the Jabber client. The client sends a request to a given URL and the server replies with the gadget contents. With Imagicle, gadget content is sent to the clients by the Imagicle UCX Suite embedded web server.
Obviously, the company firewall must allow access from the user's PCs to the Imagicle server on port 80 (HTTP) or port 443 (HTTPS).
If Cisco MRA (Expressway) is in place, above HTTP(s) requests are tunneled through MRA, as described in this section.
URLs for each Imagicle application should be configured on Cisco Unified CallManager. This section describes step by step configuration, depending on your CUCM version.
Cisco Unified Call Manager version <= 12.0
Configuration task list
Check access to the Imagicle server from the PC
Upload a new Jabber-config.xml file to the CallManager or modify the existing one
Restart the CuCM TFTP service
Restart the Cisco Jabber client
Check access to the Imagicle server from the PC
From your PC, open the web browser and navigate to this URL:
http://<IAS_IP_ADDRESS>/E.g. http://192.168.0.1/
The UCX Suite login page should be displayed. If you cannot reach the URL, please check the local network settings, local Windows firewall, and company firewall settings.
If Cisco MRA is in place, access to Imagicle web portal might be forbidden, but still Imagicle gadgets will work. Pls. contact your CUCM administrator for more details.
Ensure Imagicle UCX Suite integrated Active Directory authentication is enabled
The first time you use the Contact Manager gadget, you are asked to authenticate on the Imagicle UCX Suite server. The user can login through embedded UCX Suite username and password, but Imagicle suggests to allow the user to authenticate on UCX Suite by using integrated Active Directory authentication. In this way, the user should enter own Windows credentials and doesn't need to learn another set of credentials.
If the user's password is changed, the session expires and the user should authenticate again at the next access.
To enable Active Directory authentication on UCX Suite, please fill the users Active directory username and Domain fields in the users list, as described in the User Management section of this guide.
Note: the Speedy gadget session will be persistent on the user's PC. If the user accesses the Contact Manager gadget from another PC, he or she will be requested to authenticate again.
Upload a new Jabber-config.xml file to the CallManager or modify the existing one
If you never configured Jabber on your CuCM
The configuration file for all Jabber clients must be created on a PC and uploaded on the CallManager. All Jabber clients will download and use the configuration file upon Jabber client reset and restart. The configuration file must include a section which defines URLs pointing to the UCX Suite server. Here is how to do it.
Recommended procedure
Log into UCX Suite web interface as administrator. Navigate to the Admin ⇒ Jabber web page. The Jabber configuration file builder creates a jabber configuration file for you. Download the file and move to next step to upload the file to CuCM.
Manual procedure
Create a new XML file like the following:
<?xml version="1.0" encoding="utf-8"?>
<config version="1.0">
 <CUCM>
   <PhoneService_UseCredentialsFrom>presence</PhoneService_UseCredentialsFrom>
 </CUCM>
  <Directory>
    <ConnectionType>1</ConnectionType>
    <BusinessPhone>ipPhone</BusinessPhone>
    <OtherPhone>telephoneNumber</OtherPhone>
  </Directory>
  <Client>
	<jabber-plugin-config>
		<browser-plugin>
			<page refresh="false" preload="true">
				<tooltip>Call Recording</tooltip>
				<icon>http://imagicle_server_address/gadgets/callrecording/callrecording.png</icon>
				<url>http://imagicle_server_address/gadgets/callrecording?User=${UserID}</url>
			</page>
			<page refresh="false" preload="true">
				<tooltip>Contacts</tooltip>
				<icon>http://imagicle_server_address/gadgets/contactmanager/speedy.png</icon>
				<url>http://imagicle_server_address/gadgets/contactmanager?User=${UserID}</url>
			</page>
			<page refresh="false" preload="true">
				<tooltip>Fax</tooltip>
				<icon>http://imagicle_server_address/gadgets/digitalfax/stonefax.png</icon>
				<url>http://imagicle_server_address/gadgets/digitalfax?User=${UserID}</url>
			</page>
			<page refresh="false" preload="true">
				<tooltip>Call Analytics</tooltip>
				<icon>http://imagicle_server_address/gadgets/callanalytics/billing.png</icon>
				<url>http://imagicle_server_address/gadgets/callanalytics?User=${UserID}</url>
			</page>
            <page refresh="false" preload="true">
				<tooltip>Phone Lock</tooltip>
				<icon>http://imagicle_server_address/gadgets/phonelock/stonelock.png</icon>
				<url>http://imagicle_server_address/gadgets/phonelock?User=${UserID}</url>
			</page>
            <page refresh="false" preload="true">
                <tooltip>Expense Management</tooltip>
                <icon>http://imagicle_server_address/gadgets/budgetcontrol/budgetcontrol.png</icon>
                <url>http://imagicle_server_address/gadgets/BudgetControl?User=${UserID}</url>
			</page>
		</browser-plugin>
	</jabber-plugin-config>
</Client>
 <Policies>
   <EnableSIPURIDialing>true</EnableSIPURIDialing>
 </Policies>
</config>
Replace imagicle_server_address with the Imagicle UCX Suite server IP address or FQDN.
To create a new XML file, create a new file with Notepad, Notepad++ or your favorite text editor and save it in UTF-8 format with this name:
Jabber-config.xmlIf you are already using a customized Jabber configuration file:
Edit your existing Jabber-config.xml file and add the following lines, just before the </config> tag.
<Client>
	<jabber-plugin-config>
		<browser-plugin>
            <page refresh="false" preload="true">
				<tooltip>Call Recording</tooltip>
				<icon>HTTP://imagicle_server_address/gadgets/callrecording/callrecording.png</icon>
				<url>HTTP://imagicle_server_address/gadgets/callrecording?User=${UserID}</url>
			</page>
			<page refresh="false" preload="true">
				<tooltip>Contacts</tooltip>
				<icon>http://imagicle_server_address/gadgets/contactmanager/speedy.png</icon>
				<url>http://imagicle_server_address/gadgets/contactmanager?User=${UserID}</url>
			</page>
			<page refresh="false" preload="true">
				<tooltip>Fax</tooltip>
				<icon>http://imagicle_server_address/gadgets/digitalfax/stonefax.png</icon>
				<url>http://imagicle_server_address/gadgets/digitalfax?User=${UserID}</url>
			</page>
			<page refresh="false" preload="true">
				<tooltip>Call Analytics</tooltip>
				<icon>http://imagicle_server_address/gadgets/callanalytics/billing.png</icon>
				<url>http://imagicle_server_address/gadgets/callanalytics?User=${UserID}</url>
			</page>
			<page refresh="false" preload="true">
				<tooltip>Phone Lock</tooltip>
				<icon>http://imagicle_server_address/gadgets/phonelock/stonelock.png</icon>
				<url>http://imagicle_server_address/gadgets/phonelock?User=${UserID}</url>
			</page>
			<page refresh="false" preload="true">
				<tooltip>Expense Management</tooltip>
				<icon>http://imagicle_server_address/gadgets/budgetcontrol/budgetcontrol.png</icon>
				<url>http://imagicle_server_address/gadgets/budgetcontrol?User=${UserID}</url>
			</page>
		</browser-plugin>
	</jabber-plugin-config>
</Client>
Replace imagicle_server_address with the Imagicle UCX Suite server IP address or FQDN.
Notes:
the file format must be UTF-8.
in the jabber-config file, the protocol keywords 'http' or 'https' of the URLs must be written lowercase.
Specific settings for Jabber Desktop MacOS ver. 12.7 and above
Starting from this specific version of Jabber Desktop client for MacOS, a new set of Imagicle icons have been prepared to support new Jabber GUI. To display new icons, you need to change some XML commands, pointing to a different location. See below the list of amended XML lines:
<icon>http://imagicle_server_address/JabberForMac/callrecording/callrecording_12_7_MAC.png</icon>
<icon>http://imagicle_server_address/JabberForMac/speedy/speedy_12_7_MAC.png</icon>
<icon>http://imagicle_server_address/JabberForMac/stonefax/stonefax_12_7_MAC.png</icon>
<icon>http://imagicle_server_address/JabberForMac/billing/billing_12_7_MAC.png</icon>
<icon>http://imagicle_server_address/JabberForMac/stonelock/stonelock_12_7_MAC.png</icon>
<icon>http://imagicle_server_address/JabberForMac/budgetcontrol/budgetcontrol_12_7_MAC.png</icon>
Upload the Jabber configuration file to the CuCM
Log onto the CuCM "Operating system interface" and select "Software upgrades", then "TFTP File Management".
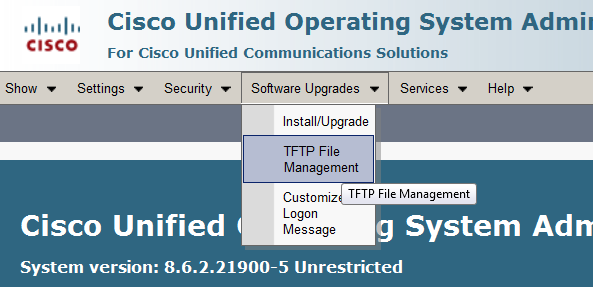
Locate the current jabber-config-xml file and delete it.

Upload the file you created or edited, entering root folder "/" as destination path.
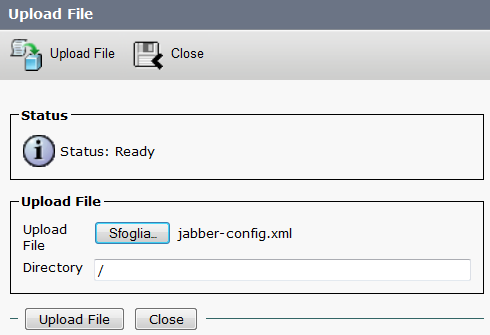
When the file upload is complete, you should be able to see your jabber-config.xml file in your CuCM TFTP files list.
Restart the CuCM TFTP service
Please restart CuCm TFTP service. Log onto CuCM Serviceability and select Tools ⇒ Control Center - Feature Services. In the CM Services list, please select Cisco Tftp and press the Restart button.
Restart the Cisco Jabber client
To let the Jabber client download the new configuration, pls. reset and restart it.
Cisco Unified Call Manager version >= 12.5
Configuration task list
Check access to the Imagicle server from the PC
Configure UC Service(s) for each Jabber client type
Restart the Cisco Jabber client
First two steps are the same available above into CuCM version <= 12.0 paragraph
Configure UC Service(s) for each Jabber client type
CuCM 12.5 allows to create multiple UC Services, related to specific Jabber configurations to associate to different Jabber clients type. Pls. access to this feature by logging into "Cisco Unified CM Administration" web portal and select User Management ⇒ User Settings ⇒ UC service
Click on Add New to create a new UC Service Type "Jabber Client Configuration (jabber-config.xml)"
If not yet available, you can start compiling the first part of UC Service with some parameters related to Cisco environment. See a sample below:
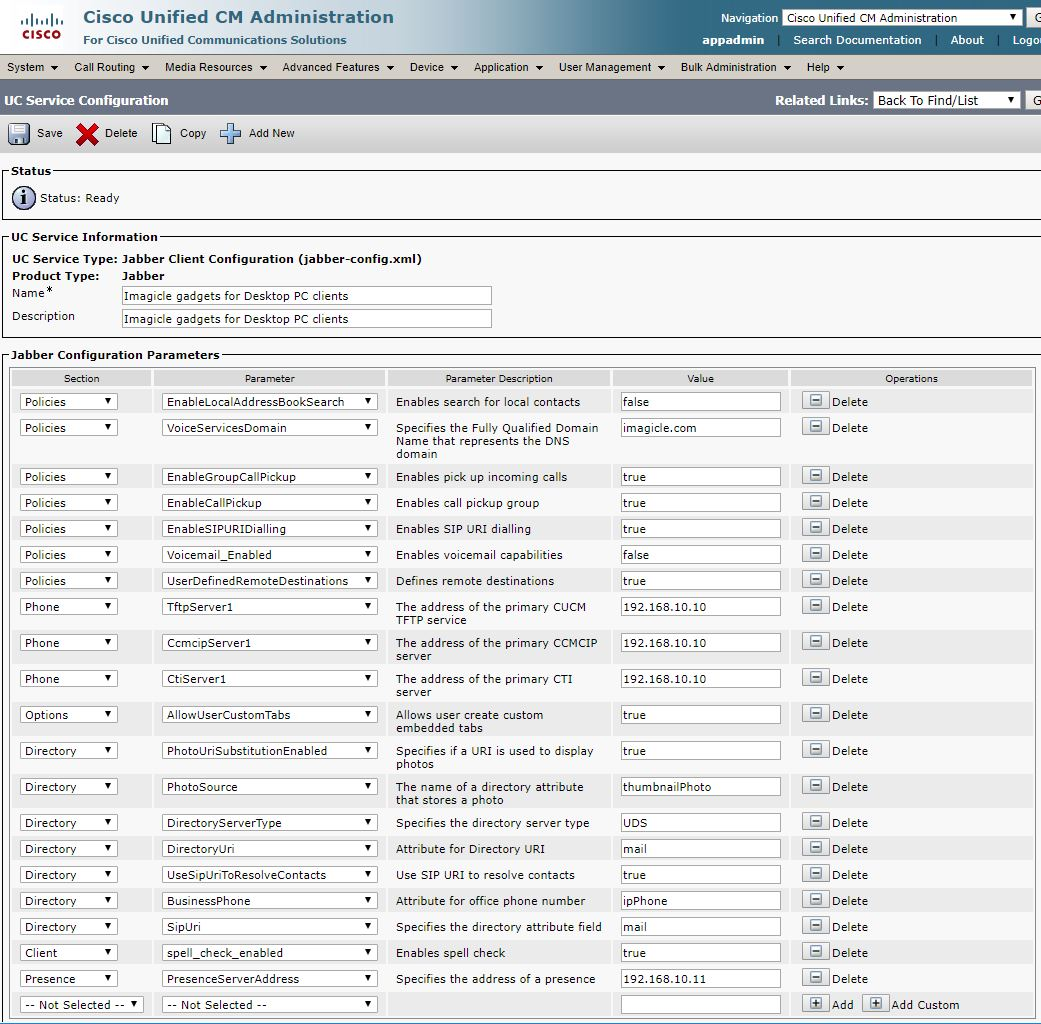
Then you can add a "Client" section for each Jabber Gadget to enable, following the sample below:
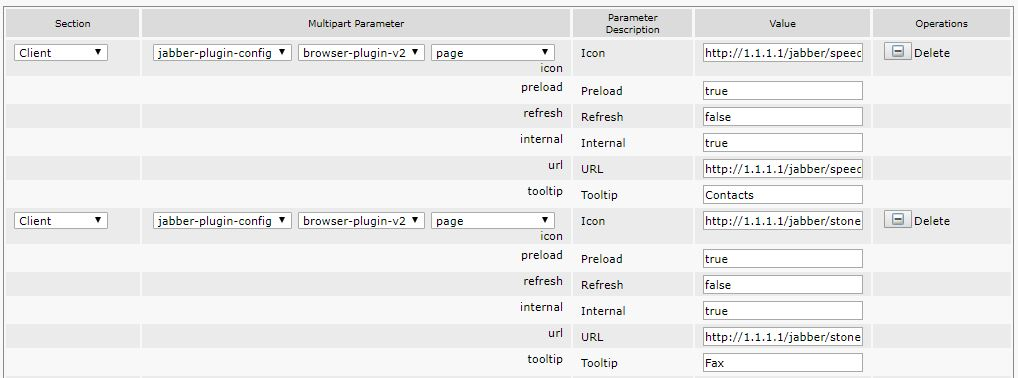
Here is a list of URLs to add into Icon and URL fields:
Call Recording Icon:
http://imagicle_IP_address/gadgets/callrecording/callrecording.pngCall Recording URL:
http://imagicle_IP_address/gadgets/callRecording?User=${UserID}Contact Manager Icon:
http://imagicle_IP_address/gadgets/contactmanager/speedy.pngContact Manager URL:
http://imagicle_IP_address/gadgets/contactmanager?User=${UserID}Call Analytics Icon:
http://imagicle_IP_address/gadgets/callanalytics/billing.pngCall Analytics URL:
http://imagicle_IP_address/gadgets/callanalytics?User=${UserID}Digital Fax Icon:
http://imagicle_IP_address/gadgets/digitalfax/stonefax.pngDigital Fax URL:
http://imagicle_IP_address/gadgets/digitalfax?User=${UserID}Phone Lock Icon:
http://imagicle_IP_address/gadgets/phonelock/stonelock.pngPhone Lock URL:
http://imagicle_IP_address/gadgets/phonelock?User=${UserID}Please replace "imagicle_IP_address" with UCX Suite IP address or FQDN. The parameter "internal" should be set to true to allow gadget tunneling over MRA. This is the correct configuration for gadgets associated to PC/Mobile Jabber clients.
For MacOS-based and Mobile Jabber clients, where gadget traffic MRA tunneling is currently not supported, this means that you will need direct access to Imagicle UCX Suite Web Portal (via Internet or via VPN), in order to force Jabber to NOT use MRA tunneling, you need to set "internal" parameter to false, we suggest to create a specific profile for Jabber mobile/MAC.
Specific settings for Jabber Desktop MacOS ver. 12.7 and above
Starting from this specific version of Jabber Desktop client for MacOS, a new set of Imagicle icons have been prepared to support new Jabber GUI. In order to display new icons, you need to change some XML commands, pointing to a different location. See below the list of amended XML lines:
https://imagicle_server_address/jabberformac/callrecording/callrecording_12_7_MAC.png
https://imagicle_server_address/jabberformac/speedy/speedy_12_7_MAC.png
https://imagicle_server_address/jabberformac/stonefax/stonefax_12_7_MAC.png
https://imagicle_server_address/jabberformac/billing/billing_12_7_MAC.png
https://imagicle_server_address/jabberformac/stonelock/stonelock_12_7_MAC.png
https://imagicle_server_address/jabberformac/budgetcontrol/budgetcontrol_12_7_MAC.png
Assigning UC Services into CuCM Service Profile
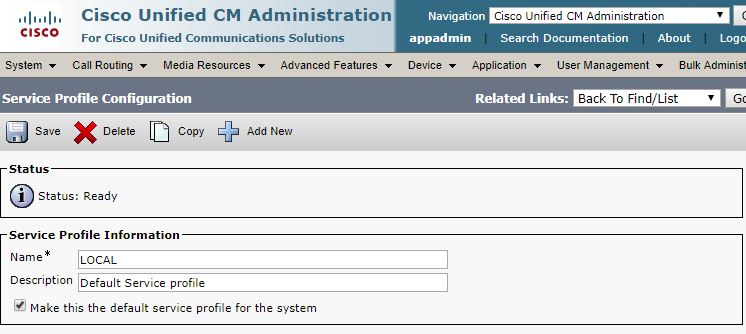
Once required UC Service(s) have been defined, please configure them into the CuCM Service Profile associated to each End User. You can add three different UC Services into each Service Profile. See sample below:

Troubleshooting
The gadget configuration is trivial. The most common mistakes are: wrong configuration file name, invalid xml syntax because of broken tags, wrong XML file format (must be UTF-8), invalid characters in the Jabber URL inside the config file. Please ensure you are typing only ANSI characters in the Imagicle Server FQDN and in the file name.
To test the Imagicle Applications configuration, open the web browser and enter one by one of the application URLs, replacing imagicle_server_address with the Imagicle UCX Suite server IP address or FQDN.
http://imagicle_server_address/gadgets/callrecording
http://imagicle_server_address/gadgets/contactmanager
http://imagicle_server_address/gadgets/digitalfax
http://imagicle_server_address/gadgets/callanalytics
http://imagicle_server_address/gadgets/phonelock
http://imagicle_server_address/gadgets/budgetControl
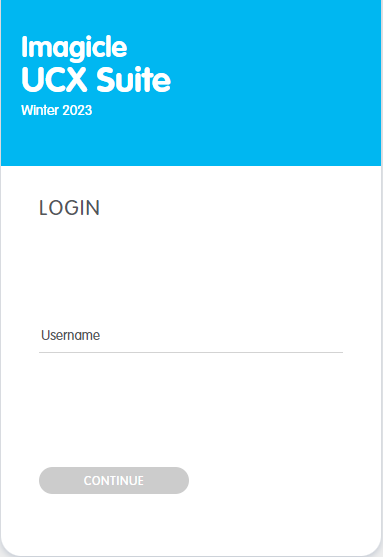
The login form should be displayed.
You can then test the access from a Cisco Jabber client, by manually adding the gadget:
From the File menu select New -> Custom tab and enter this URL:
http://imagicle_server_address/gadgets/contactmanager?User=useridReplace imagicle_server_address with the Imagicle server IP address and userid with the Windows user login or UCX Suite username.
