Starting from version 10.0, CuCM can notify an external application each time a call is placed or received, and the external application is allowed to change the calling and the called number, and also the associated name. Contact Manager leverages this CuCM feature to perform a lookup in the directories and change the called or the calling name.
This section describes how to configure Contact Manager through External Call Control (also known as CURRI).
External Call Control Profiles
The External Call Control Profile (ECCP) is how Imagicle Application Suite is linked with Unified CM. Configuring an ECCP adds your application's URL to the Unified CM database. The ECCP can then be added to Trigger Points in Unified CM. Available Trigger Points that allow to change the caller and called party description are:
- Translation Pattern
- Route Pattern
- Directory Number
When one of this Trigger Points is involved in routing process (e.g. a phone makes an outgoing call and tries to pass through a Route Pattern) Unified CM sends a request to the ECCP configured link (Imagicle Application Suite) that elaborates the request and answers changing the description.
How it works
Contact Manager directories are searched with the following procedure:
- The lookup is triggered by an incoming call (see pbx configuration below)
- If the caller or the called number is a known internal extension, configured in the users list, the search begins. If not, the call is ignored
- The internals (colleagues) directory is searched first, trying to match the called number
- If the destination of the call is not a colleague, the calling number is used to search the directories available to the called party (in this order: personal, department and public)
- If a match is found, the description of the calling number is filled with the contact First Name, Last name and Company name (see below how to change this)
- The search is repeated for the other party
- The call is allowed to continue
ECC versus TAPI
When using Contact Manager through ECC to provide the Caller ID service, TAPI configuration is not needed. Nevertheless, TAPI configuration is required for Click to call.
Contact Manager System Requirements for External Call Control - CURRI
- Cisco Unified Communications Manager 10.0 or higher
- Imagicle Application Suite 2014.6.1 or later
Cisco CallManager ECC Configuration for Contact Manager
Configuration steps:
- Get the ECC Uri from the AppSuite Web Interface
- Add a new ECC profile to the CuCM
- Link the ECC profile to a trigger point
- Make sure the ECC request is triggered
Get the ECC Uri from the AppSuite Web Interface
Go to the Imagicle Application Suite Web configuration site. From the main menu select Directory -> Manage Service and scroll to the bottom of the page.
You will need the Cisco External Call Control URI generated from this web page to configuring External Call Control Profile URI in Cisco CallManager configuration.
The URI will be similar to:
http://<Imagicle_server_IP_address>:80/fw/ecc.ashx
The above url is shared with the StoneLock application (i.e. it is the same URL).
Note: you must enter the URI generated form this page. If you enter a different URI (e.g. without the specified port) the configuration won't work.
Add an ECC profile to Cisco UCM
In Cisco Unified CM Administration, select the "Call Routing" -> "External Call Control Profile Configuration" menu entry. Press the "Add new" and enter the following information.
- Name of the External Call Control Profile (ECCP)
- Primary web service: Uri of the Imagicle Application Suite (the one generated by the Manage Service page)
- allows configuration of two URIs, for redundancy (active & standby) and for load balancing (where Imagicle High Availability options is available)
- supports HTTP - Timeout value for call routing response (suggested value is 5000 ms)
- Diversion rerouting calling search space: meaningful for StoneLock. See StoneLock configuration.
- Call treatment on failures: the treatment if Imagicle Application Suite is unresponsive o response timeout has been reached. Set it to Allow Calls

Link the Ecc profile to a trigger point
A Trigger Point is where Unified CM issues a Routing Request to the external application.
- Translation Pattern
- Route Patterns
- Directory Numbers (for incoming calls only)
You must link the newly created ECC profile to a trigger point.
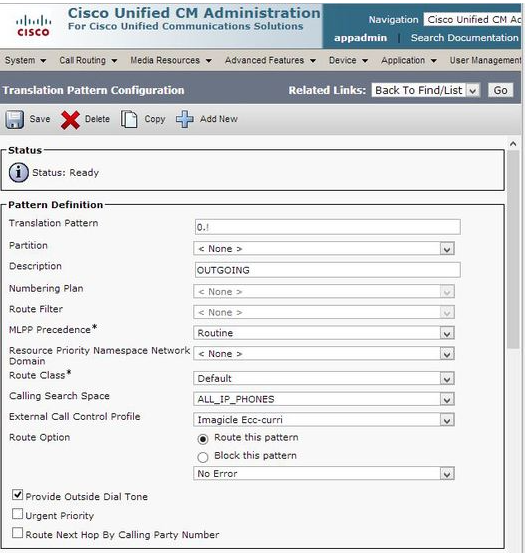
Enable Contact Manager ECCP in Translation Pattern Trigger point
If you enable the ECC profile on a Translation pattern, when a call matches the pattern, Cisco CallManager sends a CURRI request to the Imagicle Application Server.
This is the suggested configuration.
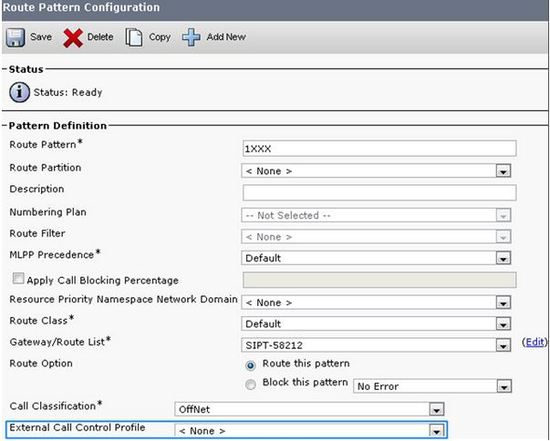
Enable Contact Manager ECCP in Route Pattern Trigger Point
It is possible to enable lookup feature simply creating an External Call Control profile and assigning it to a Route pattern.
If the Route Pattern does not include a trailing #, when a user places a call, a CURRI request will be sent to the Application Suite for each dialled digit.
Enable Contact Manager ECCP in Directory Number Trigger Point
It is also possible to enable lookup feature assigning the ECC Profile to one ore more Directory Numbers. This is the most flexible configuration, allowing you to grant the service to specific phones. Unfortunately, the ECC call is triggered only for the calls received by the DN.
Warning: if you user Queue Manage Enterprise, the Operator's phones Directory Number must not be associated to an External Call Control Profile, otherwise statistics and distribution algorithms could not work as expected. Conversation Time could be 0.
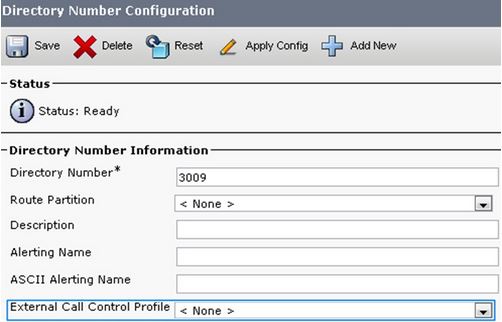
Note: When applied on a DN, the ECC lookup request is triggered only for incoming calls: i.e., calls received on the device to which the DN is associated. Call placed by that device won't trigger the ECC request, unless they use route pattern or translation patter with an associated ECC profile.
Make sure the ECC request is triggered
The recommended trigger point for Contact Manager directory lookup is the Translation Pattern.
If you want the External Call Control (also known as CURRI) web service to be used in call routing you must be sure to involve the translation pattern in call flow. Following schemas represent a simple standard configuration in a Cisco CallManager environment:
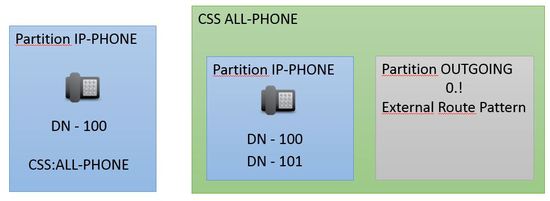
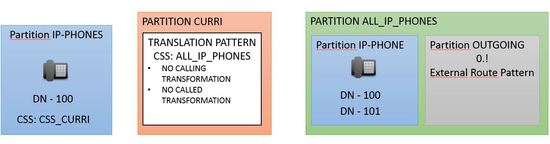
In this example, we have a phone with a Directory Number included in the IP-PHONE partition with the ALL-PHONE Calling Search Space. ALL-PHONE includes IP-PHONE and OUTGOING partitions. In this simple case any Directory Number in partition IP-PHONE could call any phone in IP-PHONE partition or any External number starting with 0.
Call Flow examples:

If you add a new translation pattern to trigger the External Call Control, you should:
- Create the translation pattern with External Call Control Profile and Calling Search Space ALL-PHONE
- Create a new partition, CURRI, that includes the newly created translation pattern
- Create a new Calling search Space, e.g. CSS_CURRI, that includes CURRI partition, and not the IP-PHONE partition
- Change the Directory Numbers Calling Search Space to CSS_CURRI
The new schema will be:
The call flows becomes:
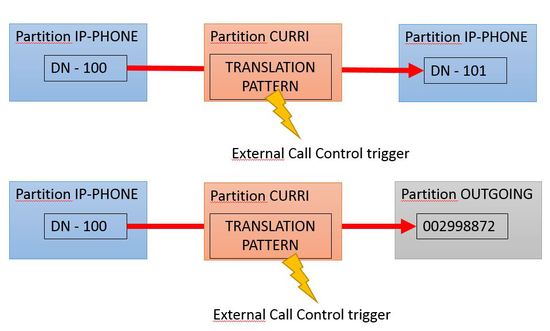
Note: be careful with CSS and Partition configuration, a wrong configuration could lead to call loops that can give telephony inefficiency or deteriorate your PBX and Imagicle Application Suite performances
Application configuration
Display Name formatting rules
You can change the way Contact Manager formats the contact information displayed on the phone.
In Imagicle Application Suite web interface, select "Contact Manager" and "Manage Service".
In Service Configuration box change the "Display Name Formatting rules" text box, according to the desired format.
You must create an ordered list of rules which are tested top-down when a call is placed. The rule may include placeholders for the First Name ($$FIRSTNAME$$), Last Name ($$LASTNAME$$) and Company ($$COMPANY$$). If one of those information is not available for the contact, the next rule is tested.
You can enter more than one rule. The topmost rule containing only non-empty placeholders will be used. For this reason, you should leave at the bottom of the list a simple rule which is matched for all the contacts (e.g. "$$LASTNAME$$").
Tip: default values cover most of the needs. Test the feature with the default rules before making changes.
Example:
Contact First Name: John
Contact Last Name: White
Contact Company: Acme
Display Name formatting rules:
$$FIRSTNAME$$ $$LASTNAME$$ - $$COMPANY$$
Result -> John White - Acme
$$COMPANY$$
Result -> Acme
$$FIRSTNAME$$ $$LASTNAME$$
Result -> John WhiteContact First Name: Marc
Contact Last Name: Bloom
Contact Company: - (Empty)
Display Name formatting rules:
$$FIRSTNAME$$ $$LASTNAME$$ - $$COMPANY$$
$$FIRSTNAME$$ $$LASTNAME$$
$$LASTNAME$$ - $$COMPANY$$
$$COMPANY$$
$$LASTNAME$$
Result -> Marc Bloom
Disabling Directory Lookup For a Specific User
You can disable the lookup feature for a single user. When that user is involved in a call as party A, party B won't be resolved and the party name won't be modified.
In Imagicle Application Suite Web interface, go to "User Management" page and open the "Modify" user page. Look for the Contact Manager heading. Check "Disable caller lookup on phone".
Example 1:
User A First Name: Patrick
User A Last Name: Millner
Line number: 200
Line Display Name: Patrick - office
User B number: 201Call from 200 to 201
User B Lookup Enabled: phone 201 receives a call from Patrick Millner (200) (Modified Display Name)
User B Lookup Disabled: phone 201 receive a call from Patrick - Office (200) (original Display name)Example 2:
Contact First Name: John
Contact Last Name: White
Contact Company: Acme
Phone Number: 0330055Call from 0330055 to 201
User B Lookup Enabled: phone 201 receives a call from John White - Acme
User B Lookup Disabled: phone 201 receives a call from 0330055
Disable the Directory Lookup for internal numbers
It is possible to enable/disable the Calling and Caller ID resolution the caller or the called numbers are Imagicle Application Suite users.
By default, when a user directory number is involved in a call, default Display Name will be overwritten with Contact Manager directory information. If you disable the feature, the Display Name will remain the one configured in Cisco Call Manager (if any).
To disable Directory Lookup for a user, in Imagicle Application Suite Web configuration, select "Contact Manager" -> "Manage Service".
In the Service Configuration Section, check or uncheck "Enable lookup of users extension numbers".
Example:
User Username: user_A
User First Name: Patrick
User Last Name: Millner
Line number: 200
Line Display Name: Patrick - officeUser B number: 201
A call is placed from 200 to 20.
If the option is Enabled: 201 receives a call from Patrick Millner (200) (Modified Display Name)
If the option is Disabled: 201 receives a call from Patrick - Office (200) (original Display name)
Disable the Directory Lookup on phones which are not associated to any user
You can enable or disable the Calling or Caller ID lookup made when Imagicle Application Suite cannot recognize an extension number.
- Disabling this feature will prevent directory lookup of the party B, when party A is not a user.
- Enabling the feature will allow directory lookup of the party B, even if party A is not a user. Lookup is made on Public Directories only.
To disable Directory Lookup for a user, in Imagicle Application Suite Web configuration, select "Contact Manager" -> "Manage Service".
In the Service Configuration Section, check or uncheck "Show called ID on phones not associated to any user".
Example:
Contact First Name: John
Contact Last Name: White
Contact Company: Acme
Phone Number: 0330055
And external call is received from 0330055 to 300, which is not associated to any user.
If the option is Enabled: 300 receives a call from 0330055 (John White - Acme)
If the option is Disabled: 300 receives a call from 0330055
Completely Disabling Directory ID lookup when StoneLock is enabled
All the Imagicle applications share the same ECC URL. If you purchased StoneLock but you do not want to use the Caller ID service, you can disable the directory integration to prevent performance degradation.
To do this, go to the Imagicle Application Suite Web interface, and select "Contact Manager" -> "Manage Service".
In the Service Configuration box, uncheck "Enable Lookup by External Call Control".
Smart numbers will continue to work.
Notes on CuCM performance: Unified CM experiences some degree of performance degradation if it queries route servers for a majority of incoming calls. The performance degradation depends on the response time from route servers, or network latency for call routing requests and responses. Slow response or network latency adds delay to the post-dial silence for a call. Testing shows that when the response time from the route server is below 50ms (RTT), there is a 15% degradation in the maximum call rate when all calls are subject to a Route Request/Response.
Check List & Troubleshooting
A complete list of calls processed by the Imagicle Application Suite External Call Control (CURRI) web service is accessible at the StoneLock Calls History Web Page. This web page reports the full list of processed requests. You can filter on a specific date, check the call resume (Time, Calling, Caller, Decision and Reason) and go deep in a single request opening the call detail. Here you can check if the call was processed by Contact Manager, the calling and called numbers, and if one of the numbers was recognized as associated to an AppSuite user.
Basic functional tests
To test Contact Manager Caller ID feature, you need two IP phones registered with the CuCM and a mobile phone to place calls from the PSTN.
- Associate the internal lines to two AppSuite users (set them as primary extension). Make sure the First Name and Last Name are filled.
- Add the mobile phone number to a public directory.
- Verify the association between the user and the IP phone in the web interface (Admin -> Support -> PBX devices details)
- Set the dialling plan patterns and prefixes in the global AppSuite configuration (Admin -> System parameters -> Numbering plan parameters)
Then:
- Place a call from an IP phone to the other IP phone.
- Place a call from the mobile phone to one of the IP phones
If the caller or called information is not displayed as expected, please check that the CURRI request is issued by the CallManager in Stonelock history (Phone lock -> Call history).
If no request can be seen, check the partitions and the CSS of the IP phones and of the translation patterns. If you changed the ECC profile URL, you may also need to restart the CallManager service.
Please see the StoneLock ECC configuration for hints on CuCM ECC configuration troubleshooting.
If the request can be seen in the history table, but the caller ID is not displayed, check that the actual phone number sent by the PBX matches the dialling plan.
Further testing may involve moving the contact associated to the external mobile number from a public directory to a department or private directory.