This page describes how to configure Cisco Unified CallManager with Imagicle Call Recording.
CuCM offers many ways to record calls: always on, on demand, media forking, network based... The configuration differs slightly depending on the recording mode. Regardless the recording mode, you need to create a SIP Trunk for Imagicle Call Recording.
SIP Trunk configuration
1. Create a new SIP Trunk Security Profile named “Imagicle Call Recording SIP Security Profile” with following settings.
- Incoming Transport Type: TCP + UDP
- Outgoing Transport Type: TCP
- Incoming Port: 5070
- Enable Digest Authentication: disabled
- Enable Application Authorization: disabled
- Accept Unsolicited Notification: enabled
- Accept Replaces Header: enabled
Leave all other settings to their default value.
2. Define a new SIP Profile named "Imagicle Call Recording SIP Profile", with following settings:
- Timer Invite Expires: 5
- Retry INVITE: 1
- SIP OPTIONS PING - Enable OPTIONS Ping: Enabled
- SIP OPTIONS PING - Ping interval for In- service Trunks: 10
- SIP OPTIONS PING - Ping interval for Out-of-service Trunks: 5
- SIP OPTIONS PING - Ping Retry Timer: 500
- SIP OPTIONS PING - Ping Retry Count: 3
Leave all other settings to their default value.
3. Create a new SIP Trunk named “Imagicle Call Recording Primary SIP Trunk” with following settings:
- Device name: Imagicle_CallRecording_Primary_SIP_Trunk
- Call Classification: On-Net
- Media Resource Group List: if you need to record conversations using a voice codec different from G.711 and G.729A, you need to assign a Media Resource Group List that includes at least one hardware transcoding resource.
- Run on all Active Unified CM Nodes: Enabled
- SIP Information - Destination Address: <Imagicle server IP address>
- SIP Information - Destination port: 5070
- SIP Trunk Security Profile: Imagicle Call Recording SIP Security Profile (see above)
- SIP Profile: Imagicle Call Recording SIP Profile (see above)
- DTMF Signalling Method: RFC2833
Leave all other settings to their default value.
Configuration for Media Forking (Built-in-Bridge) Recording mode
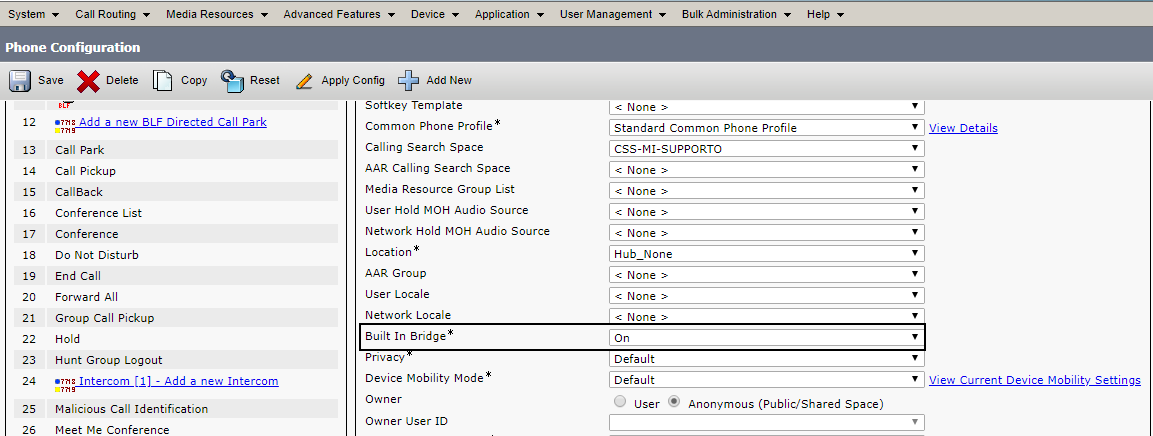
Enable Built-in-Bridge in Phone Configuration
In the CallManager Phone Configuration set Built-in-Bridge On for Call Recording
Disabling unsupported codecs
Imagicle Call Recording supports G.711 and G.729A only. All other codecs must be disabled from CuCM configuration.
G.729B should be disabled at system level for all the calls, G.722 can be disabled for recorded calls only.
If the unsupported codecs can't be disabled, you must ensure to assign hardware transcoding resources to the Call Recording SIP Trunk (in the Media Resource Group List option). Otherwise, Imagicle Call Recording won't be able to record the calls that are established with an unsupported codec.
In CuCM Administration, select System, then Service Parameters. Choose your server, then "Cisco CallManager".
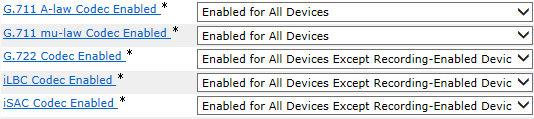
In the CallManager Service Parameters page, disable the following codecs, choosing the option "Enabled for All Devices Except Recording-Enabled devices" (CuCM 9.1 and higher) or "Disabled" (CUCM 8.x):
- G.722
- iLBC
- iSAC
- Opus
Starting CUCM version 12, the following service parameter needs to be disabled for recorded devices only:
.jpg)
For the same reason, in the same page, remove the "G.729 Annex B (Silence Suppression) from Capabilities", by setting the parameter to True:

Alternatively, to avoid G.729B communication only on recorded phones, you can:
- Define in CuCM a codec preference list that includes G.729A before G.729.B
- Assign such codec preference list to a region used by the phones enabled for recording
How to provide a recording tone
If you want to provide the background recording tone (every 15 seconds) to the recorded parties, in the CuCM administration set the following Service Parameters for CallManager service (on all CallManager nodes).
In CuCM Administration, select System, then Service Parameters. Choose your server, then "Cisco CallManager". Locate the Clusterwide Parameters (Feature - Call recording) group. Set the following values:
- Play Recording Notification Tone To Observed Target: True
- Play Recording Notification Tone To Observed Connected Parties: True
The first one enables the recording tone for the agent, the second one enables the recording tone for the remote party.
Audio files format
Prior to 2021.Summer.1 release, all BiB recordings are save in Mono format. From 2021.Summer.1 onward, recorded conversations are save in Stereo format, having local party on left channel and remote party(ies) on right channel. If you need to revert this format to Mono, please contact Imagicle Tech Support.
Enable phones for recording
To leverage the recording capabilities of CuCM, some additional configurations are needed on CCM.
1. Associate the phones to the ImagicleCTI user you created.This gives several advantages and functionalities. In particular, thanks to CTI/TAPI monitoring is possible to:
- start and stop the recordings directly from the XML Phone Service, from Jabber Desktop gadget or Cisco Finesse gadget
- automate the dial-in conference calls; compared to Manual dial-in, the automated allows to resolve the remote party and call direction.
In order to be controlled via CTI correctly, please follow the procedure available here.
2. Create a new Recording Profile (Device - Device Settings - Recording Profiles) with following settings:
- Name: Imagicle Call Recording Profile
- Recording CSS: A CSS able to engage the Route Pattern described below.
- Recording Destination Address.: An internal, unused service phone number that will trigger the Route Pattern below defined (e.g. 8500)

3. Create a Route Pattern to route the media forking calls to the Imagicle Call Recording SIP trunk. The pattern must match the pattern defined in the "Recording Destination Address" box of the Recording Profile.
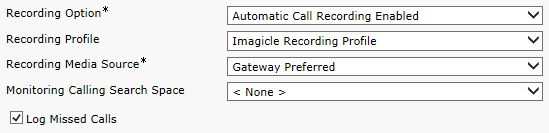
4. Set the following settings to each phone line to be recorded:
- Recording Option: choose one of the following options
- Automatic Call Recording Enabled, for Always On mode
- Selective Call Recording Enabled, for On-Demand mode*
- Recording Profile: Imagicle Call Recording Profile
- Recording Media Source:
- Phone preferred: if you want to use the built-in bridge recording mechanism for this phone
- Gateway preferred: if you want to use the Network recording mechanism for this phone.
If you are configuring Always On recording mode with phone Phone preferred, the configuration is complete. If you are configuring Always On recording mode with phone Gateway preferred, please skip the following "Recording Control" paragraph and head directly to paragraph "Configuration for Network Based Recording mode (Gateway Recording) UCM 10.X and higher" to complete the required configuration.
If the Extension Mobility feature is used, you must enable for recording the line of the associated Device Profile.
Note: *Selective Call Recording is available since CUCM 9.1 only for some ip phone models. See the official Cisco documentation for the list of supported phones and recording modes.
Recording Control
If you are configuring the On Demand recording mode, there are some additional configuration steps to be performed in order to configure phone(s) to be able to invoke the recording. Imagicle Suite supports:
- Standard Recording Control, with start and stop commands
- Advanced Recording Control, with start, stop, pause and resume commands
4.1 Standard Recording Control (Start-stop) for On Demand Recording
Cisco Unified CallManager provides a build in mechanism to start the recording of a call.
Basing on the phone model, you can use a SoftKey Template or a Programmable Line Key.
a) Adding Recording button to phones supporting SoftKey Template (i.e. IPC, Cisco 68xx,78xx,79xx IP Phones, ...)
Create a new Softkey Template (Device -> Device Settings - Softkey Templates) that includes the “Record” softkey for the Connected status. You can also simply add such softkey to your existing Softkey Template.

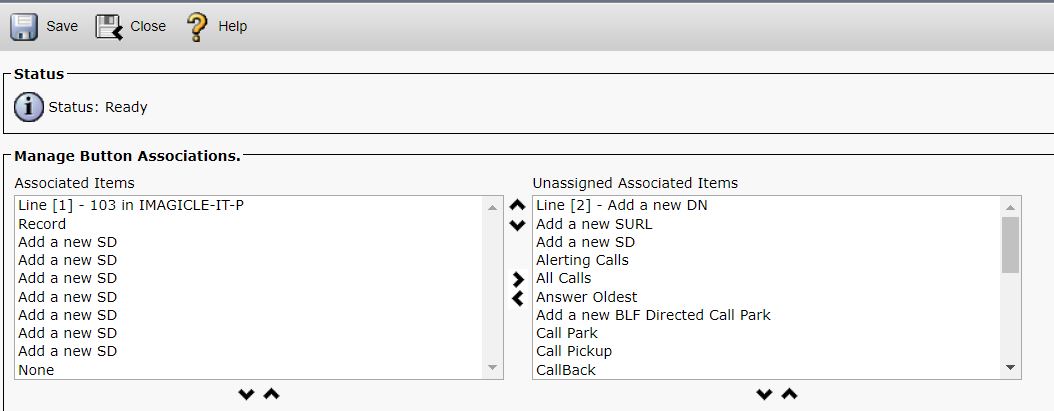
b) Adding Recording button to phones supporting Button Template (i.e. Cisco 99xx,88xx,89xx IP Phones, ...).
You need to configure the recording button into the Button Template, so it appears as a PLK (Programmable Line Key) on the left-hand side of the phone. From the Device, Phone menu, select the device you want to configure, and the click Modify button items on top of the button/PLK list to the right. Look for the "Record" entry among the "Unassigned Associated Items" and move it to "Associated Items" as in the screenshot below.
4.2 Advanced Recording Control (Start-stop & Pause-Resume) for On Demand Recording
Imagicle Application Suite 2018.3.1 (Spring edition) and later also support pause and resume for recordings. If pausing recordings is not a required use case, please refer to chapter 4.1 for the phones configuration alternatives. To enable pausing a recording, phones require some specific configuration.
1) Create a new Phone Service (XML)
In CuCm Web interface, go to Device, Device Settings, Phone Services. Add a new phone services with the following settings:
- Service Name: something meaningful, e.g. Record
- Service URL: http://<IMAGICLE_APPLICATION_SUITE_IP_ADDRESS>/fw/Apps/Recorder/xml/OnDemand/MediaForking.aspx?name=#DEVICENAME#
- Service Type: XML Service
- Enable: on
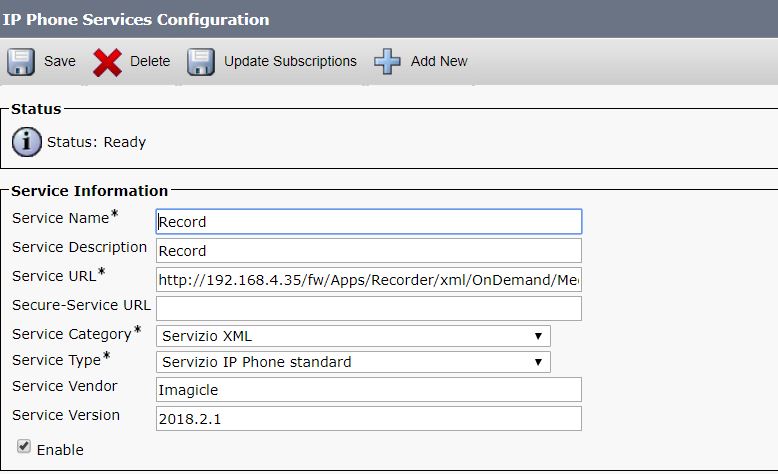
Note: you can copy the URL from your AppSuite web interface, from the Global Settings page, Services URL section. Ensure you copy the Media Forking URL.
2) Subscribe the phones you want to enable to recording, to the XML phone service you just created. You'll be able to use the new service pressing the "Services" button on the IP phone
3) Optionally, add the service as a new Service URL button on the phone. See the procedure at the bottom of this page.
4) By default, only the Start Recording option is available. To allow the users to Stop, Pause and Resume recordings, you need to change the default settings on Imagicle Application Suite. Log onto the web interface. In the Call Recording menu, select Global Settings. Expand the Recording Control section and set the relevant options.
You can also set the options per device, overriding the global setting, through the use of XML Service parameters. The procedure is detailed in the FAQ section of this guide.
Configuration for Network Based Recording mode (Gateway Recording) UCM 10.X and higher
Cisco Network Based Recording (also known as Gateway Recording) is available since UCM 10.0 and has some additional requirements if compared to the Built-In Bridge phone based recording described so far.
Specific configuration is required in all the routers/CUBEs that relay incoming/outgoing calls.
Hardware and Software Requirements
Accordingly with Cisco documentation, network based recording requires:
- UCM 10.0 or higher
- Supports both Voice Gateways and Unified Border Elements (CUBE) as long as they interface with Unified CM using SIP and the Router platform supports the UC Services Interface (not supported for H.323 or MGCP based calls). The word "Gateway" is used here interchangeably to refer to Voice gateways and CUBE devices
- The Gateway has to be directly connected to the Unified CM using a SIP trunk. No support for SIP Proxy servers
- ISR-G2 Gateways (29XX, 39XX Series) running release 15.3(3)M or later are supported. 15.3(3)M was released on CCO in July / 2013
- ASR-100X Gateways running release XE 3.10 or later are supported. XE 3.10 was released on CCO in July / 2013
- VG224 is not currently supported
Audio files format
Prior to 2021.Summer.1 release, all NBR recordings are save in Mono format. From 2021.Summer.1 onward, recorded conversations are save in Stereo format, having local party on left channel and remote party(ies) on right channel. If you need to revert this format to Mono, please contact Imagicle Tech Support.
IOS Configuration
The following IOS configuration must be applied to each CUBE/VG enabled for network based recording.
uc wsapi
message-exchange max-failures 100
response-timeout 1
source-address 192.168.204.52  << replace this with the actual voice LAN router IP address
probing interval negative 20
probing interval keepalive 255

provider xmf
remote-url 1 http://192.168.100.115/ucm_xmf  << Create a similar URL for each CallManager node running the SIP trunk
remote-url 2 http://192.168.100.115:8090/ucm_xmf  << Create a similar URL for each CallManager node running the SIP trunk
Then, check the registration is successfully, by invoking the command:
show wsapi registration all
The following command allows debugging the call media forking when call recording is triggered:
show call media-forking
Ensure that the internal HTTP server of the Cisco router is enabled, by issuing the following IOS command:
ip http server
CUCM Configuration for Network Based Recording
To enable the network recording technology, you need to go through the following specific configuration steps on CUCM.
1. On all SIP trunks pointing to the CUBE/VG, under "Recording information" select the option “This trunk connects to a recording-enabled gateway”.
2. Create a Recording Profile (Device - Device Settings - Recording Profiles) with following settings:
- Name: Imagicle Call Recording Profile
- Recording CSS: A CSS able to engage the Route Pattern described above.
- Recording Destination Address.: An internal, unused service phone number that will trigger the Route Pattern below defined (e.g. 8500)
3. On all IP phone lines enabled for call recording, select the "Automatic Call Recording Enabled" option in "Recording Option" and the “Gateway Preferred” option in the "Recording Media Source". Use the Recording Profile you created.
4. Create a Route Pattern to route the recording calls to the Imagicle Call Recording SIP trunk. The pattern must match the number set in the recording profile you created.
Recording remote destinations
Network recording allows to record incoming calls answered by remote (off-cluster) devices. This allows to handle some particular scenarios, including:
- Single Number Reach: the user can answer his office incoming calls from his/her mobile (GSM) phone.
- On-call duty for critical services.
- Incoming calls transferred to another CUCM cluster.
- Incoming calls transferred to off-net destinations (remote call-centres, IVR,etc.).
This section describes how to configure CUCM to record this kind of calls.
Single Number Reach users
To record phone calls of users that are already enabled on CUCM for single number reach (Mobile Connect):
1) Configure CUCM for Network Recording, as described above.
2) In the Remote Destination Profile, select the associated DN and enable it for recording like a regular phone line:
DN properties:
Other remote destinations
If you need to record calls answered by remote destinations that are not associated to a user for Single Number Reach, the following configuration settings must be done on CUCM.
Just as an example, suppose you have an operator pool working in a Hunt Group (or QME agent group), normally being recorded. Suppose the Hunt Group escalates the call to a remote branch (calling a landline PSTN number) in the case no operators are available.
In order to record the calls forwarded to the remote branch, you need to create a dummy user with an "ad-hoc" extension enabled for the Single Number Reach and associated to the remote destination you need to record.
If you want to record such forwarded calls, you need to go through the following configuration steps.
1) Define a new end-user (even a generic dummy user, like rec.user1) enabling the checkbox "Enable Mobility":
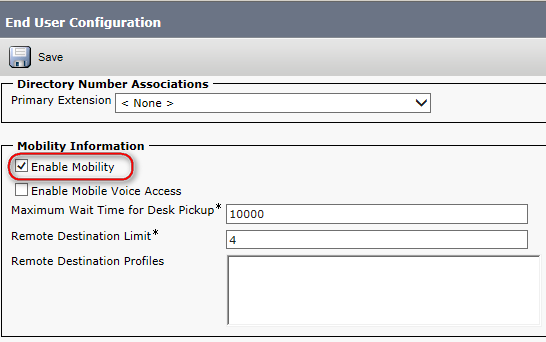
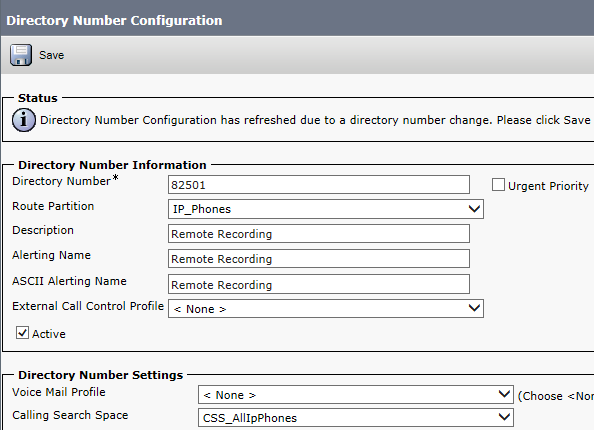
2) Create a new DN, just for recording purpose. This DN will trigger the outgoing call to the remote destination. Add the DN in the last position of the Hunt Group, for escalation purposes (e.g. 82501, in picture below).
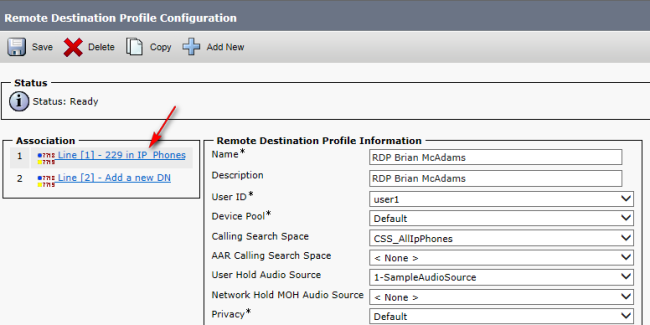
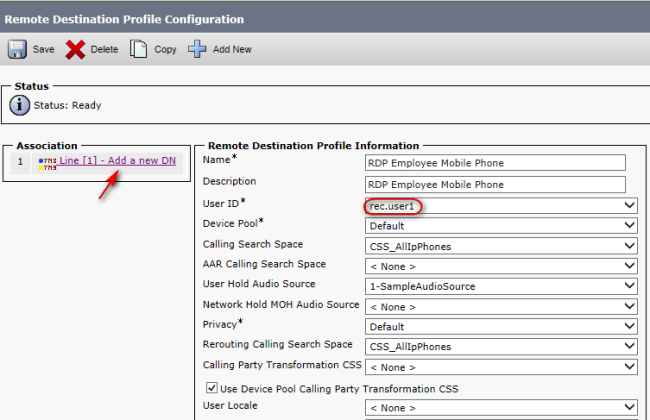
3) Create a new Remote Destination Profile (Device => Device Settings => Remote Destination Profile) with the following properties:
- Name and description: whatever you want, for instance: "RDP Employee Mobile Phone"
- UserID: the end-user created at the step 1 (rec.user1)
- CSS: a valid CSS enabled to place calls to the remote destination
- Device Pool: a convenient device pool. This device pool should contain at least a transcoding resource if the outgoing call leg is established with an unsupported codec.
Save the Remote Destination Profile:
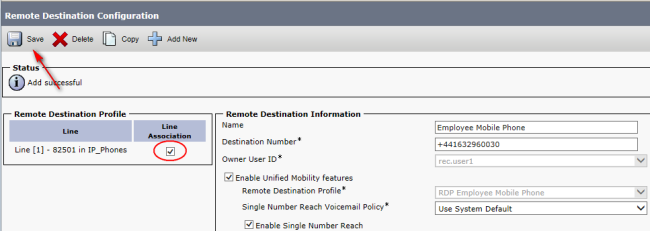
4) Go back to the Remote Destination Profile, then click on "Add a New Remote Destination"

5) Insert the remote destination number (the mobile remote branch number in the example above), including the off-net prefix, if required. Also, enable the Single Number reach checkbox and make the remote phone immediately rings as soon as the 82501 DN rings:

6) Save the remote destination, associate it to the DN defined above (82501) and save again:
7) Go back to the Remote Destination Profile, select the associated DN (82501) and enable it for the network recording (Automatic Call Recording Enabled, Imagicle Recording Profile, Gateway Preferred):
Save and apply the new settings.
8) Configure in the Imagicle Application Suite a real or dummy user with the DN defined above (82501) as primary extension number and enable it for Call Recording application.
9) Test: place a call to the DN defined above (82501). The remote phone should ring after a few seconds. As soon as the call in answered by the remote phone, the media forking should be triggered automatically and the conversation should be recorded by Imagicle Call Recording.
10) Test the real scenario you need to handle (the hunt group escalation in the example above).
Configuration for Automated Dial-In recording mode
CTI/TAPI Device association
Automated Dial-In recording requires an IP Phone to be controlled through CTI/TAPI.
Associate all the devices you want to use with Automated Dial-In to the ImagicleCTI user you created during TSP setup.
XML Service creation
To use Automated Dial-In recording, an XML service has to be configured once.
Log onto the CuCM web interface. Click on Device -> Device Settings -> Phone Services.
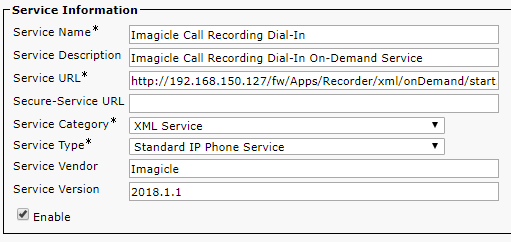
Define a new Phone Service with following parameters:
- Name: Imagicle Call Recording Dial-In
- Description: Imagicle Call Recording Dial-In On-Demand Service
- Service Category: XML Service
- Service Type: Standard IP Phone Service
- Service URL: http://<IAS_ip_address>/fw/Apps/Recorder/xml/OnDemand/Start.aspx?name=#DEVICENAME#
- Flag "Enable": set
TIP: You can automatically get the right URL to be pasted, with the right IP address, directly form the Application Suite web interface. Just open the Call Recording -> Global Setting page -> Settings panel -> Service URL sub-panel
Service Button URL configuration
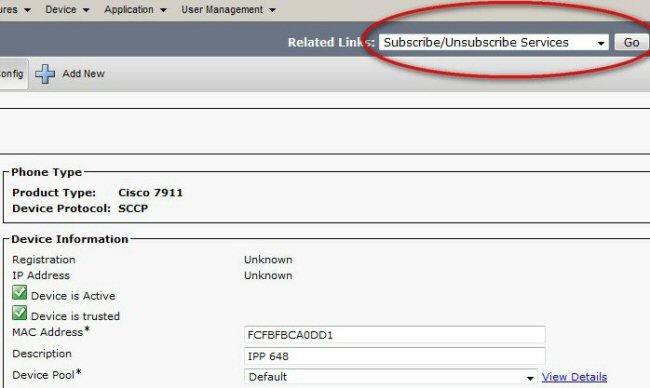
For each IP Phone where the Automated Dial-In recording has to be used, you need to configure a Service Button URL on that phone. You first need to subscribe the XML Service on the target IP Phone. Click Device -> Phone, select the target IP Phone. Then, in "Related Links" drop-down, choose "Subscribe/Unsubscribe Services" and click Go.
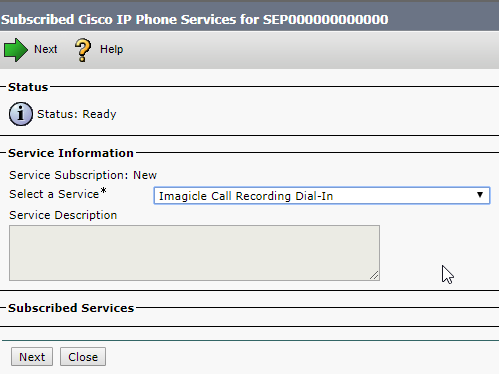
In "Select a Service", choose "Imagicle Call Recording Dial-In", click "Next" and then "Subscribe".
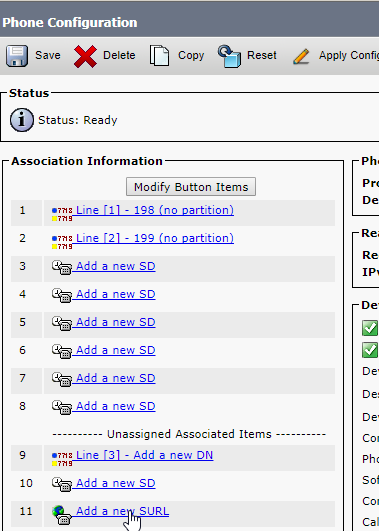
Now, you can create the Service Button URL: go back to the target phone configuration page and, in the "Association Information" panel on the left, locate and click the "Add a new SURL":
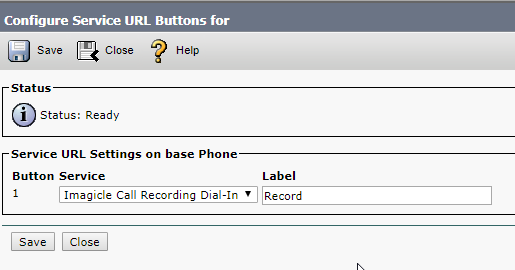
Then, in the "Service" drop-down, choose the service you want to link to the button, i.e. "Imagicle Call Recording Dial-In". Edit the "Label" field as you prefer- This is the label the operator will see on phone display. Then Save.
Finally, click on "Modify Button Items" to associate a phone button to the Service Button URL.
CallManager Service Parameters configuration
To let a user record any conference call, the "Advanced Ad Hoc Conference" Service Parameter of the "Call Manager" service has to be enabled.
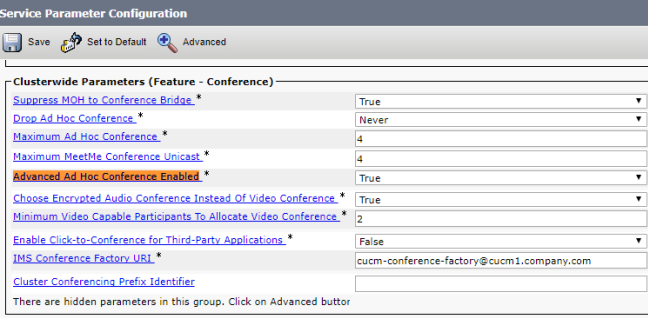
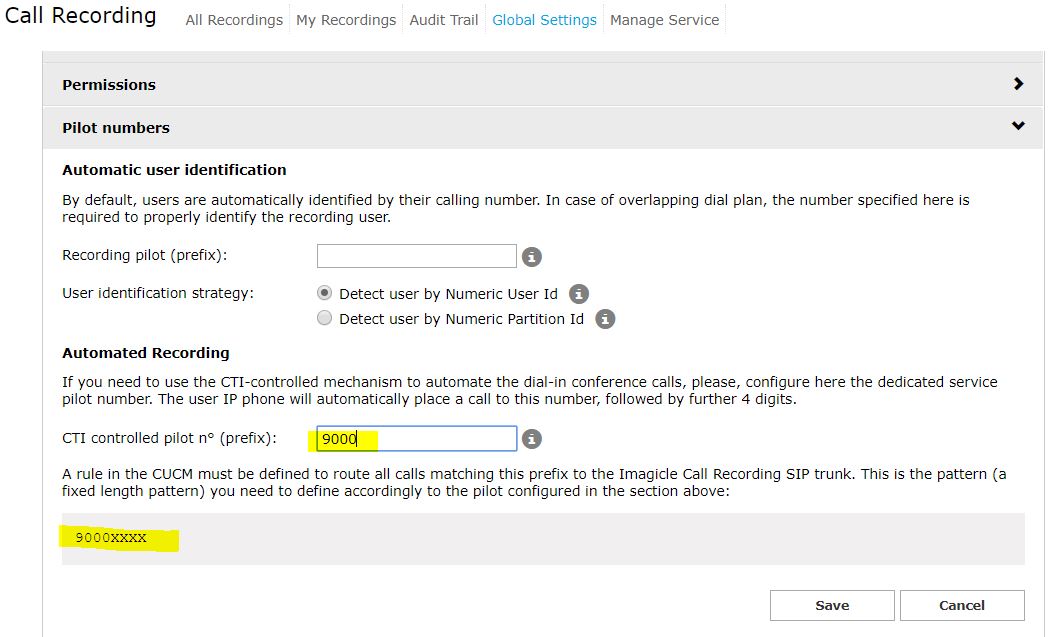
Ruote Pattern Creation
A fixed-length Route Pattern must be configured accordingly with the phone number prefix specified in section "Automated Recording" within "Pilot Numbers" of Imagicle Call Recording's Global Settings (e.g. 9000XXXX, in the image below).
Configuration for Live Keep recording mode
XML Service creation
To use Live Keep recording, an XML service has to be configured once.
Log onto the CuCM web interface. Click on Device -> Device Settings -> Phone Services.
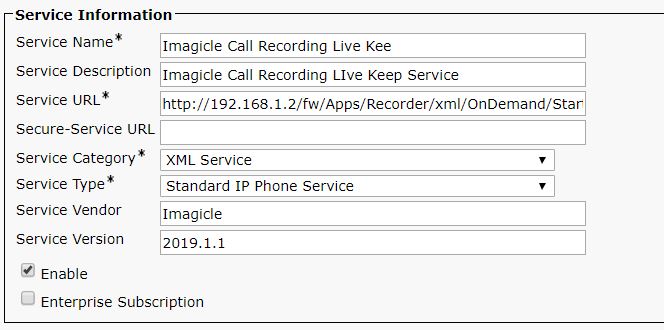
Define a new Phone Service with following parameters:
- Name: Imagicle Call Recording Live Keep
- Description: Imagicle Call Recording LIve Keep Service
- Service Category: XML Service
- Service Type: Standard IP Phone Service
- Service URL: http://<IAS_ip_address>/fw/Apps/Recorder/xml/OnDemand/StartMediaForking.aspx?name=#DEVICENAME#
- Flag "Enable": set
TIP: You can automatically get the right URL to be pasted, with the right IP address, directly form the Application Suite web interface. Just open the Call Recording -> Global Setting page -> Settings panel -> Service URL sub-panel
Service Button URL configuration
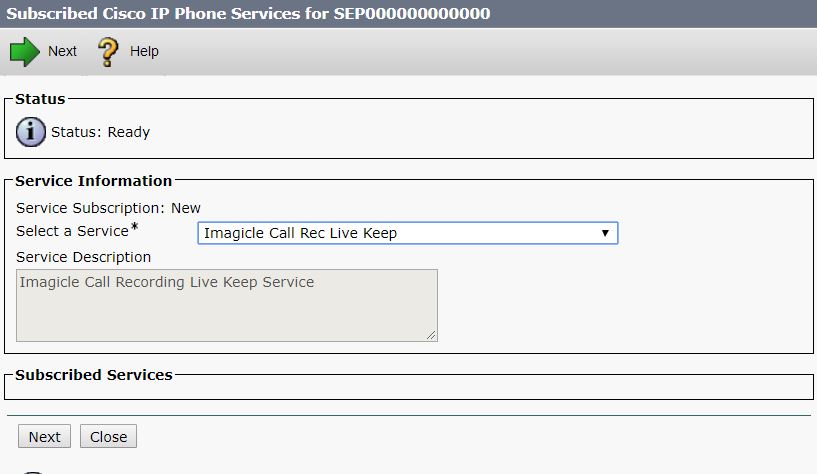
For each IP Phone where Live Keep recording has to be used, you need to configure a Service Button URL on that phone. You first need to subscribe the XML Service on the target IP Phone. Click Device -> Phone, select the target IP Phone. Then, in "Related Links" drop-down, choose "Subscribe/Unsubscribe Services" and click Go.
In "Select a Service", choose "Imagicle Call Recording Live Keep", click "Next" and then "Subscribe".
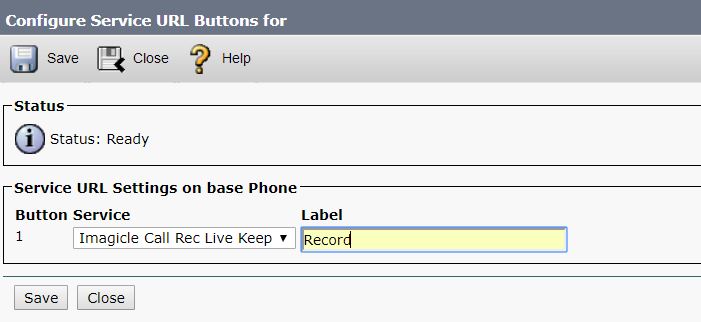
Now, you can create the Service Button URL: go back to the target phone configuration page and, in the "Association Information" panel on the left, locate and click the "Add a new SURL":
Then, in the "Service" drop-down, choose the service you want to link to the button, i.e. "Imagicle Call Recording Dial-In". Edit the "Label" field as you prefer- This is the label the operator will see on phone display. Then Save.
Finally, click on "Modify Button Items" to associate a phone button to the Service Button URL.
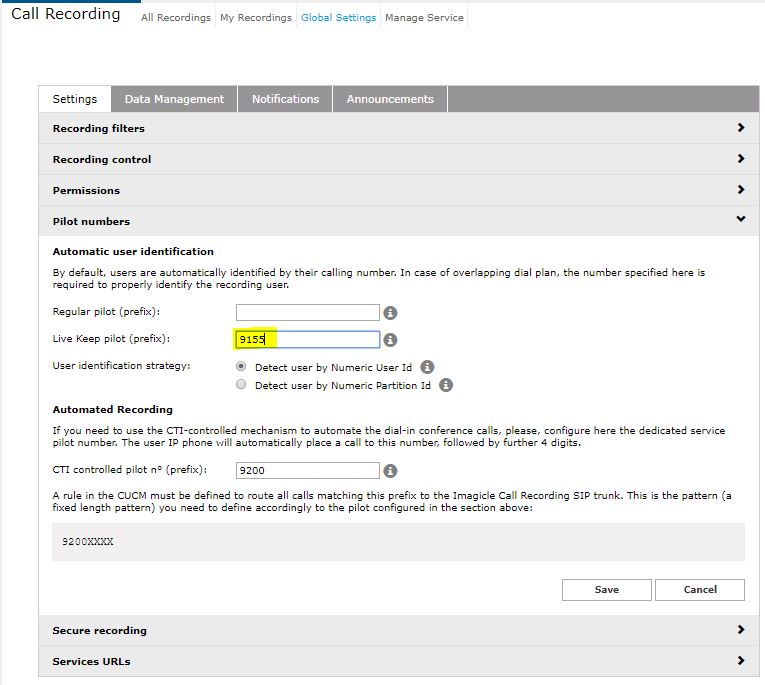
Ruote Pattern Creation
A Route Pattern must be configured accordingly with the pilot number specified in "Live Keep pilot (prefix)" field within "Pilot Numbers" of Imagicle Call Recording's Global Settings (e.g. 9155, in the image below).