StoneFax interacts with the telephony system through SIP or H.323 protocols using either T.38 or G.711 passthrough modes.
The h.323 configuration is suggested and will be detailed. Remember to enable h.323 in the StoneFax – Manage Service – IP Routes page on the Application Suite.
In the following examples, we are supposing the StoneFax server IP address is 192.168.1.200.
Supported Telephony Platforms
- iPECS Lik - firmware revision from 5.5Df on
- iPECS MG - firmware revision from 5.5Dl on
iPECS Lik Configuration
In this configuration, StoneFax directly sends and receives h.323 calls directly from the PBX. It will use t.38 to transport the t.30 fax data.
On the iPECS Lik PBX you must configure a networking pointing to the StoneFax server. By default it will use h.323.
Configuration steps:
- Choose which Voip gateway to use to route the faxes (internal Voip board or external VOIM8 / VOIM24).
- Select which lines will be used to send or receive faxes. The lines can be reserved for fax calls or shared with networking traffic. Enable DID on the lines.
- Enable networking
- Assign a range of numbers in your dial plan to StoneFax users. For example, if you have a three digits DID you may want to reserve the internals beginning by 4 to StoneFax (e.g. 4xx) and route these calls to the StoneFax server IP address. Assign the range of numbers used by the phones (e.g. 2xx) to the PBX itself.
1. Choose the gateway
Log onto the web interface as administrator. By default the password is 0000.
On the left menu select System ID & Numbering Plan, then System & Device IP [102-103]. Check the Sequence number and the voip channels (Seq and Logical Num) to be used for faxes and write them down for later use. E.g. Seq=8, Logical Num 1-24 means that 24 channels are available.

2. Enable DID
Enable DID for the lines you want to use with StoneFax. Since the lines can be shared with networking voice calls you can enable DID for all the lines.
Then assign a group to the lines.
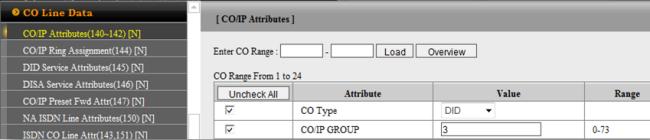
Select CO Line Data, then CO/IP Attributes (140-142). As CO Range enter the range of lines you want to use (1-24 in our example). As CO-Type choose DID. Assign a number to the CO/IP Group (any number but 1) and click on Check All to enable the checkboxes.
3. Enable communication between the PBX and StoneFax
Select Networking Data, then Net Basic Attributes(320) and set NET Enable to ON.

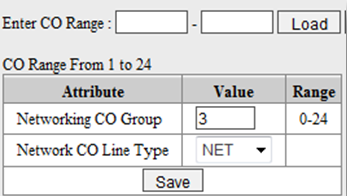
Set the CO Line type to NET for the line group you want to use with StoneFax. Select Net CO Line Attributes(322). In CO Range insert the lines range ( e.g. 1-24). In Networking CO group enter the group id you previously choose (3 in our example) and in Networking CO Line Type select “NET”. Then press Save.
Select Networking Data, then Net Numbering Plan Line Attributes(324).
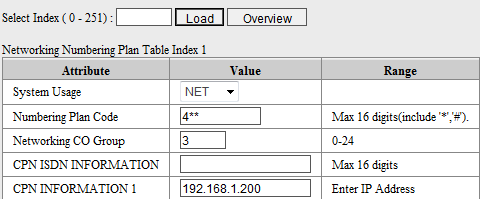
Select index: enter “0” and press “Load”. Then enter the numbering plan for the PBX, usually the root number followed by # and **. E.g. if the internal extensions range is 200-299, insert 2#**.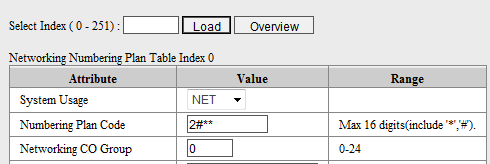 Select index: enter “1” and press “Load”. Then enter the numbering plan for StoneFax and the CPN information, e.g. 4** and 192.168.1.200.
- System Usage: NET
- Numbering Plan Code: 4**
- Networking CO Group: 3
- CPN Information 1: StoneFax server IP address (e.g. 192.168.1.200)
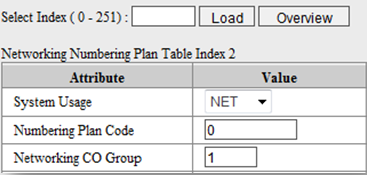
Select index: enter “2” and press “Load”. Then enter the CO prefix for outgoing calls.
- Numbering Plan Code: the prefix you want (e.g. 0)
- Networking Group: 1 (which is the default for the first line)
4. Enable extensions to access networking lines
This step is needed when you networking lines shared between faxes and voice, or when you want to be able to reach StoneFax from traditional faxes connected to the PBX.
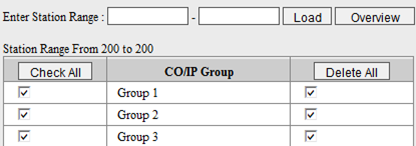
Select Station Data, then CO/IP Group Access (117) .Enter Station Number or Station Range and press "Load".
Select the Group of lines you want to apply the changes to, accordingly to your configuration. In our example Group 1 as default to reach the PSTN, Group 3 for networking / StoneFax. Press "Save" to apply the changes.
5. Setup the Codec for networking calls
StoneFax works in T.38 over a RTP stream, but needs to negotiate a g.711aLaw logical channel to be able to begin the voice call. So you must set the codec priority like this.
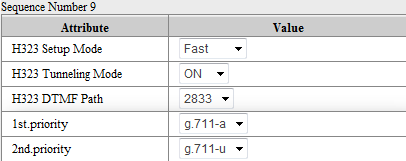
Select Board based data, then h.323 Voip Attributes (130). Enter the Sequence Number you wrote at Configuration Step 1.
- H.323 Setup Mode: Fast
- H.323 Tunneling Mode: ON
- First Codec Type: G.711A
- Second Codec Type: G.711U
6. Enable DID Service Attributes
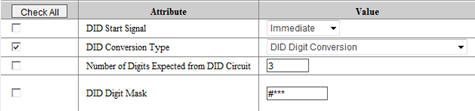
Select CO Line Data, then DID Service Attributes (145). As CO Range enter the range of lines you want to use (1-24 in our example).
- DID Conversion Type: DID Digit Conversion
7. Setup the default gateway for the VoiM Board
Select Board Based Data, then Board Based Attributes(132). Enter the Sequence Number of the Voim Board you used in System & Device IP (102-103).
- Router IP Address: enter the IP of the network default gateway
- T38 Enable: ON
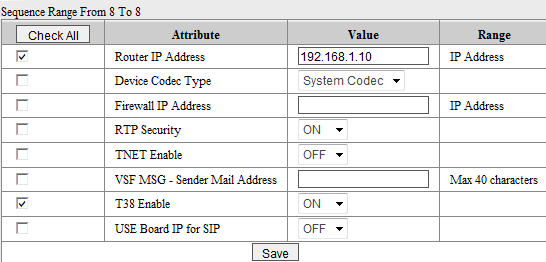
Note: if you use the integrated Voip gateway, enable T.38 and leave the Router IP address blank.
iPECS MG Configuration
In this configuration, StoneFax directly sends and receives h.323 calls directly from the PBX. It will use t.38 to transport the t.30 fax data.
On the iPECS MG PBX you must configure a networking pointing to the StoneFax server. By default it will use h.323.
Configuration steps:
- Choose which Voip gateway to use to route the faxes (internal Voip board or external VOIB8 / VOIB24).
- Select which lines will be used to send or receive faxes. The lines can be reserved for fax calls or shared with networking traffic. Enable DID on the lines.
- Enable networking
- Assign a range of numbers in your dial plan to StoneFax users. For example, if you have a three digits DID you may want to reserve the internals beginning by 4 to StoneFax (e.g. 4xx) and route these calls to the StoneFax server IP address. Assign the range of numbers used by the phones (e.g. 2xx) to the PBX itself.
1. Choose the gateway
Log onto the web interface as administrator. By default the user must be left blank and the password is 0000.
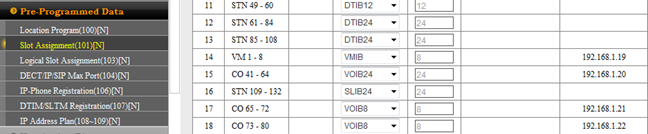
On the left menu select Pre-Programmed Data, then Slot Assignment [101]. Check the Slot number and the voip channels (Slot No. and Logical No.) to be used for faxes and write them down for later use. E.g. Slot=15, Logical No. 41-64.
2. Enable DID
Enable DID for the lines you want to use with StoneFax. Since the lines can be shared with networking voice calls you can enable DID for all the lines.
Then assign a group to the lines.
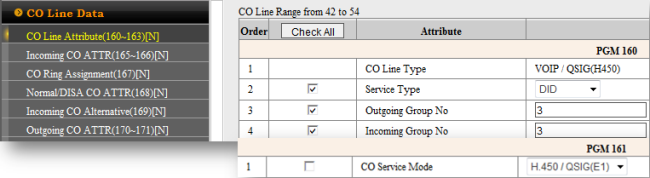
Select CO Line Data, then CO Line Attribute (160-163). As CO Line Range enter the range of lines you want to use (42-54 in our example).
- Service Type: DID
- Outgoing Group No: Assign a number to the CO/IP Group (any number but 1). For example 3
- Incoming Group No: 3
Under PGM161:
- CO Service Mode: H.450/QSIG(E1)
Then click on Check All to enable the checkboxes. and press Save.
3. Enable T.38 and setup the IP address on the external Voip board
- Select Board Data, then VOIB/VMIB Board ATTR(305).
- Enter slot No: 15
- IP address/Router IP Address/Subnet Mask: enter the IP address of the VOIB board and the Default Gateway
- T38 usage: ON

4. Enable TRaNSIT CALLS between the PSTN and StoneFax and FROM STONEFAX to the PSTN
Select CO-to-CO Call Attributes (179).
- Enter First CO Group Range: 1 where “1” is the external calls line group
- Enter Second CO Group : 3 (this is the StoneFax Networking calls group you choose earlier)
- Release time: 3600
- Direct: Enable
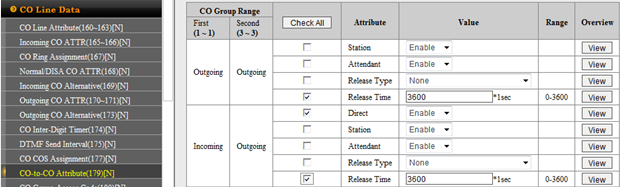
Select the relevant checkboxes and press Save.
Select CO-to-CO Call Attributes (179).
- Enter First CO Group Range: 3 (this is the StoneFax Networking calls group you choose earlier)
- Enter Second CO Group : 1 where “1” is the external calls line group
- Release time: 3600
- Direct: Enable
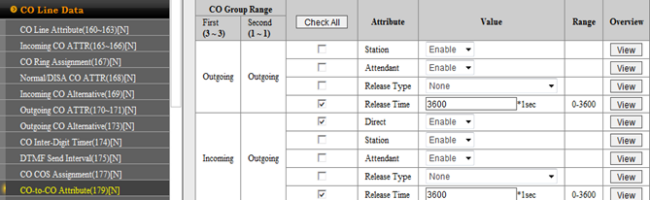
Select the relevant checkboxes and press Save.
5. Enable Networking between the PBX and StoneFax
Select Voice Network, then Networking Attribute (320) and set NET Enable to ON.
.png)
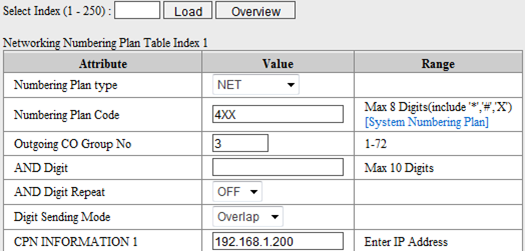
Select Networking Numbering (321). In Select Index insert 1.
- Numbering Plan Type: Net
- Numbering Plan Code: 4xx
- Outgoing CO Group No: 3
- CPN INFORMATION 1: StoneFax server IP Address
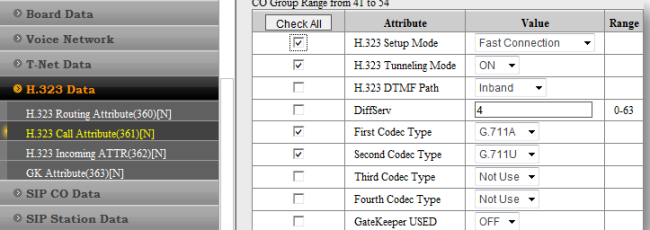
5. Setup the Codec for networking calls
StoneFax works in T.38 over a RTP stream, but needs to negotiate a g.711aLaw logical channel to be able to begin the voice call. So you must set the codec priority like this.
Select H.323 data, then h.323 Voip Attributes (361). Enter the Sequence Number you wrote at Configuration Step 1.
- H.323 Setup Mode: Fast Connection
- H.323 Tunneling Mode: ON
- First Codec Type: G.711A
- Second Codec Type: G.711U
6. Enable DID Service Attributes
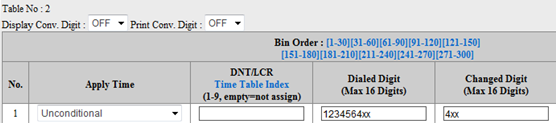
Select Table Data, then DID Conv Table (251-252). As Table Number enter the number you can find in CO Line Attributes line 6.
Example: If in your company 123456 is the root number, 4 is the prefix for the fax numbers and the dial plan is three digits long, enter:
- Dialled Digit: 1234564xx
- Changed Digit: 4XX