This is a guide that explains how to add Imagicle Gadgets to Webex client from Webex Control Hub.
Applies to:
- Webex version >= 41.9.0
- IAS Version >= 2023.Winter.1
Limitations:
- Gadgets don't work if the Imagicle UC Suite has a self-signed certificate and secure connection is used, this is because Webex only admits trusted sites/gadgets
- Certificate must be trusted by a public authority, local trusted certificates are not accepted by Webex
- Webex Mobile app and Webex web version are still not supporting this feature
- Connection to the gadgets is not tunneled through Expressway (you need to allow access from the internet, in case a direct connection to Imagicle server is not available)
How to add gadgets
Sign in to Webex Control Hub as Administrator and open the Apps page.
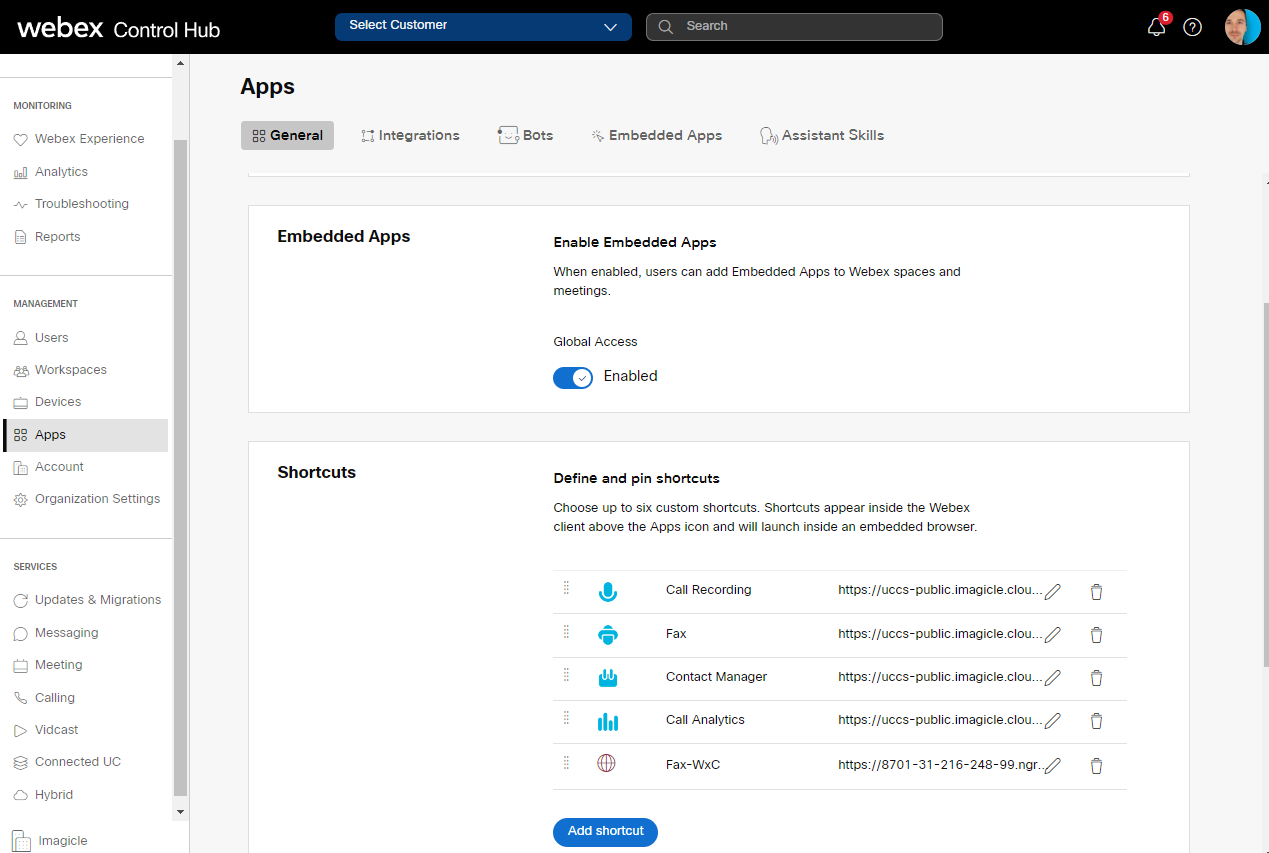
Scroll down to Shortcuts section and click on Add shortcut
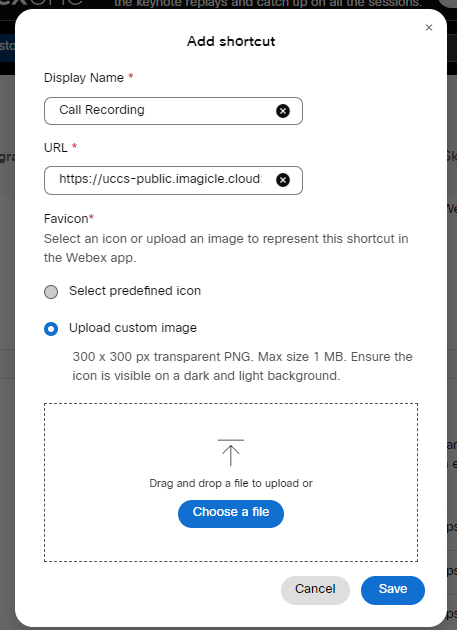
Enter the Display Name and URL for the shortcut, as per below table:
| Imagicle Application | Gadget URL |
|---|---|
| Call Recording |
|
| Contact Manager |
|
| Digital Fax |
|
| Call Analytics |
|
| Expense Management |
|
Please replace imagicle_FQDN with the proper Imagicle UCX Suite host name.
Select "Upload custom image" and drag or upload relevant icon using the Imagicle images set suitable for both light and dark background. See ZIP file attached to this KB.
Once done, please hit Save and repeat same procedure for each Imagicle gadget you wish to add into your Corporate's Webex clients. Maximum number of shortcuts is six.
Special URL for Contact Manager "click-to-call" feature
Imagicle Contact Manager gadget includes click-to-call feature, allowing to search for a contact a click on relevant phone number to initiate the outbound call.
The Webex behaviour changes, depending on the Calling Platform in place:
- If Webex Desktop client is registered to Control Hub for IM and to Cisco UCM for actual phone dialling, then you need to change the URL to:
https://imagicle_FQDN/gadgets/contactmanager?CallingPlatform=JABBER - If Webex Desktop client is registered to Control Hub for both IM and phone dialling (i.e. Webex Calling MT), then you need to change the URL to:
https://imagicle_FQDN/gadgets/contactmanager?CallingPlatform=WEBEX
How to edit gadgets
- In Apps ⇒ Shortcuts, you can see the list of available gadgets.
- Click the gadget you want to edit.
- Click the pencil.

- Change the Display Name, URL, or custom icon.
- Click Save.
- The edited gadget shows in the list
How to delete gadgets
- In Apps ⇒ Shortcuts you can see the list of available gadgets.
- Select the gadget you want to delete.
- Hit the trashcan icon.
- Click Delete.
- The gadget is removed from the list.
How to reorder gadgets
- In Apps ⇒ Shortcuts you can see the list of available gadgets.
- Click and hold the dimples on the left end of the gadget you want to move.
- Drag the gadget to a new place in the list.
- Repeat until the gadgets are in the order you want.
The top 3 from your list show on the side menu in the Webex App. The rest of the list show up on the 'more shortcuts' menu. See here for mode details.