Product Configuration
User Management Fields
Although Advanced Queuing can distribute the calls to any telephone number that can be dialed through the PBX, only UCX Suite users can be Agents. Agents must have a UCX Suite user properly configured in the users list. To be able to tell which line is associated to an agent, Advanced Queuing uses the primary extension and, if available, the Device Name. It is needed when the main line is shared between two or more phone devices.
User permissions
The following access levels are defined for the Advanced Queuing application:
Administrators: these users have complete management rights on the application. The can:
Create, edit and delete any queue
Start/Stop the service and edit application settings
Change the queues global settings
Monitor and change the login status of any agent
See the historical reports of any queue and any agent
Assign permissions to specific queues/users
Global Supervisors: a supervisor has limited control on all queues. Supervisors can:
Edit existing queues settings, behaviours and agent list
View global settings
Monitor and change the login status of agents
See the historical reports of any queue and any agent
Advanced Global Supervisor*: Same as Global Supervisor. In addition, the permission to trigger Silent Monitoring and Whisper Coaching on all queues' agents
Queue Manager: administer only the queues they are assigned to by an administrator
Queue and agents observer:
can monitor queue statistics
can see calls waiting for the queue
Monitor and change the login status of agents
cannot change the queue settings but can read them
Queue statistics observer:
can monitor queue statistics
can see calls waiting for the queue
cannot see information on the agents of the queue , not even the name and surname and therefore not even the distribution list (agents privacy protection)
cannot change the queue settings but can read them
Queue Supervisors: edit all the basic queue settings for every-day management
Edit queue timetable
Edit the agent list
Login/Logout queue agents
Manually switch the queue between statuses open/closed
See the historical reports of the queue
See real-time status statistics for queue and agents
Advanced Queue Supervisor*: Same as Queue Supervisor. In addition, the permission to trigger Silent Monitoring and Whisper Coaching on own queues' agents
Advanced Agents: can temporarily change the queue behaviour, and see advanced stats
Basic Agents: usually reserved for the queue agents. These users:
Cannot create or edit queues, neither change any queue settings
Can see and modify their login/logout status
No Access: users with this level do not see Advanced Queuing in the UC Suite web menu
Basic Agent is automatically assigned to an UCX user when it is configured as an agent or operator for one or more queues.
*Silent Monitoring & Whisper Coaching are available on Cisco UCM calling platform only.
Detailed Access List Table
The first column describes the operation, the second if the right to do that operation can be assigned per queue or if it applies to all queues.
The Administrators and Global supervisors operations implicitly apply to all queues. Users with other roles may perform the operations only on the queues they are assigned to. To allow them to perform such operations on other queues, you must explicitly assign them through the web interface.
Rights / Roles | Scope | Administrator (complete management) | Advanced Global Supervisor | Global Supervisor | Queue Manager | Advanced Queue Supervisor | Queue Supervisor | Queue and Agents Observer | Queue Statistics Observer | Advanced Agent | Basic Agent |
|---|---|---|---|---|---|---|---|---|---|---|---|
Create Queue | Generic only | X | |||||||||
Delete Queue | Generic / per queue | X | X | X | |||||||
Assign managers to queue | Generic / per queue | X | |||||||||
Assign supervisors to queue | Generic / per queue | X | X | ||||||||
Assign observers to queue | Generic / per queue | X | X | ||||||||
Assign agents to queue | Generic / per queue | X | X | X | X | ||||||
Change scheduled behaviours | Generic / per queue | X | X | X | X | ||||||
Change audio messages | Generic / per queue | X | X | X | X | ||||||
Change other queue parameters | Generic / per queue | X | X | X | X | ||||||
View agents status | Generic / per queue | X | X | X | X | X | X | X | |||
Activate manual queue behaviour | Generic / per queue | X | X | X | X | X | X | X | |||
Pickup and answer calls | X** | X** | |||||||||
Silent Monitoring & Whisper Coaching | X | X | X | X | |||||||
Read personal real time stats | Generic / per queue | X | X | X | X | X | X | X | X | ||
Read all agents real time stats | X | X | X | X | |||||||
View calls waiting on any queue | Generic / per queue | X | X | X | X | X | |||||
View calls waiting on my queues | Generic / per queue | n/a | n/a | n/a | X | X | X | X | X | X | X |
Manage scheduled reports | Generic / per queue | X | X | X | X | ||||||
View online and scheduled reports | Generic / per queue | X | X | X | X | X | X | ||||
Login/Logout from my queues | Generic / per queue | n/a | n/a | n/a | X** | X** | |||||
Change other agents login / logout status | Generic / per queue | X | X | X | X | X | X |
** Added automatically when the user is added to the queue distribution list.
Default settings
Most of queue settings can be inherited by default settings, that are a set of values that can be used as default values and shared by multiple queues. These include basic parameters, queue behaviors, date/time schedule and voice prompts.
In this way administrators can create multiple queues with similar behaviors and settings without spending a lot of time entering the same values for every queue. However, every setting can be overridden anytime with a queue-specific value (i.e. that will apply to that queue only).
In the image below, a sample of a parameter inheriting its value from default settings and another taking a queue-specific value (override).
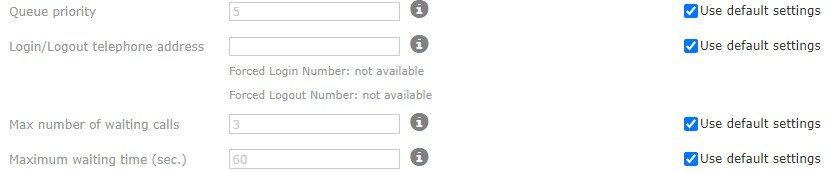
Uncheck "use default settings" to be able to enter the override value.
Note: each default setting can be easily reverted to its default value, a factory setting, that is a built in value set during the UC Suite installation.
Administrative menu
Select "Advanced Queuing" in the UC Suite menu. The following options are available:
Queues: allows to create, delete and edit the queues.
Default settings: allows to edit the queue settings which will be inherited by all queues
Agent Status: this is a link to a page that allows managing the login/logout status of the agents on any queue
Reports: link to Advanced Queuing Public queues/agents reports
Scheduled reports: Displays the list of all scheduled Advanced Queuing reports.
Manage Service: to start or stop Advanced Queuing service
Queues configuration
Note: Advanced Queuing reloads settings every 1 minute. So most Advanced Queuing setting changes apply 1 minute after they have been saved. For example, after changing a voice prompt, you must wait 1 minute before callers hear the new one.
Note: all Advanced Queuing settings are explained by a contextual help available as a tooltip window over the "i" icon, beside each control.
PBX Configuration: please, see PBX Configuration for the initial PBX configuration. Be sure that the queue you're going to create is reachable by a route.
Creating a queue: this is a very simple task. Select the Queues menu option, the list of existing queues is displayed.
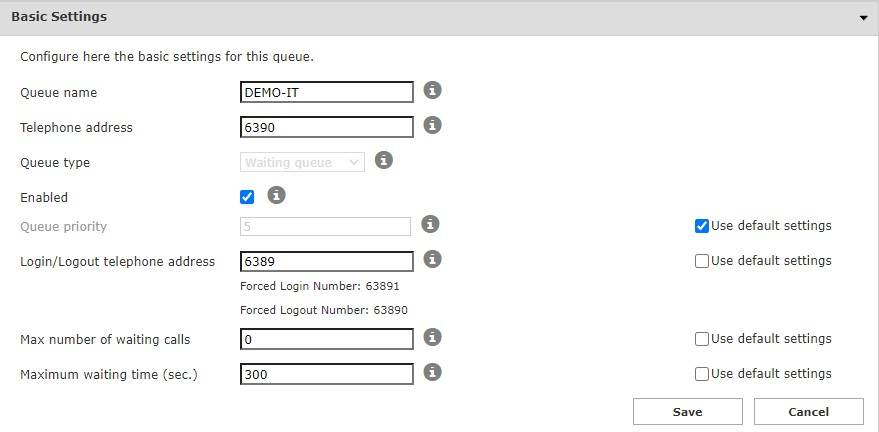
Click the "Add new queue" link on top of the list. A popup form window will appear asking to fill the basic queue information:
Queue name: a mnemonic identifier of the queue. This must be unique, that is, two queues cannot have the same name
Queue phone number: the telephone number to be called to enter the queue (DNIS). This must be unique, that is, two queues cannot have the same phone number. Also called Pilot Number
Type: the type of the queue. Waiting Queue is the normal waiting queue (Priority-FIFO). The Camp-On is used internally to park calls directed to internals which are currently busy. See below.
Enabled: tells the system if the queue is enabled or not. Disabling unnecessary queues may be useful to change the queue settings without the need to stop the service.
Once confirmed the new queue will appear in the queue list. Double click on it or click the "details" icon to edit the queue settings and behaviours.
Basic Settings
The basic settings windows allow to edit the information you inserted during creation, plus other parameters:
Queue Priority: this is the priority level value of this queue, in the range 1-10. Higher values will instruct Advanced Queuing to serve this queue calls before the ones in lower priority queues. This value is used only when two or more queues share the same agents and the distribution algorithm has selected the same agent as destination for a call.
Login/Logout telephone address: The operator can dial this number from its IP/softphone to toggle own login status. A simple voice prompt informs the operator about new login status and then call is ended. This service checks the calling number, to block the access to other users not included in the queue distribution. Therefore, the operator must be associated to a +E.164 phone number, configured either in the "First Extension Number" or "First extension number alias" user's field.
Max number of waiting calls: this is the upper limit you can define for the number of waiting calls in the queue. Incoming calls exceeding this limit will trigger the overflow scenario and the associated treatment will be applied. Set this value to 0 (zero) to remove any limit.
Maximum waiting time: this is the maximum time interval the calls will wait in queue for an agent. When this time is over, the maximum waiting time scenario will trigger and the associated treatment will be applied. Set this value to 0 (zero) to remove any limit.
Hint: to make a simpler configuration, set the main queue phone number and the login/logout phone number with a constant offset. For example, define three queues with phone numbers 800, 810, 820 and associated login/logout numbers with 801, 811, 821.
Configuring Specific scenarios
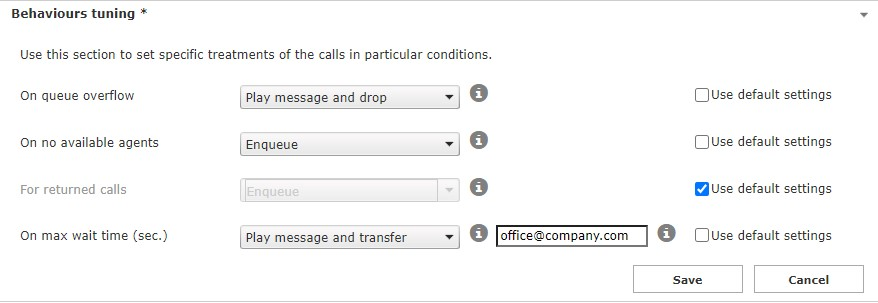
In the "Behaviours Tuning" section of the queue configuration page, you can define the treatments that will be applied in less common situations/conditions. The following conditions can occur:
Queue overflow: this treatment is applied when the incoming call is exceeding the maximum number of waiting calls (if such value is different from zero). You can just play a message and hang-up or play a message and transfer to any number or SIP address.
No available agents: this treatment will be applied when the incoming call arrives and there are no agents configured or all configured agents are logged out. You can place the call in the waiting queue or just play a message and hang-up or play a message and transfer to any number or SIP address.
Returned calls: this treatment is applied to calls that enter the queue for the second (or more) time, for example because of a no-answer forward by a company extension. You can place the call in the waiting queue or just play a message and hang-up or play a message and transfer to any number or SIP address.
Maximum waiting time: this treatment is applied when the maximum wait time expires (if such timeout is set different from zero). You can just play a message and hang-up or play a message and transfer to any number or SIP address.
To better understand how above parameters are influencing queued calls flow, please consult the “Decision Tree” paragraph available here.
Time Table
Once selected a queue, the "Time table" tab allows to configure the ordinary weekly time table, with relevant queue behaviours. In this tab administrator can define when the queue is open (business hours), holidays or special events and the related treatments to apply. The combination of default behaviours, ordinary weekly schedule and special events/holidays makes the queue programming really flexible allowing, for example, to provide specific voice prompts or trigger different behaviours in particular hours or days. This tab include five sections, descriptions follow.
Timezone selection
Select the timezone that rules the queue timetable (opening/closure time bands).
Please, notice that the daylight saving time shift will automatically apply to the selected timezone.

Forced Mode
This section allows to force a particular behaviour of the queue, overriding any schedule. This is also known as "Manual Mode", since this forced mode can also be set from UCX Console, typically to override a schedule programmed by the administrator.
Administrators can program which is the call treatment to apply in the case of forced open status and forced closed status. They can also use this section to switch the queue to one of the following options:
Regular queue scheduled
Forced open
Forced closed
Default behaviour
This section allows to decide which is the default behaviour of the queue, that is, out of any scheduled time interval and holidays/special events.
Typically a queue is closed by default, but administrator could choose to keep the queue open by default, for example if the queue is managing a 24x7 service.
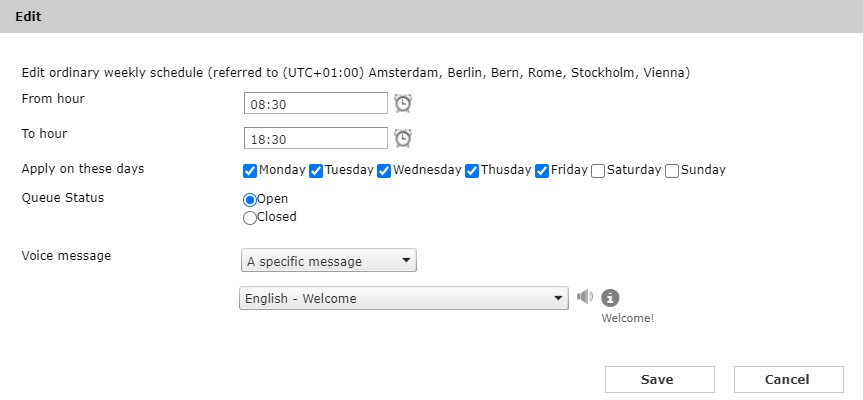
Ordinary weekly schedule
This section allows to define the business hours of the queue over the week and the treatments to apply.
A calendar with a weekly view displays the actual configuration and edit it very easily.
Right click the mouse over the week calendar view to add a new time interval. Click on the right upper corner of a defined time interval to delete it.
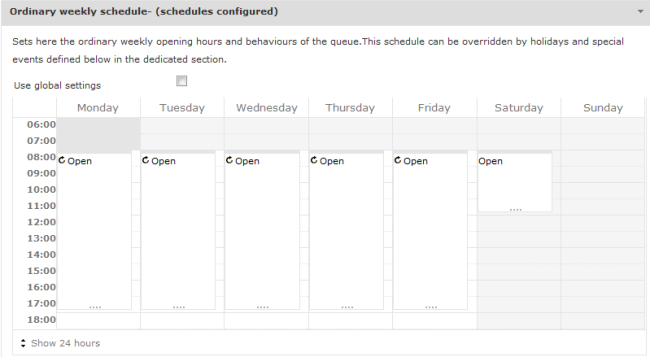
Note: you need to uncheck the "Use global settings" option in order to enable the calendar editing, otherwise the weekly view will display the global settings, that is not editable from this window (you need to configure it in the "Global Settings" left side menu option).
Hint: You can select a time interval in the weekly calendar view, then press the right click button, to select a time range as in the image above.
Once selected the "Add a new schedule" option, a popup window will appear allowing to define the new time interval.
You can choose the starting hour, the ending hour, the days of week the time interval will be valid and the preferred behaviour to apply in such time interval.
Notice that you can program the queue to be closed in the time interval. This may be useful, for instance, if the default behaviour of the queue is set to be open.
Hint: You can define a mix of closure and opening time intervals. The schedule in the following screenshot, for example, uses a closure time interval on Saturday morning only to provide a different closure voice message, respect to the one programmed in the default behavior.
Holidays and special events
Use this section to define treatments for holidays and special events that override the ordinary weekly schedule.
A grid will display the list of configured events, grouped in two classes of events:
Common holidays/events: these are holiday and events common to all queues, inherited from global settings. They are displayed in the higher part of the list. Administrators can define common events in the global settings configuration page. This allows to define new holidays/events that apply to all queues very quickly.
Queue-specific events: these events apply only to the specific queue, they are displayed in the lower part of the list. If needed, you can also use this kind of events to override the common holidays/events.
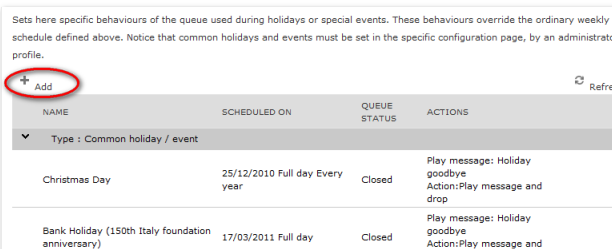
To add a new holiday/event, click the "Add" link. A popup window will appear, asking for the event details (starting date-time, ending date-time, recurrence, treatment to apply, voice prompt).
Remember to click the Save button to apply changes.
Testing behaviours
In order to understand which treatment will be applied by Advanced Queuing on a specific date-time, a test section is available (named "Test a scheduled behaviour").
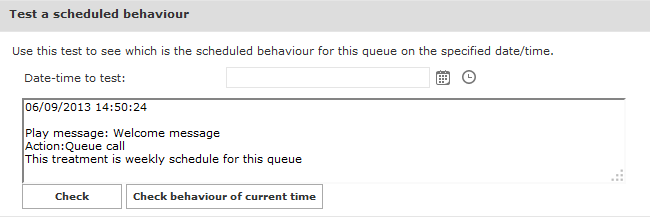
This is a very simple form that displays the scheduled behavior for a given date-time, pressing the "Check" button. Pressing the "Check current behaviour" will display the behavior applied at the current date-time.
Note: this test only considers the scheduled behaviors, not the scenarios that may trigger in particular conditions that arise at run time, not available in advance (for instance: no agents available, overflow, etc).
Configuring voice prompts
The "Voice messages" tab allows to define and customize the audio prompt and music provided by the application to callers.
A set of pre-installed voice prompts are available in the various supported languages (builtin prompts).
All audio messages settings can be inherited by default from the global settings, more over, it's possible to listen at the voice prompts directly from the WEB browser clicking the speaker icon (requires a multimedia-capable PC and a multimedia plugin able to play WAV files).
In order to avoid a voice prompt is played, select the entry "None" in the drop-down selection list.

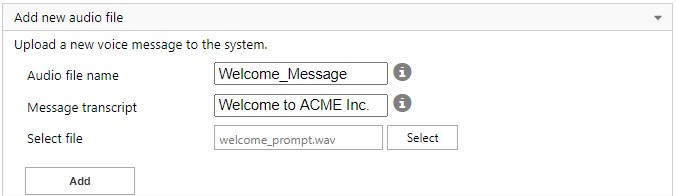
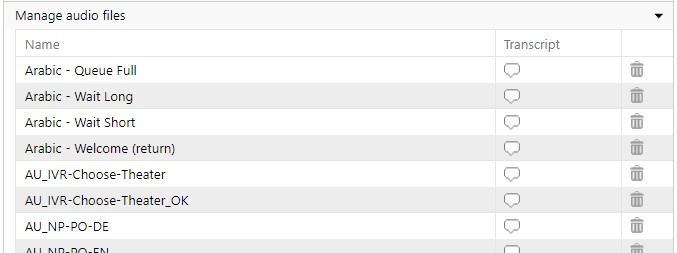
Administrators can load and manager their own voice messages in a dedicated window, available pressing the "Manage messages" link.
A popup window will allow to upload a new audio file from the client PC in Wav or MP3 formats. If the audio sample rate is not compliant, it will be automatically converted to the required format.
Each audio file is associated to name (identifier) and an optional transcript, useful to describe the content of the voice prompt.
The second section of the popup form (named "Manage audio files") can be used to list and delete the existing audio files.
Following, the list of voice prompts that can be edited:
Ordinary voice prompts
Welcome messages
Ordinary welcome message: played before the call is enqueued, if there is at least one agent logged in the queue.
No-available agents welcome message: played before the call is enqueued, if there are no operators logged in the queue.
Closure messages
Closure goodbye: played out of the business hours (queue closed).
Holiday goodbye:played by default during the holiday events.
Wait messages
Wait music: the loop played while the caller is waiting in queue.
Short wait message: this message is played once, while waiting in queue for an available agent. Generally used to provide prompts such as "We apologize for the wait, our operators are still busy". The delay amount triggering this prompt replay can be set in the waiting treatment tuning section of the queue settings.
Long wait message: this message is played periodically after the short wait message, while waiting in queue for an available agent. The recurrence time of this prompt is can be set in the waiting treatment tuning section of the queue settings.
Additional messages (play queue position): If the option is enabled, after the Welcome message, the ShortWait and the LongWait, Advanced Queuing plays a system message with an indication of the position in the queue. At each position change, Advanced Queuing delivers:
no message if:
the call is at the head of the queue and there is at least one agent available (ready and idle)
or a consultation is in progress with an operator
"You will be the next caller to be served”, if the call is at the front of the queue and there are no agents available, nor are consultations with operators
“There are <n> calls waiting to be served before you”, in case there are 1 to 9 calls waiting before the involved call;
“There are more than 9 calls waiting to be served before you”, in case there are more than 9 calls before the involved call;
NOTE. Note: If a VIP call is queued, it overrides sequence of non-VIP calls in the queue, without affecting queue position voice announcement, which still plays the "best" gained position in the queue (cheat).
Special cases
Returned calls: this is the optional welcome message provided to calls that enter in queue for the second (or more) time.
Queue full: this is the goodbye message played before the overflow treatment is applied.
Max wait time: this is the goodbye message played before the maximum wait time treatment is applied.
Multi-Tenant environments: Voice Prompts Separation
In case of Imagicle Multi-Tenant environments,it is possible to restrict access to customized voice prompts on a tenant basis.
In fact, customized voice promtps can be fully managed (uploaded, configured and deleted) by users who has been given the following Advanced Queuing system permissions:
Global supervisor;
Global advanced supervisor;
Complete management.
Such users can manage Advanced Queuing voice prompts at system level and set them as shared (accessible and available by all Tenants) or set them to a specific Tenant (accessible and available only by the specific tenant they have been assigned to)
A specific user who has been given "queue manager" permission can manage (configure and delete) only voice prompts that are shared across all Tenants and Tenant specific ones.
Hint: set a message prompt to "None" to skip it.
Defining the set of agents/targets that will serve the queue
In the "Call distribution" tab administrators can set the agents/targets that will answer the calls of the current queue and the algorithm used by Advanced Queuing to dispatch calls to the available agents.
Destination agents/targets are grouped into escalation levels. An escalation level is a group associated to a progressive number that is considered by some of the available algorithms in the case of no-answer escalation. Such algorithms try to engage an available target starting from the first escalation level; if nobody answers the call in the current escalation level, the algorithm raises to the next escalation level group, searching for another available target. Algorithms involving escalation levels also can have sub-selection variants, that are different policies used to choose the first agent when considering raising in the higher escalation level.,
Following, a table representing the available algorithms and their sub-selection variants, with the description of how they work. Please, notice how some algorithms require that all target phones are CTI-monitored (TAPI) to make them working properly. If one or more phones are not monitored, the call distribution of such algorithms may be different from the expected one.
Please note that the algorithms never take into account how much time the agent was logged into the system. If needed, they calculate the time the agent spent on a call.
Algorithm type | Considers Escalation level | Requires CTI monitoring | Description | Sub-selections policies |
|---|---|---|---|---|
Priority | Yes | Yes | Selects the available agent starting from the first escalation level. Escalates to next levels only when all agents in previous levels are not available or busy. This algorithm can be used to manage skill levels, balancing the load inside the skill group. |
|
Sequential | Yes | no | Scans for an available agents/targets starting from the first level. If a call is not answered by the current level, it escalates to the next level (no-answer escalation).If the call is not answered by the next escalation level, it loops back to the first agent group. |
|
Round Robin | No | No | Always selects the available agent with the oldest engagement. Escalation level and position in the group are not considered by this algorithm, that is focused only to load-balancing. |
|
Idle Time | No | Yes | Selects the available agent that is idle for the longest time. Escalation level and position in the group are not considered by this algorithm, that is focused on the load-balancing. |
|
Broadcast | No | No | All agents/destination phones are made ringing at the same time, the first of them answering will take in charge the call. Priority level is not considered by this algorithm. |
|
On Demand ("pull") | No | No | This algorithm does not push the call to agents. By using their UCX console, they can manually pick and answer a call from the waiting queue. The call remains in the queue until it is picked up by an agent or the maximum waiting time is over. |
|
Configured agents are represented in a tree view, grouped in escalation levels:
Agents are displayed with an agent icon, green-colored if the associated phone number is actually monitored by CTI (TAPI).
Simple destinations are displayed with a phone set icon.
Note: you need to save the agents list, to properly display CTI indication (green/grey agent icon).
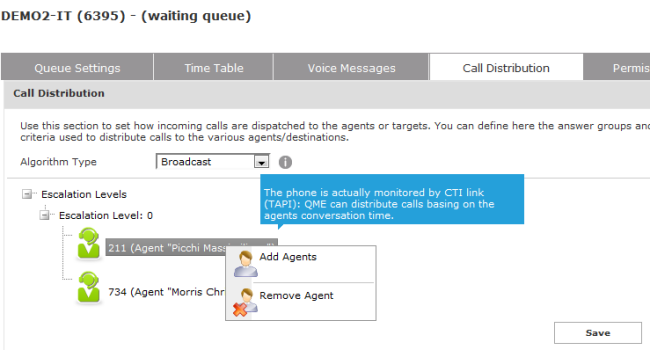
A right click will activate a menu to add/delete escalation levels (groups) and single agents. When you select the "Add agent" option, a popup window will let you to insert a new target.
Such popup window has two sections:
Agent: allows to add an agent searching him/her in the IAS users list. Search can be done by name, department or extension.
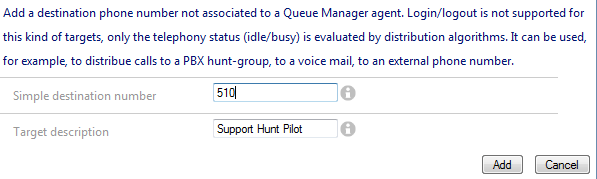
Simple number: allows to add a new target just inserting the destination phone number or SIP URI address (and a short description for it).
Advanced Settings
Advanced settings for Call Distribution include some parameters that should be changed carefully, because they impact on the call dispatching mechanism and its effectiveness. Such parameters are:
Call Transfer Type: this sets the type of call transfer from Advanced Queuing to targets. Basically it's possible to decide if enabling the supervised transfer (with consultation, this is the recommended option) or the blind transfer.
No Answer Timeout: the maximum duration (in seconds) of the consultation transfer to agents. When this time value has been exceeded, QME retrieve the call in queue and try to engage the next agent. This value is not considered if the call transfer type is "blind".
Automatically logout agents on no-answer: if the consultation to an agent call times out and this flag is enabled, the agent is automatically logged out from the current queue.
Automatically logout agents with unreachable phones: Automatically logout agents with unreachable phone device (e.g. Jabber/Webex client not running);
Transfer attempts every: this value (in seconds) rules the frequency of consultation calls to agents/targets in the case the target is not CTI-monitored. Please, change this value only if suggested by Imagicle support team.
Ignore agents telephony status: Advanced Queuing engages a consultation call to agent, regardless own phone status.
Max consultation calls per agent: Maximum number of queued calls offered to an agent;
Caller name string: use this setting to compose the caller name string of the consultation call from Advanced Queuing to agents. Such name can be constant or composed dynamically, using a set of variables indicated by the tooltip, in the web page. Some of such variables are related to the Speedy Enterprise contacts (for instance the company name) and are blank if Contact Manager is not licensed. This value is not considered if the call transfer type is "blind".
Caller number: use this setting to compose the caller number of the consultation call from QME to agents. It can be constant or dynamically set using the original caller number (variable $$CALLERNUMBER$$). This value is not considered if the call transfer type is set to "blind".
After call work - Wrap-up time (sec.): This is the comfort interval, in seconds, assigned to agent after every served call. During Wrap-up time, calls are distributed to other agents.
Configuring user permissions for the Queue
Once you have added agents to the queue, you may change their permissions. Open the Queue settings, Click on Permissions.
Here you can set the permissions for the agents. For a detailed descriptions of the available roles, please see User permissions at the beginning of this section.
In the lower part you can assign a role to users who are not agents. This allows, for example, to define Queue supervisors or observers who do not begin to queue distributions lists. The first step is to choose an UC Suite user by clicking on the "add user link". Select one or more users and the permission level you need. You can edit the Permissions later through the list in the main User's permissions page.