Synchronize Users against Entra ID (Azure) Source
Starting from December 2022, you can provision Imagicle users from an Entra ID source. To enable such users' synch, you must involve Imagicle Technical Support and provide them some data about your geographic area.
Before illustrating the whole procedure, let us highlight the requirements:
Imagicle UCX Cloud Suite must be in place, or a Cloud-connected on-prem/hosted UCX Suite, reaching "imagicle.cloud" domain on both TCP ports 443 and 1636.
The customer's delegate, in charge to apply the configuration, should have administrative access to Entra ID portal.
Moreover, consider the following limitations, coming from Entra ID:
disabled users are not provisioned;
users belonging to nested groups are not provisioned: to include them you need to explicitly add the nested groups to the provisioning scope (see here for more details).
Null/empty user fields are not provisioned by Entra ID (see here). This means that if a synchronized user property is cleared on Azure, the change will not reflect automatically on Imagicle suite.
Request to Imagicle Technical Support
If above requirements are satisfied, please proceed by contacting Imagicle Support team to provide the following information:
Customer name
Optionally: a short nickname to identify the customer, with no spaces inside, like "ACME-INC". max 35 chars length. If not provided, Imagicle invents one.
Geographical macro-area where customer is located. I.e. Europe, Americas, middle-east, etc.
Imagicle Support applies an internal configuration in our Cloud, to enable a LDAP interface. This might requires few days. Once done, they are going to return you the following:
Az_client_creds.json: A script text file including Entra ID token.
Suite_ldap_creds.txt: this is a text file including all details and credentials to manually configure the LDAP synch connector in Imagicle UCX Suite, as explained at the bottom of this KB.
In case of an Imagicle UCX Cloud Suite, the LDAP connector is configured by Imagicle Support team.
How to enable Users Synchronization on Entra ID
Please download ImagicleUserCloudSync_240313172434.zip to automatically apply the Entra ID configuration. Expand zip and save the executable in a local folder (for instance C:\Temp).
Copy into the same folder the configuration json file provided by Imagicle.
Open a Command Prompt window (CMD) as administrator and move to the same folder:
cd \Temp
Then type the following command:
ImagicleUserCloudSync Az_client_creds.json --disable-autostart --app-name "Imagicle Users Synch"Once you execute above command, a pop-up window appears prompting you to enter your Microsoft admin credentials. Once done, you can close the pop-up window.
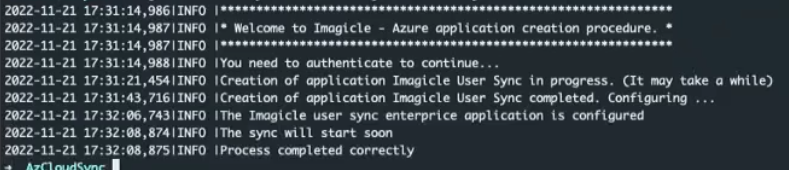
After few seconds, the process completes and you can track the configuration steps as below sample:
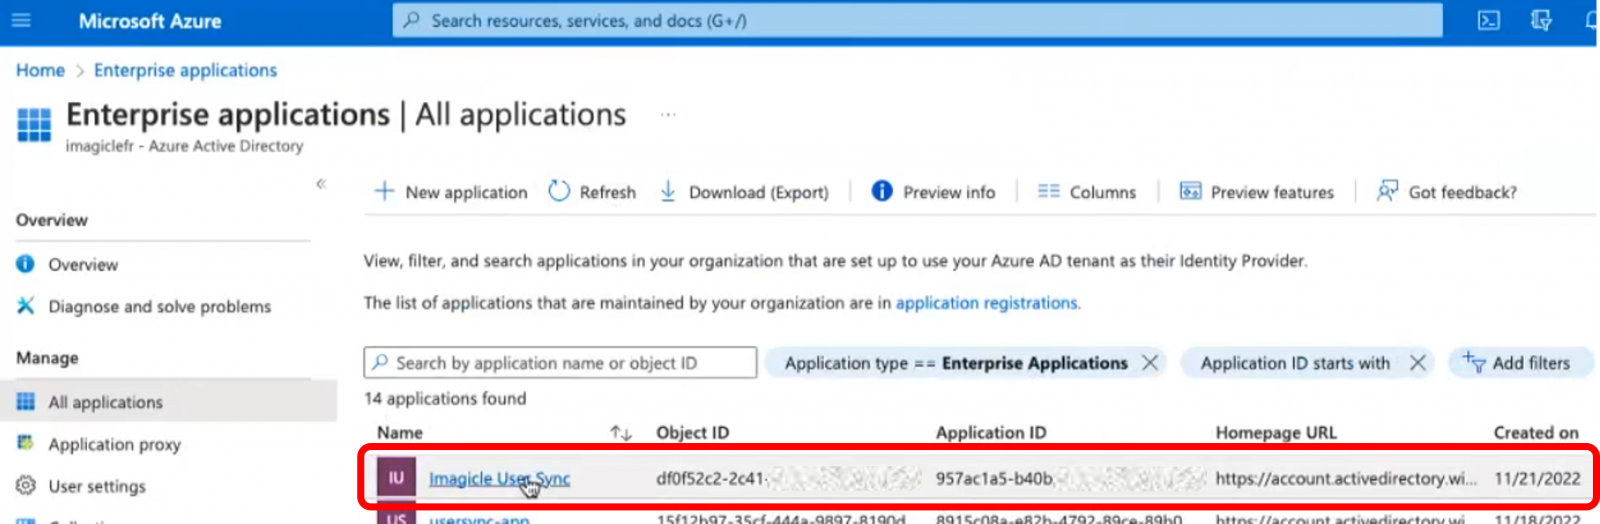
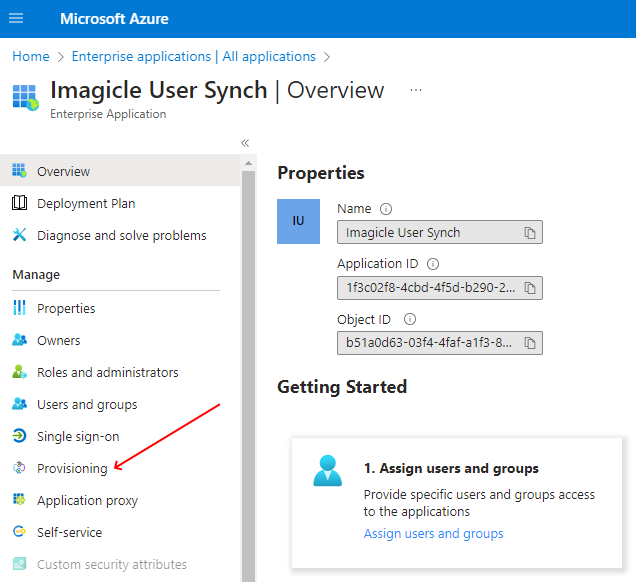
The Imagicle script automatically creates an Azure Enterprise Application. You can view it from Azure web portal, as below sample:
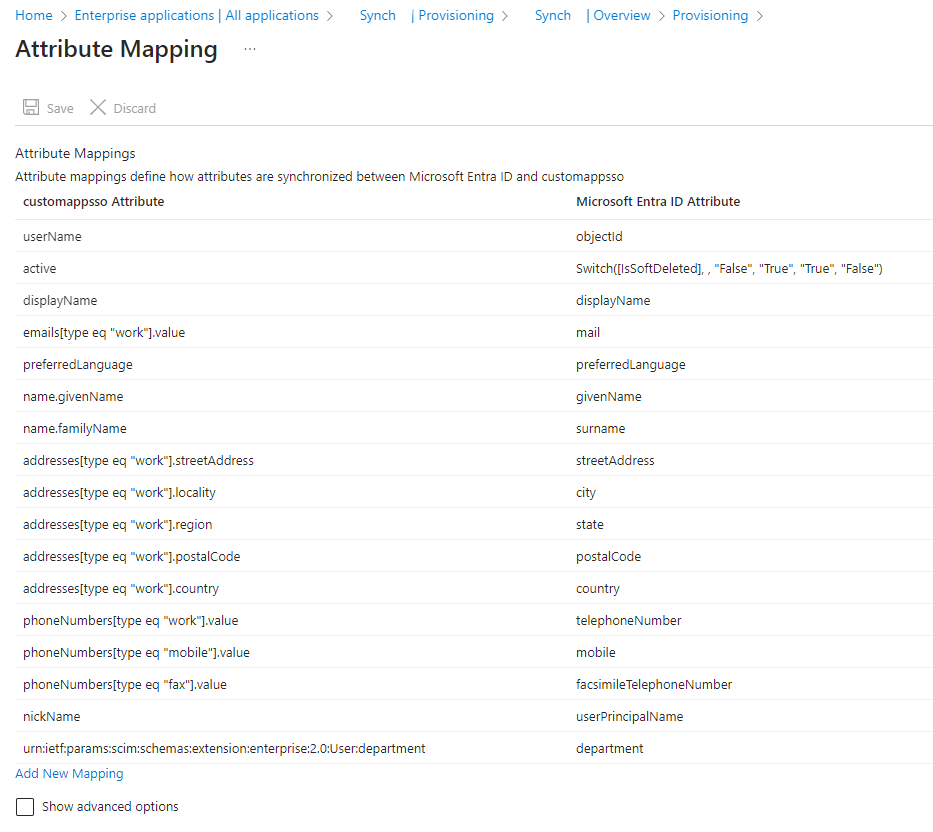
This script applies a default field mapping according to below screenshot:
If you click on the Imagicle application, you can access the "Provisioning" menu and trigger a users' synch by hitting "Restart provisioning" button. If the synch is correctly accomplished, you get the number of imported users (33 in below sample):

Interval between each users' synch can't be below 40 minutes.
How to apply filters to provisioned users
By default, above configuration imports ALL users available in Entra ID. You can limit the amount of data by applying either a filter based on users/groups or based on attributes content. Both filtering methods are explained in the following paragraphs.
Filter based on Users/Groups list
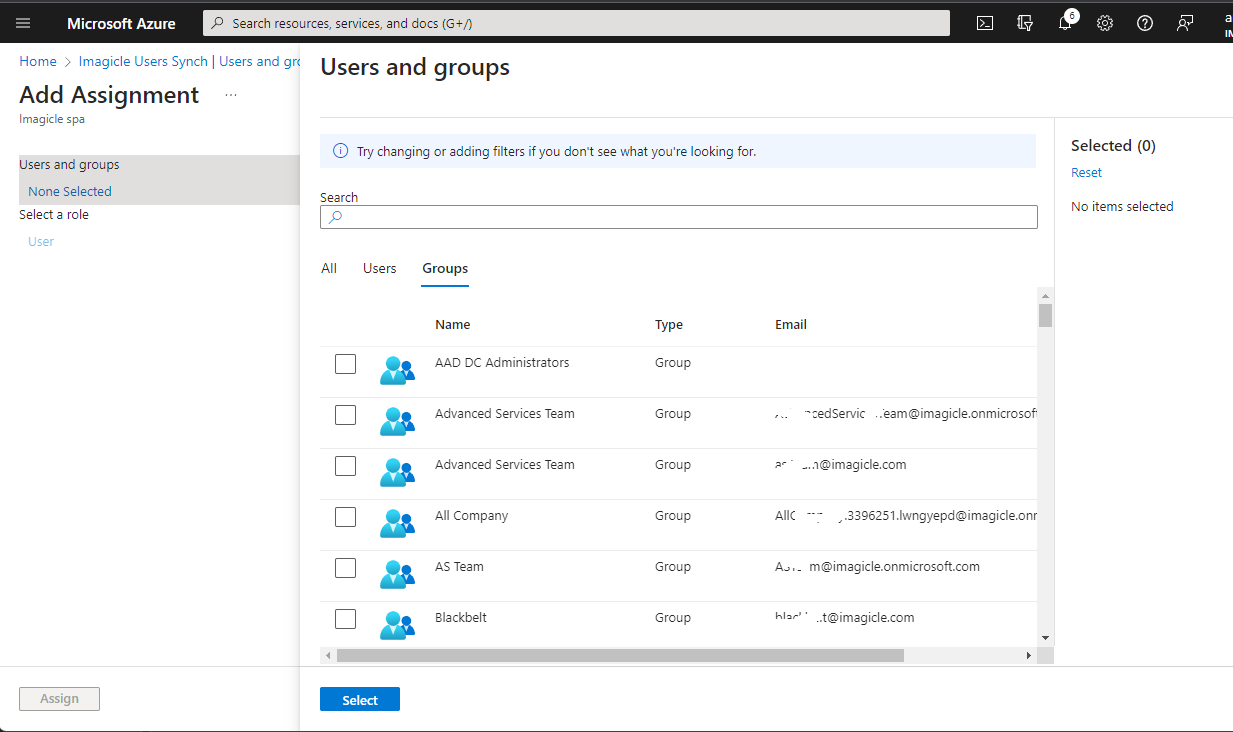
Within the Imagicle Enterprise Application, please click on left panel's "Users and groups" menu option and browse/search for users/groups you wish to import from Entra ID. Just tick the box besides each user or group to enable the import. See below sample:
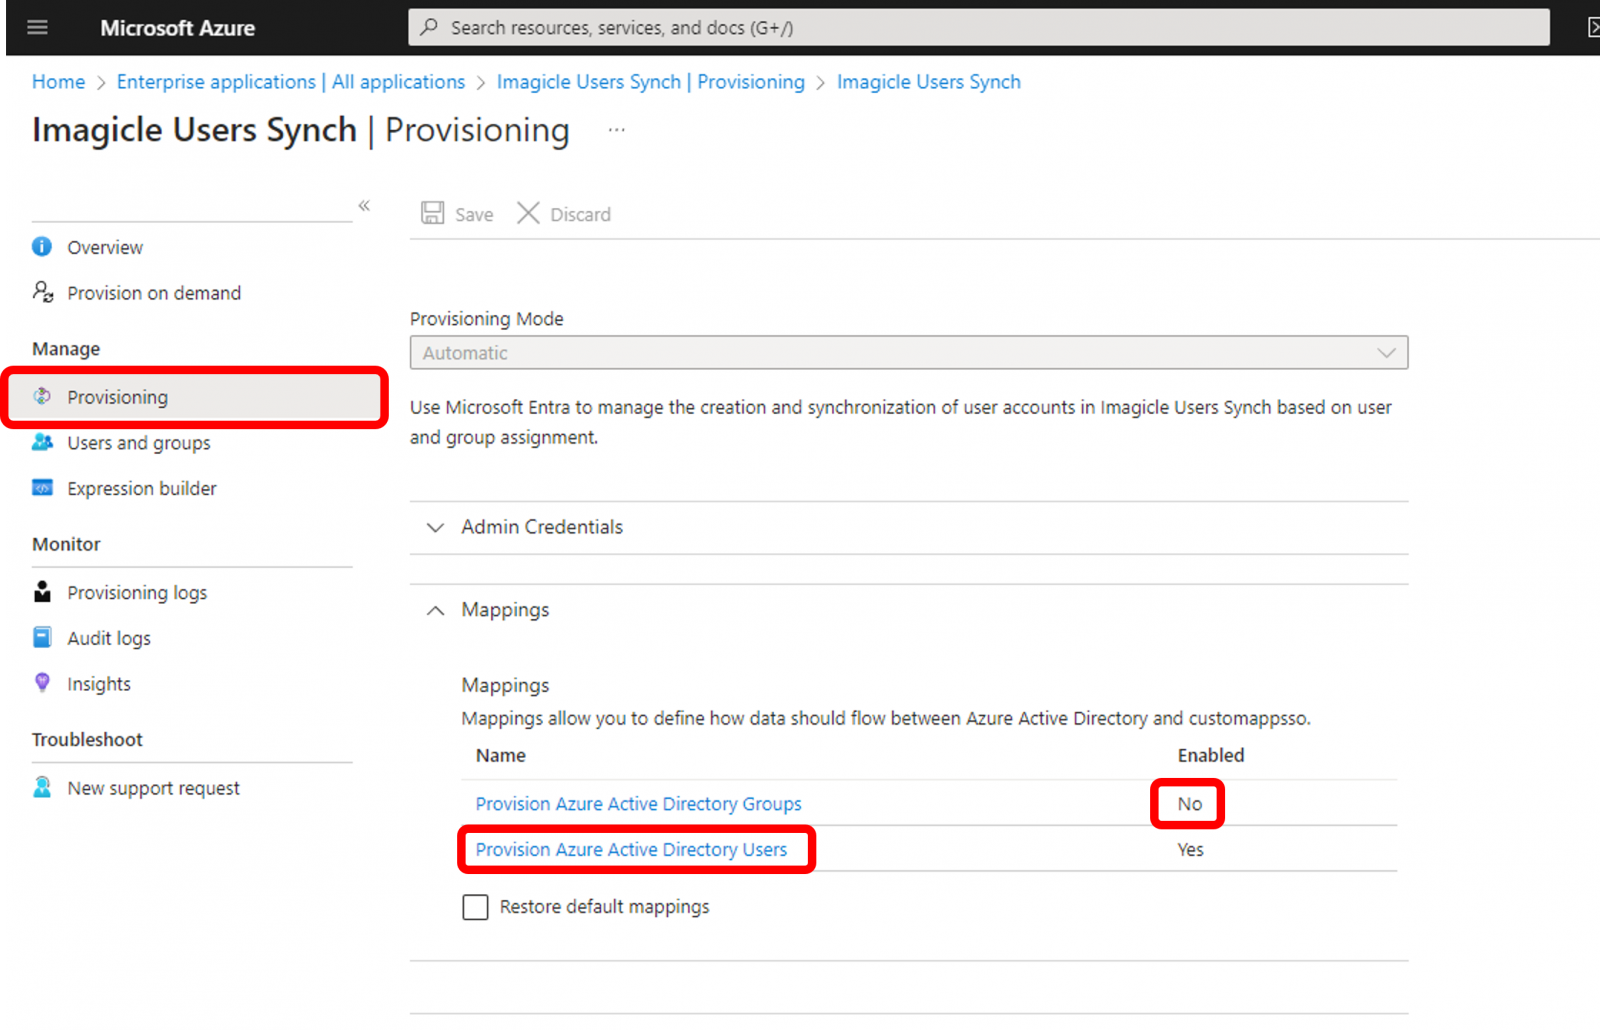
Within the Imagicle Enterprise Application, please click on left panel's "Provisioning" and make sure that "Provision Azure Active Directory Groups" is disabled. See below sample:
Expand "Settings" section and make sure to select "Synch only assigned users and groups" from pull-down menu:

Filter based on Entra ID attributes
Click on "Provision Azure Active Directory Users" to access the Attribute Mapping page:
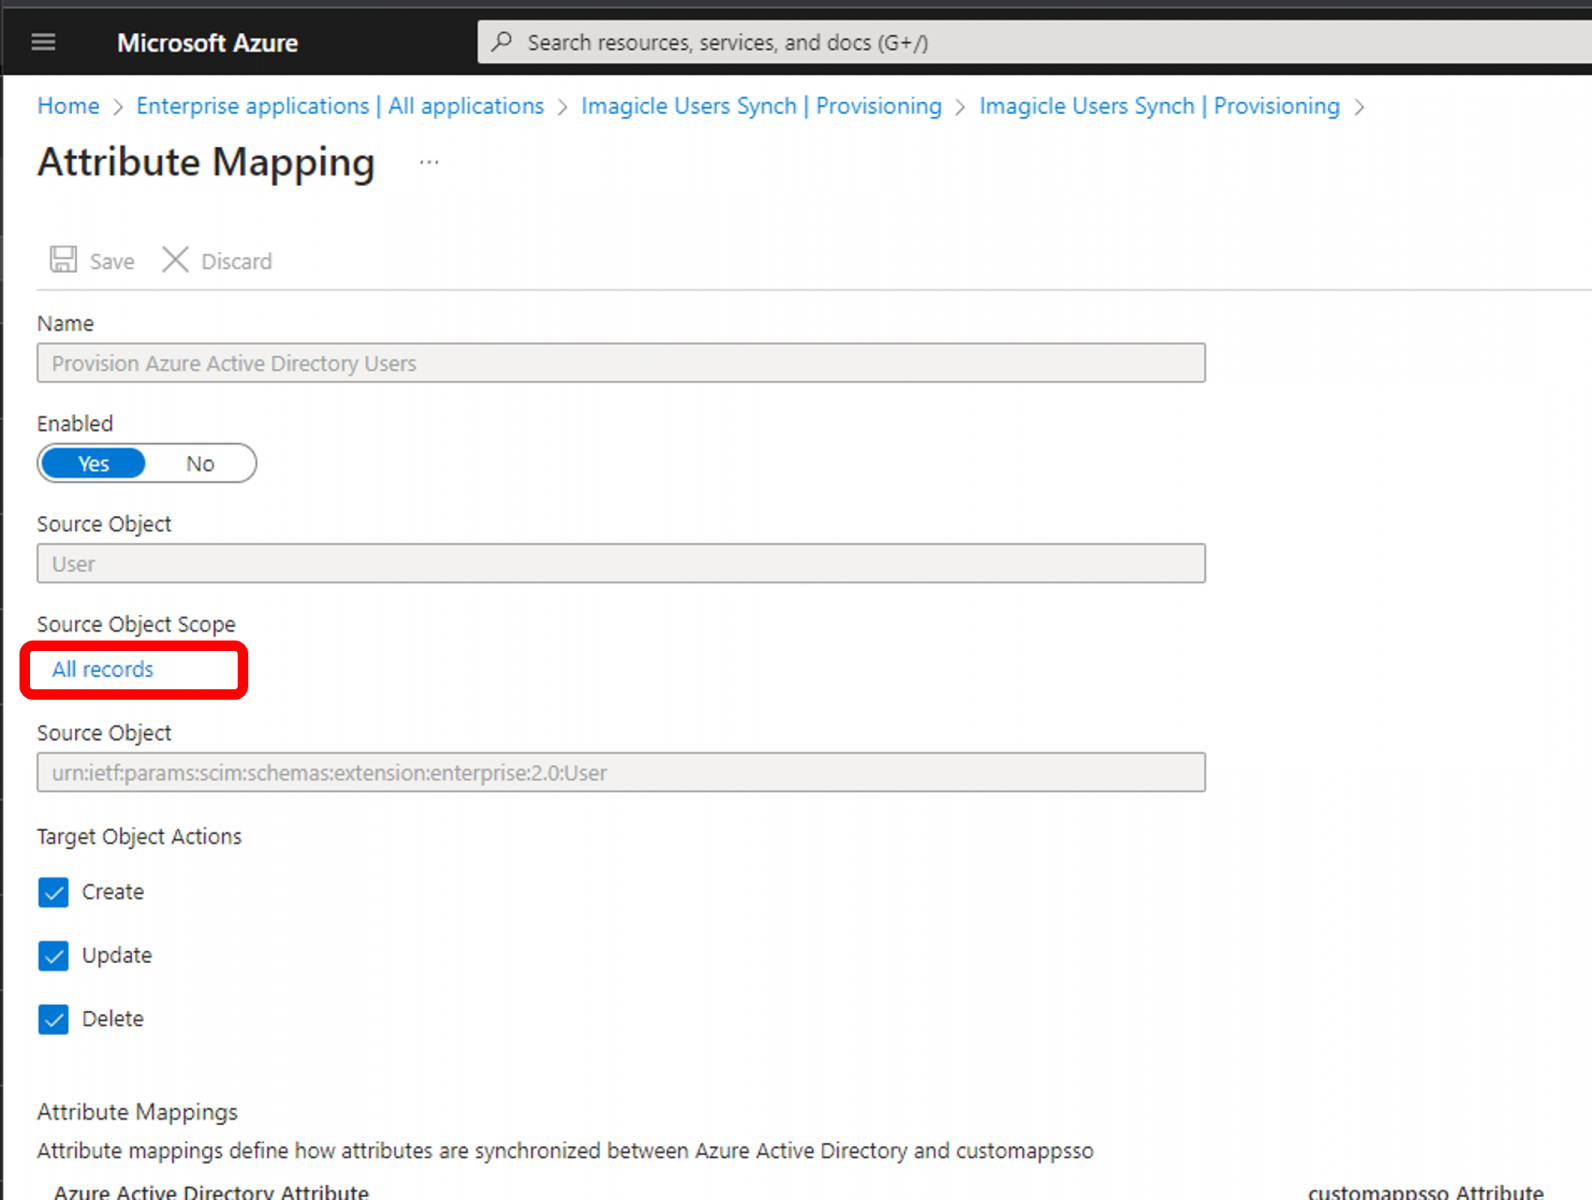
Click on Source Object Scope ⇒ All records. See below:
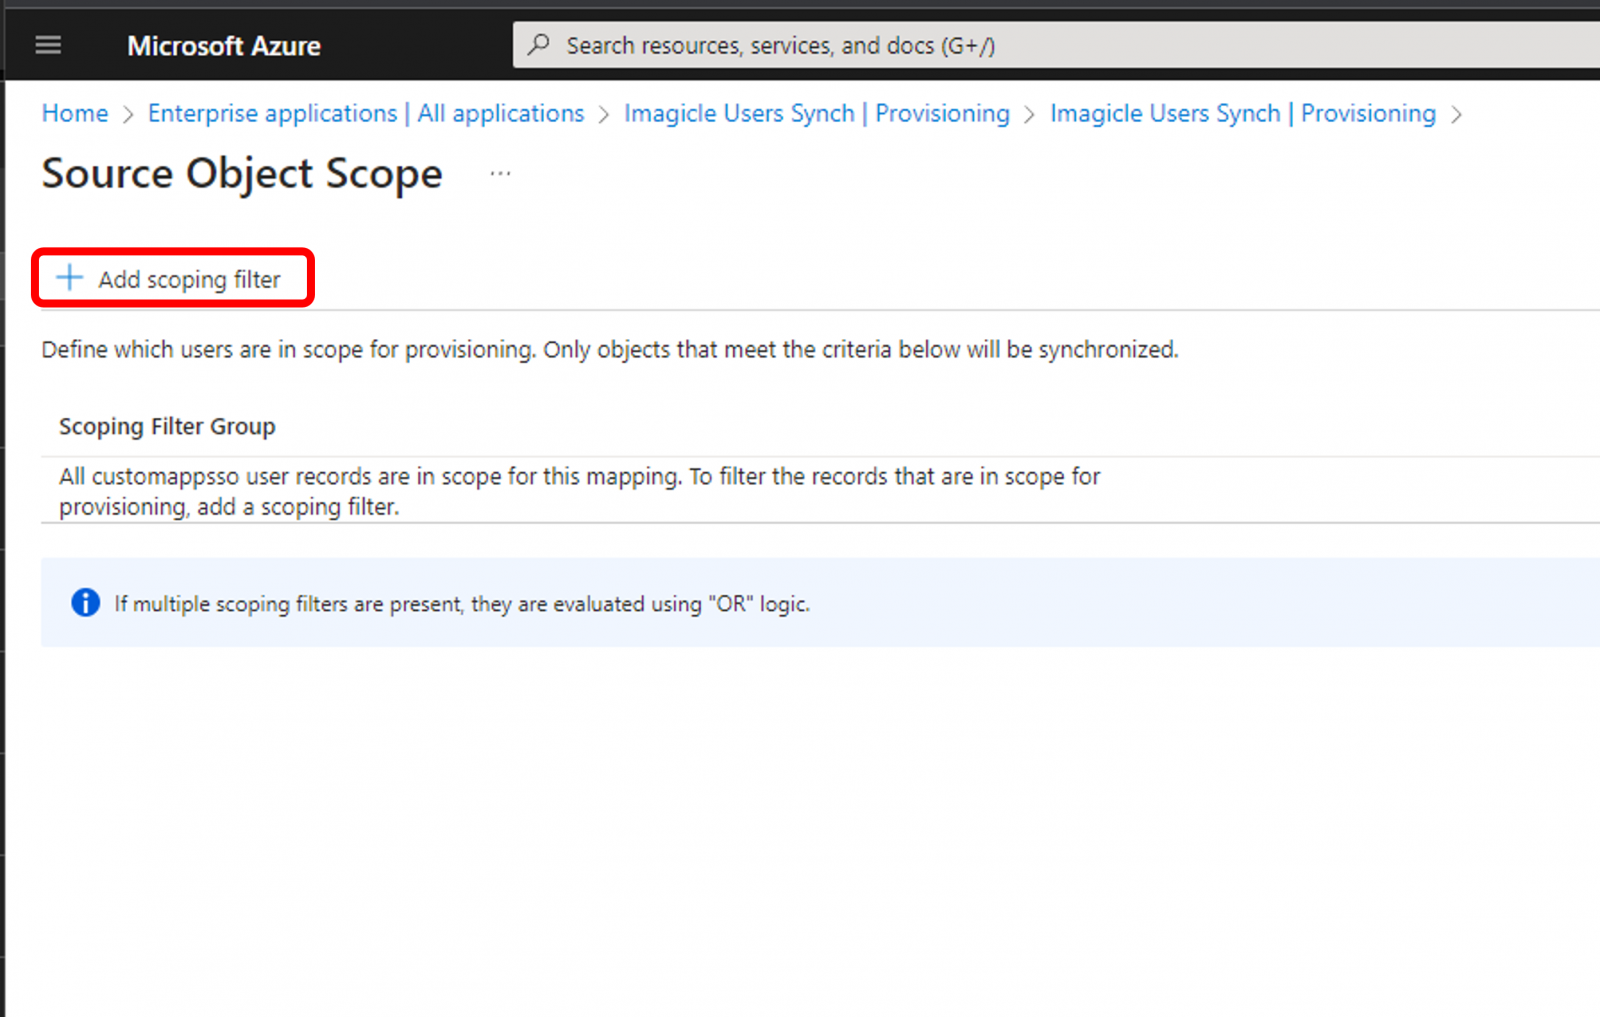
Click on "Add scoping filter" to invoke the filter editor. See below:
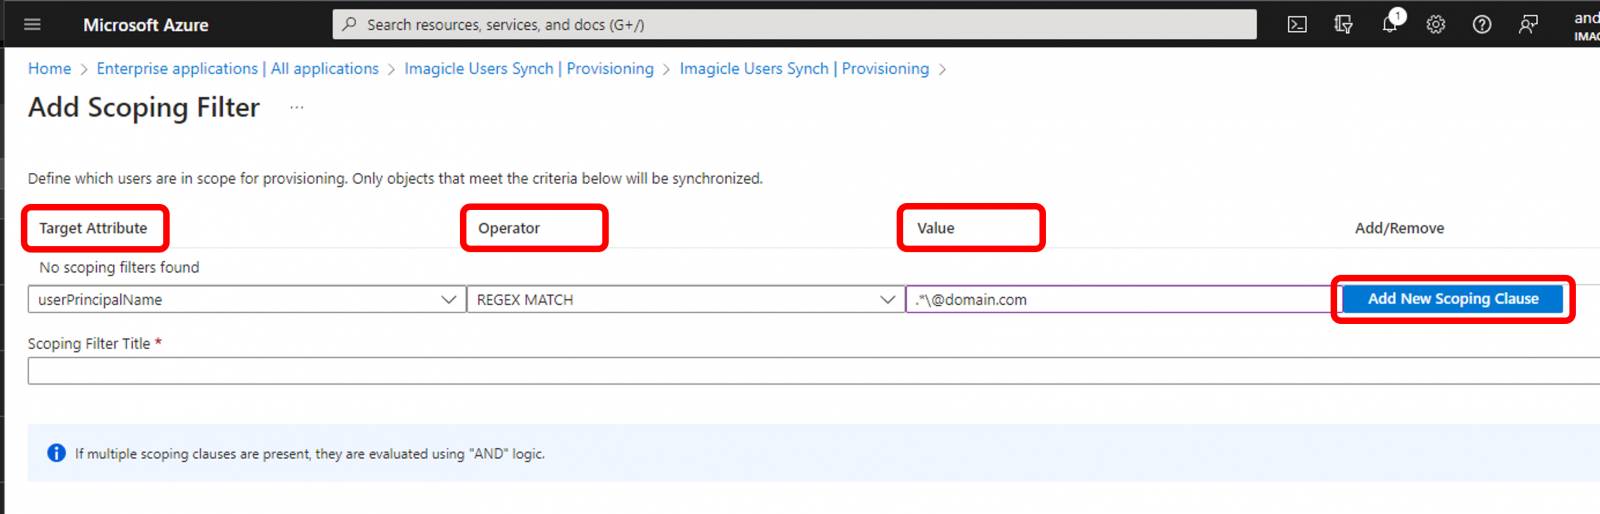
From this page, you can add multiple filters, based on different Entra ID attributes available within "Target Attribute" pull-down menu. "Operator" column decides how to match the filter entered within "Value" column. Once the row is properly compiled, you can click on rightmost button to add the rule and create another row for additional filtering.
Limitations
Multiple filtering rules are applied with "AND" operator
"IsMemberOf" filter is currently not supported.
The members attribute on a group is currently not supported.
Filtering is not supported for multi-valued attributes.
Scoping filters returns "false" if the value is null/empty.
More details are available within this Microsoft web page.
How to import custom fields
Imagicle Users' database supports 10 custom fields, to be mapped with ExternalID attribute in Azure during the provisioning. Please find below the procedure:
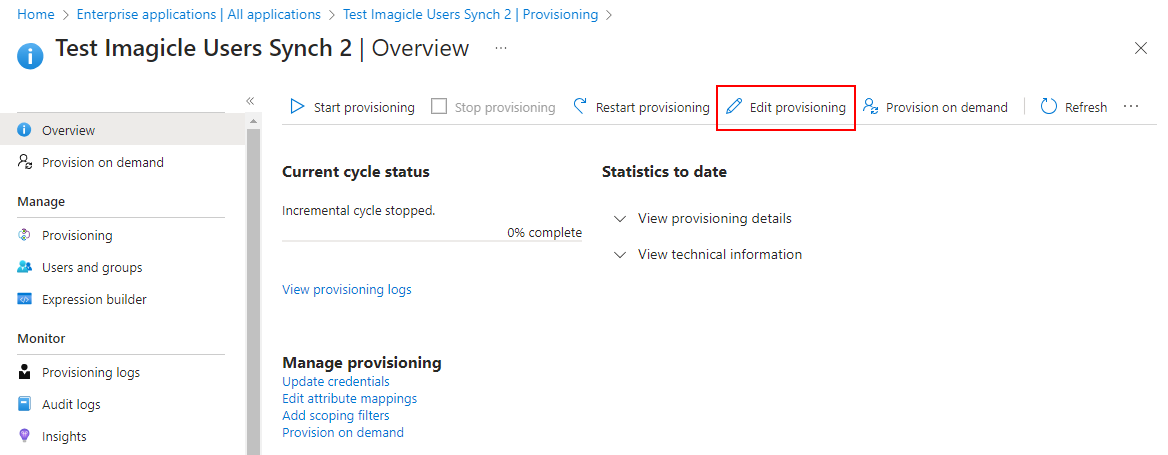
Access to Azure web portal and select "Imagicle Users Synch" Enterprise Application. From the "Overview", please click on "Provisioning":
Hit "Edit provisioning":
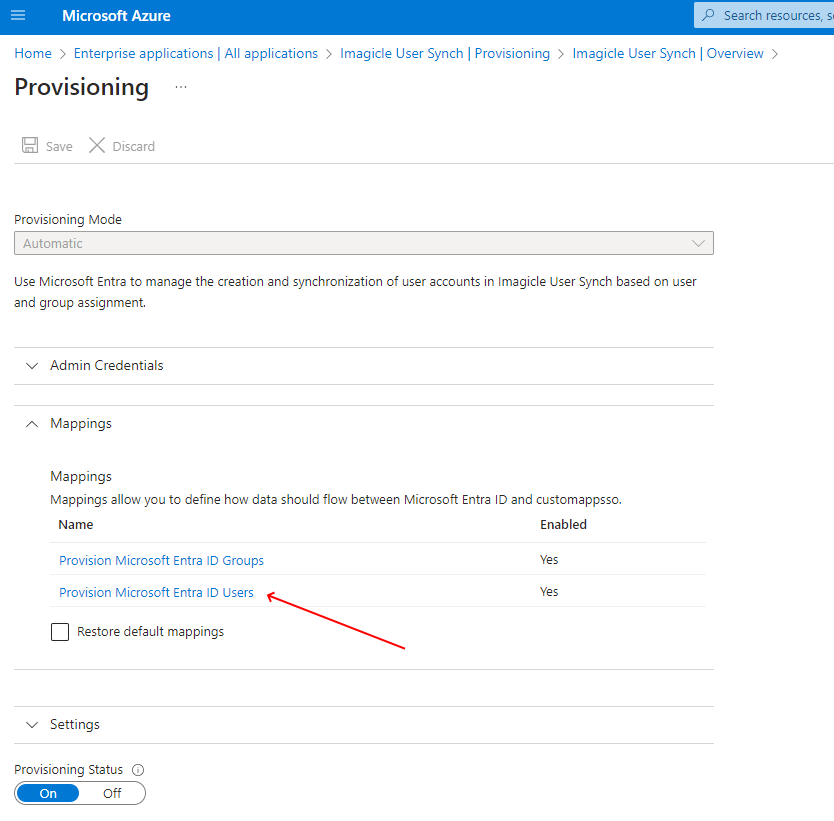
Expand "Mapping" section and click on "Provision Entra ID Users":
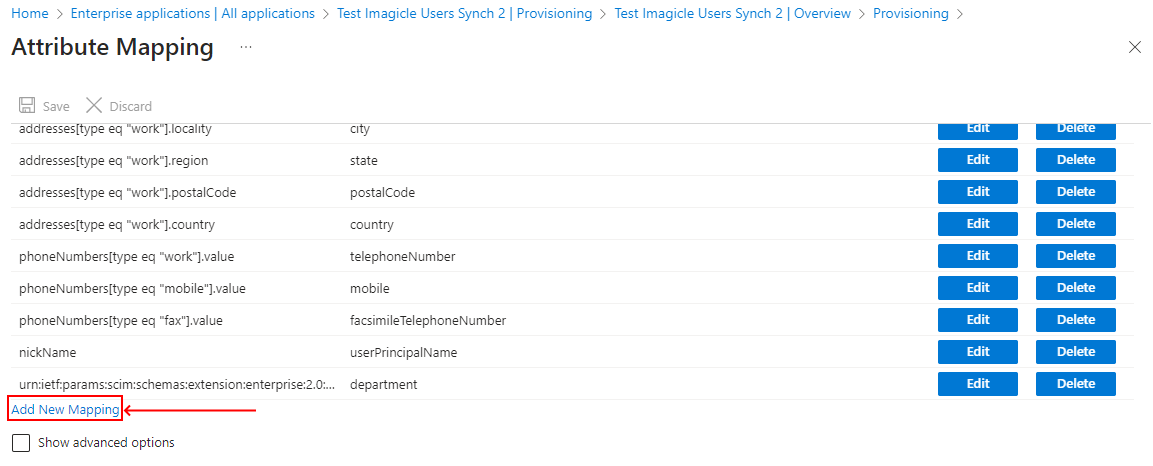
In "Attribute Mapping" section, please hit “Add new mapping” at the bottom of the screen:
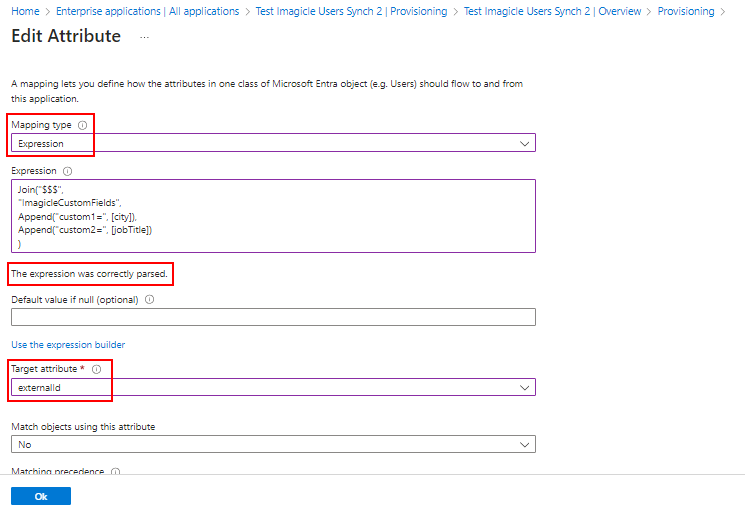
In “Edit Attribute”, please choose the following options:
“Mapping type” = Expression
“Target attribute” = ExternalID
“Expression” = see sample in below picture.
Expression syntax
Custom fields and relevant values are mapped through a dedicated "Expression" whose syntax follows Entra ID attribute mapping rules. See here for more details.
Imagicle feature implies that custom fields are mapped as “CustomX=", [Attribute] for each custom field to be enabled, where each custom field is separated from the next one by adding "$$$" separator.
See below a typical expression sample:
Join("$$$",
"ImagicleCustomFields",
Append("customX=", [Microsoft Entra ID Attribute1]),
Append("customY=", [Microsoft Entra ID Attribute2])
)
where "Microsoft Entra ID Attribute" corresponds to the actual Entra ID field to be mapped.
If the expression syntax is correct, by clicking outside of expression box, you should read the message “The expression was correctly parsed.”.
Final check
Once above configuration has been applied, you can manually launch a new provisioning by selecting "Restart provisioning". Please be patient: the restart action is queued, so it might be delayed.
Current limitations
Custom fields can include max 256 alphanumeric characters
Custom fields content should NOT include "$$$" string, already used as expressions separator.
If a custom field mapping rule is removed, custom field already populated by the last synchronization is not blanked.
If the expression is entered with a wrong syntax or field length is greater than 256 chars or content includes above mentioned separator, Azure returns a generic "Error 500" with no details.
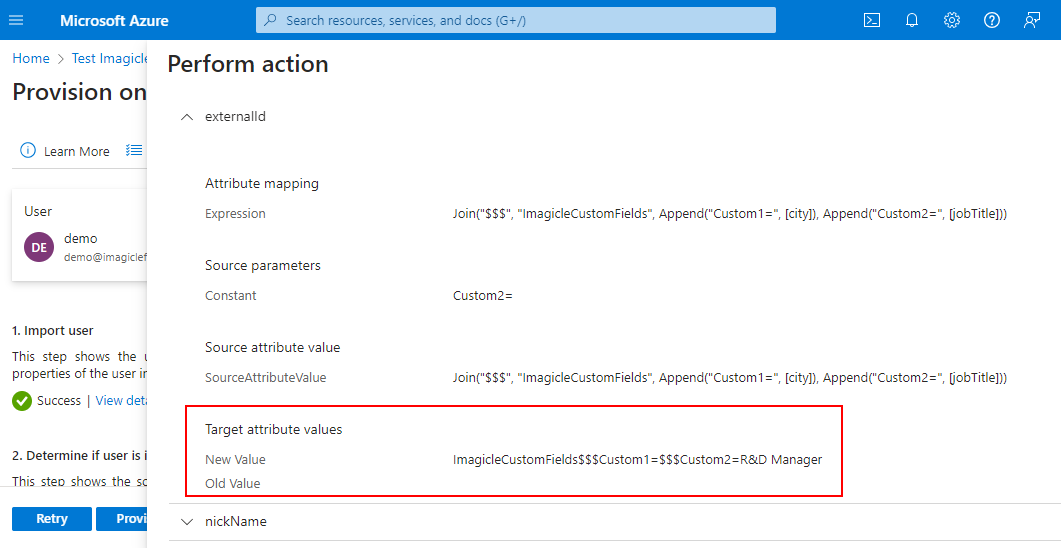
To check what Azure actually sends as External ID attribute value, you can perform a manual provisioning of s single user and then access to Dataflow section. See below:
Configurations on Imagicle UCX Suite
If you are leveraging an Imagicle UCX Cloud Suite, this configuration is applied by Imagicle Support team.
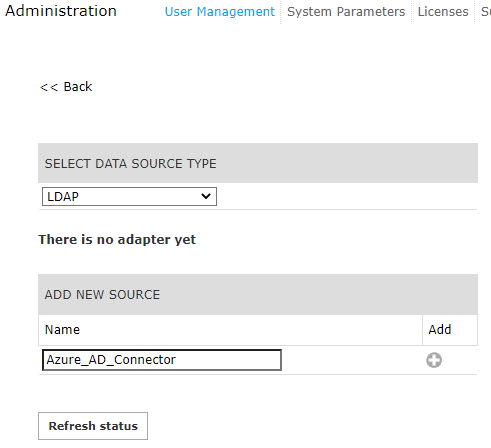
Please login to Imagicle UCX Suite web portal as administrator and go to Administration ⇒ Synchronize users with an external data source » Configure Data Sources >>
Select LDAP from pull-down menu and add a new source, with a name of your choice:
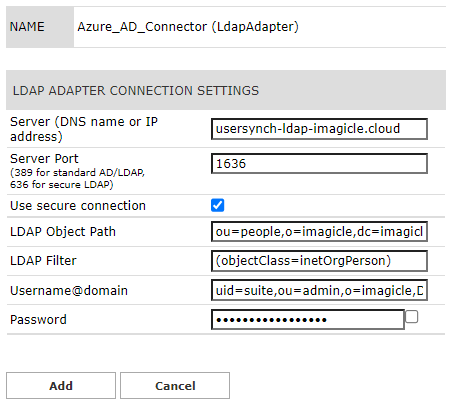
LDAP connector should be configured as per the Suite_ldap_creds.txt file provided by Imagicle support. See below sample:
You can manually run the users' synch straight away or just wait for automatic synch performed during night time (midnight, by default).
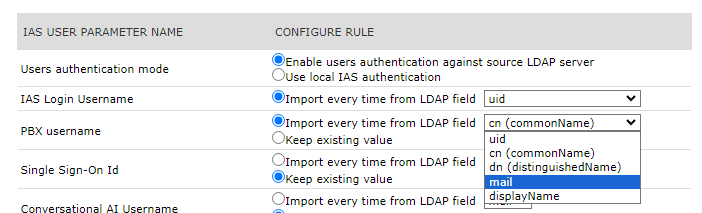
LDAP Synch Rules
In the Users' synch rules select "Use local IAS authentication" as Users authentication mode.
While we import data from Entra ID into our Cloud LDAP and, in turns, into Imagicle UC Suite, we are applying the following standard fields mapping;
Azure label | Azure attribute | LDAP attribute | UCX Suite field |
Object ID | objectid | uid | UCX Suite Login Username |
Display Name | displayName or uid or cn (commonName) or dn (distinguishedName) or | displayName or uid or cn (commonName) or dn (distinguishedName) or | PBX username |
Single Sign-on id | Email | ACS SSO UserID | |||
First Name | givenName | givenName | First Name |
Last Name | surname | sn | Last Name |
Preferred language | preferredLanguage | preferredLanguage | Preferred language |
Business phone | telephoneNumber | telephoneNumber | First Extension Number |
Department | department | departmentNumber | Department |
Mobile phone | mobile | mobile | Mobile business number |
Street address | streetAddress | street | User Address |
City | city | ||
State or province | state | ||
ZIP or postal code | postalCode | ||
Country or region | country | ||
Fax number | facsimileTelephoneNumber | facsimileTelephoneNumber | Fax Number |
Soft-Delete | active | enabled | |
UserPrincipalName | UserPrincipalName | displayName | SSO username, ACS SSO UserID |
Some mapping can be manually changed by selecting "Synch Rules" menu option. See below sample for PBX username, mapped to email address to support MS-Teams Call Recording: