WhatsApp Business channel
Overview
Smartflows WhatsApp integration enables your customers to initiate conversations through one of the most widely used messaging platforms: WhatsApp.
Not only can your human agents respond promptly to these conversations directly from the Imagicle Agent Chat Console, but you can also configure automatic bots to handle incoming conversations, providing 24/7 support and instant responses to frequent inquiries. Both customers and agents can utilize quick replies, action buttons, and share media such as images, videos, and documents.
To activate the WhatsApp channel for Smartflows, you'll need to set up and configure a WhatsApp Business Account (WABA) and connect it to Smartflows by following the provided instructions.
Traffic costs
Meta directly charges the registered business entity for WhatsApp traffic, according to WhatsApp Business tariffs. Please, notice that the Imagicle subscription does not cover any WhatsApp messaging traffic.
Refer to the official WhatsApp Business page for the up-to-date applicable costs. Consider that:
prices depends on the country (of the remote user) and on the specific use case;
the Service model is the one applied to handle incoming conversations initiated by remote users;
prices are applied “per conversation”, having a minimum duration of 24 hours since the first sent/received message.
You can find all the details about WhatsApp Business pricing model at this link.
Main steps
To establish a connection between Smartflows and Meta, follow these key steps:
Set up the "Meta for Developers" App.
Create a "Meta Business account" if you don't already have one.
Verify your Meta Business account and WhatsApp Business Account (WABA) by sending a test message.
Link a real phone number to your WABA, such as your company number, which requires phone verification via a phone call. Please, notice that you'll need to add a payment method to enable messaging.
Generate a "Permanent Access Token" for the App.
Finally, link the App to Smartflows to complete the integration.
This article drives you through such steps.
Requirements
A company phone number (landline or mobile) to be associated to the WhatsApp service. The number should not be already associated to a WhatsApp profile. See here for details.
A valid Meta Business Manager account.
A valid Meta for Developers account.
Valid Credit Card data, to be specified as payment method to pay WhatsApp traffic.
NOTE: you need to go through the verification of your Meta Business account to unlock additional capabilities, including:
register and use more than 2 phone numbers (up to 20 numbers per account)
initiate new conversation to more than 250 users per day.
You can find all the details at this link.
Procedure
1. Create a Meta for Developer app.
To use a WhatsApp Business account from third party applications like Imagicle Smartflows you need to create an integration app.
Go to Meta for Developers web site and sign in with you Facebook credentials, where you can see your Facebook apps:
click on "My Apps", and on "Create App"
select “Other” as use case
select “Business” as App type
insert the App Name “Imagicle Smartflows” and the contact email.
In the business portfolio, if you already have a Business Account, select it, otherwise leave “No Business portfolio” selection and click on “Create app”.
Now you are in the Meta App configuration page: make sure that you have selected the app where you want to install WhatsApp and search “WhatsApp" from the products list, then click “Set up”.
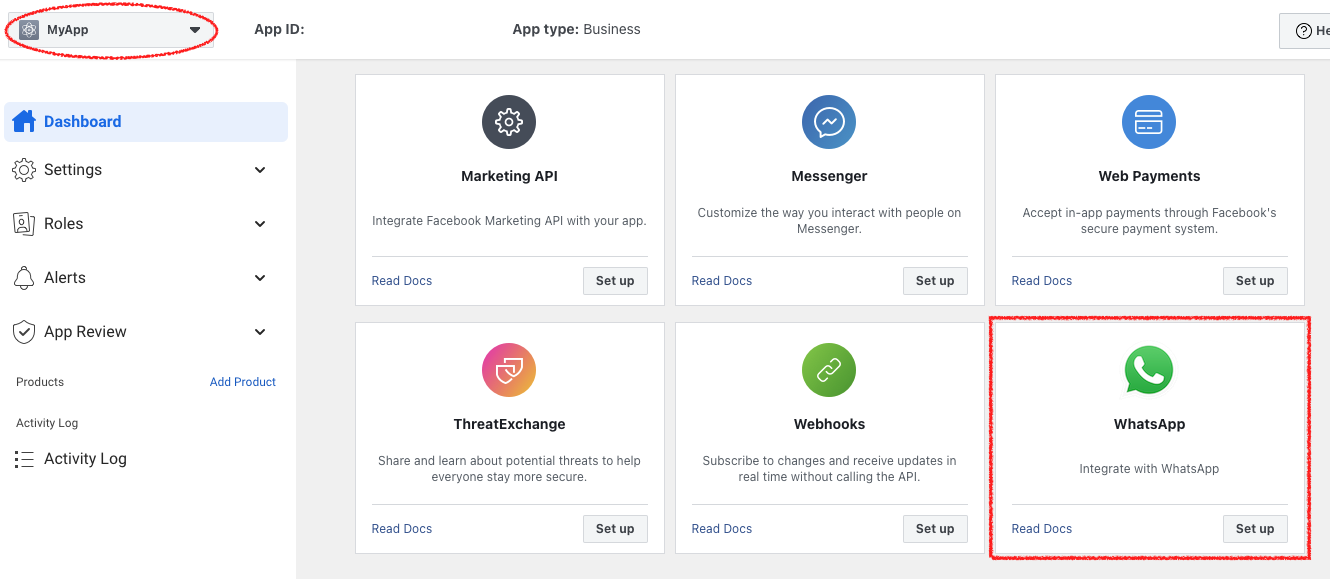
You should be able to see that on the left-side bar. Click on “Getting Started”. If you've selected a Business Account in the previous step, you can skip directly to Step 3, otherwise keep reading!
2. Create a Meta Business Account
A Meta Business account is needed to associate and manage resources like WABA. Therefore, if you don’t have one yet, you need to create it.
After clicking on “Getting Started” you will see the tool for selecting or creating a business account. Select “Create a business account” from the dropdown menu and click “Continue”.
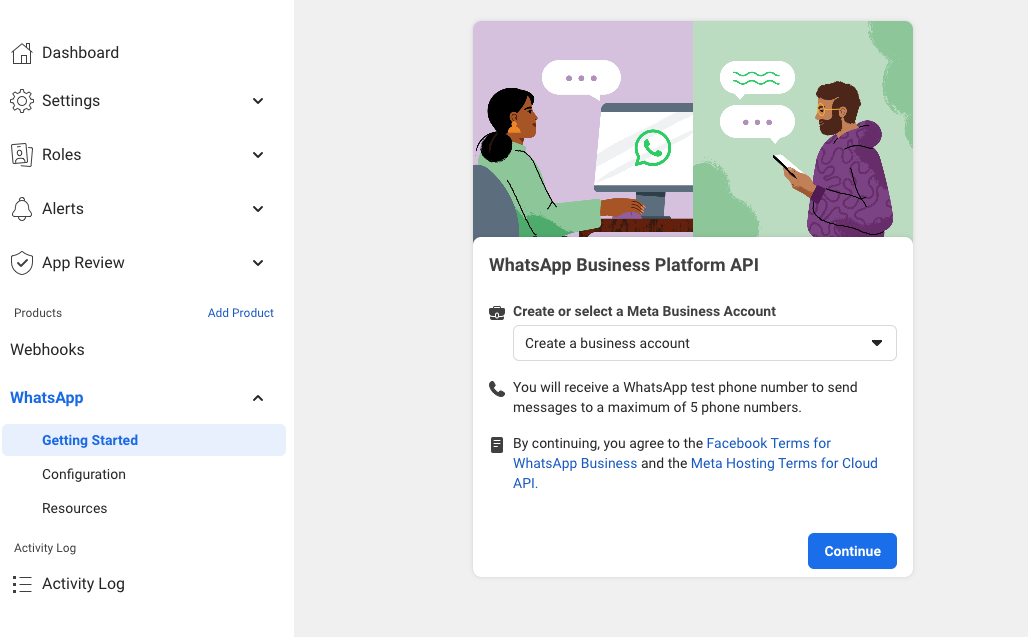
A default Business Account has been created.
Alternatively you can access the Meta Dashboard and create a new one.
Regardless the way you created it, you can customize this account accessing the Meta Dashboard.
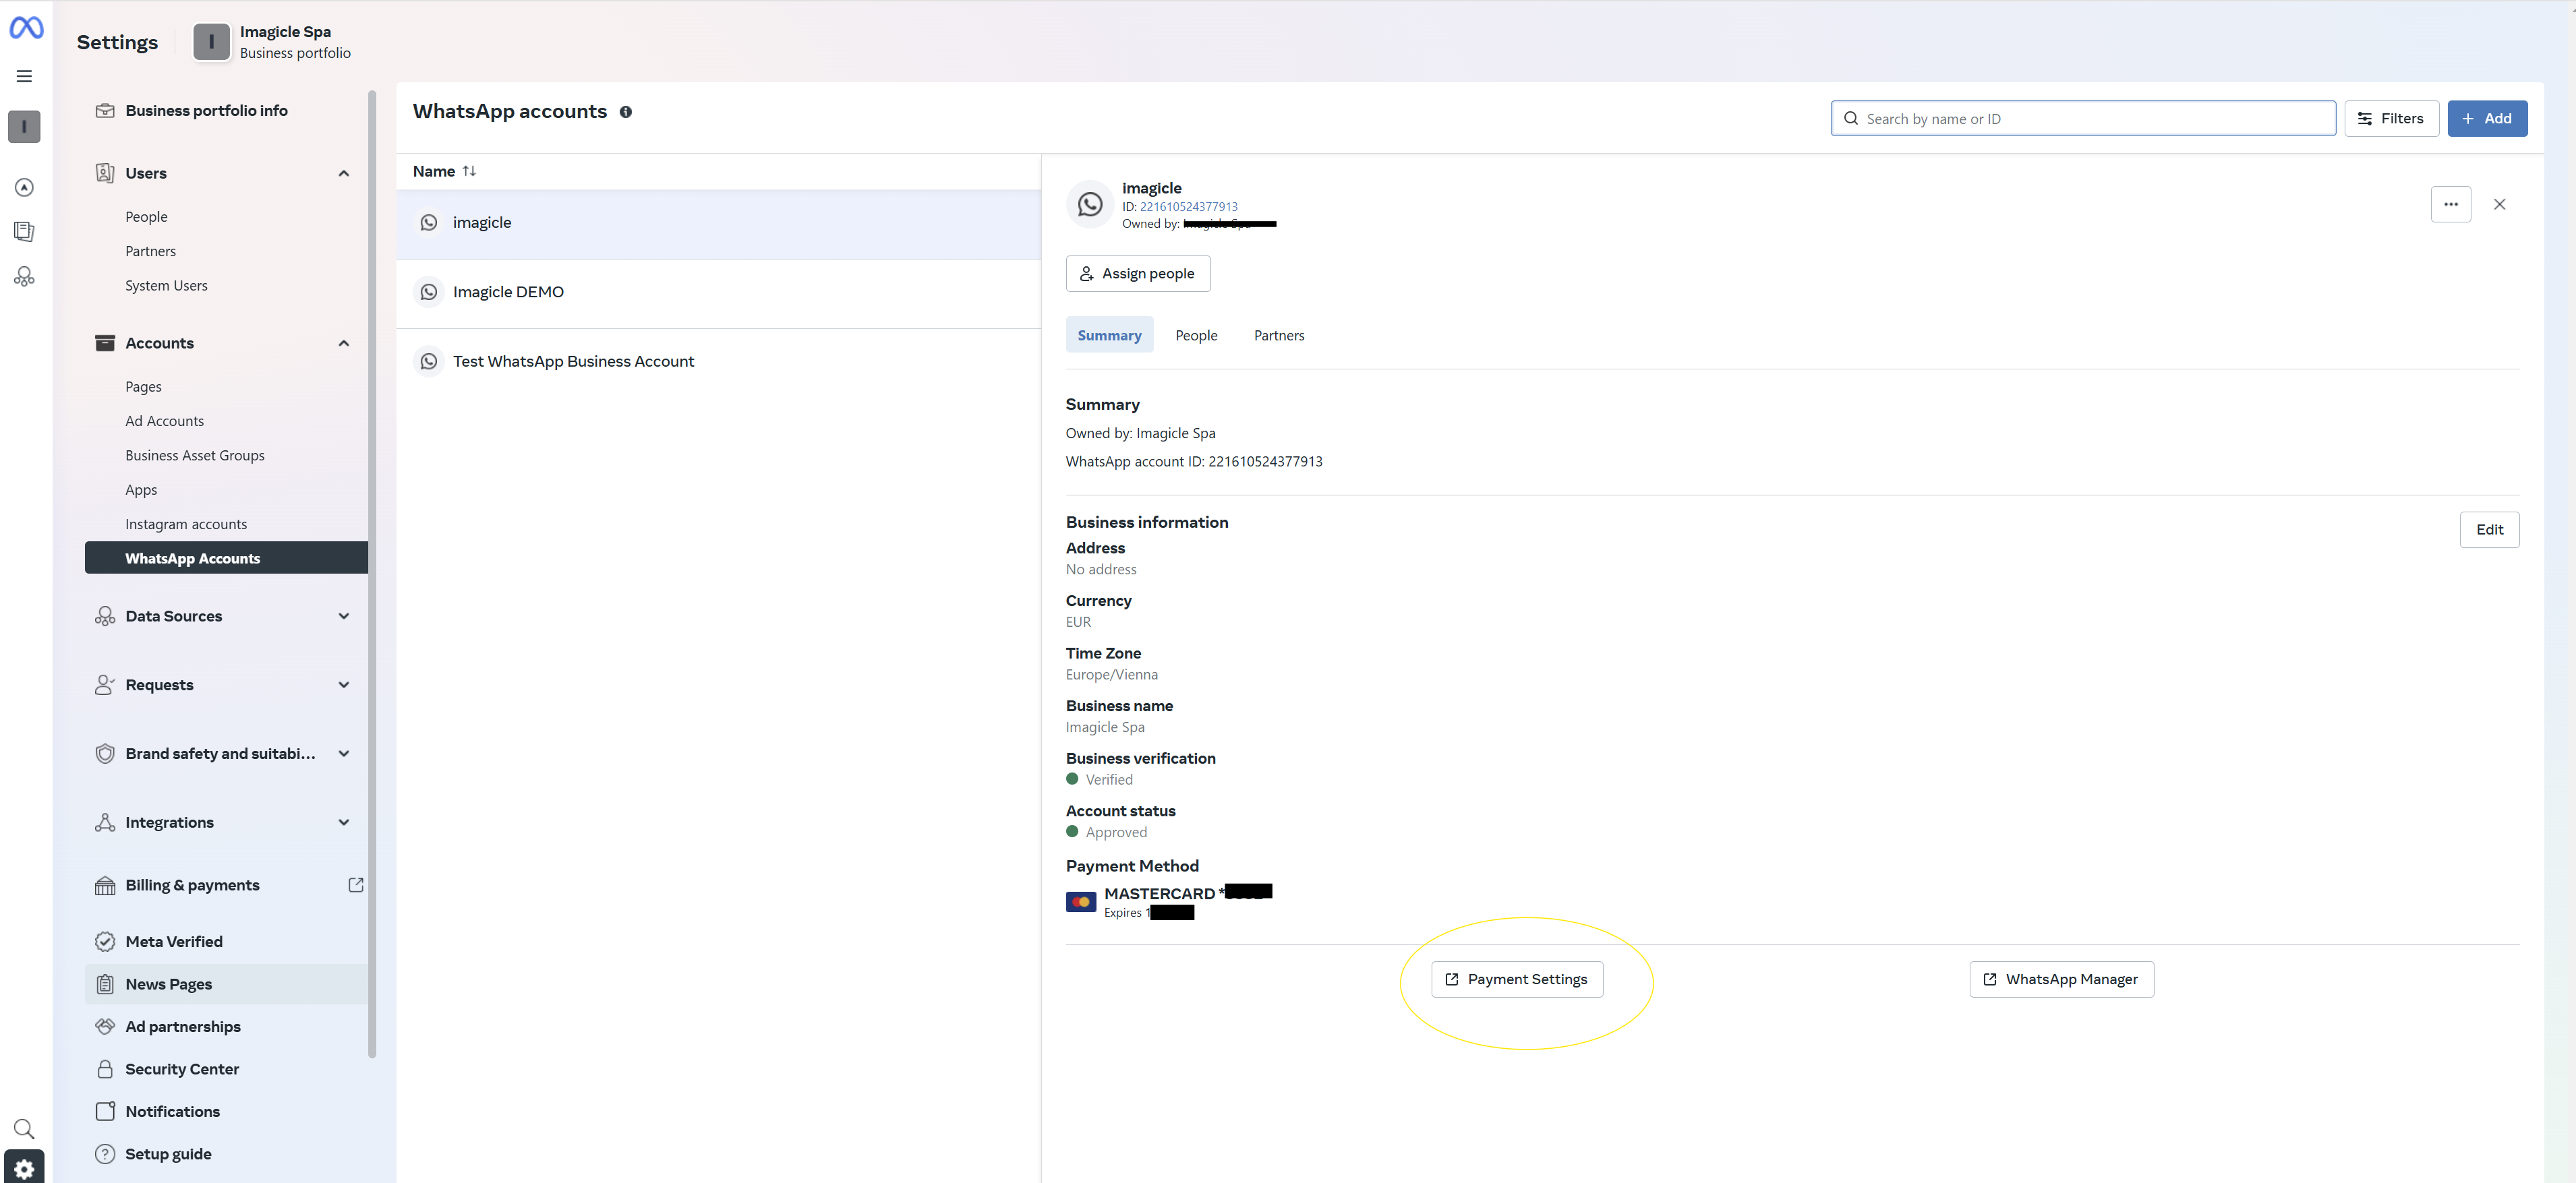
⚠️ Important: to use the WhatsApp Business account you need to add a payment method to your Meta Business Account, requiring a valid credit card. You can add a payment method in the Meta Dashboard by clicking on Account→WhatsApp accounts and click on Payment settings, as per the image below.
3. Test the integration
On Meta for Developers, click on “Getting Started”, you can test the WhatsApp integration, but first you need to configure a receiver number.
Note: In this testing phase, you can send a message from a test number (provided by Meta) to up to 5 mobile numbers to test messages sending.
To configure a test destination phone number click on the “To” dropdown, and then on “Manage phone number list” button.
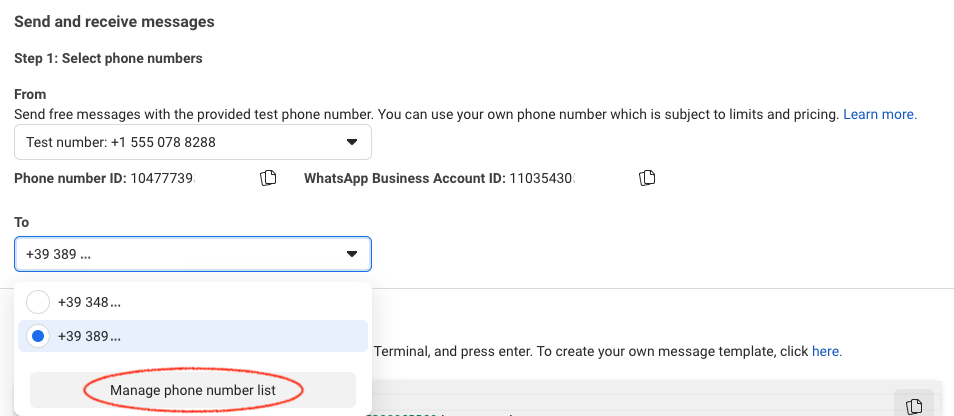
Select the prefix and insert the mobile phone number, then start the verifying procedure by clicking on "Next" (a numeric code is sent by SMS).
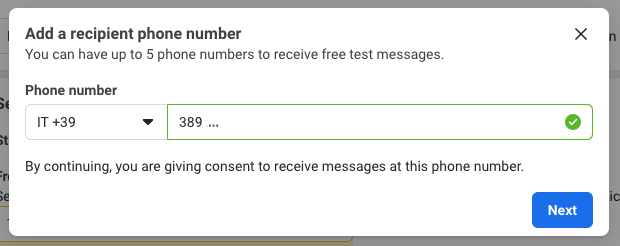
Once completed, the phone number can receive test messages. Click on “Send Message” button to try it out. You should receive a message on WhatsApp from the test number.
4. Associate a real phone number
Now you need to register a company production phone number (the one that your end-users will contact to interact with Smartflows).
It can be either a landline or a mobile number.
Note: use of a private mobile number is highly discouraged because you won't be able to use the WhatsApp mobile app anymore.
You can associate up to 2 phone numbers to the same WhatsApp Business account (additional numbers requires the Meta Business account verification).
From the Getting Started page, click on “Add phone number”, as below.

Fill in your business information and click on “Next”. Those info will be associated to the WhatsApp account and will be visible to your end-users on WhatsApp.
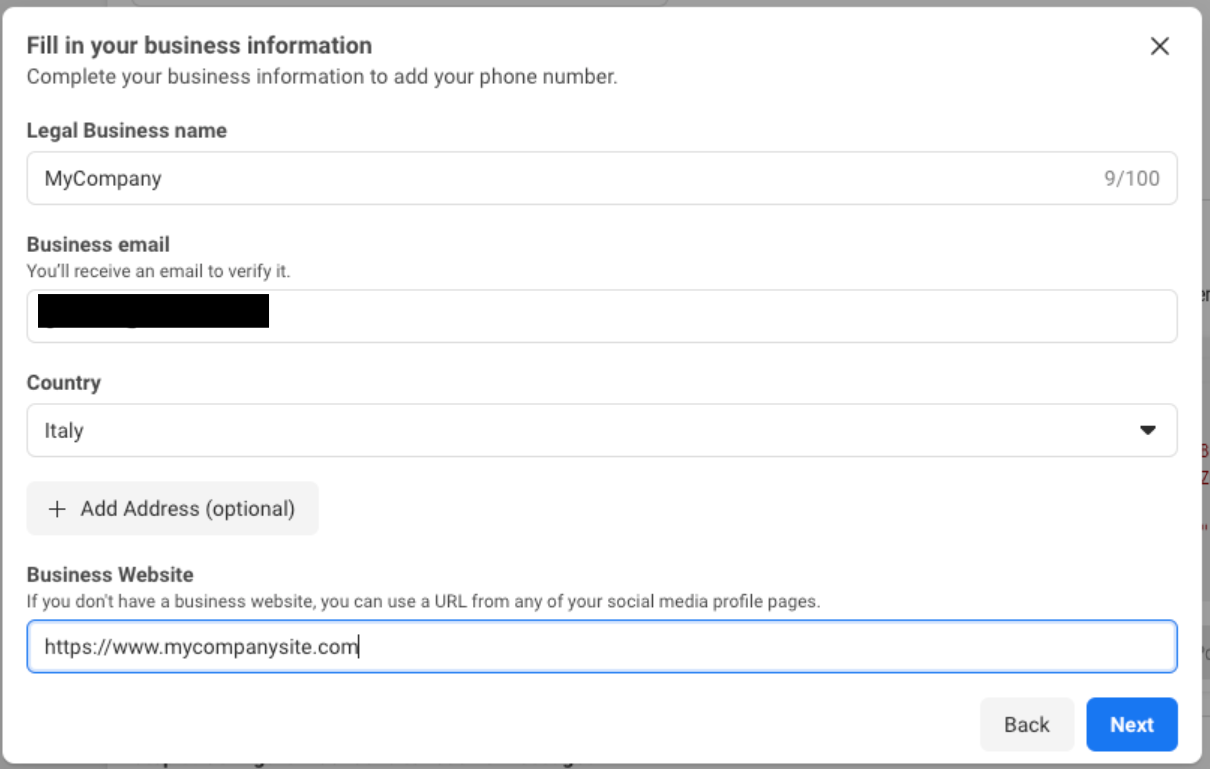
Fill in the required information to create a WhatsApp Business profile and click on “Next”.
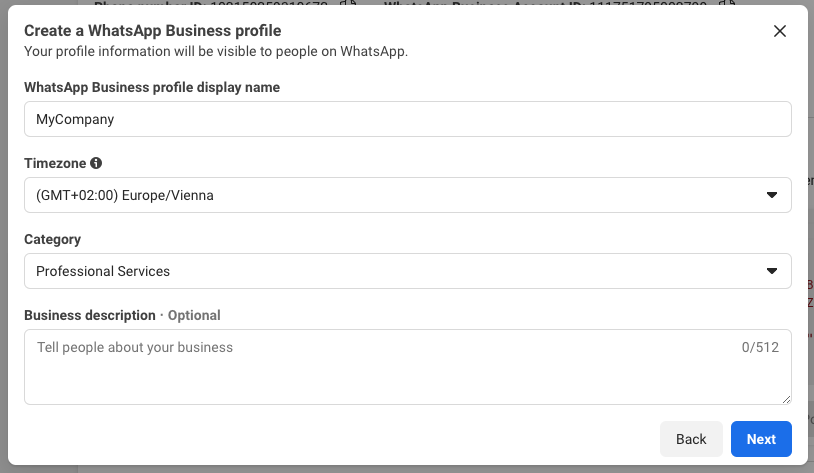
Finally, add the phone number and verify it through a Text message (SMS) or Phone call (you’ll receive a call on the number you are registering and an automated voice prompt will give you a verification code).
Note: If you are using a landline number, you can verify the number only with a Phone call.
Both the methods will provide you a unique temporary code to be inserted in the verification form.
Once the number has been approved, you can test it sending out a Whatsapp message, as shown earlier in this guide, by selecting the production number from the “From” dropdown.
5. Configure a Permanent Access Token
To use the WhatsApp integration with Smartflows you need to generate a valid access token for your App. Let's see how to create a Permanent Access Token.
Click on the name of the Business Account in My Apps or go directly in Facebook Settings Dashboard from the Facebook Developer dashboard.
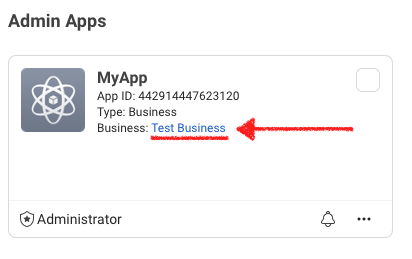
On the left-side panel, make sure that Business Account for which you want to activate the permanent token is selected, click on “System users” and then click the “Add” button.
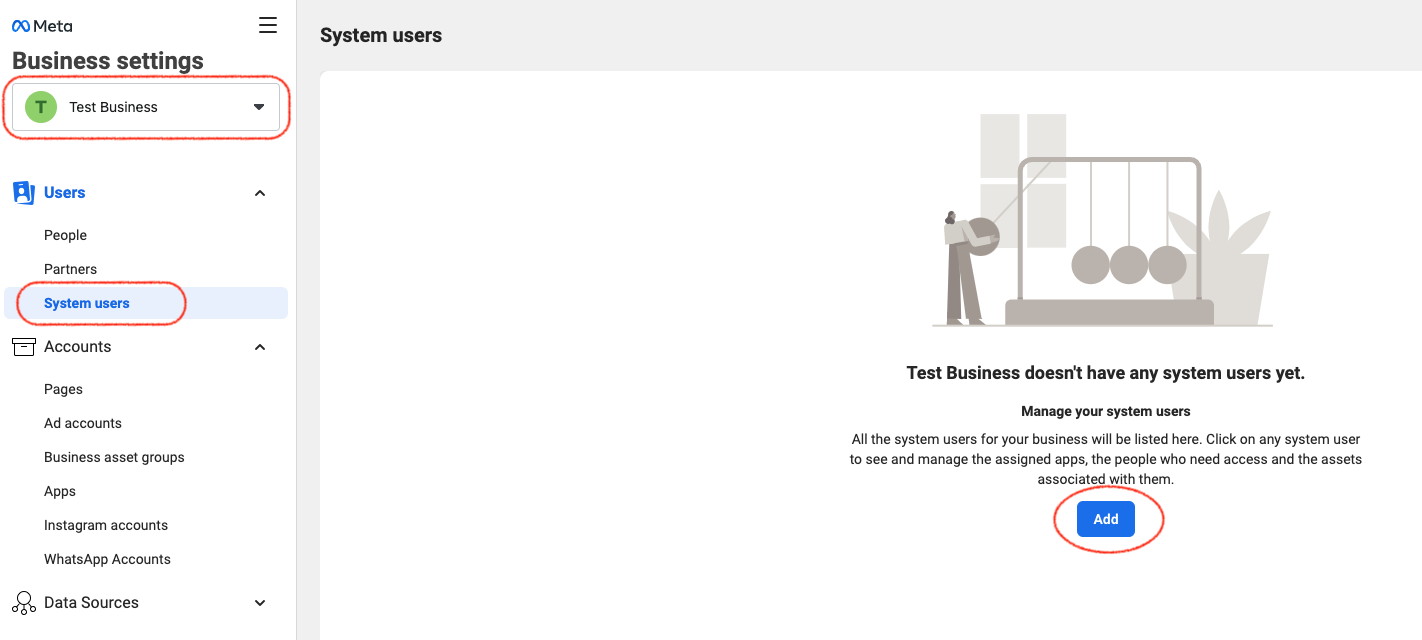
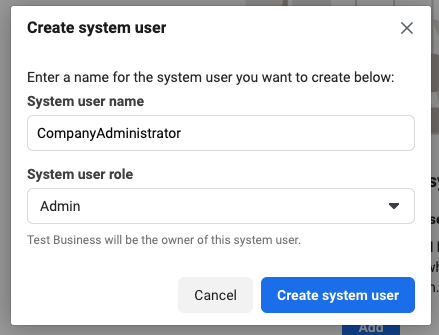
Specify the system user name “ImagicleSmartflows” and choose Admin role.
Now you can click on the “Create system user” button:
A user system has now been created. Note that the permanent token will be associated to that user.
Let's add assets to the newly created system user by clicking on “Add Assets” and giving the Full Control to the Facebook App, as illustrated below.
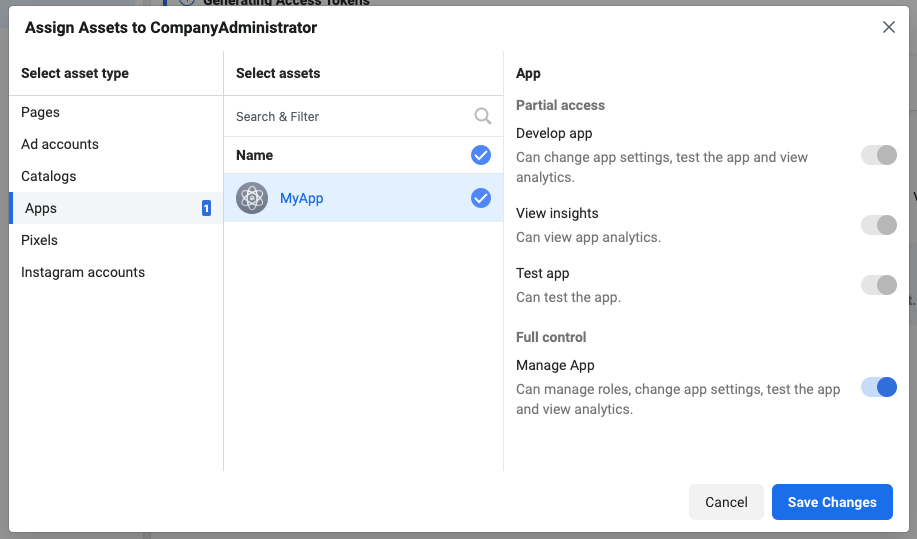
Click on “Save Changes” and the app will be added to the system user.
Finally, we are ready to generate our Permanent Access Token by clicking on “Generate new token”. Select the app…
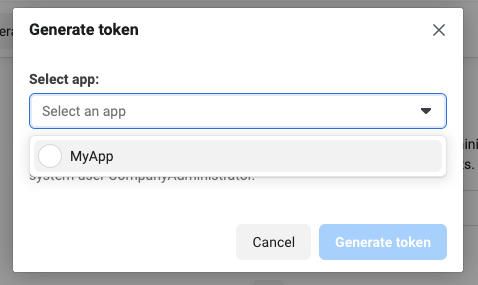
… and check the following permissions:
whatsapp_business_messaging
whatsapp_business_management
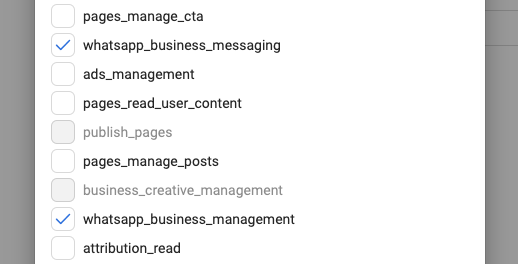
Click on “Generate token” and that's it! Your permanent token is now available. Copy it, you’ll need it in the next steps.
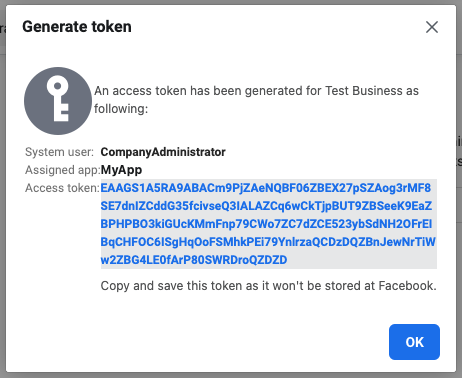
Next you need to connect the WhatsApp business account to Smartflows.
Connect to Smartflows
The 5 steps above were needed to setup the WhatsApp account on Meta platform.
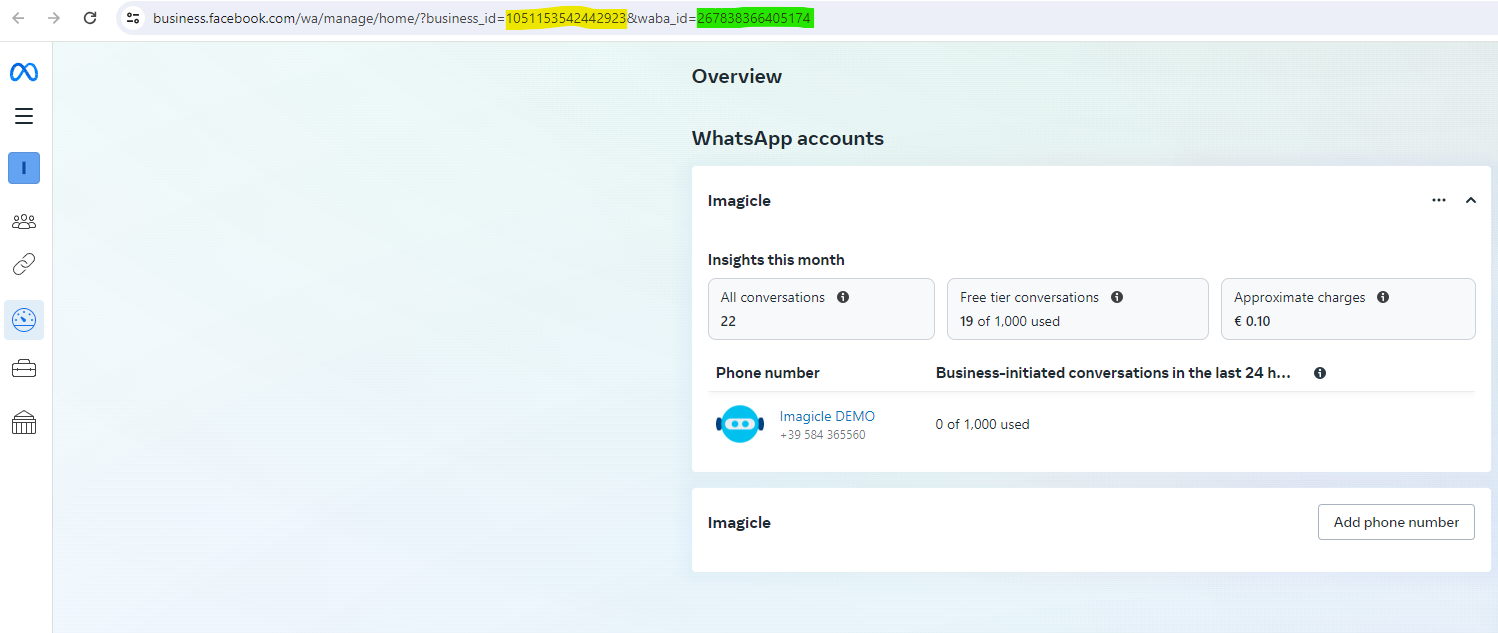
Now you have 2 important IDs:
Meta Business ID, identifying the Meta Business Account
WABA ID, identifying the WABA Account
The WABA ID is the one to be configured into SmartFlows to complete the WhatsApp integration (Business ID won’t work!).
To retrieve the WABA ID you can check here: https://business.facebook.com/wa/manage
The ID highlighted in green is the WABA ID. Keep this ready for connecting your App to Smartflows.
Login into the Smartflows admin portal and on the left-bar menu to go to “Integrations” and click on WhatsApp:
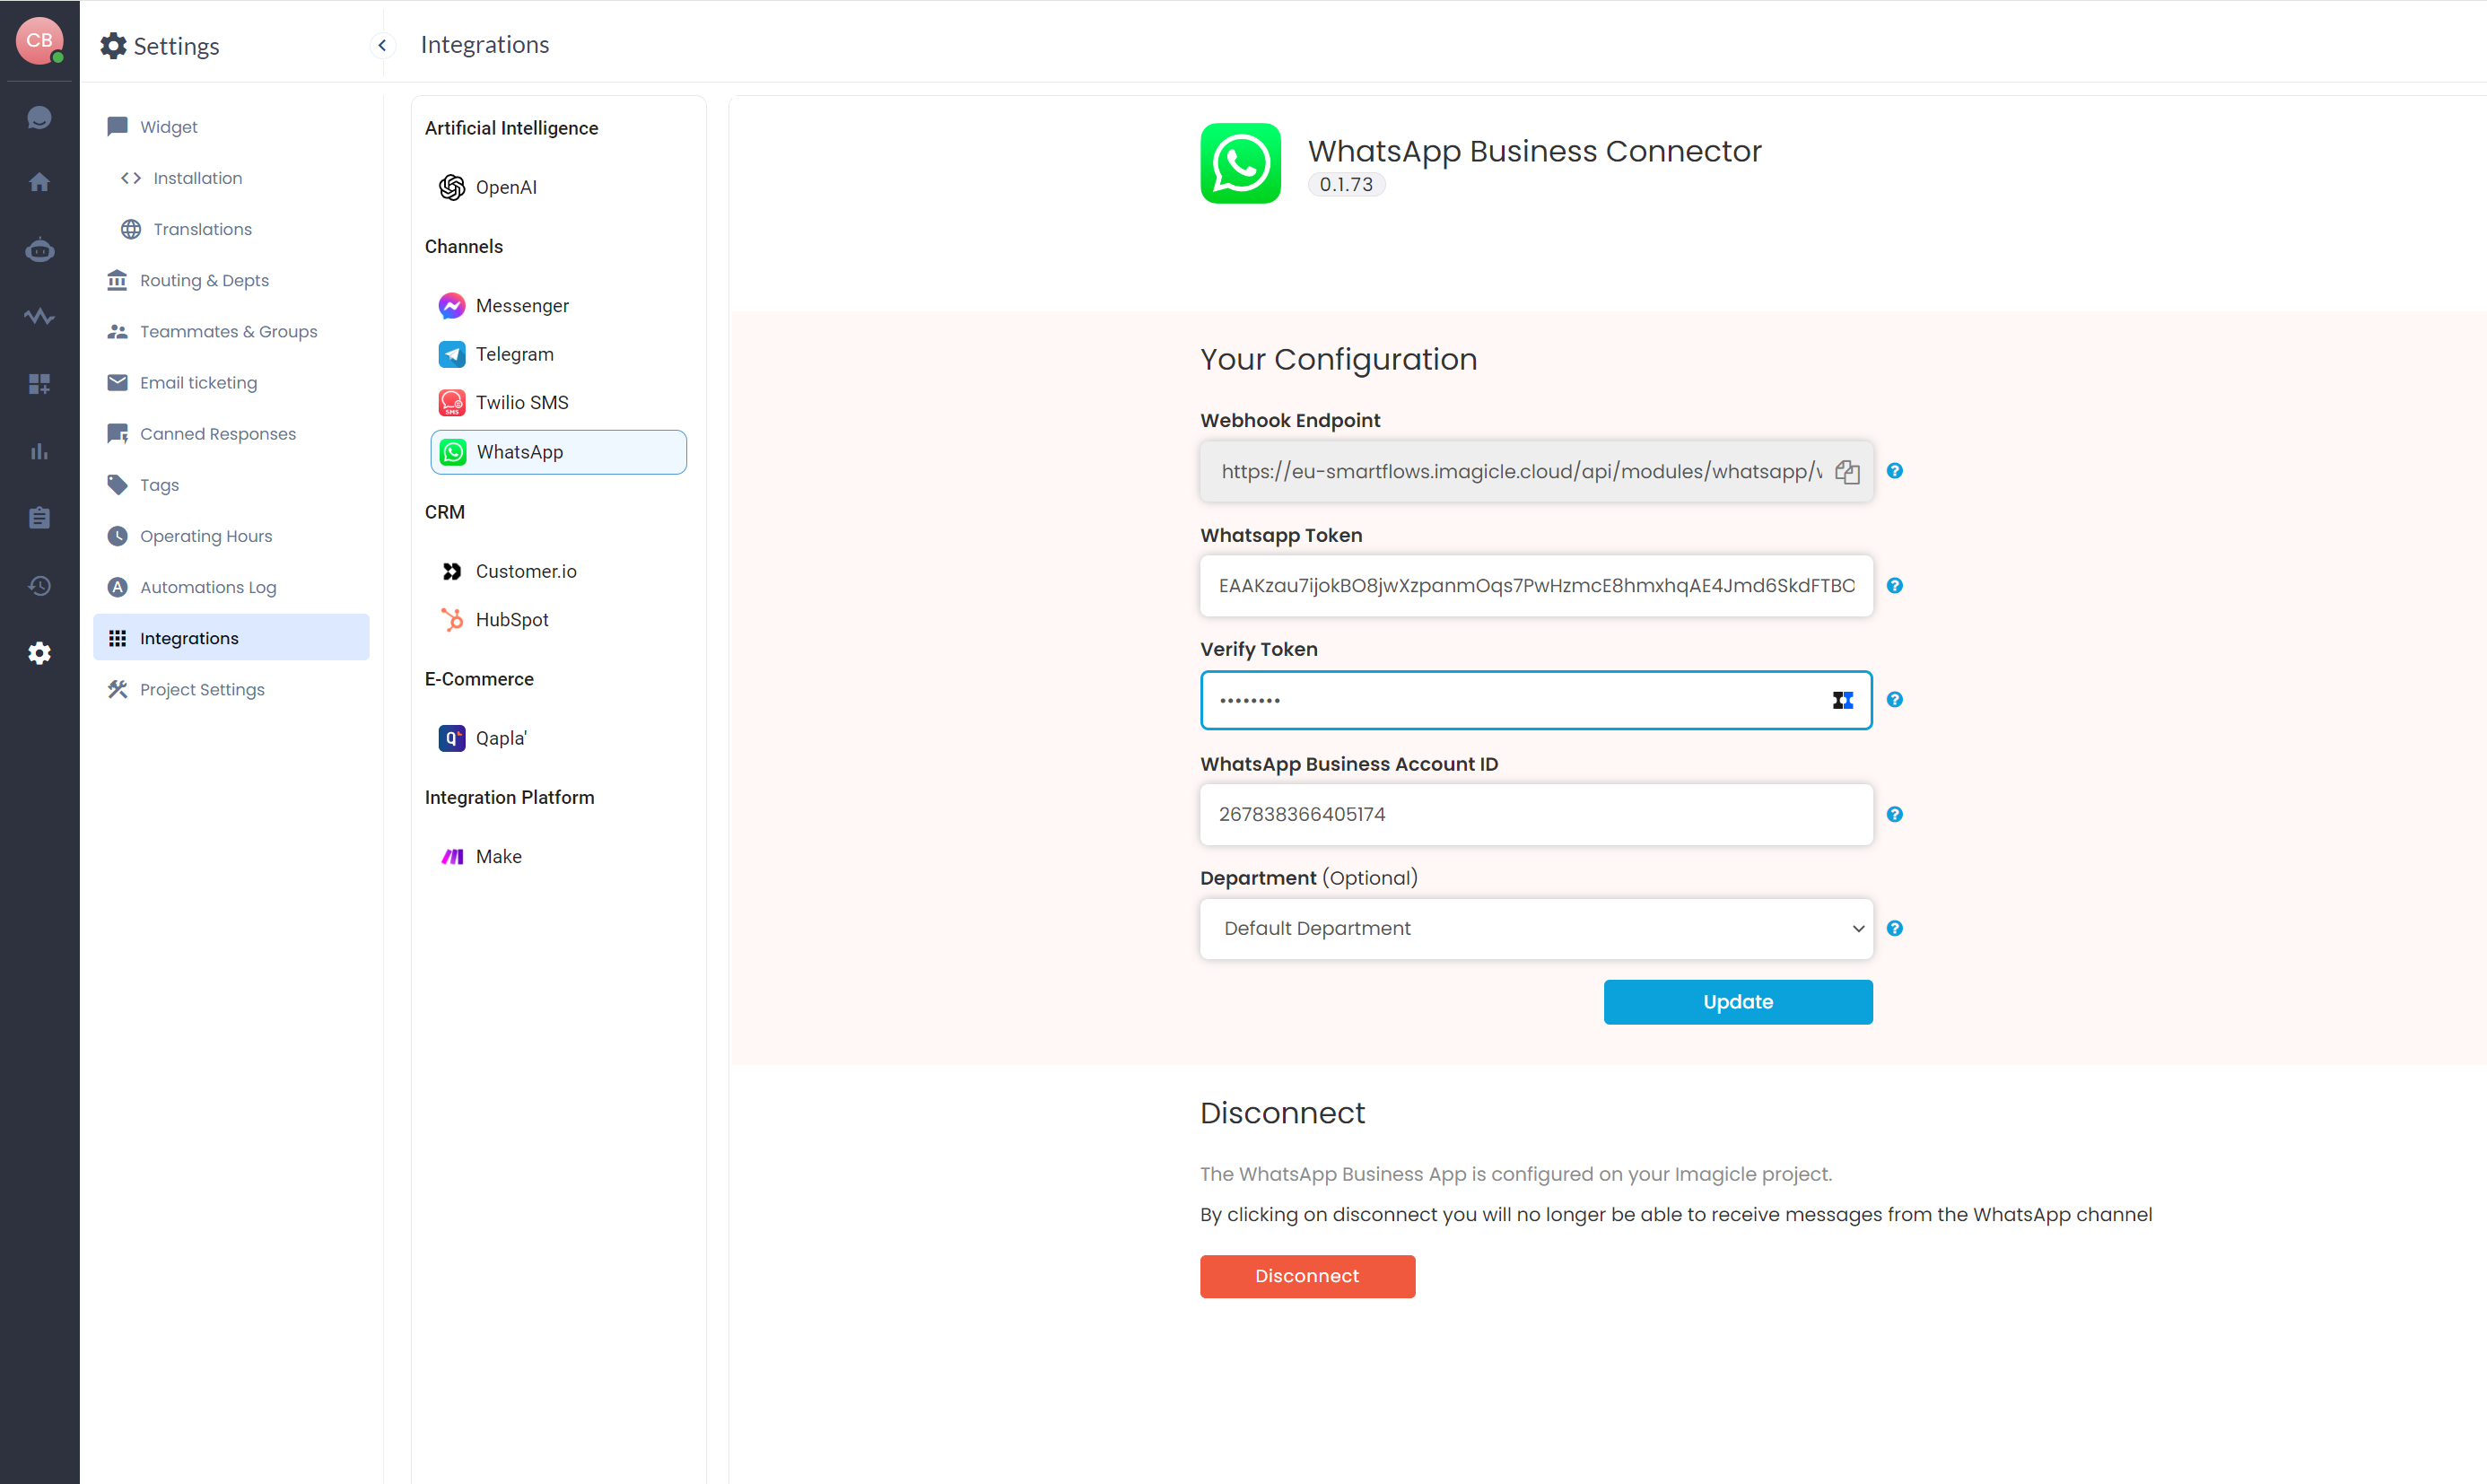
Then:
Copy your WhatsApp permanent token created at Step 5 above and paste it in "WhatsApp Token"
Type the verify token you chose above (such as "my-verify-token") in the “Verify Token” field.
Add your WABA ID you took note above
Select the department you would like this WhatsApp app being connected to
Click on the “Update” button. Your app is now connected.
Then click on “Copy” button to copy the webhook endpoint to clipboard, then move to Facebook Developer Console and open the app you created at Step 1 above:

On the left-side menu, underneath products section, go to WhatsApp → Configuration. Then click on “Edit” and paste the URL you copied earlier in “Callback URL". Type in the verify token you typed earlier on Smartflows, then click on “Verify and save” button.
If the verification fails, please check your configuration parameters.
Now click on “Manage”:

Click on “Subscribe” for messages option, then click on “Done” button.
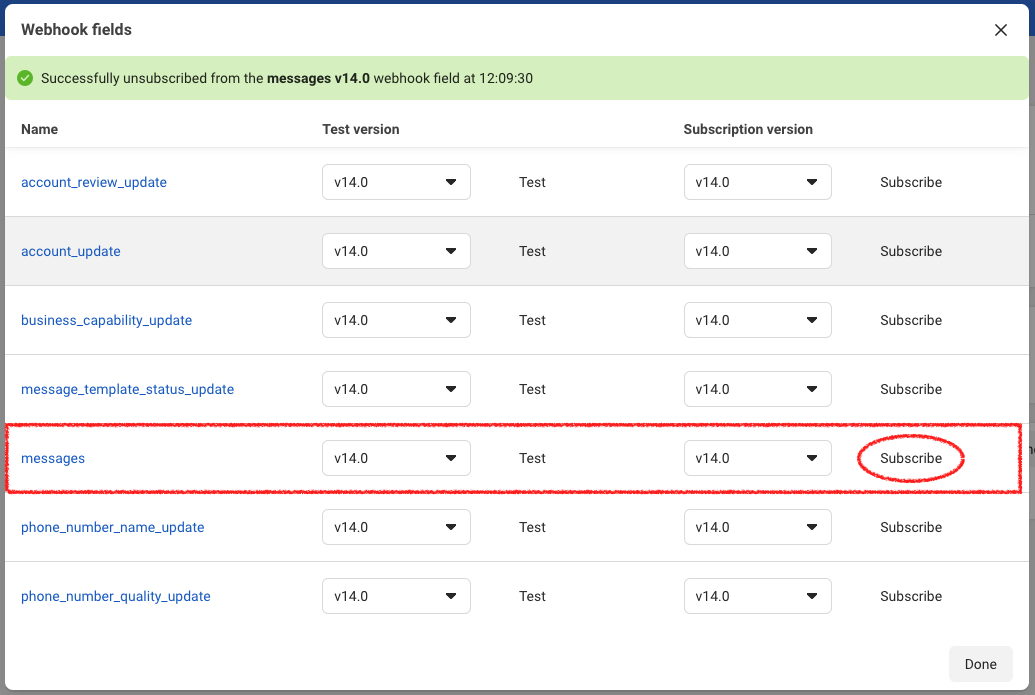
Well done! The configuration is now completed and you should be able to receive message from WhatsApp to your Smartflows chat.
If a chatbot has been configured, it will the first one to greet your customers!
Handling WhatsApp conversations
When designing your flow and/or you routing rules to agents, keep in mind the following facts:
Each Smartflows project supports a single WhatsApp Business account, meaning a maximum of 20 phone numbers. When configuring on Smartflows the WhatsApp integration you need to set the department that will be triggered for incoming conversations (the same for all numbers).
Outgoing “unsolicited” messages sent by an agent or by a bot, out of an existing conversation, must be done using one of the message templates approved by Meta. From Meta perspective this represents a business-initiated conversation, hence charged.
If a user replies a business-initiated message (sent by a bot or by an agent), from Smartflows perspective it will be treated as a new user-initiated conversation (a new Smartflows conversation). From Meta perspective, instead the conversation will remain the same if the user reply falls within 24 hours from the business-initiated message.
An incoming conversation initiated by a remote user using WhatsApp will always have the attribute lastUserText populated with the text sent by the user.
Moreover, the conversation flow will not trigger the Start block, rather, it will trigger a programmed intent or the DefaultFallback block.WhatsApp menus can have maximum 3 clickable buttons
During a conversation the human agent can send images and documents to the remote Whatsapp user. However, the remote user can only send text messages to the agent (images, videos and documents are ignored).
The following features are not supported:
WhatsApp voice calls
Geo-localization
Read receipts
Disappearing (ephemeral) messages
Channel Capabilities
Interaction | Text | Images | Video | Documents | Geo-loc. |
|---|---|---|---|---|---|
End-user to BOT | ✅ | ❌ | ❌ | ❌ | ❌ |
BOT to End-user | ✅ | ✅ | ✅* | ✅* | - |
End-user to human agent | ✅ | ✅ | ✅ | ✅ | ❌ |
Human agent to end-user | ✅ | ✅ | ✅ | ✅* | - |
*sent as link
