Application Settings
Imagicle UCX Suite administrators with a Digital Fax permission level 10 or above are entitled to apply some global settings by accessing the Imagicle web portal ⇒ Digital Fax ⇒ Application Settings.
This menu page includes different settings, split into three sections:
Service Parameters: Most important settings related to inbound/outbound fax routing, email integrations and other service configurations
Company Info: Company data, displayed on fax header and cover pages; default "catch all" username
Data Retention: How long you wish to keep fax documents and call data records within Imagicle UCX Suite storage.
Service Parameters
Settings included in this section are explained in dedicated KB articles:
Outgoing Faxes
Incoming Faxes & return Receipts
IP Routes
Print and Storage
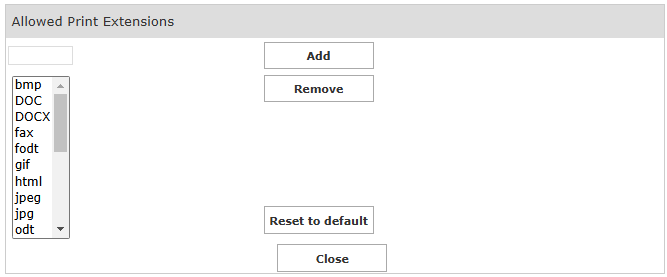
Allowed print extensions
Imagicle Digital Fax embeds a document converter engine which can handle different document formats which can be sent as fax attachment.
The list of default document formats is available from Imagicle web portal for administrators: Digital Fax ⇒ Application Settings ⇒ Allowed print extensions
You can add new file types here, making sure that relevant document format is not a binary file. See below sample:
Service Configuration
To access to this dialog, go to Digital Fax ⇒ Application Settings ⇒ Service Configuration. Various fax service parameters can be configured:
The number of times that Digital Fax will try to send a fax
The time span between retries
The maximum number of fax that can be sent at the same time. If your company usually has more incoming fax than the outgoing, you may want to reserve some lines for receiving. Supposing you have 12 channels, you may set the "Max Concurrent Outgoing Faxes" value to 8. In this way, a minimum of 4 ports are always available to incoming fax calls. If you have no outgoing faxes, then you can receive up to 12 faxes at the same time.
Selecting an attachment format for Fax-to-email
Incoming faxes can be forwarded to the users' mail boxes either in TIF or PDF format. You do not need to restart Digital Fax to enable this setting. If you enable incoming fax storage, the format of the stored documents are the same as the ones sent by email.
The conversion to PDF format for incoming faxes is performed by an internal library - there is no need to install external apps to have this feature.
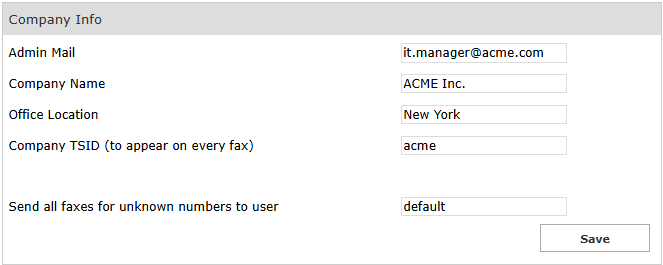
Company Info
The values specified in this section are included in all cover pages:
Admin Mail: This is the email address of company's fax administrator, to which any problem or significant fax event will be notified.
Company Name: Name of the company. This parameter can be overwritten by same field available in Users' list.
Office Location: Company's office location
Company TSID (to appear on every fax): Transmitter fax ID, typically including the fax sender number. This parameter can be overwritten by same field available in Users' list.
Send all faxes for unknown numbers to user: This is the "catch-all" actual Imagicle user to which all faxes received on unregistered numbers are attributed. More details here.
Data Retention
In this section it is possible to specify the required fax data retention.
You can set both automatic fax documents and call detail records deletion from Inbox/Outbox in case they are older than a defined number of days, specifying the Maximum lifetime (in days) of historical data.
Setting one of these two parameters to zero (0) disables faxes/call details records automatic deletion.
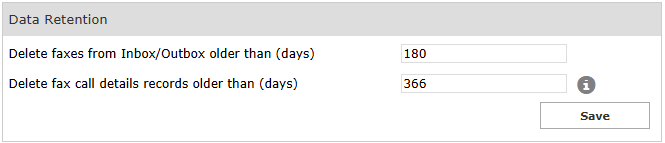
"Delete fax call details records older than (days)" setting may impact on the database size.
Reference number
Imagicle Digital Fax assigns a unique reference number to each fax it receives or sends.
A small banner with that number is impressed on the top of each fax page.
The number can also be used to search for the fax in the web interface through the inbox and outbox pages.
The default format for the reference number is like this:
2013.00000912i.e. the current year followed by a dot and a sequential number padded on 8 digits. The number is reset to 0 every year.
This format is not suitable for cluster installations. If you need to edit the format of the reference number, please ask Imagicle Technical Support.