Call Analytics for Cisco UC Configuration Wizard
This KB article applies to Imagicle UCX on-prem Suite owners. If your Imagicle UCX Suite is deployed in the Cloud, please contact Imagicle Support to apply internal settings.
"Imagicle Call Analytics Configuration" is the configuration wizard that must be run right after the deployment of a new Imagicle UCX Suite, to enter CUCM cluster and/or Call Manager Express platforms, together with gateway topology of your Cisco UC system architecture.
Note: Call Analytics configuration wizard can be manually started by clicking on "Imagicle Call Analytics Configuration" desktop icon, accessible from Imagicle UCX Suite file system. Please remember to always run this tool as Administrator. This configuration is NOT available through the Web interface.
Cisco Calling Platforms configuration
Once Call Analytics Wizard is launched, it is prompting to enter the Cisco Calling platform(s) you wish to add in your telephony topology. You can add here one CUCM cluster and multiple Call Manager Express appliances.
If you need to amend an existing configuration, please start reading from below "Add Gateway details" paragraph.
Add CUCM cluster
Enter a name of your choice in "Reference name", identifying your CUCM environment
Choose connection type "Cisco CallManager"
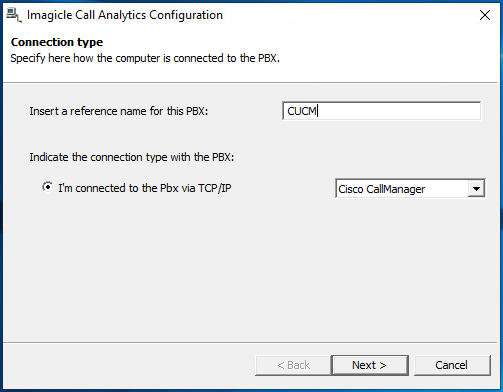
Hit Next and choose a path where to retrieve Cisco raw CDR files. Please leave default path, unless embedded (s)FTP server is pointing to a different folder.

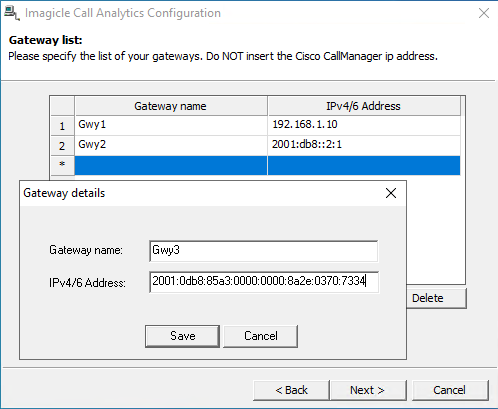
Hit Next to display "Gateway List" page. Here you need to add, one by one, all the Voice Gateways or SIP Trunks used by CUCM to route calls from/to PSTN. This might include SBCs, GSM gateways or another PBX with PSTN breakout. For each entry, please add:
Gateway name: An alphanumeric identifier of your choice
IP Address: Gateway's or SIP Trunk's network address
If your telephony architecture includes multiple CUCM clusters, please add in the list all gateways/trunks interfaced to all CUCM clusters. Please DO NOT ADD here any CUCM IP address!
Starting from 2022.Spring.1 release, you can either enter gateway addresses in IPv4 and/or IPv6 formats.
Warning: If you miss a gateway/trunk in below list, the calls through this gateway are considered as internal.
Hit Next to reach the Internal Calls settings. Here you can choose to import and monitor internal calls among extensions or just external PSTN calls. If your telephony architecture includes multiple CUCM clusters/CCME appliances, remember that inter-PBX calls are documented multiple times (one for each cluster/CCME).
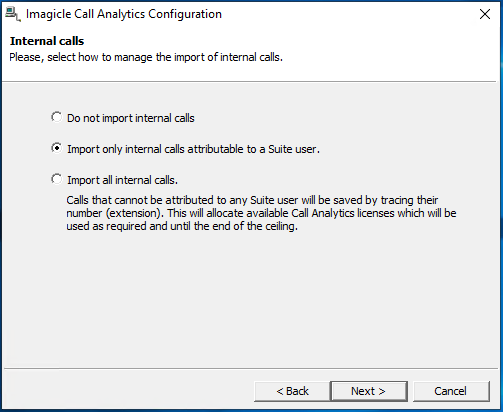
Starting from Winter 2021 release and above, we enabled the automatic acquisition of those extension numbers/DNs not associated to named users. This typically applies to shared phone lines in meeting rooms or numbers associated to answering groups or Hunt Groups. If you choose to enable this feature, please select the third option. Hit Next and then Finish to proceed with gateways configuration.
Add a CCME appliance
If you wish to add a Call Manager Express in your telephony network, please choose "Cisco CallManager Express" in Connection type window:
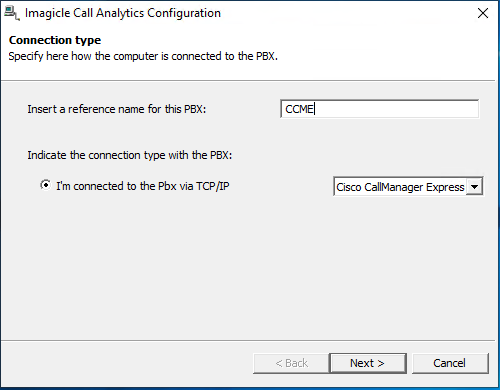
Hit Next and add all required parameters to establish a Telnet connection to CCME and properly acquire CDR data:
Gateway name: label representing CCME gateway
Max ext. length: enter the length of your internal numbering plan. If the called/calling number is longer than this value, the call is considered external (PSTN). If the length is equal or less than this value, the call is considered internal.
Dial Out Code: if users need to add a prefix to dial out, enter here the relevant digit
Remove from incoming calls: if incoming calls CDRs include a prefix, you can remove it by entering here the relevant digit(s)
Data path: Path where raw CCME CDRs are stored. Please leave default path
Pabx IP address: Network address of CCME appliance. Starting from 2022.Spring.1 release, this address can be entered in IPv4 or IPv6 format.
Pabx username, password and enable password: Enter the Telnet credentials to access CCME (same as command prompt). You can hit "Test connection" button to make sure CCME is reachable from UCX Suite and credentials are correct. If a connection error occurs, the following message is displayed: Pbx does not accept "file-acct flush with-close" command.
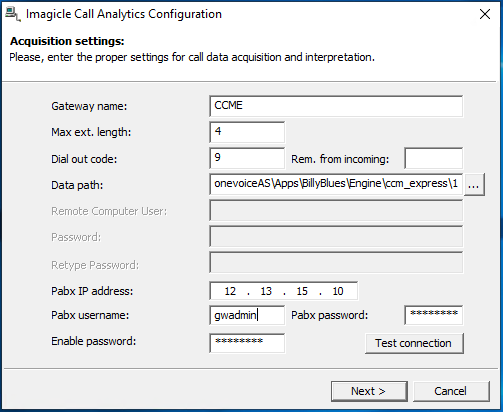
Hit Next and then Finish to proceed with gateways configuration.
Please be aware that the choice of importing both internal and external calls or just external calls is available in CCME Gateway setup, explained in next paragraph.
Add Gateway details
Once CUCM Cluster and/or all CCME appliances have been added, as previously explained, Call Analytics Wizard displays a summary window showing the list of Cisco Calling platforms in your architecture:
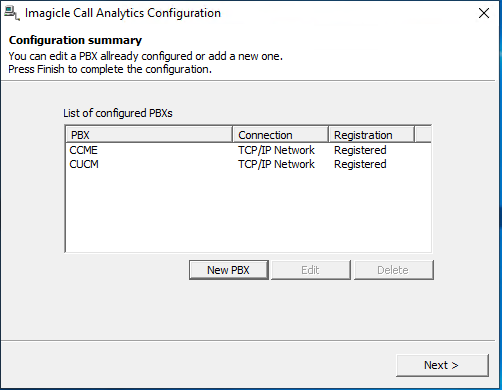
If you launch the Wizard in a later phase, it actually starts from above page, allowing you to add a new CCME or amend existing CUCM/CCME parameters as desired. This is particularly important if you need to edit CUCM cluster to add/remove a Voice Gateway or a SIP Trunk. Hit Next to continue.
The list of Voice Gateways and CCME appears. You can select "Enable" flag of any entry in the list and hit "Configure" to add all associated parameters.
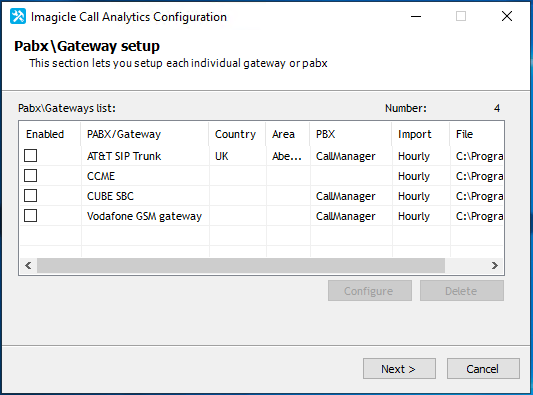
First configuration page displays the import path (please leave the default value) and allows to change the import frequency. You can leave the default value, in case you have up to 10 gateways in your architecture. Otherwise, you can change it to a higher value, to avoid useless service overload.
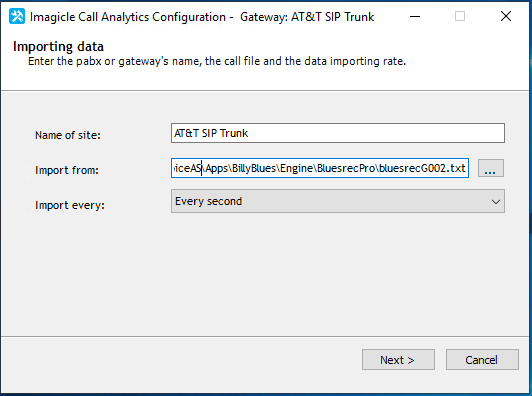
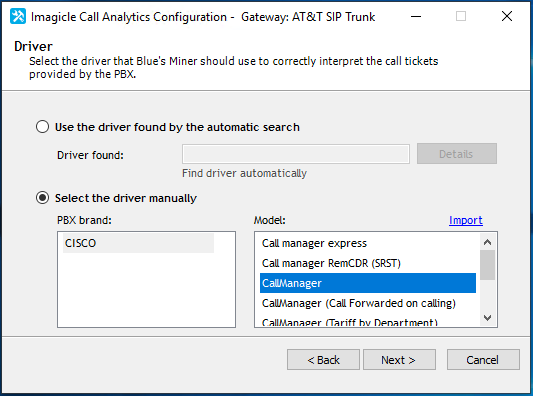
Hit next to display Driver selection page. Available options are:
Call manager Express: for CCME only
CallManager: standard driver for a Voice Gateway/Trunk interfaced to CUCM cluster
CallManager (Call forwarded): Special CUCM driver to properly document outgoing calls forwarded by a switchboard operator to users. Compared to standard CUCM driver, where diverted call costs are associated to the extension on which the diversion/forwarding is enabled, Call Forwarded driver associates the cost to the calling number.
Example: John has the extension 301 and diverts all the calls to his mobile number 3334445556. Then Giuseppe (305) calls 301 and talks with John for two minutes. The standard driver would report a call from 301 to 3334445556. The special driver reports a call from Giuseppe (777) to John's mobile 3334445556.CallManager (Tariff by Department): Special CUCM driver to apply different billing tariffs by department. See here for more details.
CallManager (with Partition): Special CUCM driver to properly discern overlapping extension numbers configured in different CUCM Partitions. See here for more details.
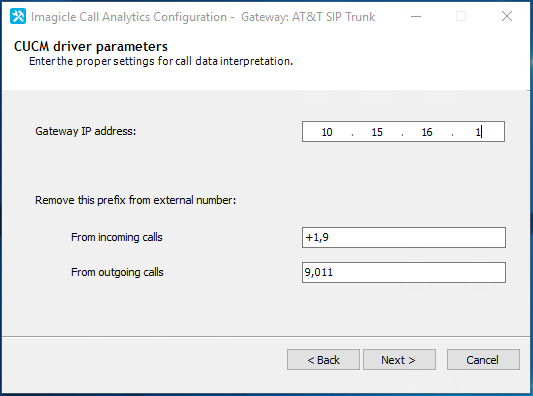
Hit Next to display Driver Parameters page, where gateway/CCME IP address is shown (either IPv4 or IPv6), together with two optional fields to remove undesired prefixes which are sometimes added in acquired CDR. This option is particularly important for outgoing calls, where the prefix might prevent our billing tariff to properly discern call type and relevant national/international/mobile destination. You can fill both fields with multiple comma-separated prefixes.
Hit Next to bring regional parameters, which allow to properly locate the gateway/CCME in the correct Country/Area, with relevant time zone, currency and taxes.
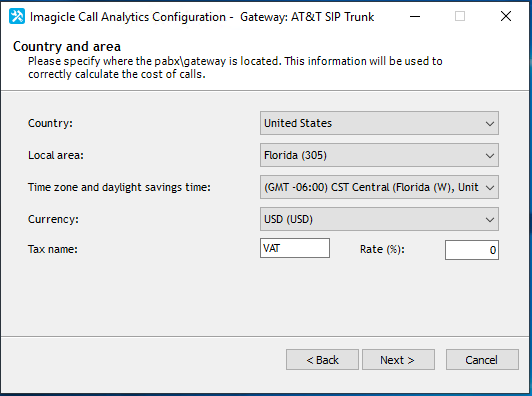
In a multi-country environment, where gateways are located in different countries, with different currencies, the VERY FIRST gateway/CCME in the list dictates the primary reference currency used by Call Analytics. Subsequent gateways/trunks can be configured with different currencies, always referring to the primary currency by adding the exchange rate.
Hit next to display Tariff chooser, which allows to choose the billing tariff to assign to the Gateway/CCME depending on local carrier. Imagicle Call Analytics includes one or more some sample tariffs for each Country. You can pick one from the list of "Available tariffs" and move it to "Tariffs to be used". You can anytime come back to this page and edit the tariff, to adapt it to your local carrier's call costs. Please find detailed instructions here.
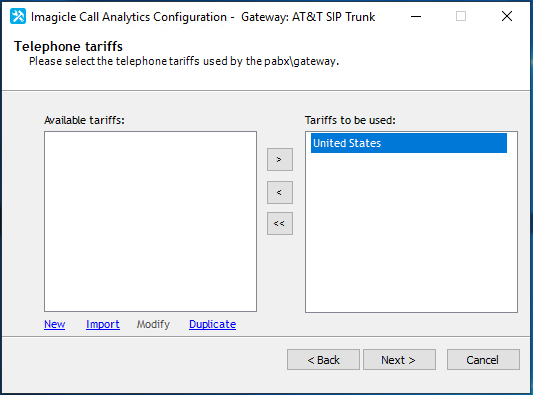
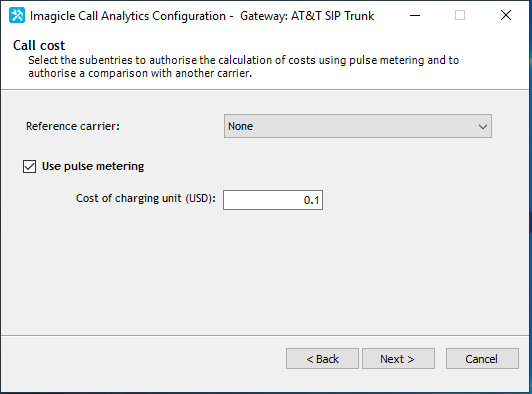
Hit Next to display additional parameters related to call costs calculation. Here you can compare phone calls expenses against an alternative carrier if your choice. If this feature is enabled, the alternative call costs is displayed in "Cost2" Call Analytics reports field. In same window, you can optionally enable pulse-based call cost calculation, by adding relevant unit cost per pulse in local currency.
Starting from 2021.Summer.1 release (and above), Imagicle Call Analytics includes a new window dialog which allows to specify if the Gateway/CCME includes own dial plan and extensions (bottom option) or if the extensions are not associated to specific PBX platforms (top option). See below sample:

By enabling "Link extensions to this site only" option, please remember to fill relevant Site name in Imagicle Users' database, as explained here.
Hit Next to bring Call Import options (Winter 2021 and above). Here you can decide to just monitor calls from/to extensions included into Imagicle UCX Suite Users' database or import and display ALL calls:
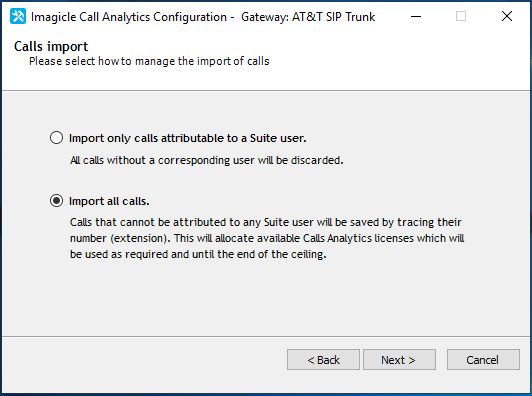
If second option is selected and a call is performed by a directory number not available in users' database or not enabled for billing, Call Analytics import engine adds an "orphan" DN entry in an internal DB table, including the extension number from CDR and leaving all other fields empty (name, username, department, cost center, …). This new entry is flagged as <Added automatically> and it consumes a Call Analytics license, unless call is related to a Cisco Hunt Group pilot or Hunt Group member. Hunt Groups-related calls are actually documented in anonymous way, without consuming additional Call Analytics licenses. When total number of named and orphan DN entries reaches the Call Analytics purchased license amount, automatic acquisition stops working and therefore all subsequent new DNs are discarded as usual.
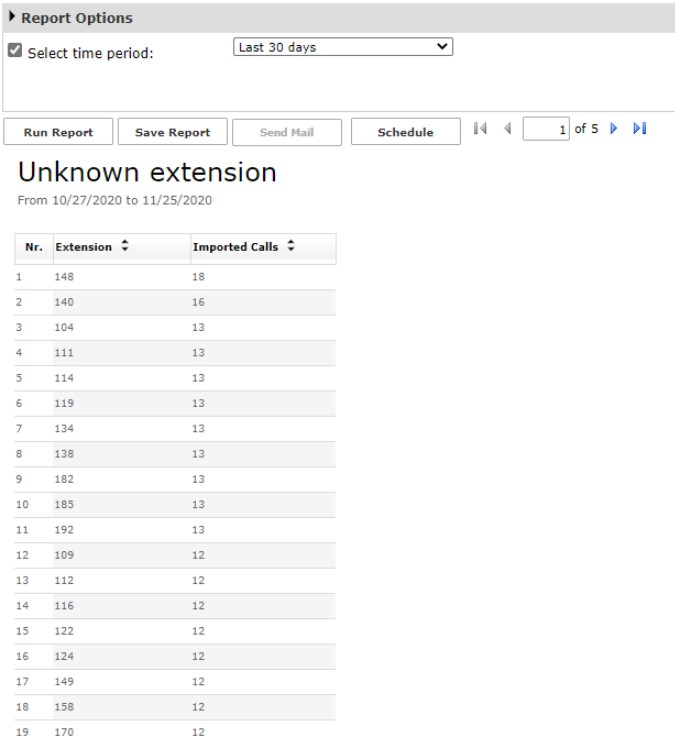
A dedicated report has been added (Winter 2021 release and above), showing the list of automatically acquired extensions. This report is available to administrators only, under 10-Extensions Analysis report category and it is called Unknown Extension. Thanks to this report, you can decide to add named Imagicle users to those orphan extensions, so relevant calls appear with name/surname and other particulars, after a call reprocessing. See below sample:
Hit Next twice to finish gateway installation. Now you can repeat same procedure for all gateways/CCME added in your telephony network.
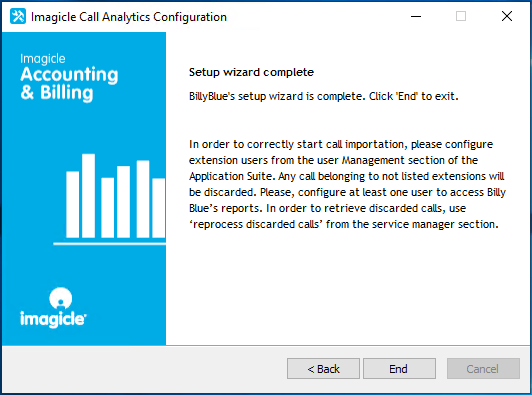
Once all Gateways have been properly configured, just hit Next from "Pabx/Gateway setup" window and finally hit "End" to exit Call Analytics Wizard and save the network topology.
Data path and FTP folder
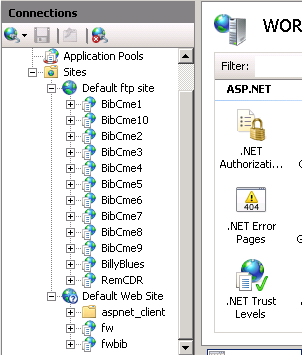
Imagicle UCX Suite installation package creates eleven pre-configured FTP folders called BillyBlues, BibCme1, BibCme2... BibCme10. The associated physical data paths are:
C:\Program Files (x86)\StonevoiceAS\Apps\BillyBlues\Engine\ccm5cdr
C:\Program Files (x86)\StonevoiceAS\Apps\BillyBlues\Engine\ccm_express\1
C:\Program Files (x86)\StonevoiceAS\Apps\BillyBlues\Engine\ccm_express\2
 ...
 C:\Program Files (x86)\StonevoiceAS\Apps\BillyBlues\Engine\ccm_express\10
If the Call Analytics Wizard has been properly executed, leaving default data paths, each Voice Gateway points to a different data path and each CCME sends CDR files to the related FTP folder.
