Native Cisco Control Hub Integration
Imagicle Digital Fax can be integrated to Webex Calling MT architecture by leveraging "Customer Managed Devices", pointing to Imagicle UC Cloud Suite instance through a Secure TLS 1.2 SIP Trunk.
The following configuration procedure can be applied independently from the PSTN access in use. If you are leveraging on-prem PSTN (local CUBE) or Cloud-Connected PSTN, please consider the simplified alternative configuration based on Route List/Route Group, described here.
Requirements
Imagicle UC Cloud Suite must be in place, with proper Digital Fax license
Webex Calling MT environment should include as many Workspace licenses or Webex Professional licenses as the number of fax numbers to be handled
Webex Calling MT environment should include the Phone Numbers (DIDs) to be assigned to Imagicle Digital Fax to receive and send faxes.
Configurations on Webex Control Hub
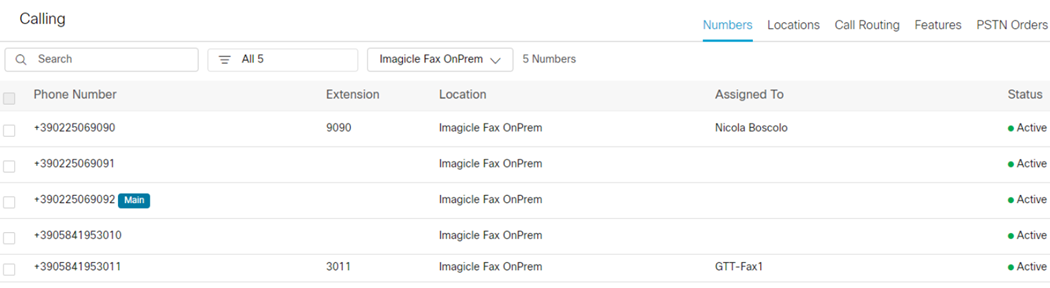
Please access to Cisco Webex Control Hub as Location Administrator and go to Calling ⇒ Numbers to verify unassigned phone numbers to be used as fax numbers. Please take note of those available DIDs you wish to associate to fax. See below screenshot:
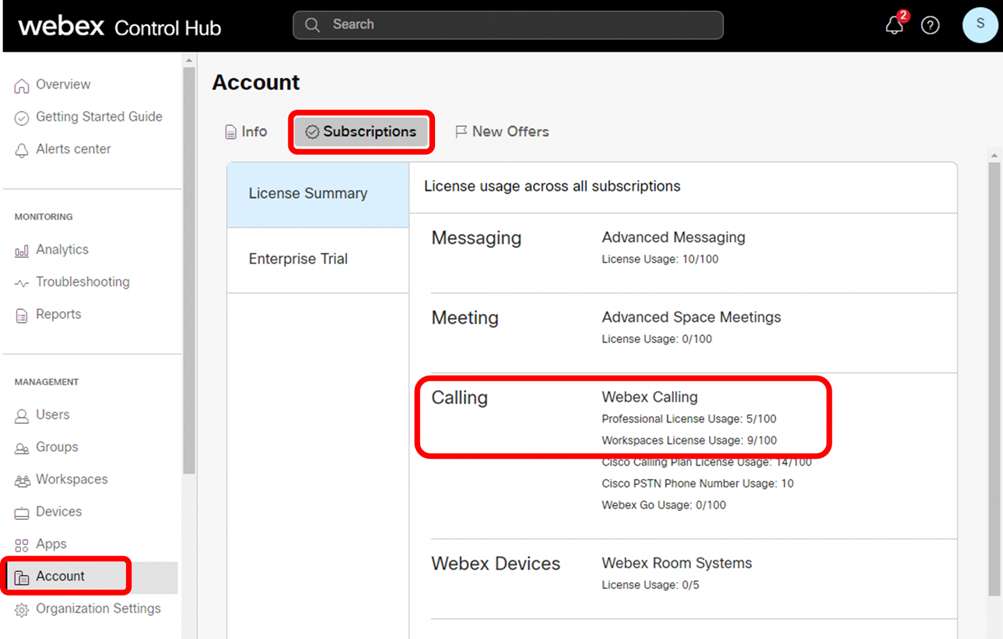
Now go to Account ⇒ Subscriptions and verify that you got enough licenses (Professional or Workspaces) to support all required fax numbers.
If phone numbers and Webex licenses are both available, then you need to make sure that involved Webex Locations where fax numbers are associated are enabled to outbound PSTN calls.
Select "Locations" from left pane to display the list of available locations. Then click on the Location(s) where you wish to enable fax number(s) and finally select "Calling" tab.
Scroll down until you reach "Call handling" section and click on "Outgoing call permissions" → “Permissions by type” to display below window:
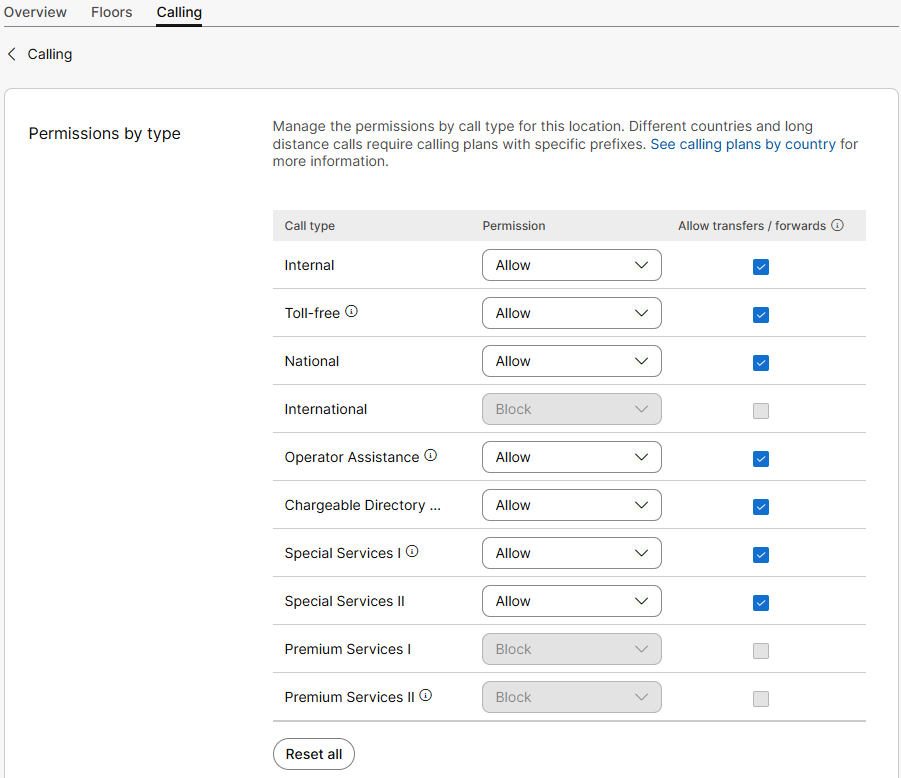
Please make sure that Outgoing call permissions are correctly configure to allow fax sending to external national/international destinations.
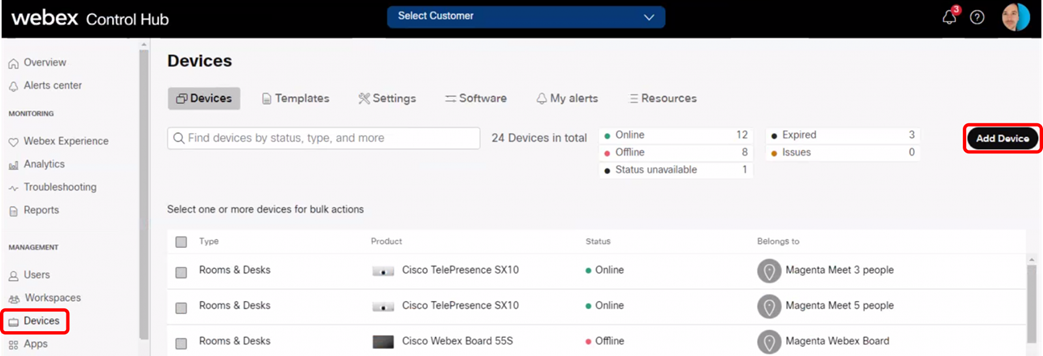
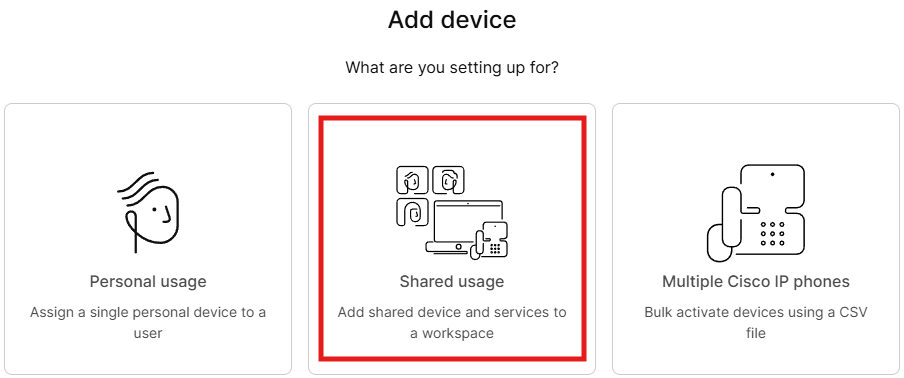
Now you can proceed by adding a new Device. Select "Devices" menu from left pane and hit "Add Device" button, as per below screenshot:
The following window appears, where you need to select "Shared usage", identifying a device shared with multiple users. Then hit Next.
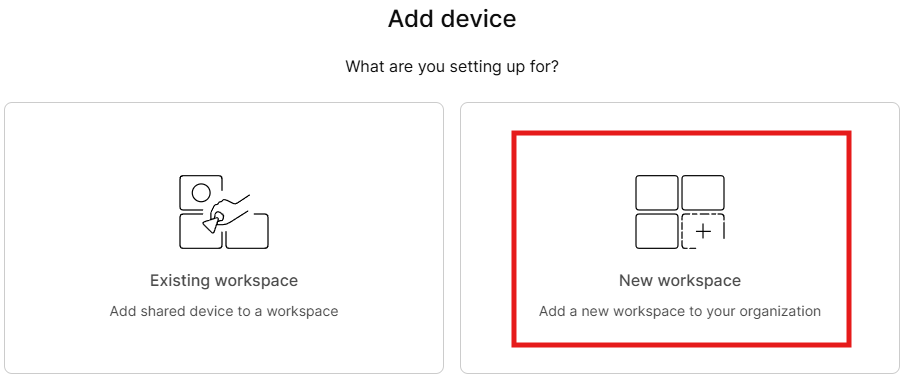
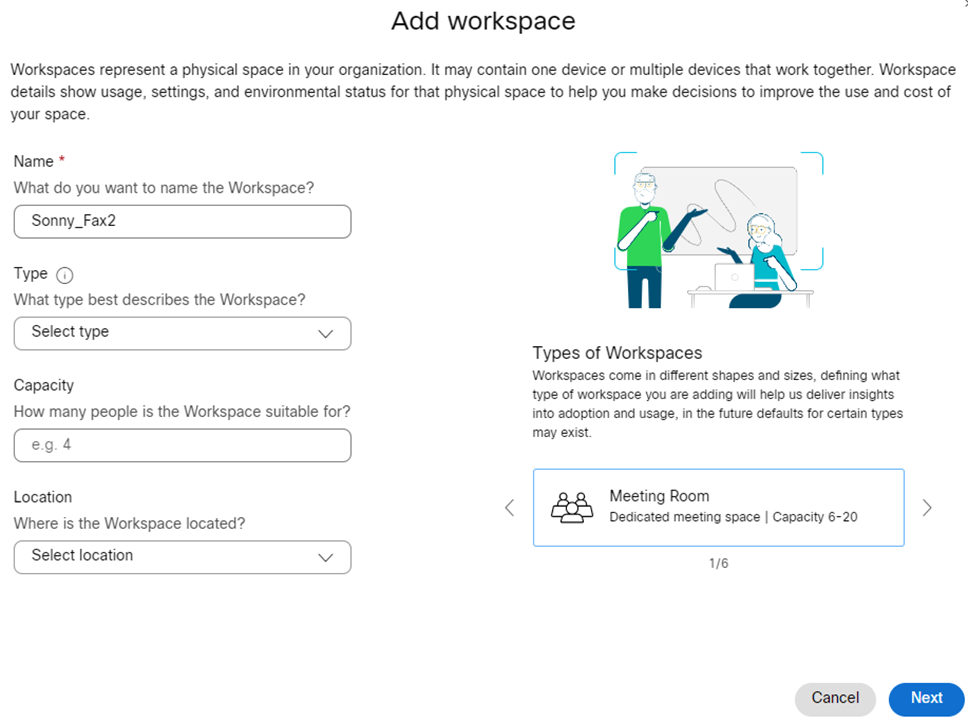
In the following window you are invited to create a new Workspace for your fax device. Hit Next to continue.
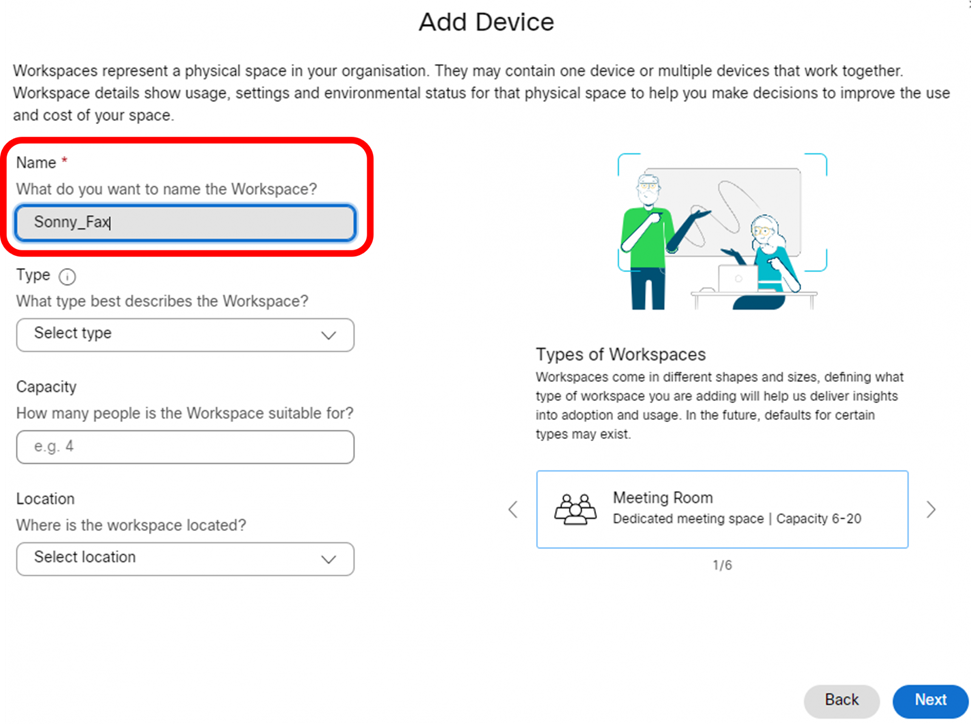
Here just enter a name of your choice, identifying the fax device. Leave all other parameters to default values. Hit Next to continue.
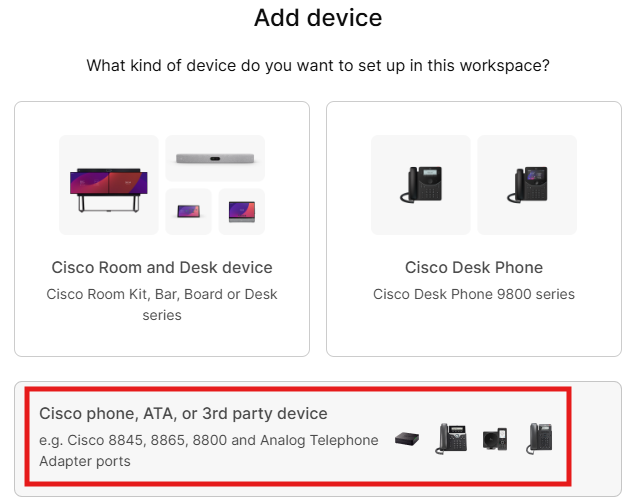
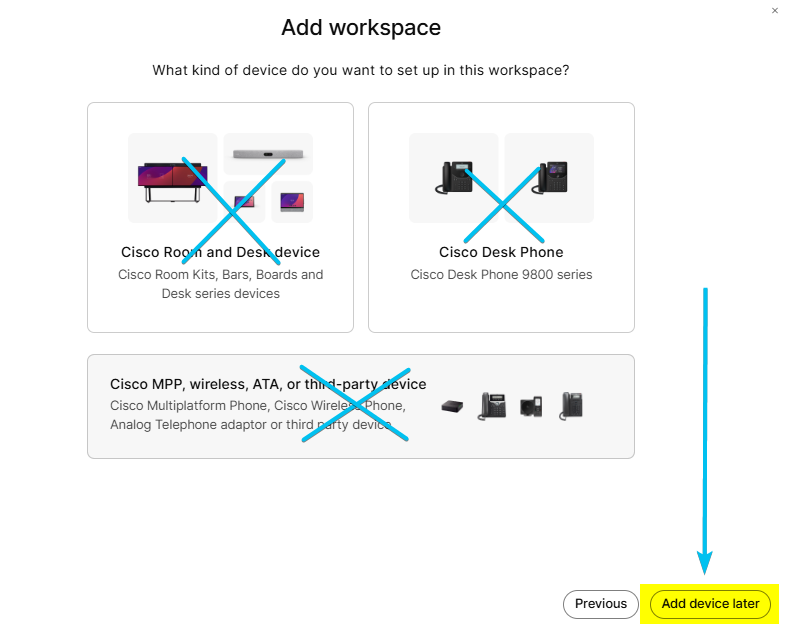
Please select "Cisco Phone, ATA, or 3rd party device" as device family. See below:
Then click on "Select device" pull-down menu and scroll down to "Customer Managed Devices" option.
In "Device Vendor" pull-down menu, please select "Imagicle Customer Managed".
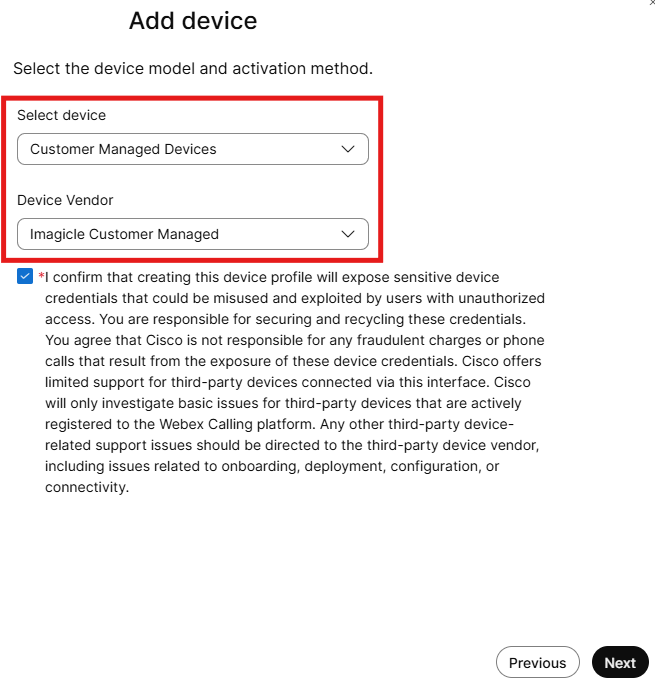
Please check the security flag and hit Next to continue.
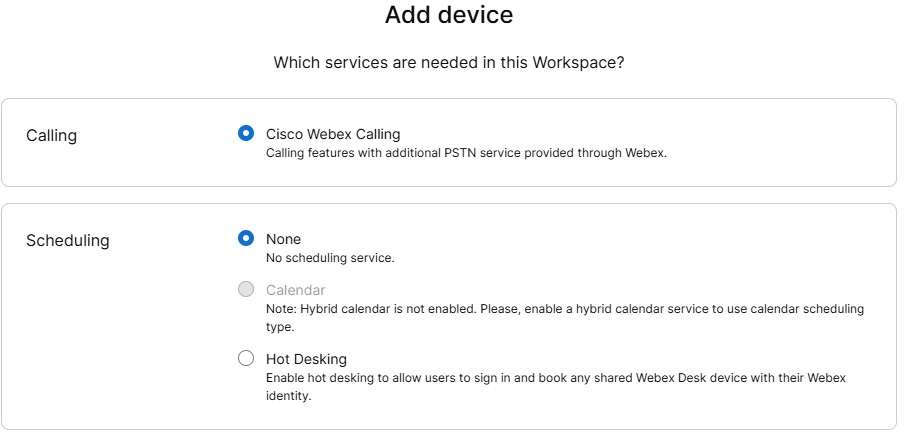
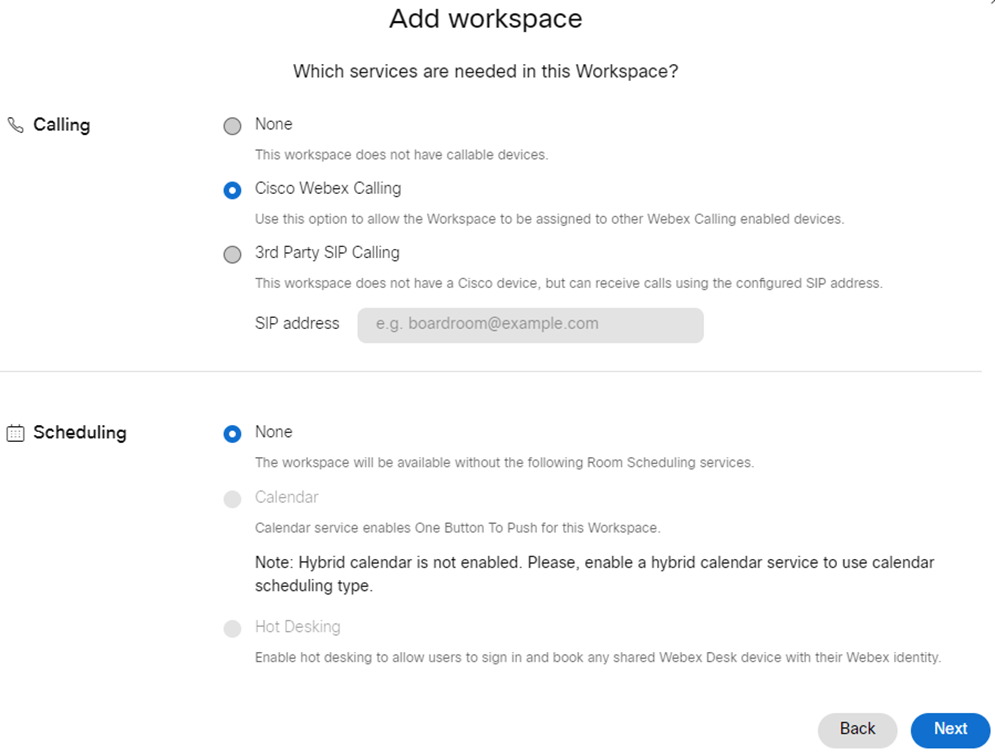
Calling services must be enabled, therefore please make sure that "Cisco Webex Calling" button is selected. No Scheduling feature required. Hit Next:
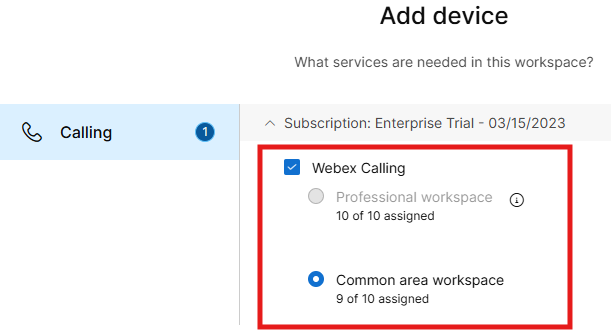
Now it is time to choose the Webex Calling license to be applied to the workspace. You can either choose "Professional" or "Common area" license, then hit Next.
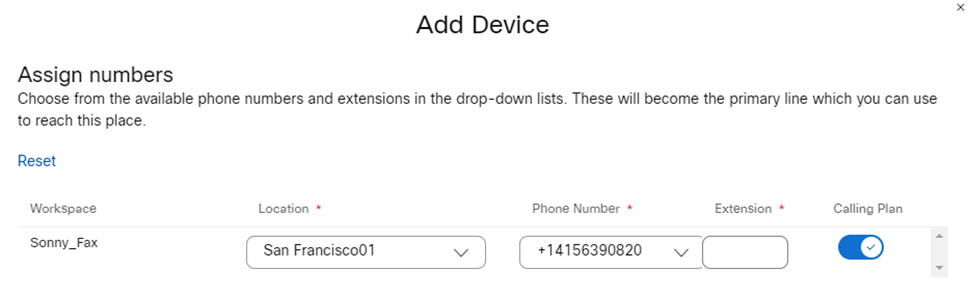
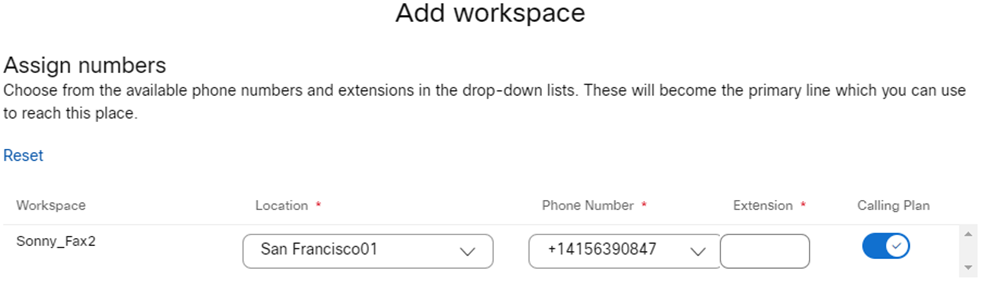
Finally, please associate newly defined Customer Managed Device to your Webex Location and to one of the previously noted fax phone numbers. Phone Number is mandatory, Please leave "Extension" field empty and leave the Calling Plan (if present) switch to its default value.

Hit Save to store new Device settings. You get a summary window like below screenshot sample:
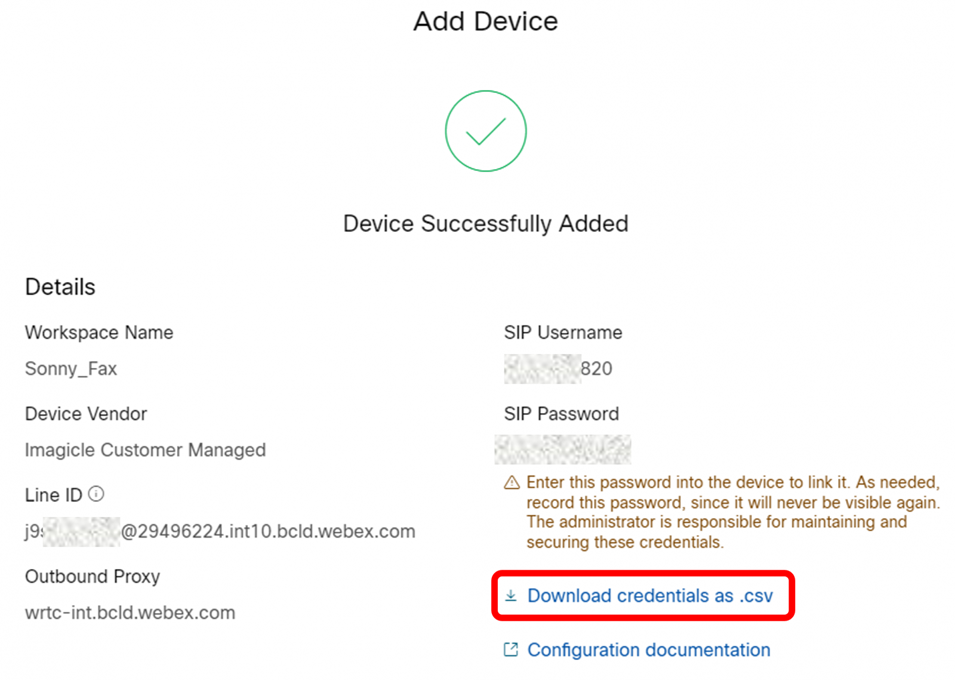
All routing details for this device are included into above summary page. If you click on "Download credentials as .csv", you get a file including all required data.
If you don't need to enable additional fax DID numbers, please skip next paragraph and go straight to "Final Stage".
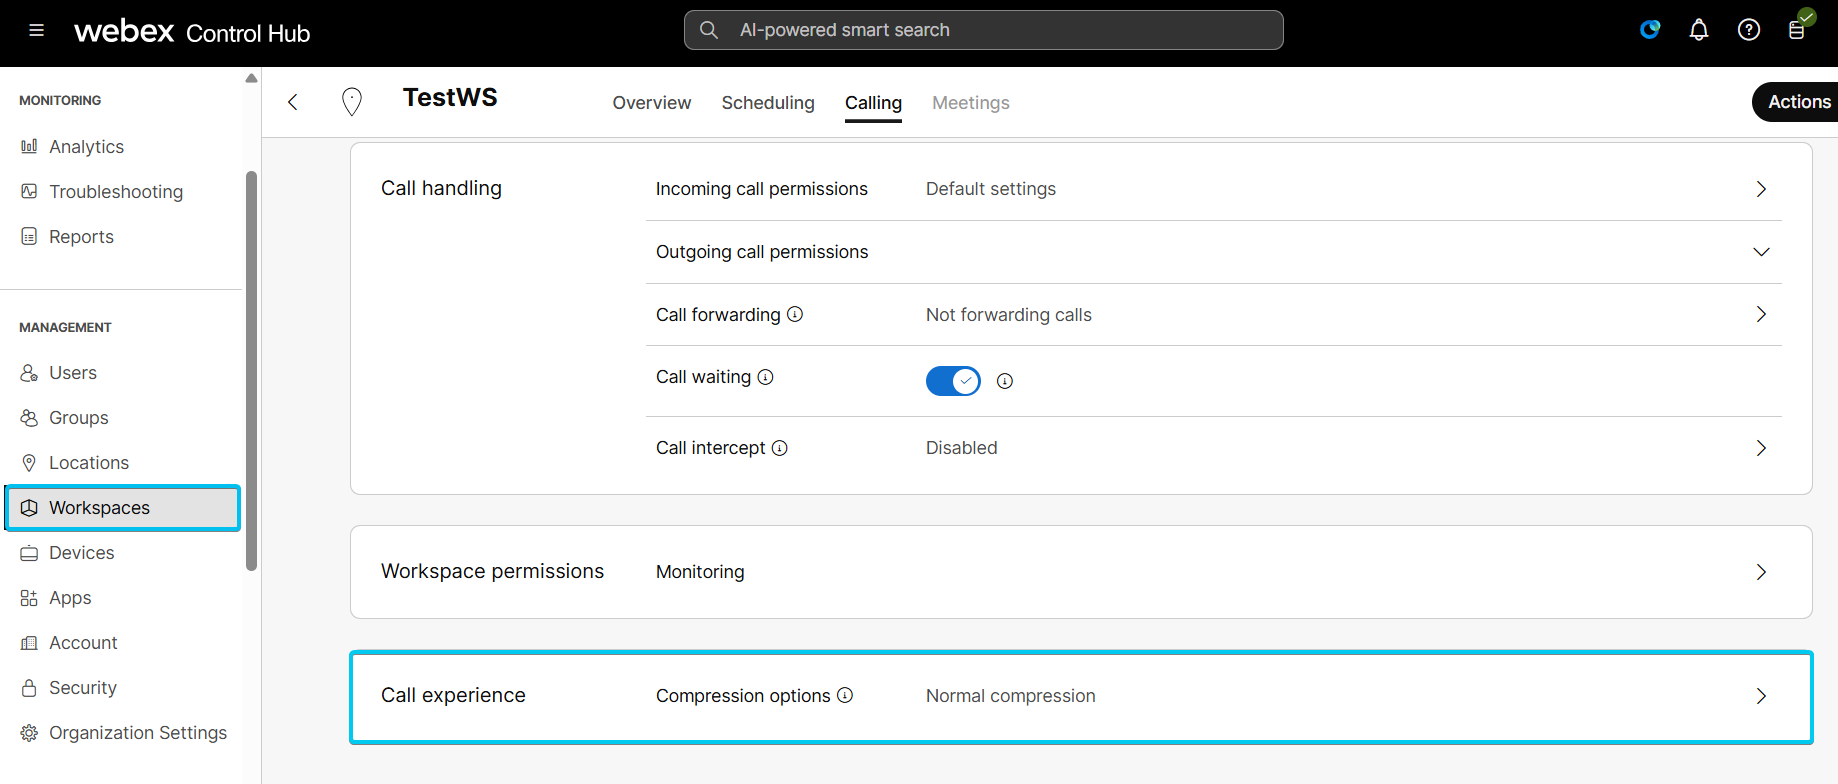
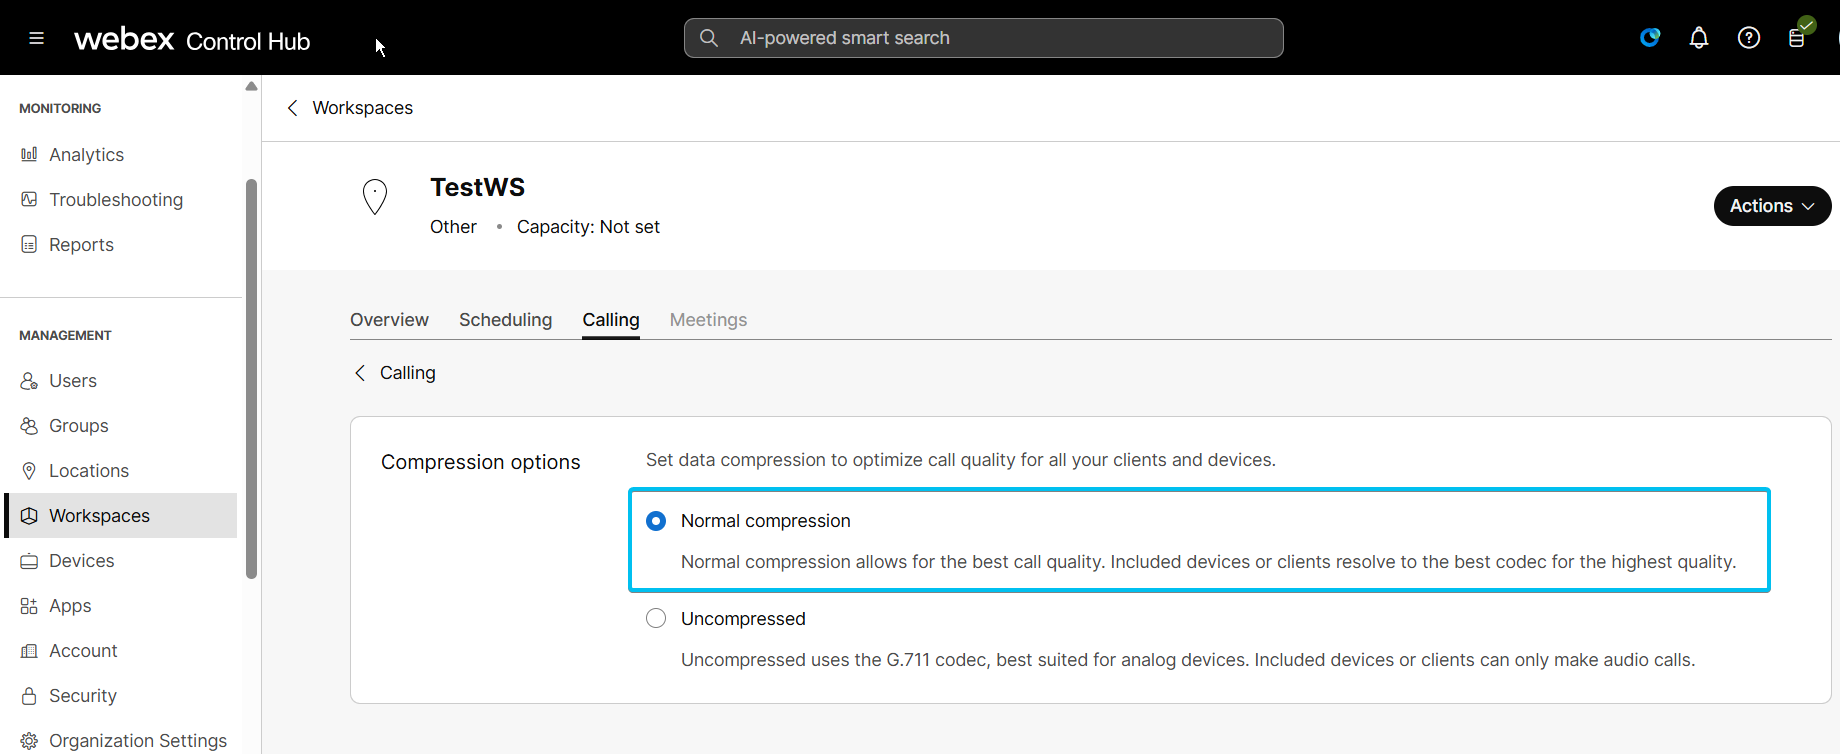
Set the compression option in the workspaces configuration (needed for T.38 negotiation)
Workspaces → Select Workspace → Calling → Call experience → Select normal compression.
Adding more fax DID numbers to same Imagicle Customer Managed Device
The following procedure can be accomplished by creating both new Users or new Workspaces, respectively consuming a Professional license or Workspace one.
A new device is not required to add additional DIDs. Create a workspace without assigning a new device, the workspace will be assigned to the device later.
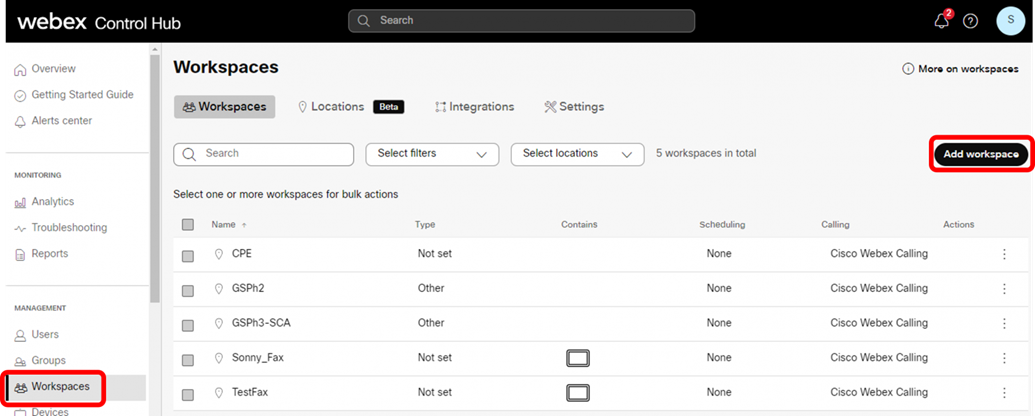
Select "Workspaces" menu from left pane and hit "Add workspace" button, as per below screenshot:
The following window appears, where you need to add a workspace name of your choice, identifying the specific fax number.
Add a proper Name and leave all other fields as default. Hit Next to continue.
In the following window, please select “Add device later”
Please select "Cisco Webex Calling" as Calling service and select "None" as Scheduling service. Hit Next to continue.
Finally, please associate newly defined empty Workspace to your Webex Location and to the next previously noted fax phone numbers. Please leave "Extension" field empty and leave the Calling Plan switch to its default value.
Hit Save to store new Workspace settings. Now go back to "Devices" menu from left pane and click on previously defined Imagicle Customer Managed device to open the following window:
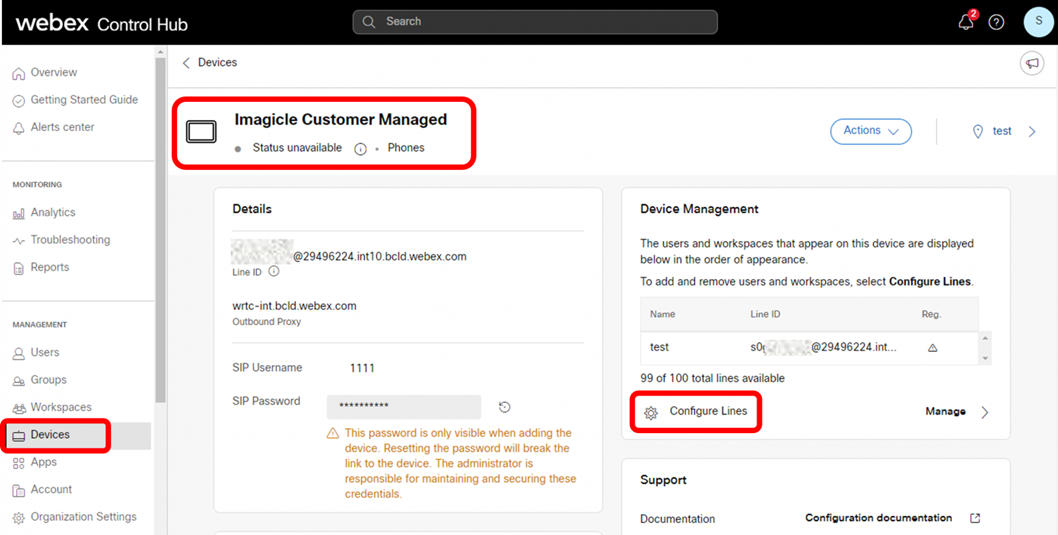
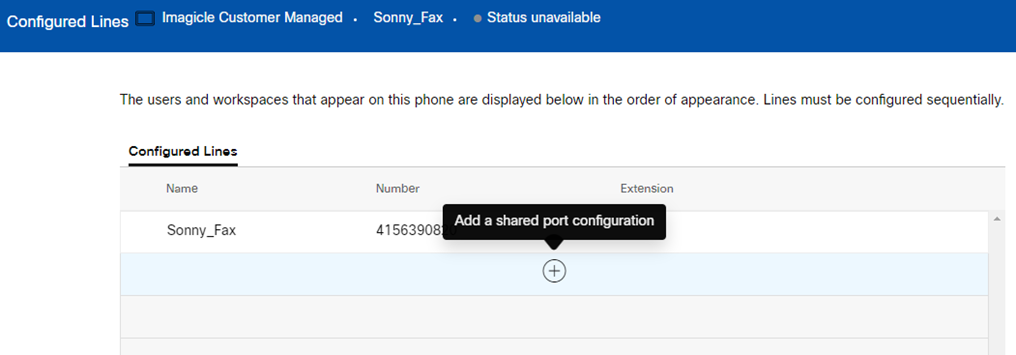
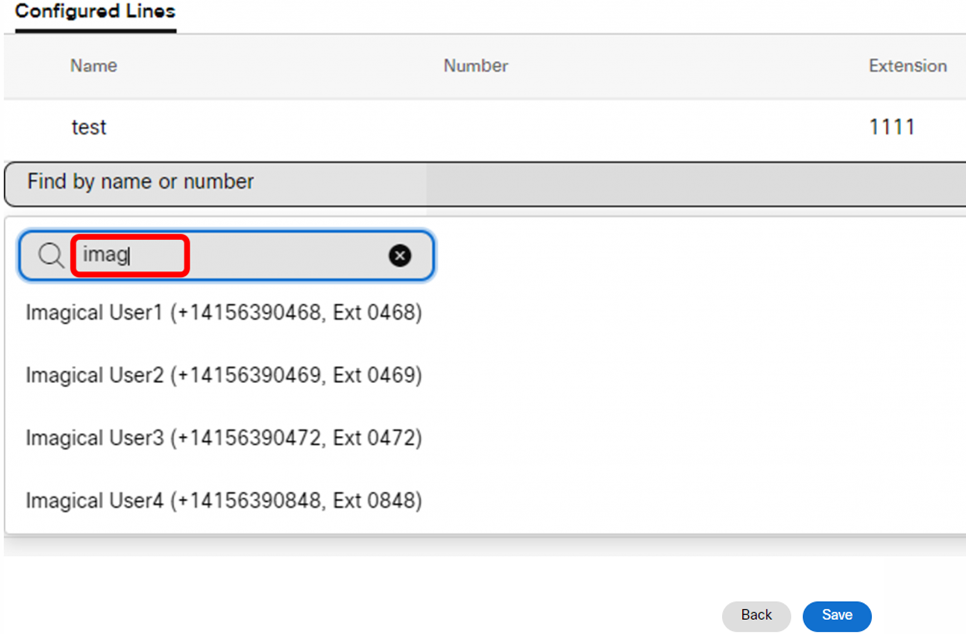
Please click on "Configure Lines" and hit "+" button to add new fax line to Imagicle Customer Managed device. Search and select the Workspace or User name you have just added.
Once new fax number has been selected, you can hit Save.
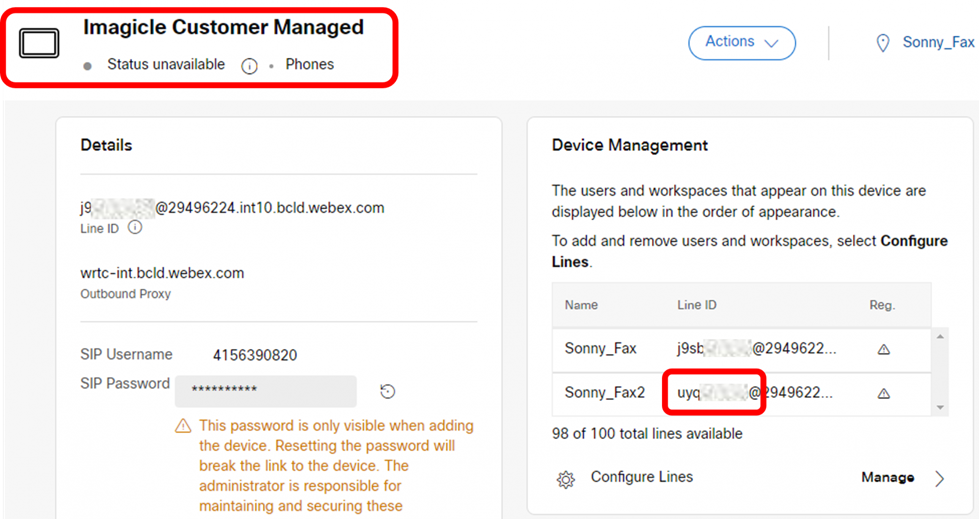
Back to Imagicle Customer Managed device, you can notice that a new fax line has been added. Please refresh below page once, to get the MAC address included into Line ID. Note that MAC address is the same for all fax lines added into Imagicle Customer Managed device.
Please take note of new Line ID.
Please repeat the whole procedure highlighted in this paragraph, for each fax number to be enabled.
Final stage
Please send an email to wbx.onboarding@imagicle.com including the lineID and the new fax DID number assigned to the workspace, example:
Request to add the following lines to [Company Name] Fax:
-
+178683XXX - Line ID - qfdfgd546h_C434565465@835638.cisco-bcld.com
+178684XXX - Line ID - ysfdsf45ggh_C434565465@835638.cisco-bcld.com
+178685XXX - Line ID - oijhfd4fdg4f_C434565465@835638.cisco-bcld.com
-
First Fax Number is +178232390XXX Line Id xbqx1mnc41_C434565465@835638.cisco-bcld.com
If you have added more fax numbers, please list them in the same email, together with relevant Line IDs.
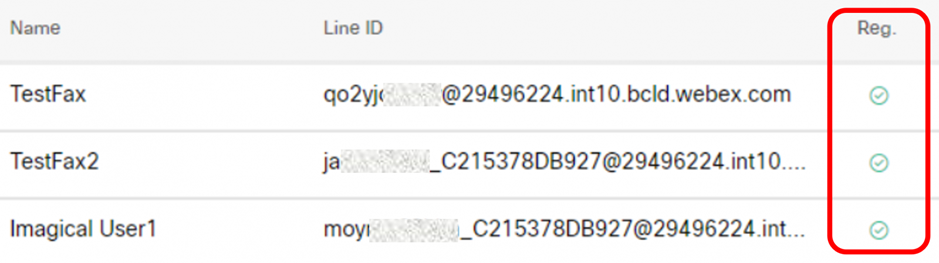
Once configurations are applied on Imagicle side, the device Status should change to “Online” and the Registration status icons must turn to green. See below sample:
Configurations on Imagicle UCX Suite
On Imagicle UCX Cloud Suite, please define a user or a fax group for each configured fax number. See here.
Moreover, the IP routing for outbound faxes should point to the correct Imagicle Public SBC.
Please access to Imagicle web portal with admin credentials and go to Digital Fax ⇒ Advanced Settings ⇒ IP Routes and set the "Default Route" field according to your regional macro-area:
Europe: 172.32.9.136
Middle East: 172.32.1.86
North America: 172.31.128.157
Once IP routes have been properly set, you must restart the service from Digital fax ⇒ Manage Service menu.
If you are accessing an existing installation, you might find different IPs for EU and USA (see below). Just leave them as they are, unless Imagicle suggests you to change them:
Europe: 172.31.9.136
North America: 172.30.128.157