Preparing the Microsoft environment
Imagicle Customer Service solution for Microsoft Teams, including Advanced Queuing, Attendant Console and optionally Auto Attendant, requires to accomplish some preliminary tasks and checks, to make sure that actual implementation goes smoothly without requiring multiple sessions with Imagicle Team.
Below list should be handled by customer/partner prior to schedule a remote session with Imagicle Team:
- A new Domain must be created in Microsoft 365 portal, by following the steps included in below New Domain Setup paragraph.
- Domain creation returns three items (TXT name, TXT value and TTL), that should be sent to Imagicle Team via email.
- MS-Teams Presence should be enabled in Imagicle Cloud, by following this KB.
- Verify that an admin-level access to Azure web portal is available, through a user with a valid Azure subscription. This is required to create new Azure Bot.
- To verify if the user has an Azure subscription, follow this procedure:
- log into https://portal.azure.com
- click on Subscriptions
- check that at least one subscription is included in the subscription list. See below sample:
.png)
- If no subscriptions are available, Imagicle can optionally provide the Azure Bot.
Requirements
- Imagicle UCX Cloud Suite 2023.Spring.1 or newer, online-activated
- Imagicle UCX Cloud Suite host name, provided by Imagicle Cloud Services team, like: customer-name-public.imagicle.cloud
- Admin-level access to Microsoft 365 web portal
- Admin-level access to Microsoft Teams web portal
- Admin-level access to MS Teams PowerShell
- One Microsoft 365 "E3" user's license, temporarily needed to enable a second level domain
- One "Microsoft Teams Phone Resource Account" license for each configured Imagicle Queue/Auto Attendant
- Each agent/operator should have a Microsoft 365 "E3” + Microsoft Teams Phone Standard OR a Microsoft 365 "E5” (it already includes the Phone Standard) user’s license.
- "New" MS Teams client is supported, requiring Imagicle Attendant Console ver. Winter 2024.3 or above.
Configuration Overview
To allow Internet SIP routing of inbound calls from MS Teams to Imagicle Advanced Queuing and Auto Attendant application + routing calls from Imagicle Cloud to MS-Teams users, you should configure a Direct Routing destination (Imagicle SBC), in turns associated to a route to Imagicle SBC for any number starting with +28 prefix, in turns associated to an Azure BOT/App Registration, in turns assigned to an actual customer's DID within own dial plan to allow reaching each Imagicle Queue/Auto Attendant from PSTN.
To enable such Internet SIP routing, the following tasks should be accomplished:
- Enable a second-level domain, associated to a Direct Routing destination (Imagicle Public SBC)
- Create a dummy Microsoft "E3" user, to be associated to above domain
- Create an "OnlineApplicationInstance" for each required Imagicle Queue/Auto Attendant service
- Associate each queue UPN to a Microsoft Teams Phone Resource Account license
- Finally, assign each queue UPN to an available PSTN number within customer's dial plan
Microsoft Teams Configurations from MS365 Admin Web Portal and PowerShell
Imagicle UC Cloud Suite is seen by Microsoft Teams as a new Direct Routing location equipped with a SIP-connected SBC. In Imagicle Cloud, a dedicated/shared Cisco CUBE (or vCUBE) "Public SBC" is deployed, to allow the Internet "OTT" Peering between Microsoft Teams cloud and Imagicle Cloud.
New Domain Setup
The following procedure can be autonomously accomplished by the customer/partner, to retrieve domain's "TXT" data and send them to Imagicle team. In this way, you can save time and proceed with further configurations.
Please login to Microsoft 365 Admin web portal and select Domains ⇒ Add Domain:
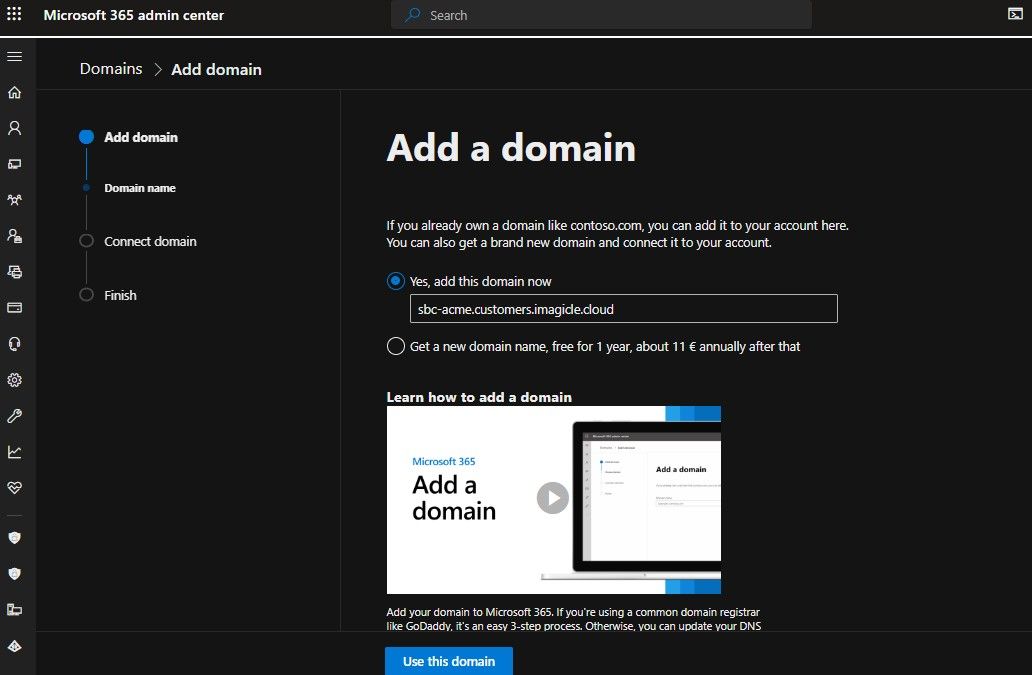
Domain Name must include the DNS name associated to Imagicle UC Cloud Suite deployed in Imagicle Cloud. This is the mandatory naming conventions:
- Europe area: sbc-<company>.customers.imagicle.cloud
- Middle-East area: sbc-<company>.customers-me.imagicle.cloud
- North America area: sbc-<company>.customers-us.imagicle.cloud
Please do not use other naming formats and just replace "<company>" with own Company name (e.g., sbc-acme.customers.imagicle.cloud).
Click on "Use this domain" to display Domain verification page:
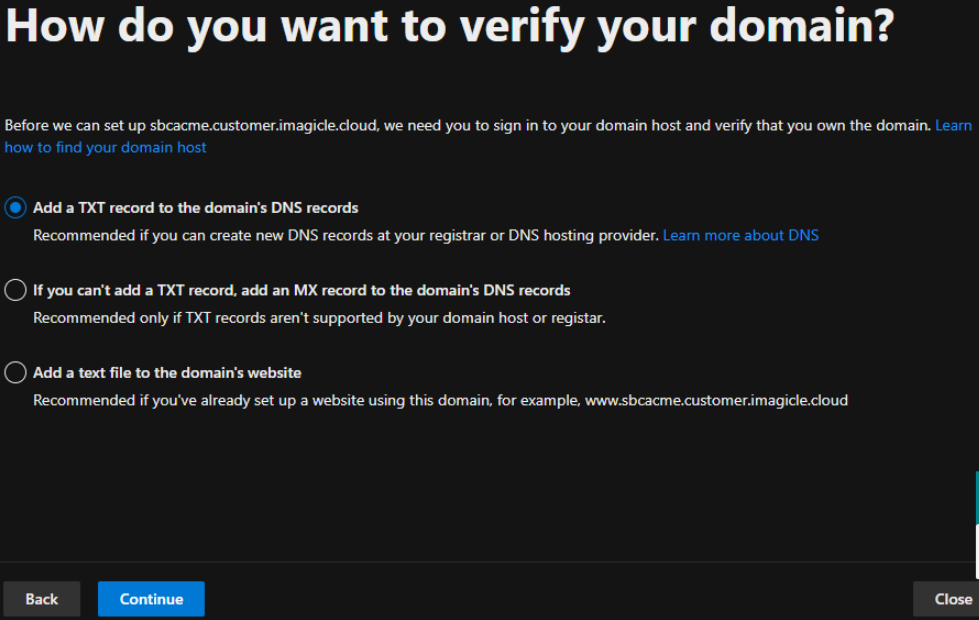
Please select "Add a TXT record to the Domain's DNS records" and hit "Continue":
.jpeg)
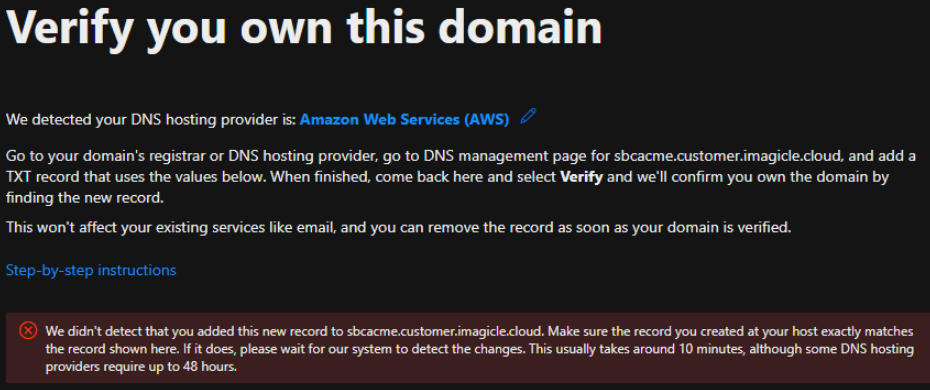
Please copy above three items (TXT name, value and TTL) and send them to Imagicle team, so they can create relevant DNS entry in Imagicle Cloud DNS. Once Imagicle Cloud Services team confirms DNS creation, please hit "Verify".
NOTE: before proceeding disable the flag "[_] Exchange and Exchange Online Protection".
If DNS entry hasn't been created yet in Imagicle Cloud DNS, you get the following error message:
Please select "Skip and do this later (not recommended)" option to skip service activation.
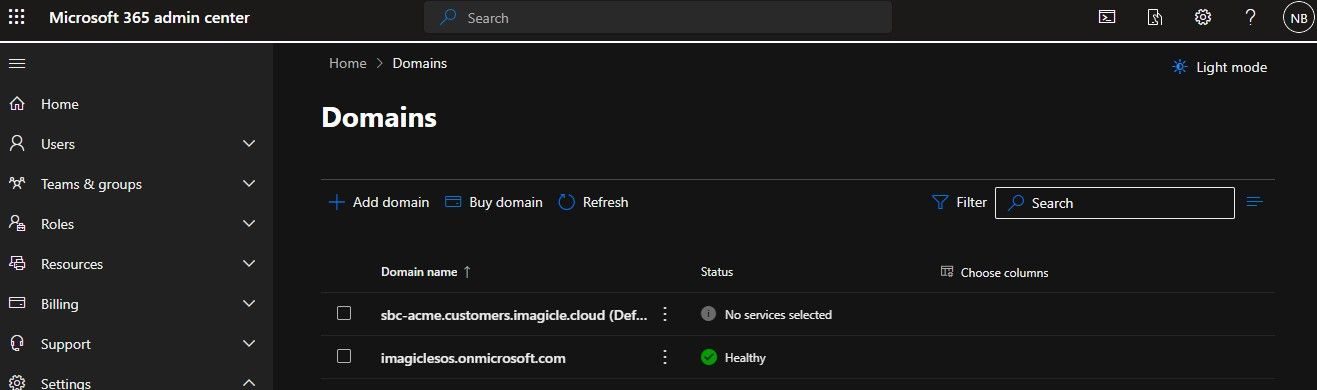
Once Imagicle Cloud team has enabled the DNS entry, you will find new domain in the following status:
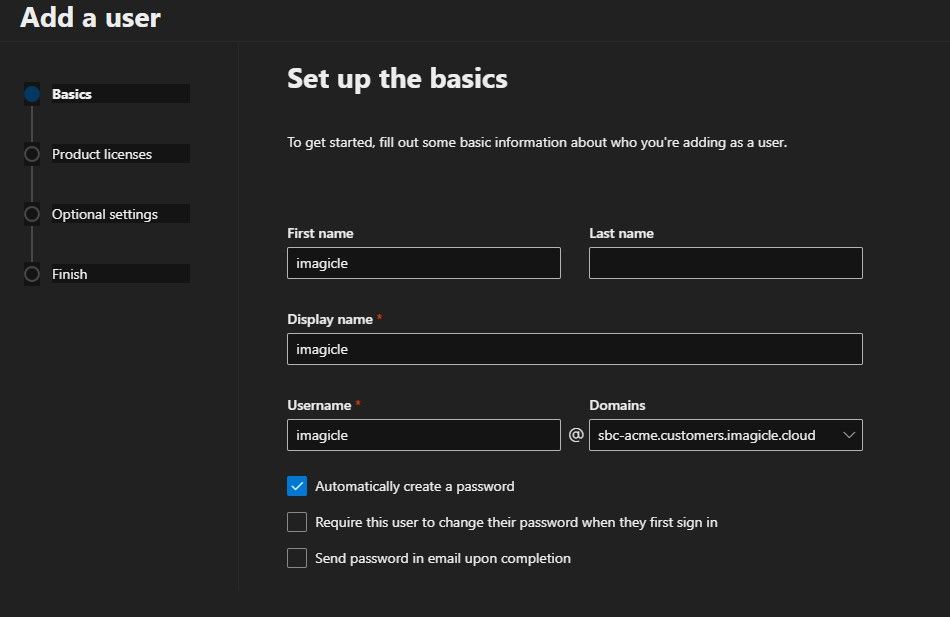
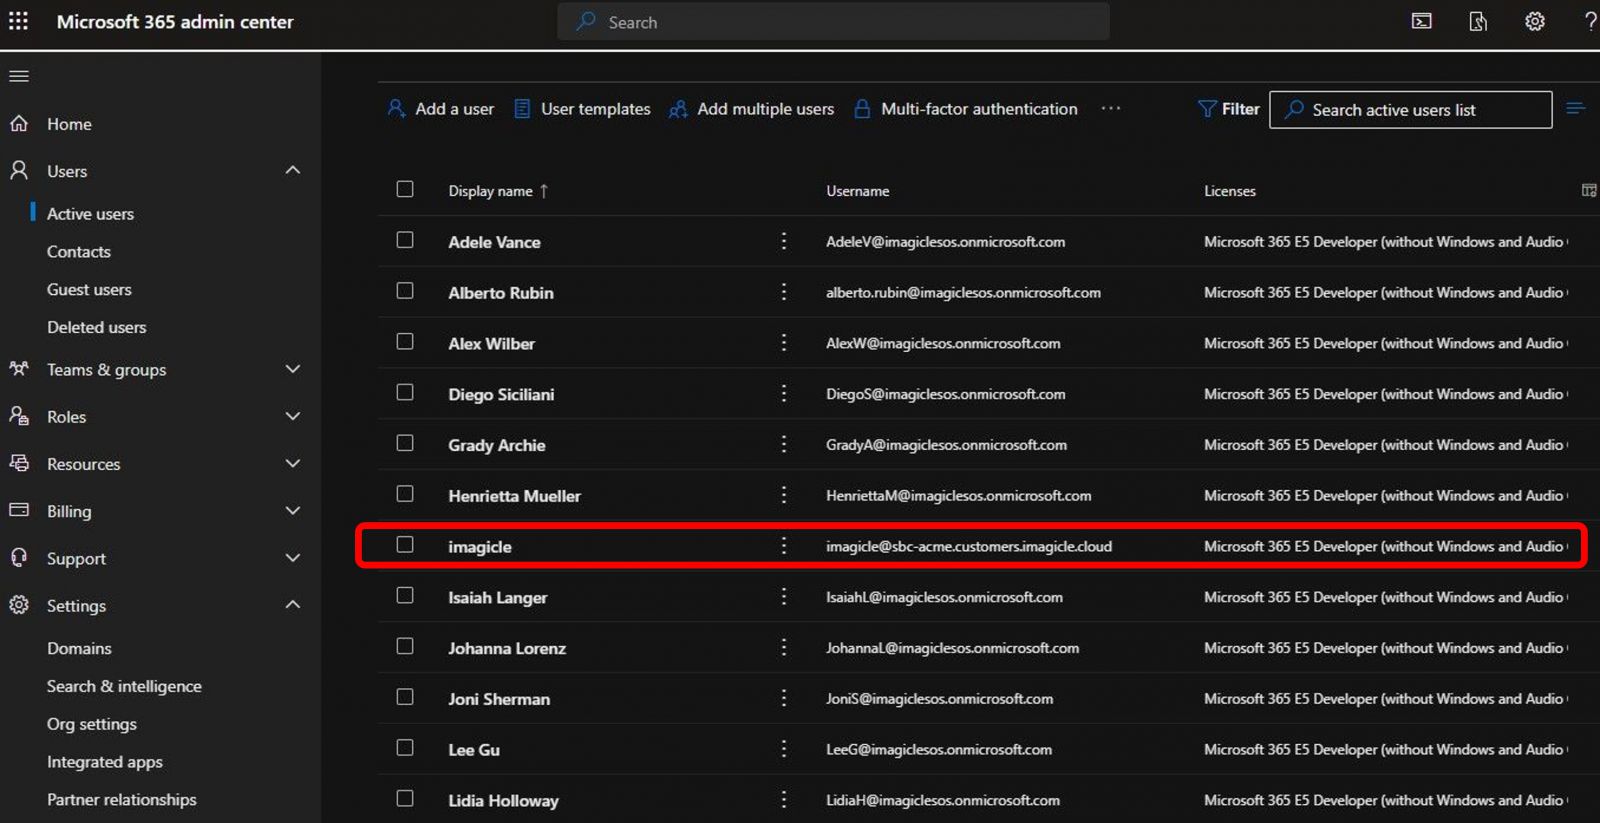
Create an Office 365 User
To enable call routing to/from the new created domain, at least one user with Office365 E3 license associated must be created in such domain. You can do it following the next steps:
.png)
Click "Add a user" and name it "imagicle":
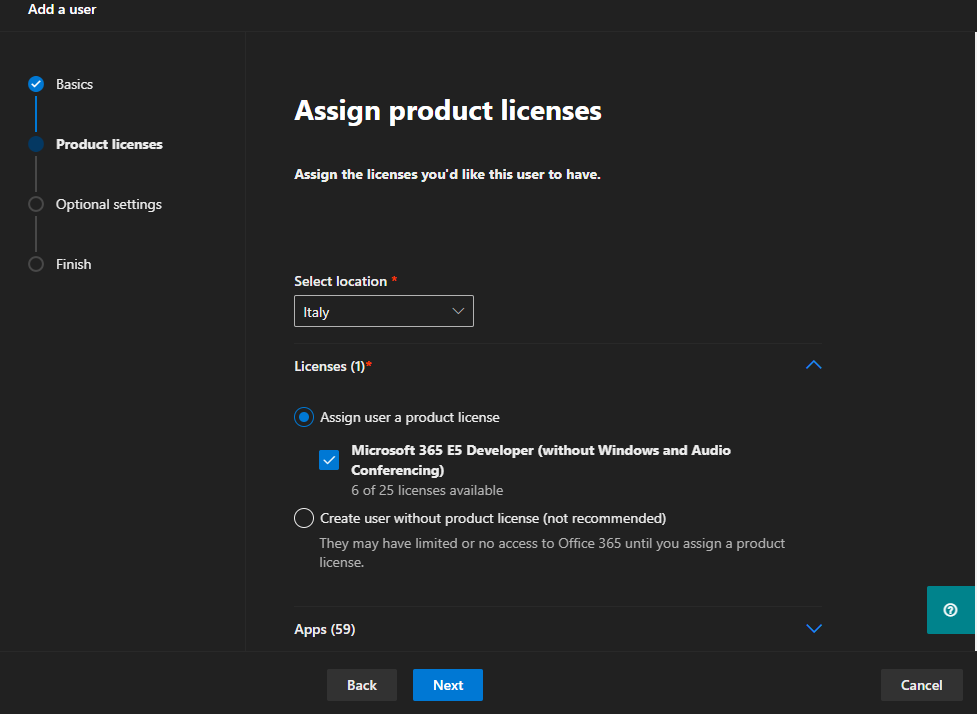
Hit Next to display "Product licenses" page. Please assign an E3 user license at least, as per below sample:
Hit next to assign a permission level to new user. Simple "User" role is enough:

Hit Next to display a User's summary page. Please review entered data.
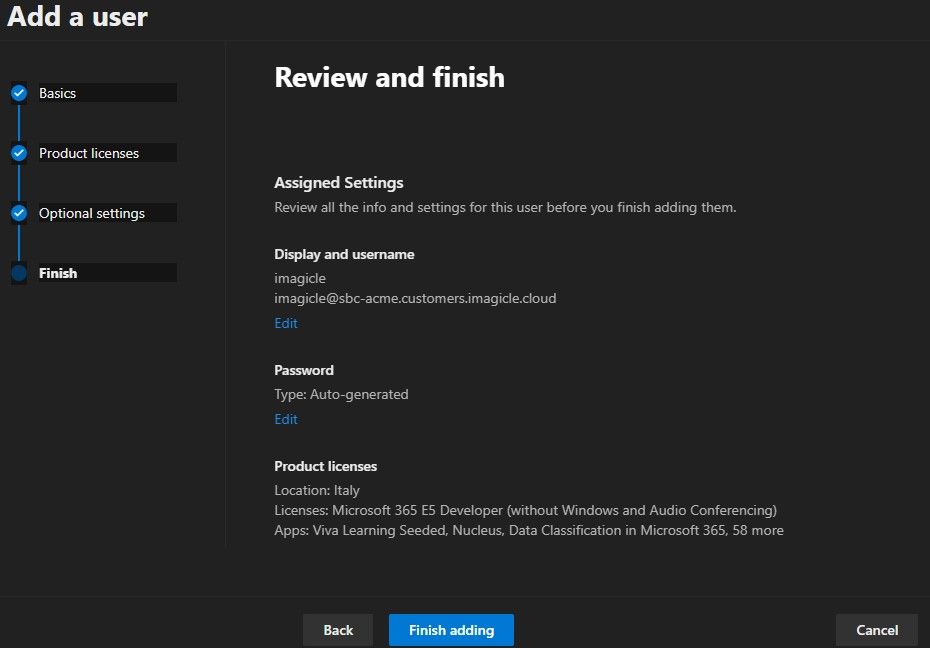
If all correct, please hit "Finish adding" to actually save new user. It subsequently appears in Active Users list. See below:
Common Voice Route to forward calls to Imagicle Cloud
If not yet done, please install MS Teams PowerShell module by issuing the following commands from PowerShell running as Administrator:
Install-Module MicrosoftTeams
Import-Module MicrosoftTeams
Connect-MicrosoftTeams
Please enter Tenant Administrator credentials, when requested.
Now enter the following command:
$FormatEnumerationLimit=-1Get-CsTenant | fl *Domain*
The results should include a VerifiedDomains line, containing the new domain added at the beginning of this procedure. See below sample:

If new domain does not appear in the list, please repeat Get-CsTenant command until it shows up.
Now you need to perform additional PS commands to enable the configuration of a common routing policies to transfer calls to Imagicle Cloud SBC and, in turns, to Imagicle queues and Auto Attendant services.
Please enter below command:
Set-CsOnlinePstnUsage -Identity Global -Usage @{Add="Imagicle_RT"}
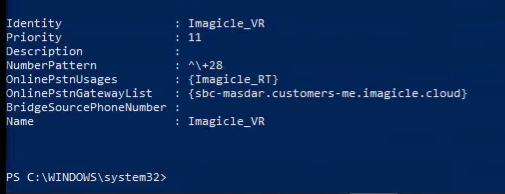
Then the following command, where you need to replace sbc-companyname with the domain configured in previous paragraph. Remember the "us" or "me" prefixes, to be added respectively for North America and Middle-East.
New-CsOnlineVoiceRoute -Identity "Imagicle_VR" -NumberPattern "^\+28" -OnlinePstnGatewayList sbc-companyname.customers.imagicle.cloud -OnlinePstnUsages "Imagicle_RT"
The result should be similar to below screenshot sample:
If you get an error "Cannot find specified Gateway", please, check the FQDN you typed and ensure the previous steps (Office365 user creation) was successfull.
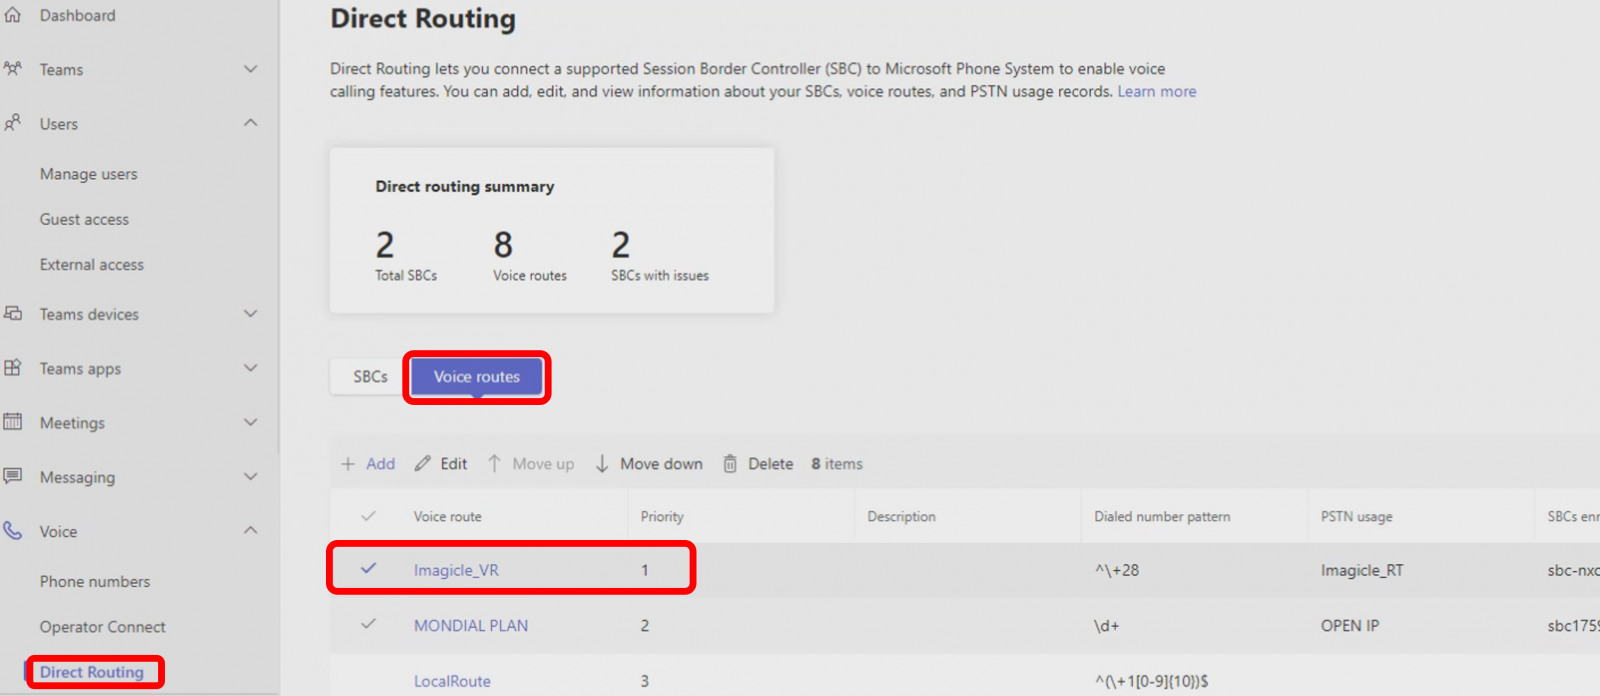
Now login as administrator to Microsoft Teams Admin Center and go to Voice ⇒ Direct Routing ⇒ Voice routes and Move up Imagicle_VR entry to the top priority 1 position, to make sure this special rule is always engaged for calls to be routed to Imagicle Cloud instance:
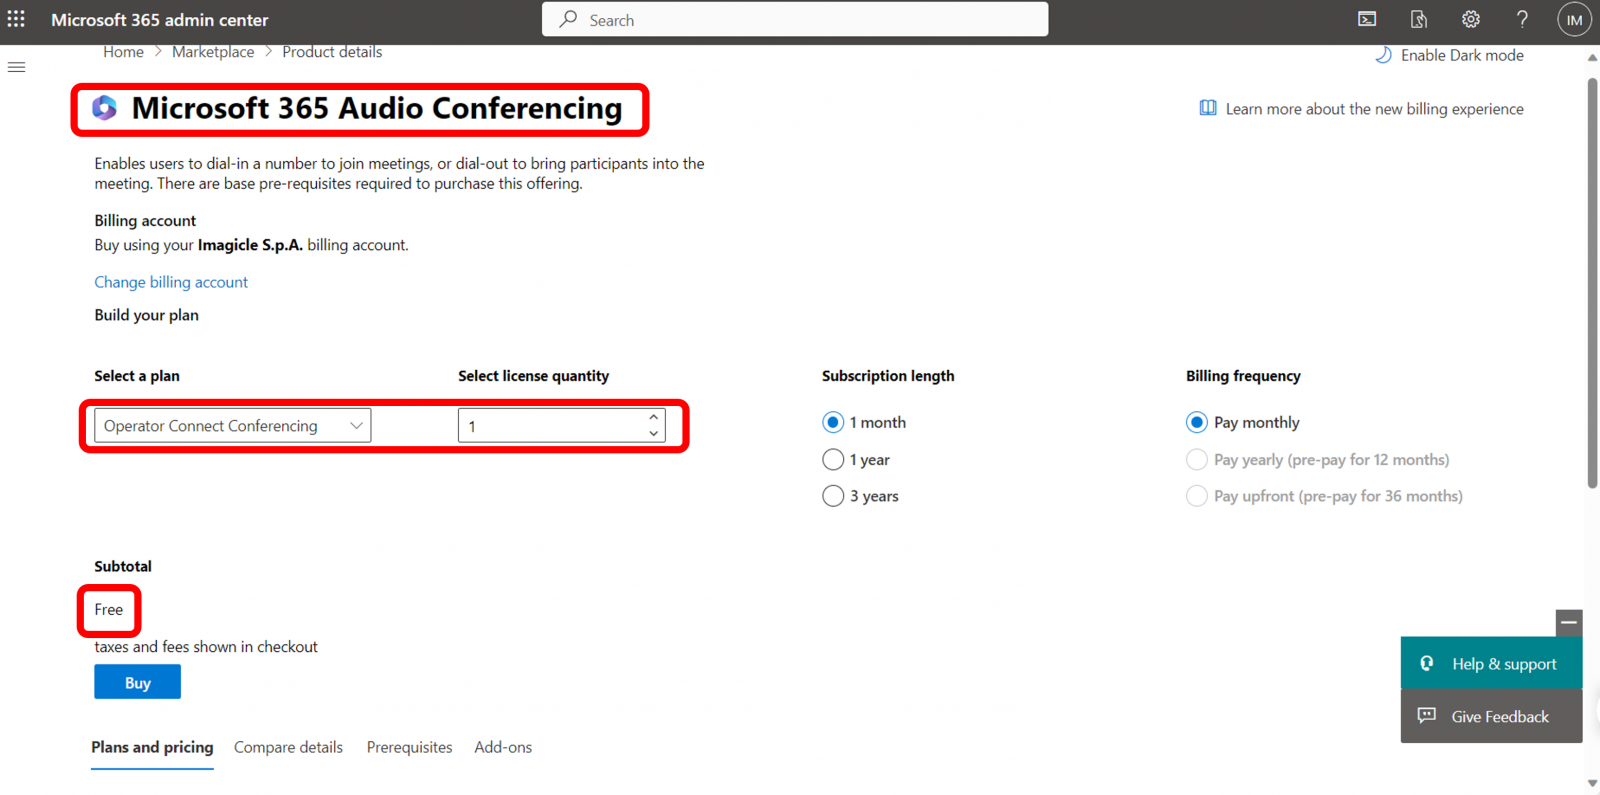
Imagicle Attendant Console leverages Microsoft three-party conference calls to answer inbound calls. This requires a "Microsoft 365 Audio Conferencing - Operator Connect Conferencing" license. If you already own an E5 license, then the conferencing feature is already included. Otherwise you can purchase this license from Microsoft Marketplace, for three years completely free of charge. See below:
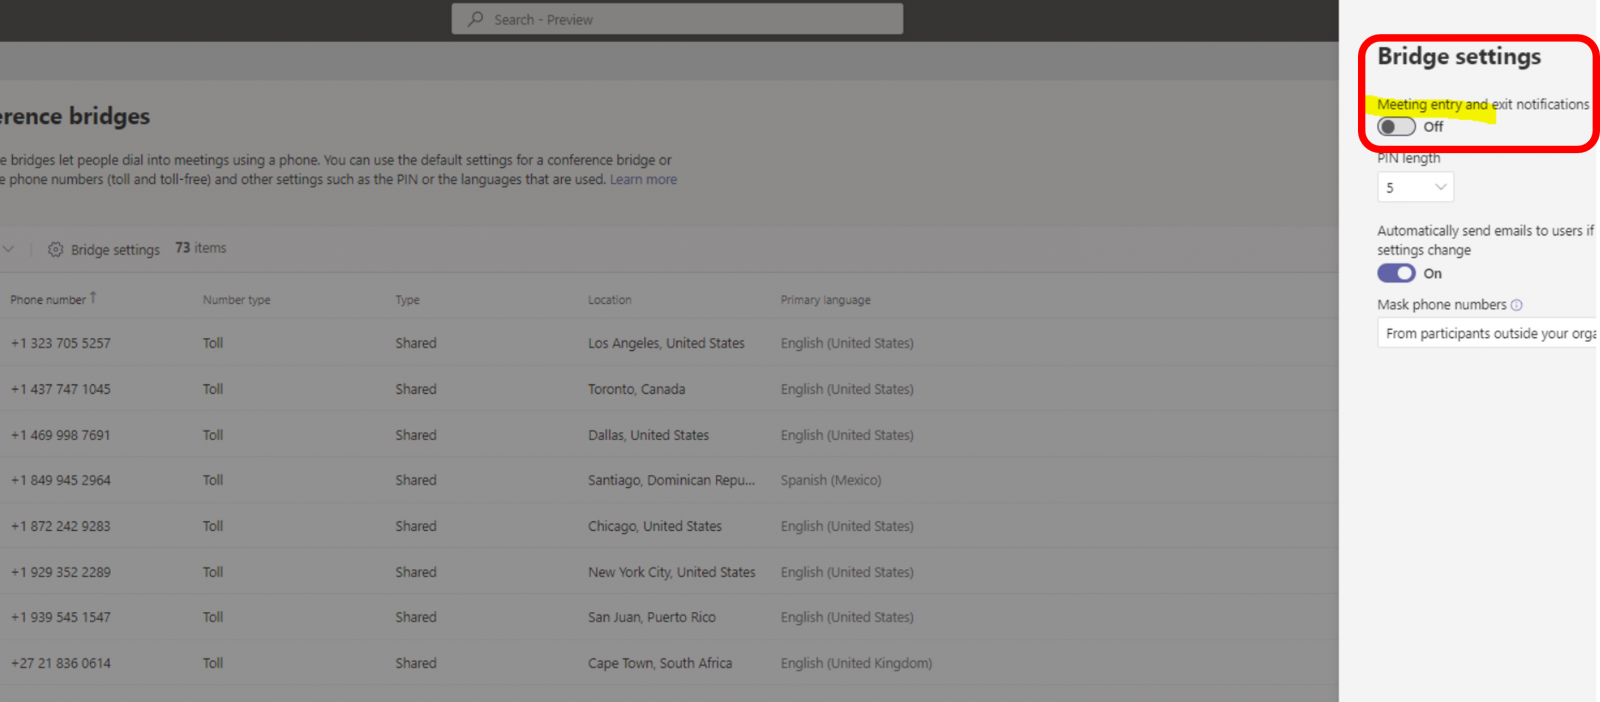
Once assured that conferencing license is available, go to Meetings ⇒ Conference bridges ⇒ Bridge settings.
Turn off "Meeting entry and exit notifications", to avoid the voice prompt to be played when somebody is calling the Imagicle queue. See below:
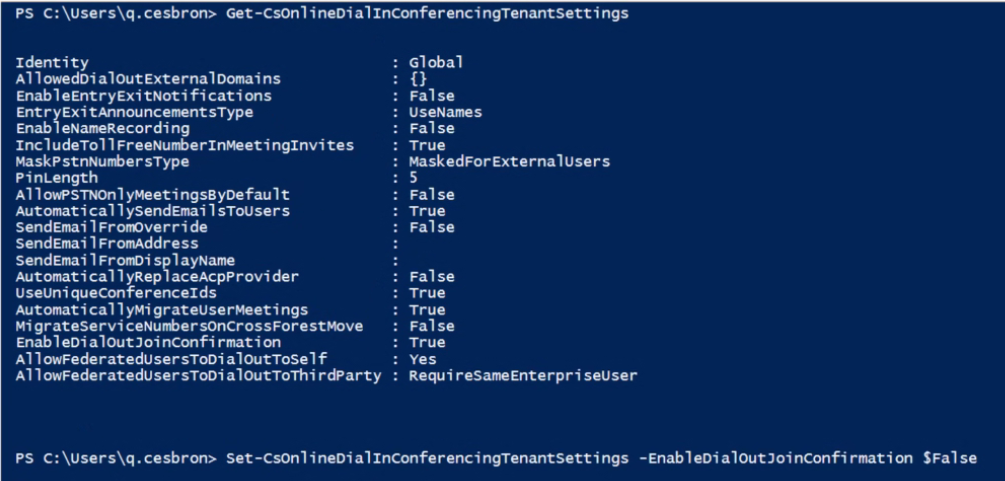
To avoid a voice prompt asking to press 1 to accept inbound calls from Imagicle queues, please enter the following PowerShell command:
Get-CsOnlineDialInConferencingTenantSettings
and make sure that EnableDialoutJoinConfirmation is set to false. See below the outcome of above command and also the command to disable the confirmation:
Now go to Voice ⇒ Voice routing policies and locate the existing VRP used for PSTN breakout. You have two options:
- Recommended: create a new Voice Routing Policy for operators called "Imagicle_VRP", including "Imagicle_RT" and all other required PSTN usage records.
- Modify an existing VRP and just add "Imagicle_RT" record in it. In this case, take note of used VRP, because this information is required later on in this procedure.
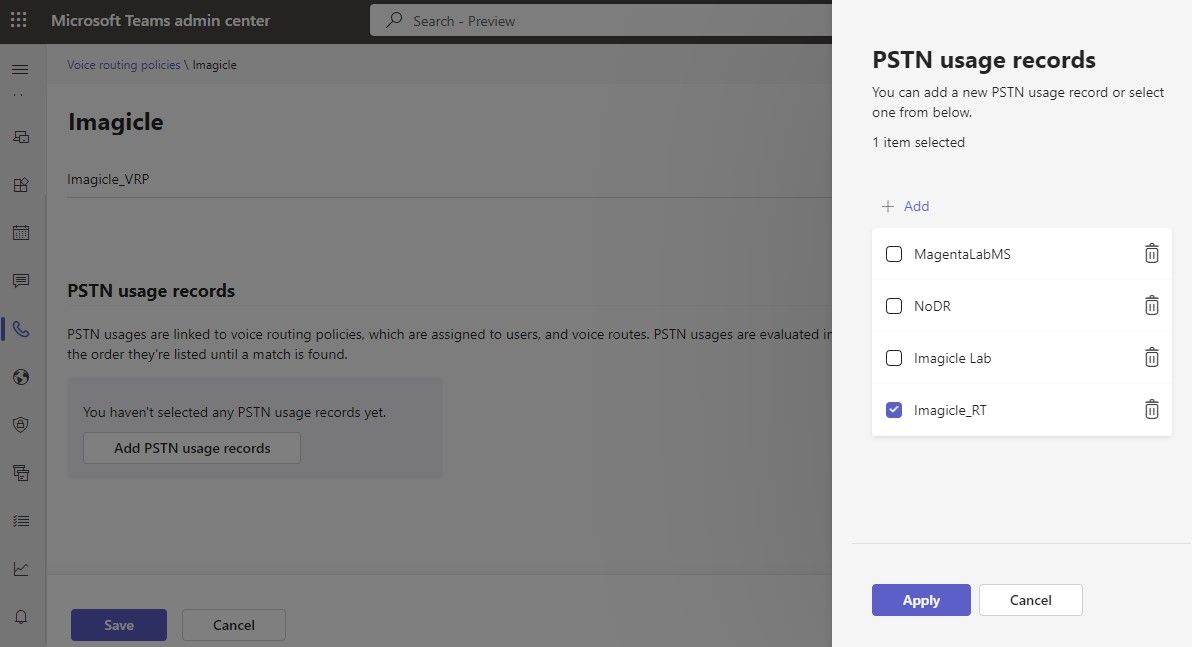
Note: Please make sure that Imagicle_RT is added at the top of "PSTN usage" entries, otherwise it might happen that it is never engaged. We strongly suggest to move the Imagicle_RT to the top of the list.
Configurations from MS Azure Web Portal
Azure BOT requires a dedicated Azure Application, to be created by following below procedure.
Azure App Registration
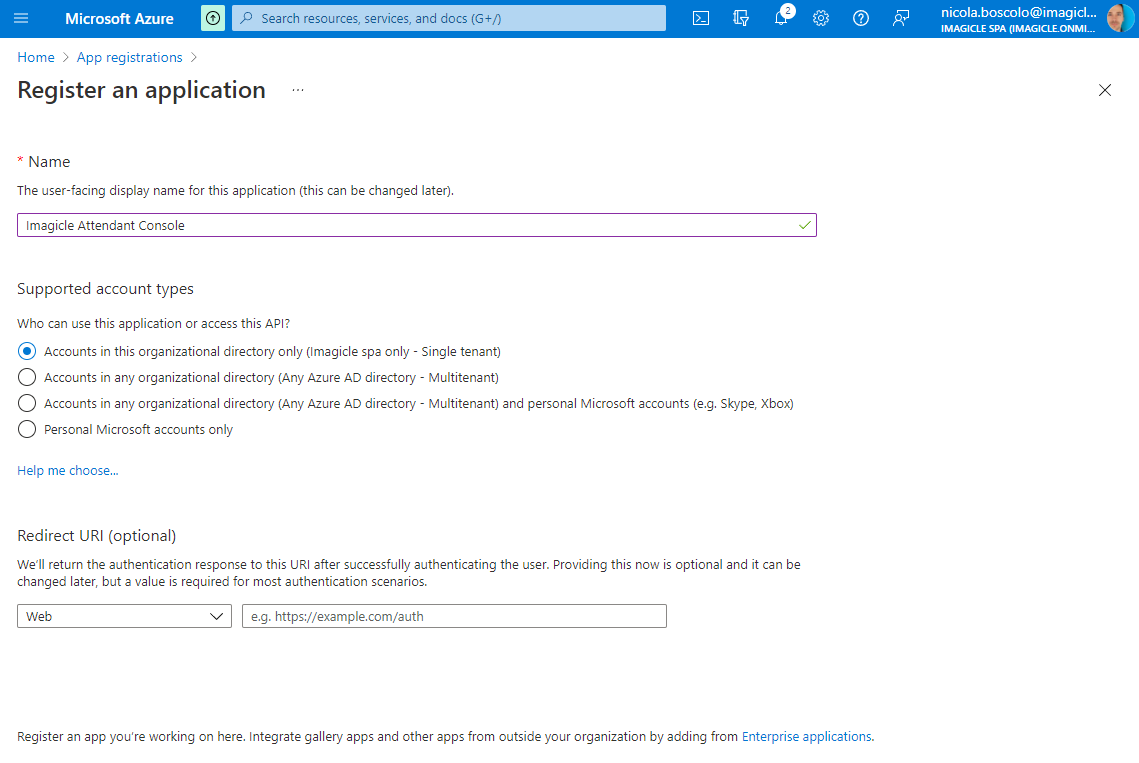
- Please connect to https://portal.azure.com and login as Administrator
- Select “App registrations” service and click on “New Registration”
- Please compile the form as below sample, filling Application name with “Imagicle Attendant Console”
- Hit "Register" to get the following resume page, including Application (client) and Directory (tenant) IDs.
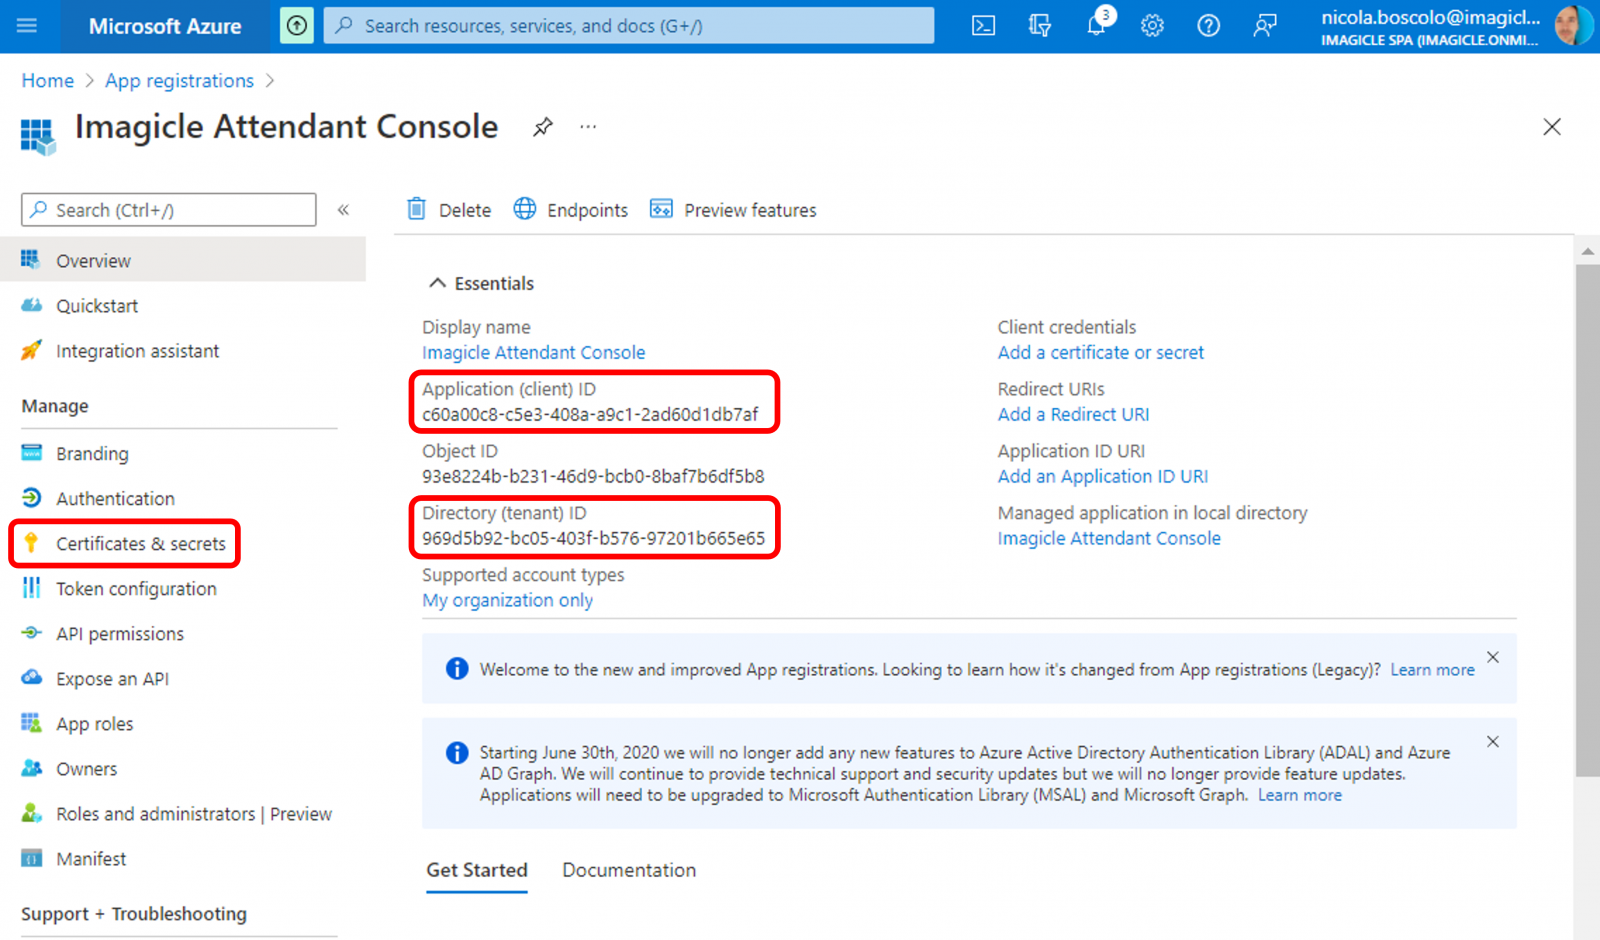
- Please take note of above Application ID and Directory ID. They are required later on in this procedure.
- Click on "Certificates & secrets" to define a new "Client Secret"
Client Secret
- Please click on “New client secret” and choose an expiration period. We suggest to apply the longest possible option (24 months):
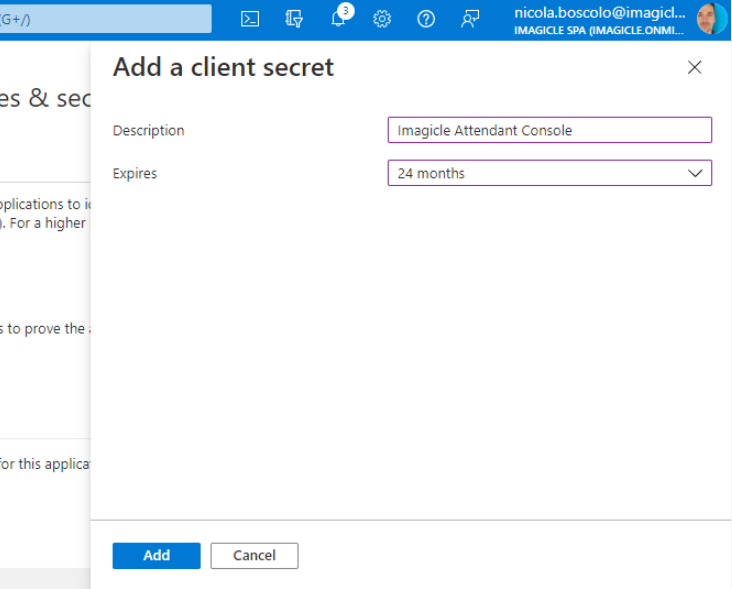
- Hit "Add" button and take note NOW of Client Secret "Value", available once new Client Secret has been created. It is required later on in this procedure and it won't be displayed anymore in the future.
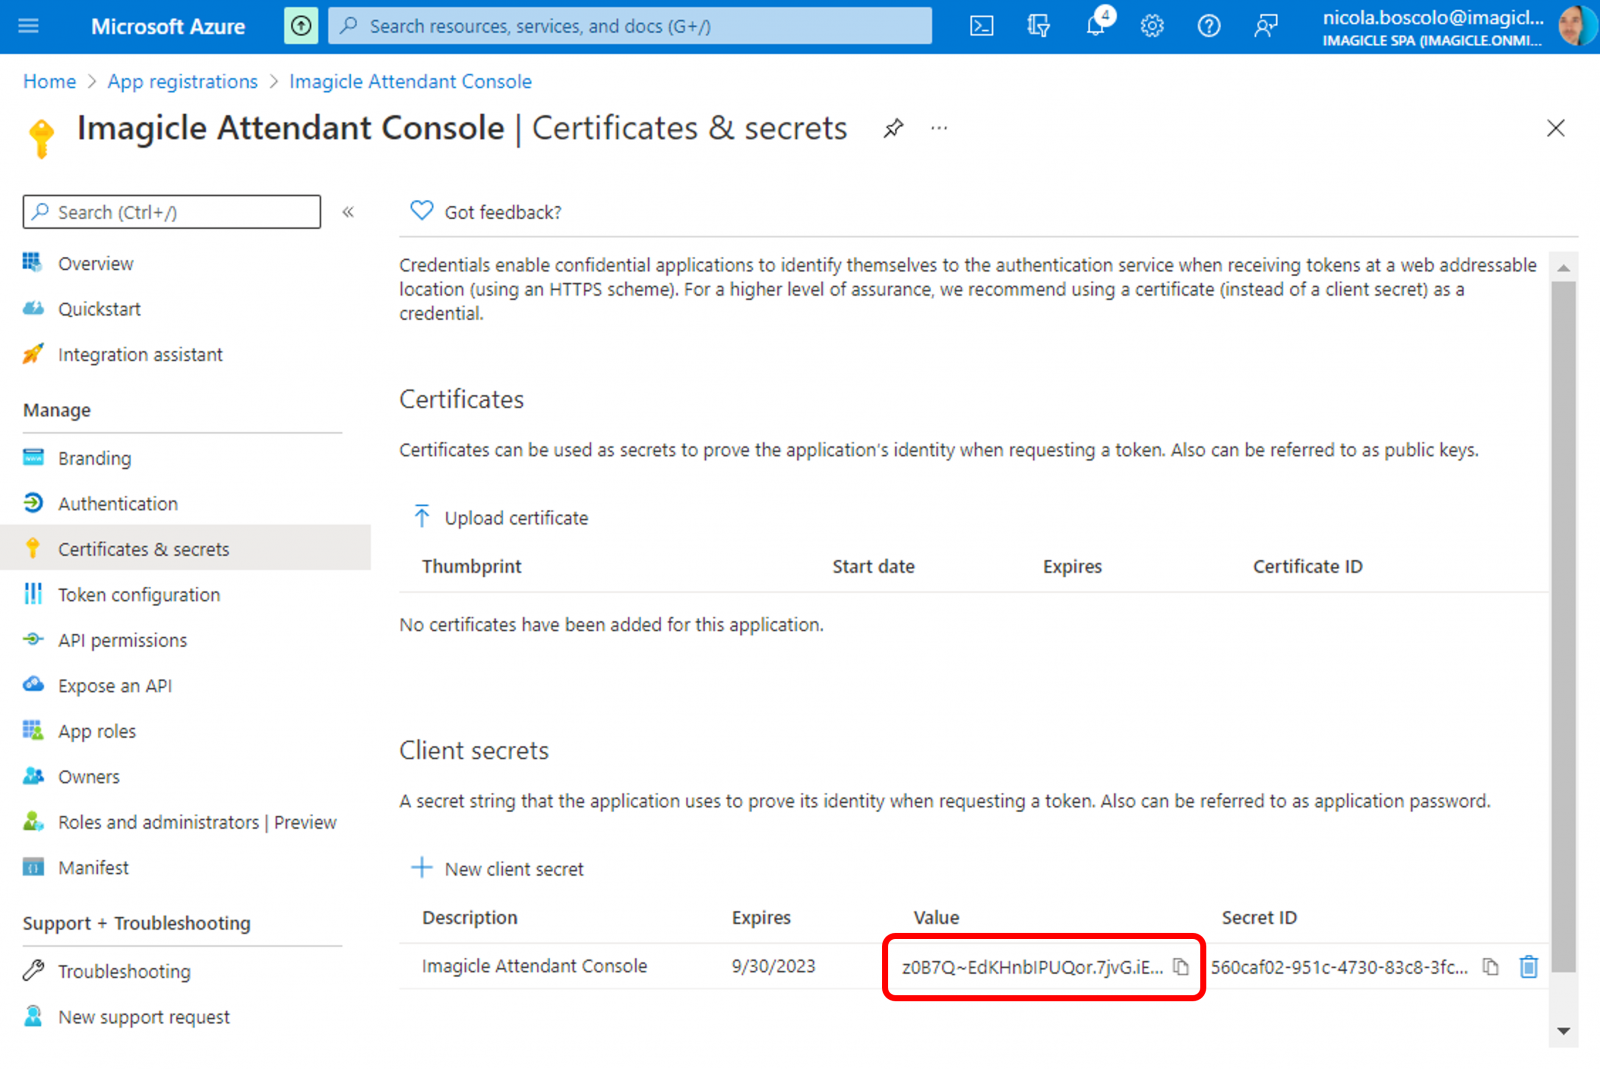
- Please set a reminder for Client Secret expiration, so you can generate a new Client Secret before it expires and the system stops working.
- When the Client Secret is going to expire (or once it has expired), you can just create a new Client Secret by following same procedure. Then you can transmit new Client Secret value to Imagicle Cloud Services team, who will apply it in the Imagicle Cloud. Once done, you can remove the expired Client Secret form your Azure Portal.
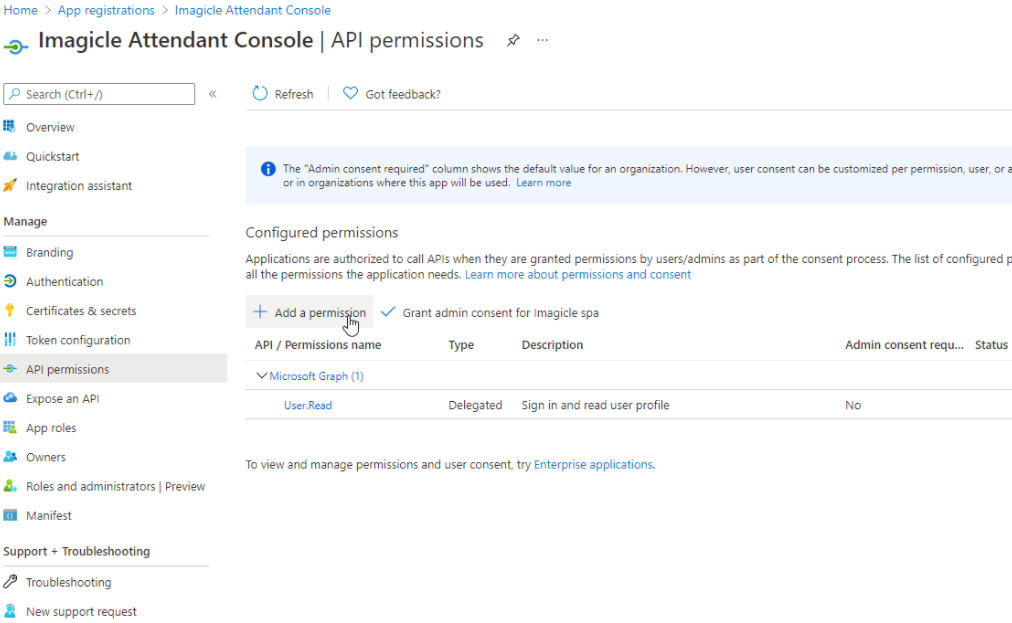
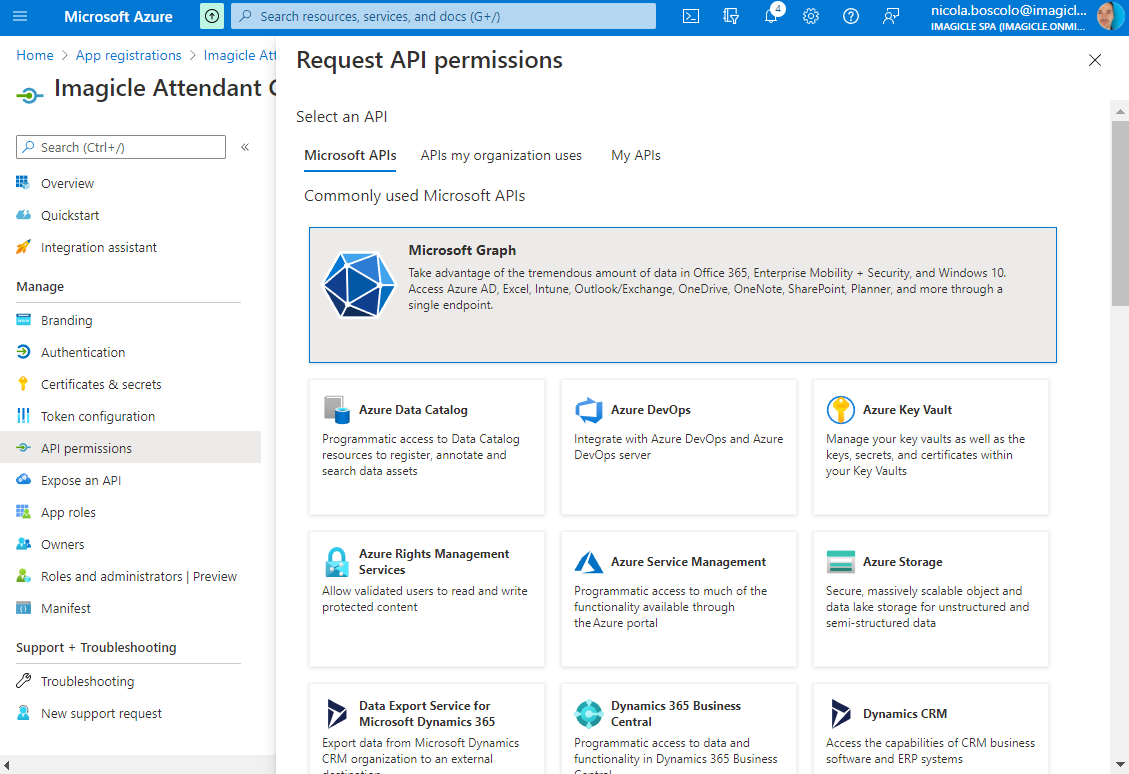
API Permissions
- Within newly created App Registration, now you need to add permissions to leverage Microsoft Graph APIs. Please click on "API permissions" to get the following window:
- Click on "Add a permission" and select “Microsoft Graph”:
- Now click on "Application permissions" and tick "Calls.InitiateGroupCall.All" permission:
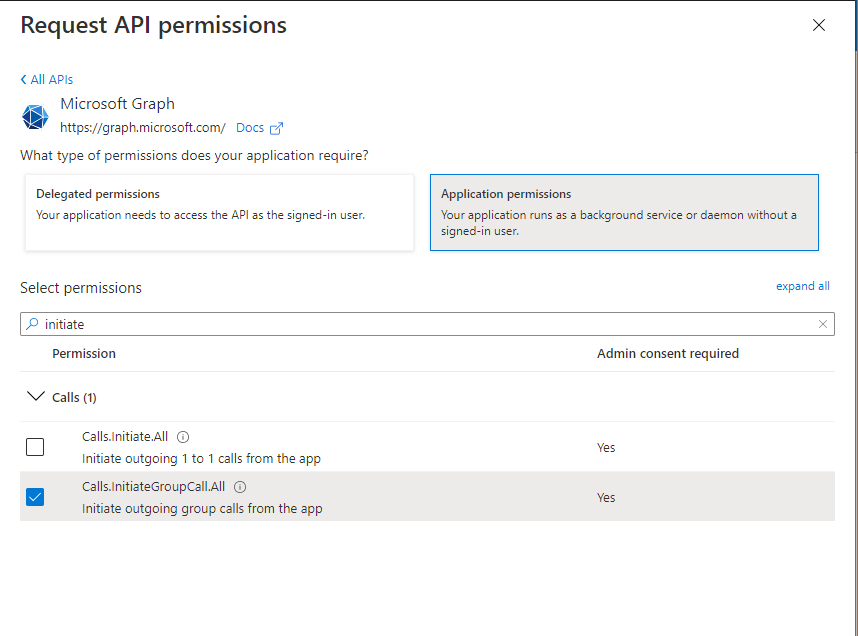
- Now search and add "Calls.JoinGroupCall.All" as well:
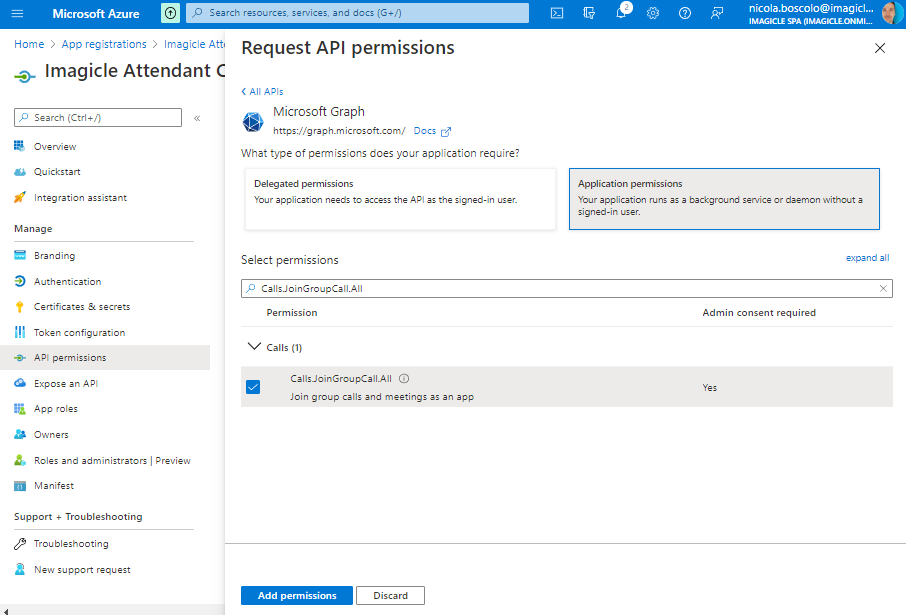
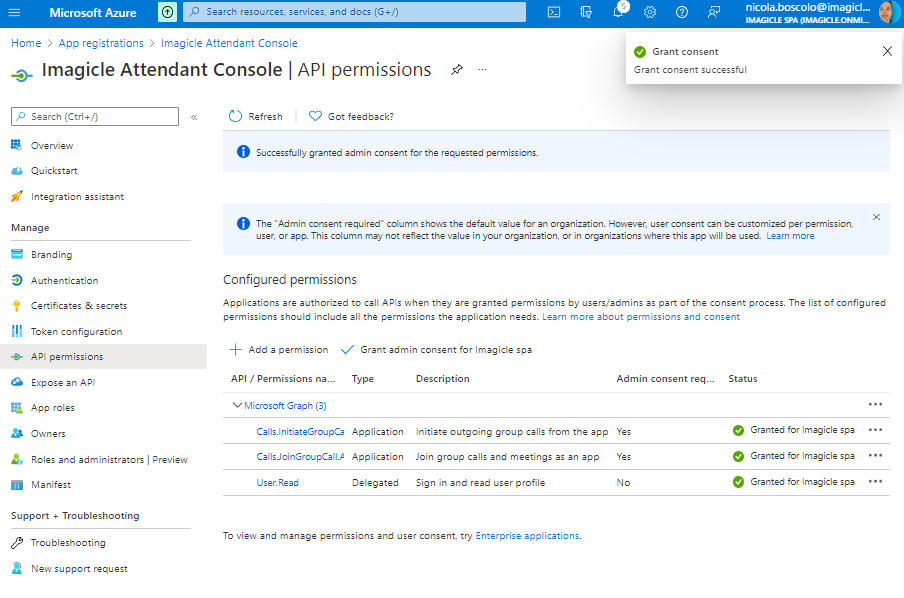
- Once both Microsoft Graph permission have been added, you need to click on “Grant admin consent for <Your Company Name>”. You get a confirmation pop-up, where you need to click "Yes"
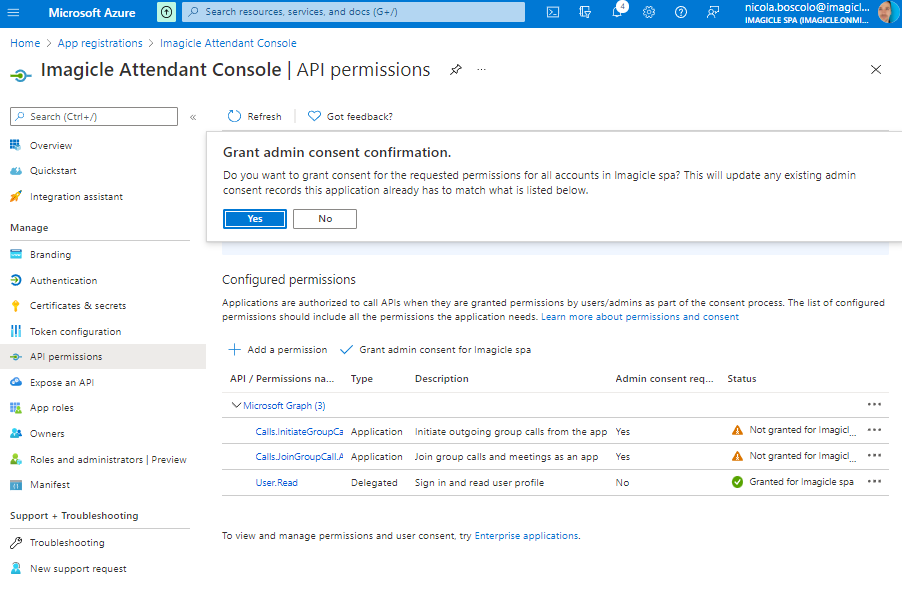
- The following screenshot sample shows the actual API permissions summary page, if the procedure has been accomplished in the correct way:
Before proceeding with additional configurations, please send the following collected data to Imagicle Team:
- Application ID
- Tenant ID
- Secret Value
Azure BOT
Please access to Microsoft Azure web portal as Administrator and search for Azure Bot from top search box, under the Marketplace section. See below:
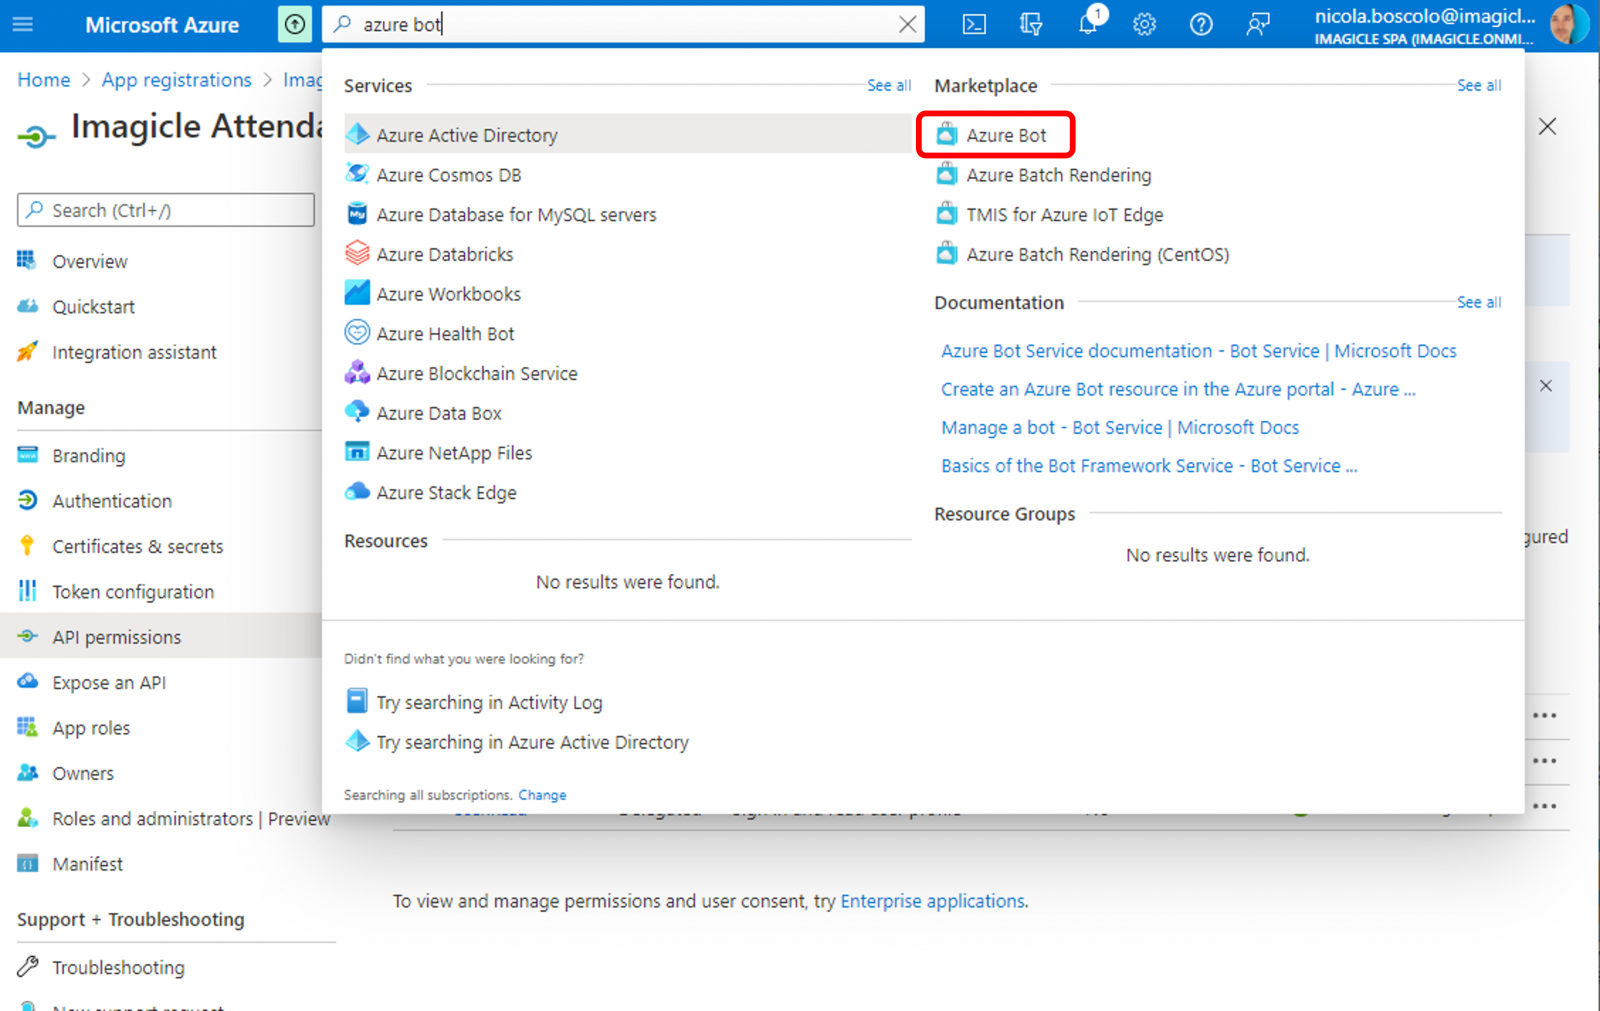
Note: If you can't find "Azure Bot" menu item, please use the following direct URL: https://portal.azure.com/#create/Microsoft.AzureBot
If the admin account you are leveraging for configurations has a valid Azure subscription or it has been added as "Contributor", the following window appears, where you can create a new BOT by hitting "Create an Azure Bot" option.
In no valid Azure subscription is available, you can apply for the free plan and a credit card number is required to proceed. No charges are applied.
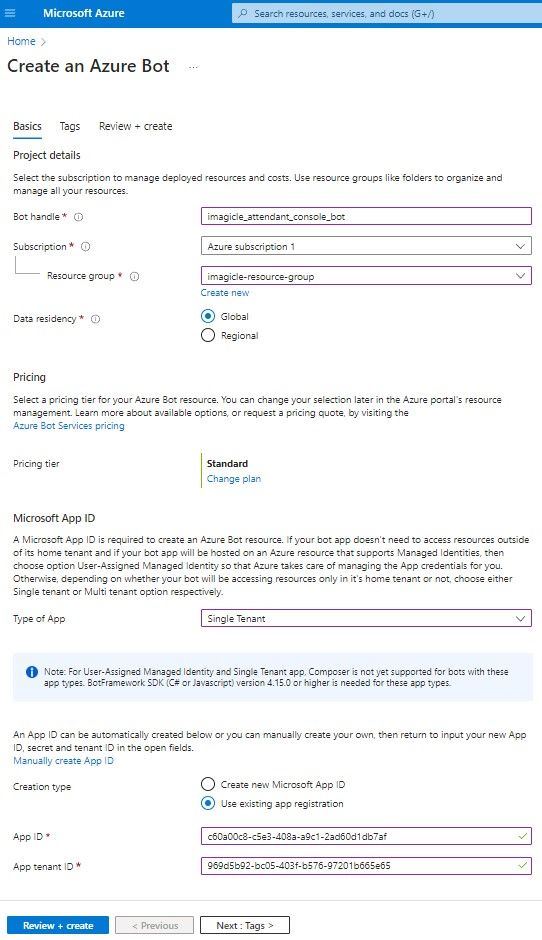
- Please fill the following above fields:
- Bot handle: Enter "imagicle_attendant_console_bot". Do not use dashes! Only underscores are allowed.
- Subscription: leave the default value
- Resource group: create a new Imagicle group, if none is available
- New resource group location: Please select the location of your MS-Teams tenant
- Data residency: Please select "Global"
- Pricing tier: Standard plan
- Type of App: Single Tenant
- Creation type: Use existing app registration
- App ID: Paste here previously copied "Application ID" saved during App creation
- App tenant ID: Paste here previously copied "Directory (tenant) ID" value, saved during creation of the Azure App Registration
- Now hit “Review + create” and check all entered values:

- If values are correct and validation is passed, please hit “Create” button. Otherwise, if you get the following error message, please hit "Previous" and review the Location you associated to new Resource Group:

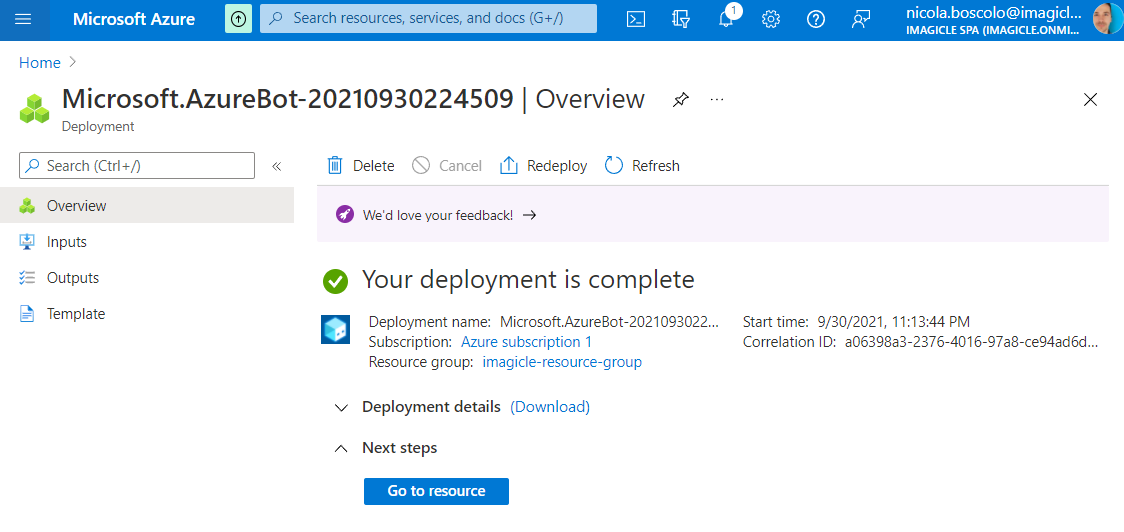
- If the Bot deployment is successful, you get below summary page:
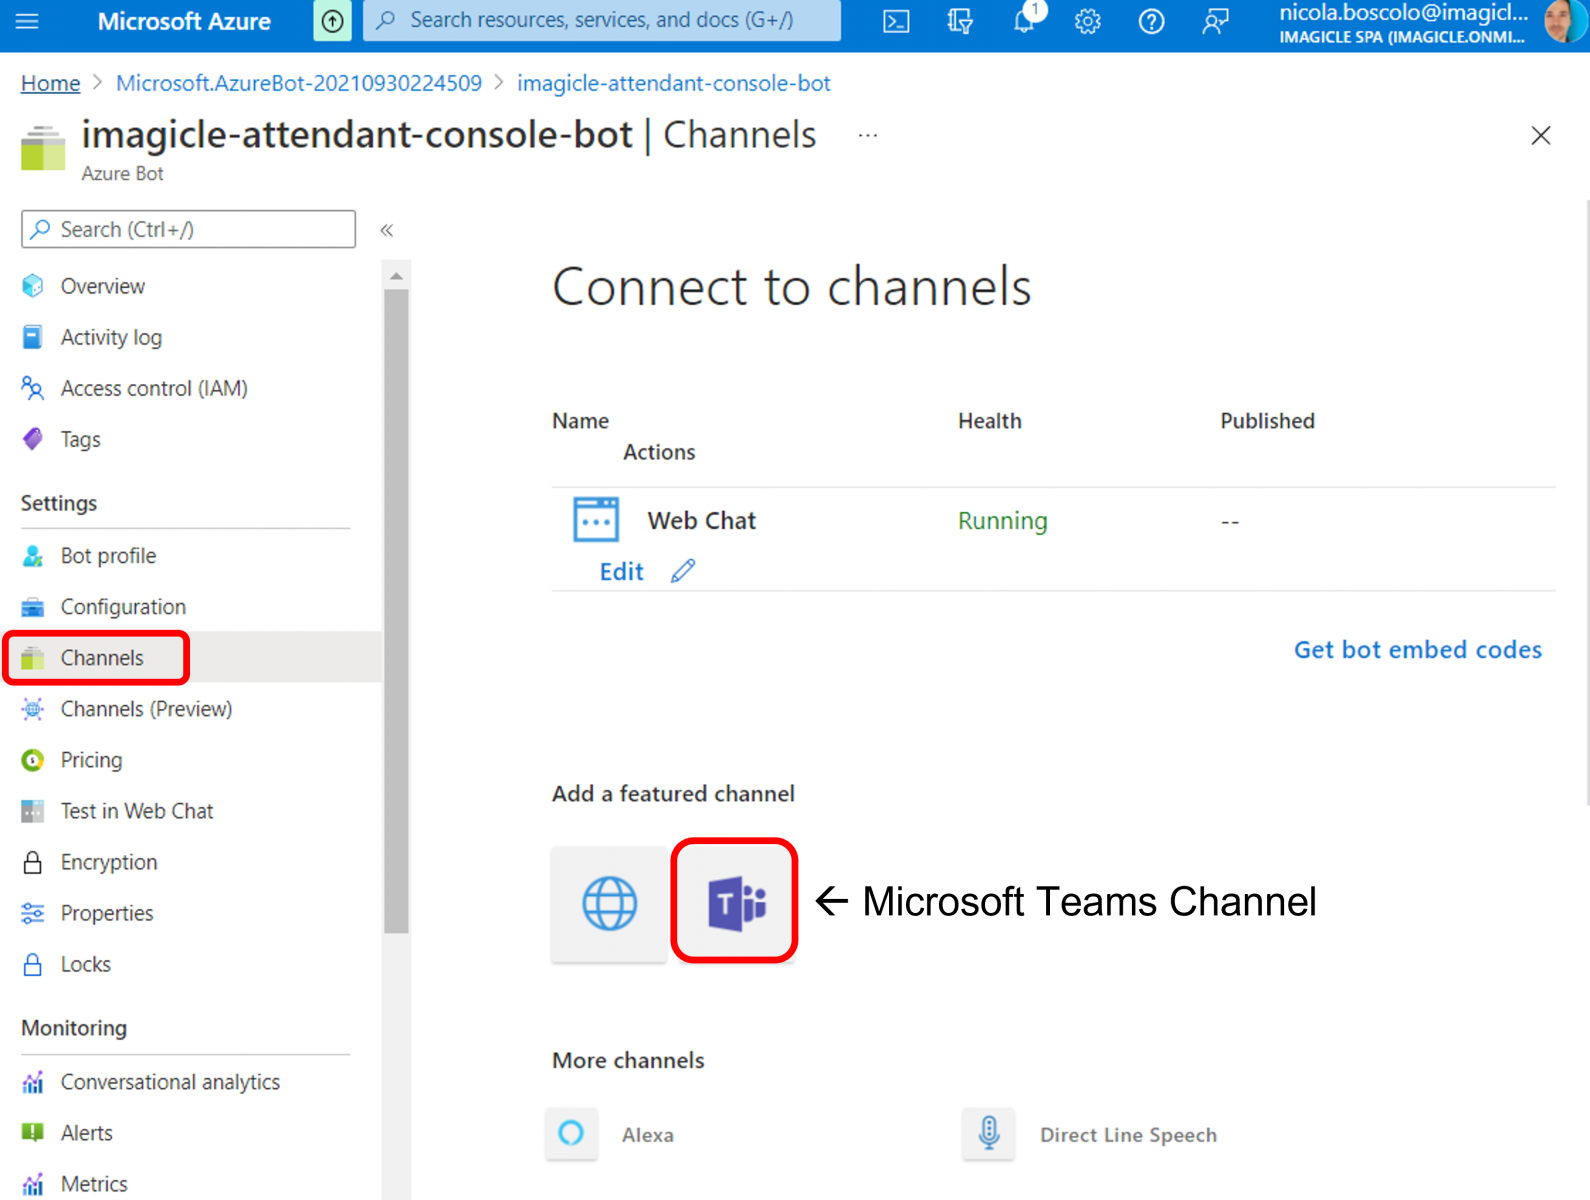
Connect BOT to MS Teams Channel
Newly defined BOT is the native MS Teams interface that Imagicle is using to transfer calls to own queues/auto attendants or to PSTN numbers. To achieve this goal, new BOT must be associated to MS Teams client by using a "Channel".
- In below BOT screenshot sample, "Channel" option is selected, pointing to "Microsoft Teams Channel":
- Once MS Teams channel is selected, a new configuration window appears, where you must select "Calling" tab:
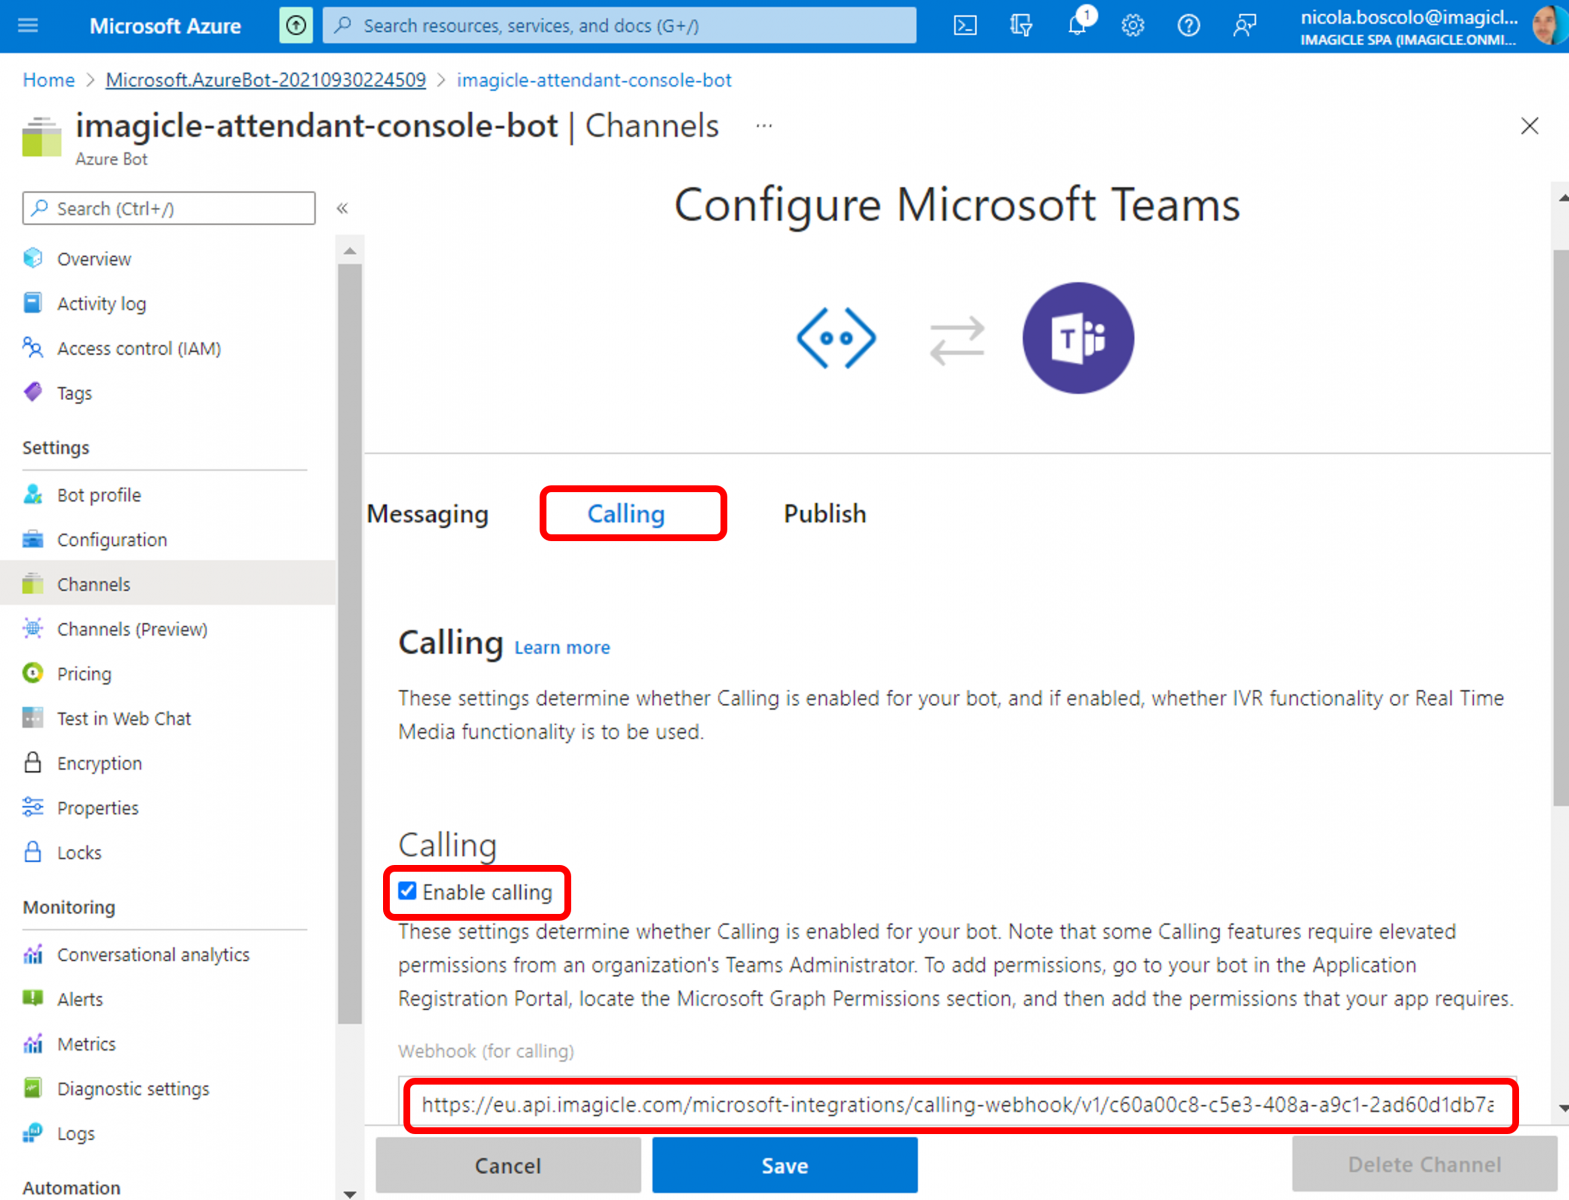
- Please tick "Enable calling" flag and add a "Webhook" URL pointing to Imagicle Cloud, including the previously copied Application ID, saved during App creation. Below the correct URL depending on the region:
EU/Middle East: https://eu.api.imagicle.com/microsoft-integrations/calling-webhook/v1/app_id/teams-call-events
United Kingdom: https://uk.api.imagicle.com/microsoft-integrations/calling-webhook/v1/app_id/teams-call-events
America: https://us.api.imagicle.com/microsoft-integrations/calling-webhook/v1/app_id/teams-call-events
Canada: https://ca.api.imagicle.com/microsoft-integrations/calling-webhook/v1/app_id/teams-call-events
Japan: https://jp.api.imagicle.com/microsoft-integrations/calling-webhook/v1/app_id/teams-call-events
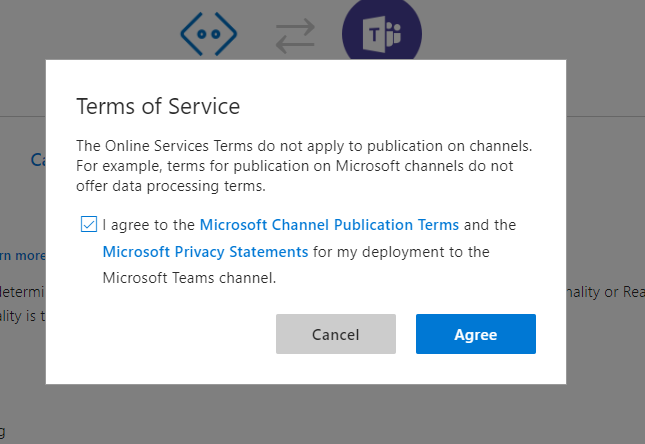
- Hit "Save" button and agree Terms of Service:
Now, please go back to PowerShell and issue this command to remove undesired BOT pop-ups during a call transfer:
Set-CsApplicationMeetingConfiguration -AllowRemoveParticipantAppIds @{Add="AppID"}
- <AppID>: This is the Application ID previously noted upon App Registration definition.
Please allows some minutes for the command to be accepted.
Once accepted, please enter next command, to verify that specified App-id appears in AllowRemoveParticipantAppIds properties:
Get-CsApplicationMeetingConfiguration
The result should be similar to below sample:

Specific configurations to apply for each Imagicle queue or auto attendant
The following steps must be done for each Imagicle ACD queue or AutoAttendant service (they are not needed for the Camp-On queue).
Please launch once again the PowerShell as administrator and enter the following command to create a new Application Instance to identify the queue/AA:
New-CsOnlineApplicationInstance -UserPrincipalName queuename@company.com -ApplicationId AppID
- <queuename@company.com>: it is an UPN identifying the Imagicle queue. Please use a valid company domain (e.g., switchboard@acme.com)
- <AppID>: This is the Application ID previously noted upon App Registration definition.
If the command is successful, you get an "Object ID" string. Please take note of this value, to be used in additional commands.
Now enter the following additional command to enable the Application Instance:
Sync-CsOnlineApplicationInstance -ObjectId ObjectID -ApplicationID AppID
- <ObjectID>: This is previously noted "Object ID" string
- <AppID>: This is the Application ID previously noted upon App Registration definition.
If you get an error message like below sample, just ignore it and proceed with the procedure.

Assign the proper license to Imagicle queue
Now login as administrator to Microsoft 365 web portal and go to Users ⇒ Active Users ⇒ <queueUPN> ⇒ Licenses and Apps
- <queueUPN>: it is previously defined queue UPN identifying the Imagicle queue or AA.
Here you can assign two different license types:
- If the customer is using MS Calling Plan, enable "Microsoft Teams Phone Resource Account” + “Domestic Calling Plan” licenses.
- In all other cases, just enable "Microsoft Teams Phone Resource Account” license.
ATTENTION: If you have purchased your Microsoft licenses from a Reseller and you can't find "Microsoft Teams Phone Resource Account” in the list of purchased licenses, then you need to contact your reseller and ask to add them. They are for free.
Now go back to PowerShell and launch this command:
Get-CsOnlineUser -Identity queueUPN | Select-Object EnterpriseVoiceEnabled
- <queueUPN>: it is previously defined queue UPN identifying the Imagicle queue or AA.
Keep launching this command until the output contains "True", meaning the Resource Account license has been properly assigned.
Now you can associate the Imagicle queue/AA to an available PSTN DID in customer's dial plan by issuing the following command:
Set-CsPhoneNumberAssignment -Identity "queueUPN" -PhoneNumber "+xxxxxxxxxx" -PhoneNumberType <PSTN_TYPE>
- <queueUPN>: it is previously defined queue UPN identifying the Imagicle queue or AA.
- +xxxxxxxxxx: This is the queue number DID in +E.164 format
- <PSTN_TYPE>: Identifies the PSTN access method in use. Please select the proper option among:
- DirectRouting
- CallingPlan
- OperatorConnect
Note: The actual queue or auto attendant pilot number to be configured in Imagicle UCX Cloud Suite corresponds to above +xxxxxxxx DID number, replacing "+" with "+28". For example, DID +17025551234 is routed to Imagicle as +2817025551234.
Now you can "grant" the VRP and associate it to newly created queue UPN:
Grant-CsOnlineVoiceRoutingPolicy -Identity queueUPN -PolicyName VRP
- <queueUPN>: it is previously defined queue UPN identifying the Imagicle queue or AA.
- <VRP>: This is the newly created VRP "Imagicle_VRP"; otherwise, the existing VRP you previously noted for PSTN breakout.
Please repeat above steps for each queue or Auto Attendant to be configured for this MS-Teams tenant.
Specific configurations to apply for each Imagicle Attendant Console operator
Operators using Imagicle Attendant Console and Advanced Queuing applications should have a Microsoft Teams valid phone license, otherwise they can't receive calls from Imagicle queues.
Operators using Imagicle Attendant Console and Advanced Queuing applications must own a SIP URI (for MS Teams client integration) or PSTN number in E.164 format (for SIP gateway deskphones integration).
- Please select "Users" from left panel and search for operator's user. Once located, make sure that proper Phone Standard or Office 365 E5 license is assigned, as per below screenshot sample:

Recording Policy Creation
Recording Policy is a group of rule policies which is assigned to each MS Teams user. The Recording Policy described in this paragraph allows an Attendant Console operator to handle up to 100 concurrent calls and 10,000 calls/month (Microsoft source). To handle a higher traffic volume, it might be required to create multiple Apps and BOTs to load balance the traffic.
The following procedure should be repeated for each operator using Attendant Console
- First of all, please enter the following PowerShell command:
New-CsOnlineApplicationInstance -UserPrincipalName attendant_name.surname -DisplayName display-name -ApplicationId app-id
- UserPrincipalName should be a new unique UPN within the Tenant (you cannot use an existing UPN associated to an MS Teams user). As a guideline, Imagicle suggests to enter a username like "attendant_name.surname".
- Displayname: same as UserPrincipalName; for instance "attendant_john.smith"
- App-id corresponds to previously copied "Application ID" saved during App creation
Command output is similar to below sample:
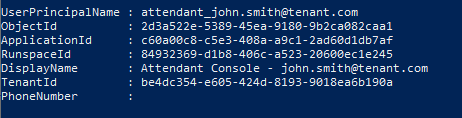
Please take note of above "ObjectId". It is required below in this procedure.
"New-CsOnlineApplicationInstance" command might fail with an error message (read here for more details). Please make sure the user is associated to an online MS-Teams tenant. Please proceed by issuing the following commands, replacing attendant-object-id according to above data and by adding the usual AppID:
Sync-CsOnlineApplicationInstance -ObjectId attendant-object-id -ApplicationID AppID
If you get an error message like below sample, just ignore it and proceed with the procedure.
Recording Policy for Attendant Console only
If you are enabling the user to the Imagicle Attendant Console application only, run the following command. Instead, if you have also enabled Call Recording application for the agents, please, jump to the next section below.
New-CsTeamsComplianceRecordingPolicy -Identity Recording-policy-imagicle -Description "Recording-policy-description"
- <Recording-policy-imagicle> is the actual name assigned to new Imagicle Recording Policy, to be used in all the following PS commands. Imagicle recommends to use "Imagicle CRP - name.surname" (for instance "Imagicle CRP - john.smith")
- <Recording-policy-description> same as above Identity name, like "Imagicle CRP - john.smith".
Set-CsTeamsComplianceRecordingPolicy -Identity Recording-policy-imagicle -Enabled $true -ComplianceRecordingApplications @(New-CsTeamsComplianceRecordingApplication -Parent Recording-policy-imagicle -Id attendant-object-id -RequiredBeforeMeetingJoin 0 -RequiredBeforeCallEstablishment 0 -RequiredDuringMeeting 0 -RequiredDuringCall 0)
- <Recording-policy-imagicle> is the actual name assigned to new Imagicle Recording Policy, to be used in all the following PS commands. Imagicle recommends to use "Imagicle CRP - name.surname" (for instance "Imagicle CRP - john.smith")
- <attendant-object-id> is the ObjectId of the Online Application Instance obtained at the previous step.
Recording Policy for Attendant Console + Call Recording usage
If, for the same users, you are enabling Imagicle Attendant Console in combination with Imagicle Call Recording or another third-party application, then please add Recorder's (or Third Party app) Object-Id (<recorder-object-id>) in the next command, to merge both applications into a single Imagicle Recording Policy:
New-CsTeamsComplianceRecordingPolicy -Identity Recording-policy-imagicle -Description "Recording-policy-description"
- <Recording-policy-imagicle> Imagicle recommends to use "Imagicle CRP - name.surname" (for instance "Imagicle CRP - john.smith")
- <Recording-policy-description> same as above Identity name, like "Imagicle CRP - john.smith".
Set-CsTeamsComplianceRecordingPolicy -Identity Recording-policy-imagicle -ComplianceRecordingApplications @(New-CsTeamsComplianceRecordingApplication -Parent Recording-policy-imagicle -Id attendant-object-id -RequiredBeforeMeetingJoin 0 -RequiredBeforeCallEstablishment 0 -RequiredDuringMeeting 0 -RequiredDuringCall 0), @(New-CsTeamsComplianceRecordingApplication -Parent Recording-policy-imagicle -Id recorder-object-id -RequiredBeforeMeetingJoin 0 -RequiredBeforeCallEstablishment 0 -RequiredDuringMeeting 0 -RequiredDuringCall 0)
- <Recording-policy-imagicle> "Imagicle CRP - name.surname" (for instance "Imagicle CRP - john.smith")
- <attendant-object-id> is the ObjectId of the Online Application Instance obtained at the previous step.
- <recorder-object-id> is the ObjectId of the Online Application Instance of the Call Recording (unique Instance, same for all operators)
If one of the following error messages appears, just ignore it:


If you entered above merge command, please enable once again the Imagicle Recording Policy through the following command:
Set-CsTeamsComplianceRecordingPolicy -Identity Recording-policy-imagicle -Description "Recording-policy-description" -Enabled $true
- <Recording-policy-imagicle> "Imagicle CRP - name.surname" (for instance "Imagicle CRP - john.smith")
- <Recording-policy-description> same as above Identity name, like "Imagicle CRP - john.smith".
Recording policy grant
Please wait few seconds and then execute next command to display Recording Policy data summary:
Get-CsTeamsComplianceRecordingPolicy -Identity Recording-policy-imagicle
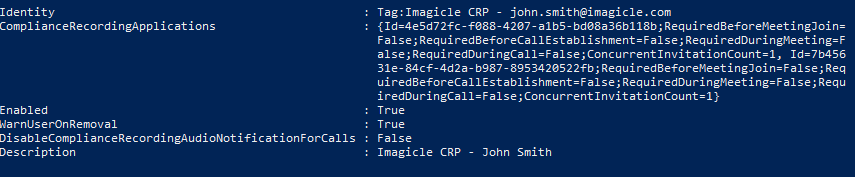
Now it's time to assign newly defined Recording Policy to the specific user, by executing the following command that includes the target user UPN:
Grant-CsTeamsComplianceRecordingPolicy -Identity username@company.com -PolicyName recording-policy-imagicle
- Pay attention: user's UPN in MS Teams is case-sensitive!
- Please create a new Online Application Instance, Recording Policy and relevant user assignment for each operator using Imagicle Attendant Console
- Once done, you can double check proper Recording Policy association to a user by issuing the following command:
Get-CsOnlineUser username@company.com | ft sipaddress, tenantid, TeamsComplianceRecordingPolicy
Enterprise Voice Enablement
Operators must be enabled to Enterprise Voice, to receive calls from Imagicle queues. Please execute the following command to check this feature enablement:
Get-CsOnlineUser -Identity username@company.com | Select-Object EnterpriseVoiceEnabled
If the command returns a result as below screenshot, then this feature is disabled:

To enable Enterprise Voice, please execute the following command:
Set-CsPhoneNumberAssignment -Identity username@company.com -EnterpriseVoiceEnabled $true
Feature enablement might take several minutes to propagate within MS-Teams tenant. Please wait before testing queues call routing. You can repeat above Get-CsOnlineUser to double check actual enablement.
Troubleshooting
Attendant Console usage with MS-Teams clients
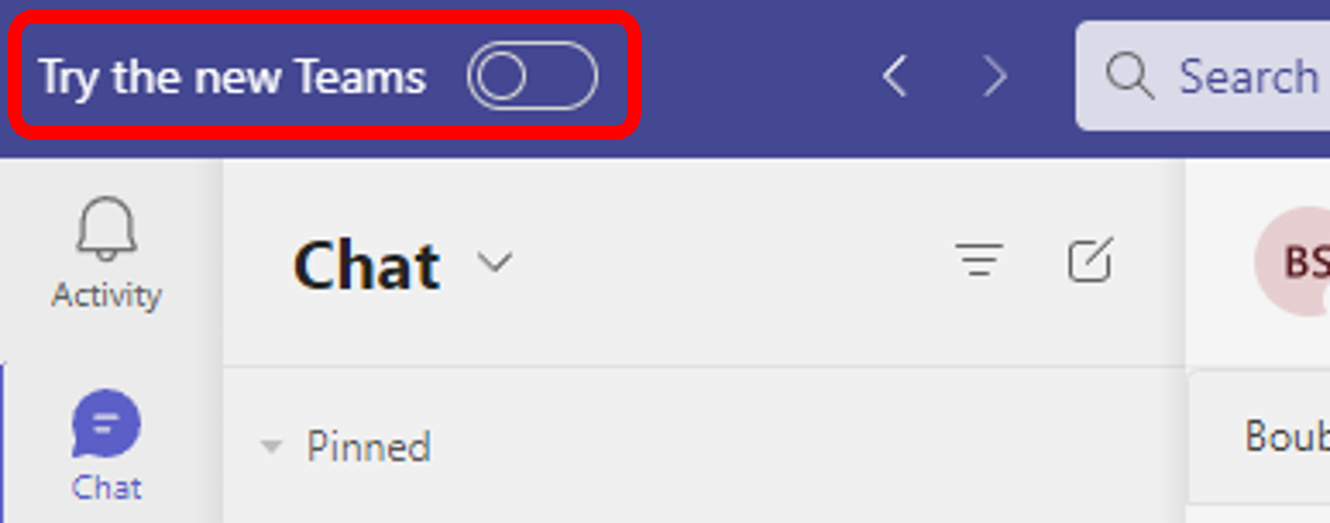
Please bear in mind that Imagicle Attendant Console does not currently support new MS-Teams client layout. Please keep "Try the new Teams" switch turned off, otherwise Attendant Console can't transfer calls to colleagues. See below:
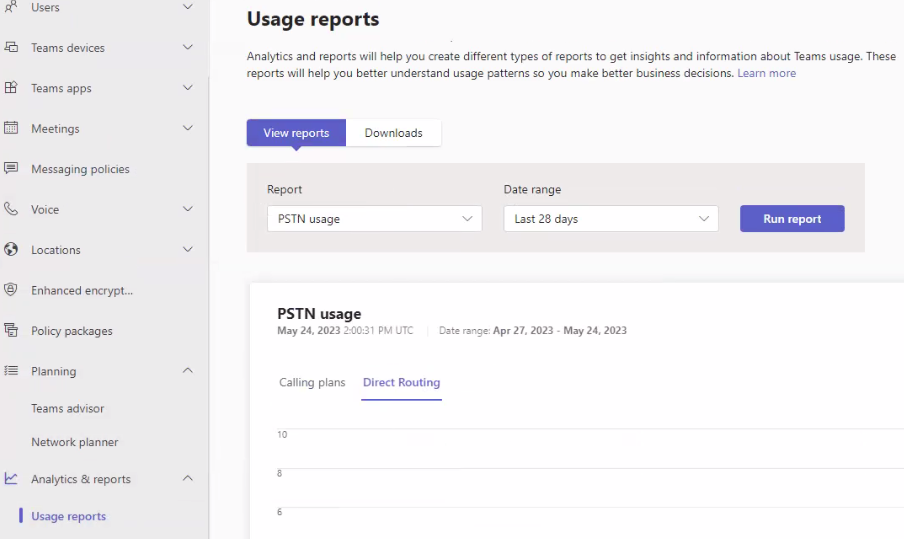
Call Routing
If you are experiencing problems while routing PSTN calls to Imagicle queues/autoattendants, please launch "PSTN usage" report from "Usage reports" menu and select "Direct Routing" option. See below screenshot: