Microsoft Teams Native SIP Routing to Imagicle Cloud
Preparing the Microsoft environment
Imagicle Customer Service solution for Microsoft Teams, including Advanced Queuing, Attendant Console and optionally Auto Attendant, requires to accomplish some preliminary tasks and checks, to make sure that actual implementation goes smoothly without requiring multiple sessions with Imagicle Team.
Below list should be handled by customer/partner prior to schedule a remote session with Imagicle Team:
A new Domain must be created in Microsoft 365 portal, by following the steps included in below New Domain Setup paragraph.
Domain creation returns three items (TXT name, TXT value and TTL), that should be sent to Imagicle Team via email.
Requirements
Imagicle UCX Cloud Suite host name, provided by Imagicle Cloud Services team, like:
<customer-name>.imagicle.cloudAdmin-level access to Microsoft 365 web portal (Global admin)
Admin-level access to Microsoft Teams web portal (Teams administrator)
Admin-level access to MS Teams PowerShell
One Microsoft 365 "E3" user's license (temporarily needed to create Voice Route and relevant policy)
One Microsoft Teams Phone Resource Account for each configured Imagicle Queue/Auto Attendant
Each agent/operator must be enabled to Enterprise Voice and should have a Microsoft 365 "E3” + Microsoft Teams Phone Standard OR a Microsoft 365 "E5” (it already includes the Phone Standard) user’s license.
Configuration Overview
To allow Internet SIP routing of inbound calls from MS Teams to Imagicle Advanced Queuing and Auto Attendant application + routing calls from Imagicle Cloud to MS-Teams users, you should create a Voice Route + relevant policy entry, in turns associated to a Direct Routing destination (Imagicle SBC), in turns associated to a Microsoft Auto attendant for each queue, in turns associated to a Resource account virtual user, in turns assigned to an actual PSTN number to allow reaching each Imagicle Queue/Auto Attendant from PSTN.
To enable such Internet SIP routing, the following tasks should be accomplished:
Enable a second-level domain, associated to a Direct Routing destination (Imagicle Public SBC)
Create a dummy Microsoft "E3" user, to be associated to a VoiceRoute and a Voice Routing Policy
Create an Auto attendant for each required Imagicle Queue/Auto Attendant service
Create a Microsoft Resource account Virtual User for each required Imagicle Queue/Auto Attendant service
Associate above Resource account user to relevant Auto attendant and assign it to an available PSTN number
Microsoft Teams Configurations from MS365 Admin Web Portal and PowerShell
Imagicle UC Cloud Suite is seen by Microsoft Teams as a new Direct Routing location equipped with a SIP-connected SBC. In Imagicle Cloud, a dedicated/shared Cisco CUBE (or vCUBE) "Public SBC" is deployed, to allow the Internet "OTT" Peering between Microsoft Teams cloud and Imagicle Cloud.
New Domain Setup
The following procedure can be autonomously accomplished by the customer/partner, to retrieve domain's "TXT" data and send them to Imagicle team. In this way, you can save time and proceed with further configurations.
Please login to Microsoft 365 Admin web portal and select Domains ⇒ Add Domain:
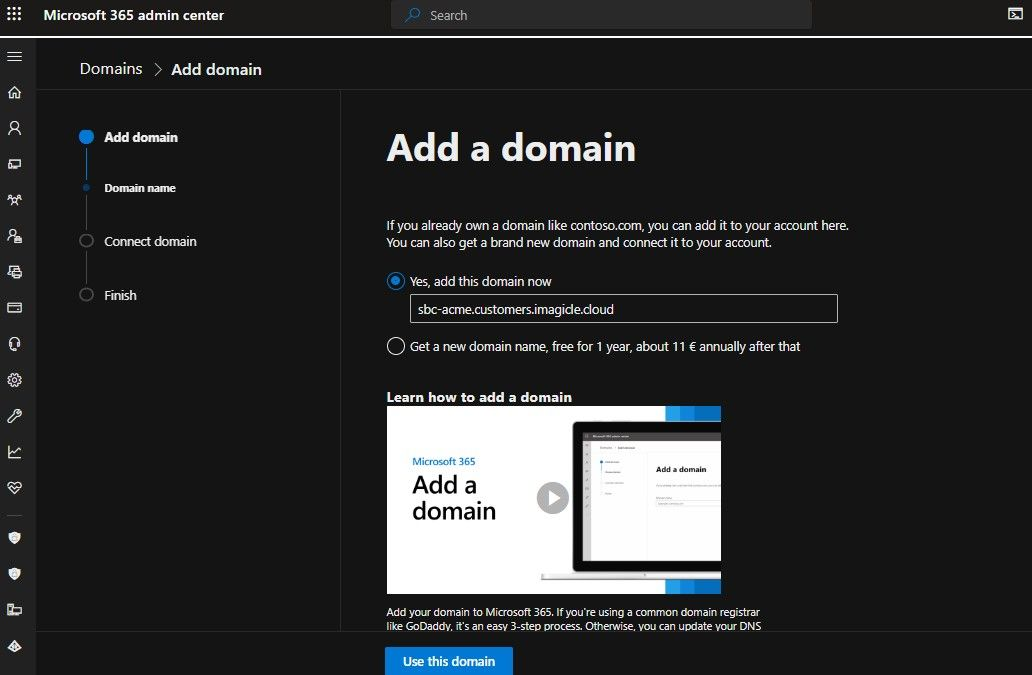
Domain Name must include the DNS name associated to Imagicle UC Cloud Suite deployed in Imagicle Cloud. This is the mandatory naming conventions:
Europe area: sbc-<company>.customers-eu-1.imagicle.cloud
Middle-East area: sbc-<company>.customers-me.imagicle.cloud
North America area: sbc-<company>.customers-us-1.imagicle.cloud
Please do not use other naming formats and just replace "<company>" with own Company name (e.g., sbc-acme.customers.imagicle.cloud).
Click on "Use this domain" to display Domain verification page:
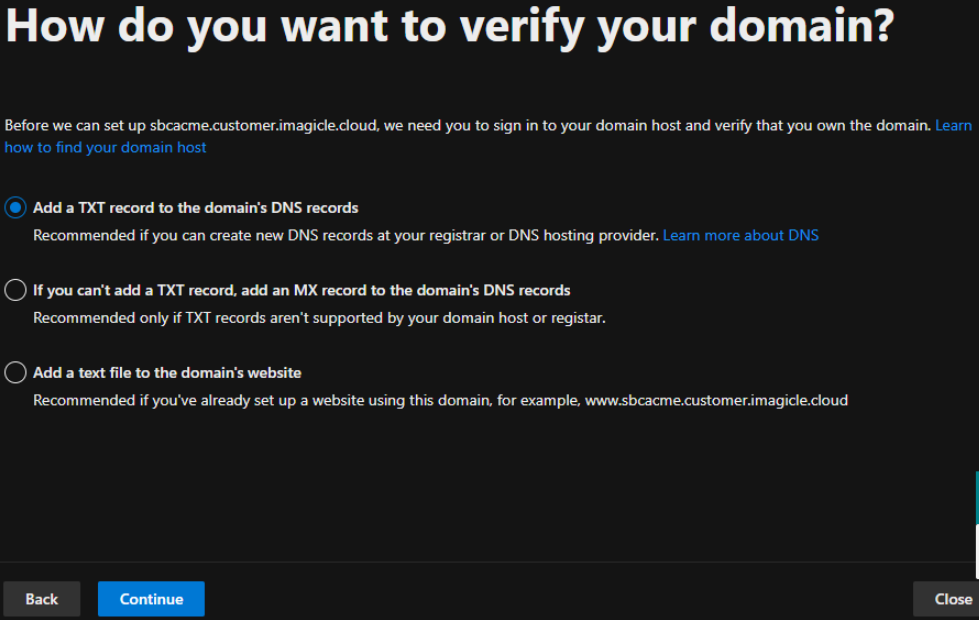
Please select "Add a TXT record to the Domain's DNS records" and hit "Continue":
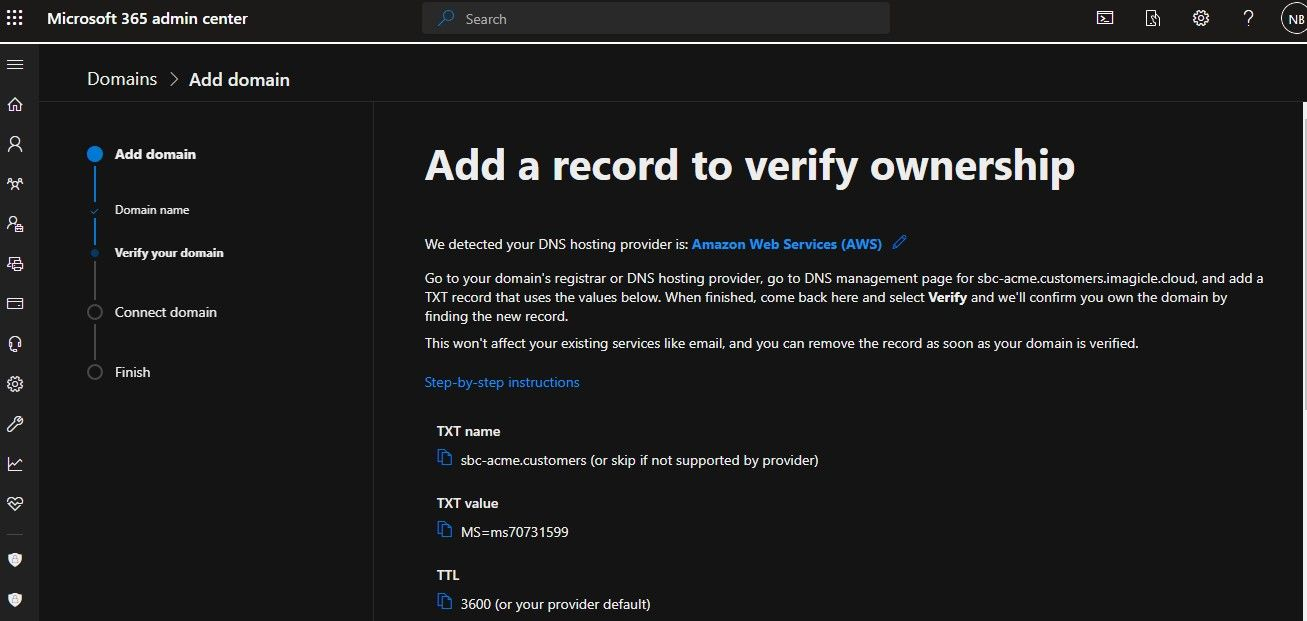
Please copy above three items (TXT name, value and TTL) and send them to Imagicle team, so they can create relevant DNS entry in Imagicle Cloud DNS. Once Imagicle Cloud Services team confirms DNS creation, please hit "Verify".
Before proceeding, please disable the flag "🔲 Exchange and Exchange Online Protection".
If DNS entry hasn't been created yet in Imagicle Cloud DNS, you get the following error message:

Please select "Skip and do this later (not recommended)" option to skip service activation.
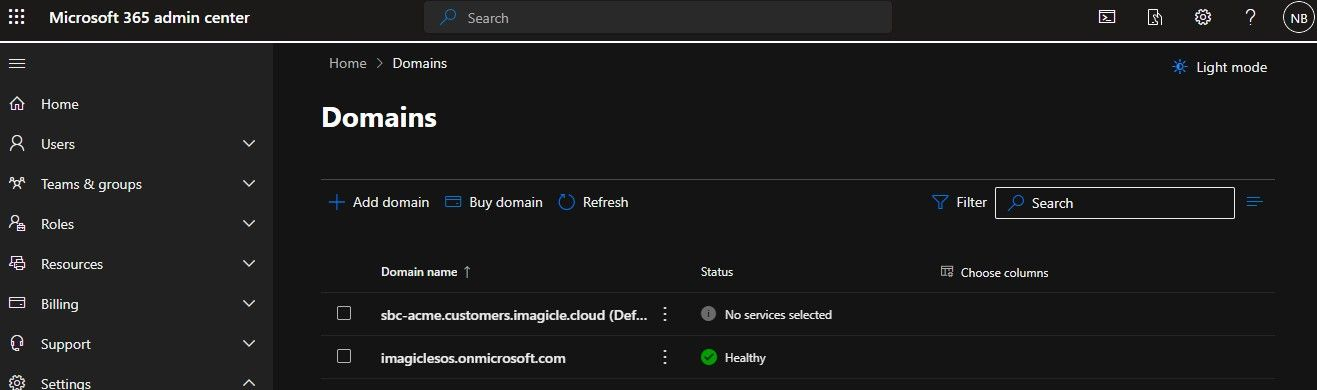
Once Imagicle Cloud team has enabled the DNS entry, you will find new domain in the following status:
Create an Office 365 User
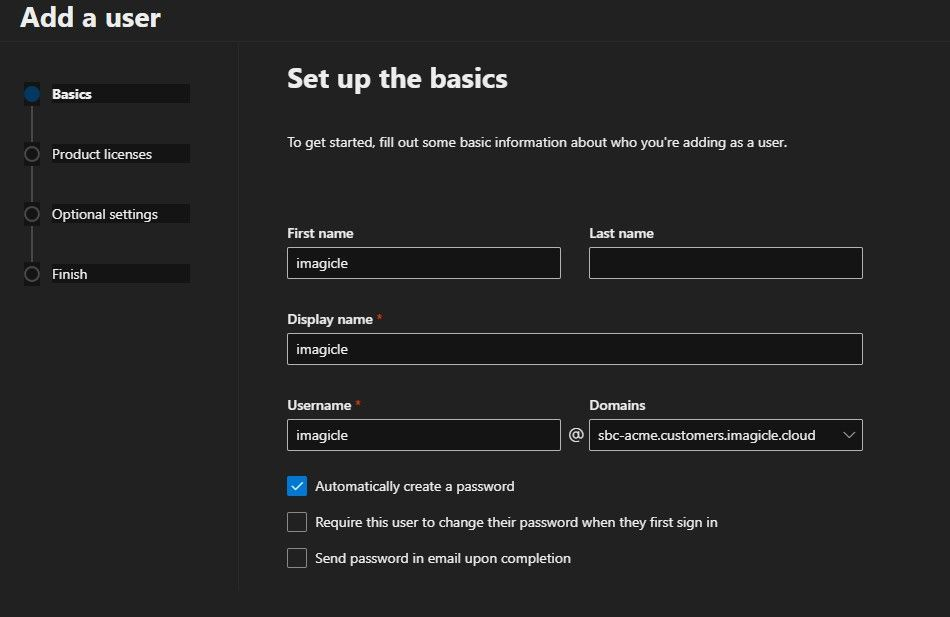
To enable call routing to/from the new created domain, at least one user with Office365 E3 license associated must be created in such domain. You can do it following the next steps:
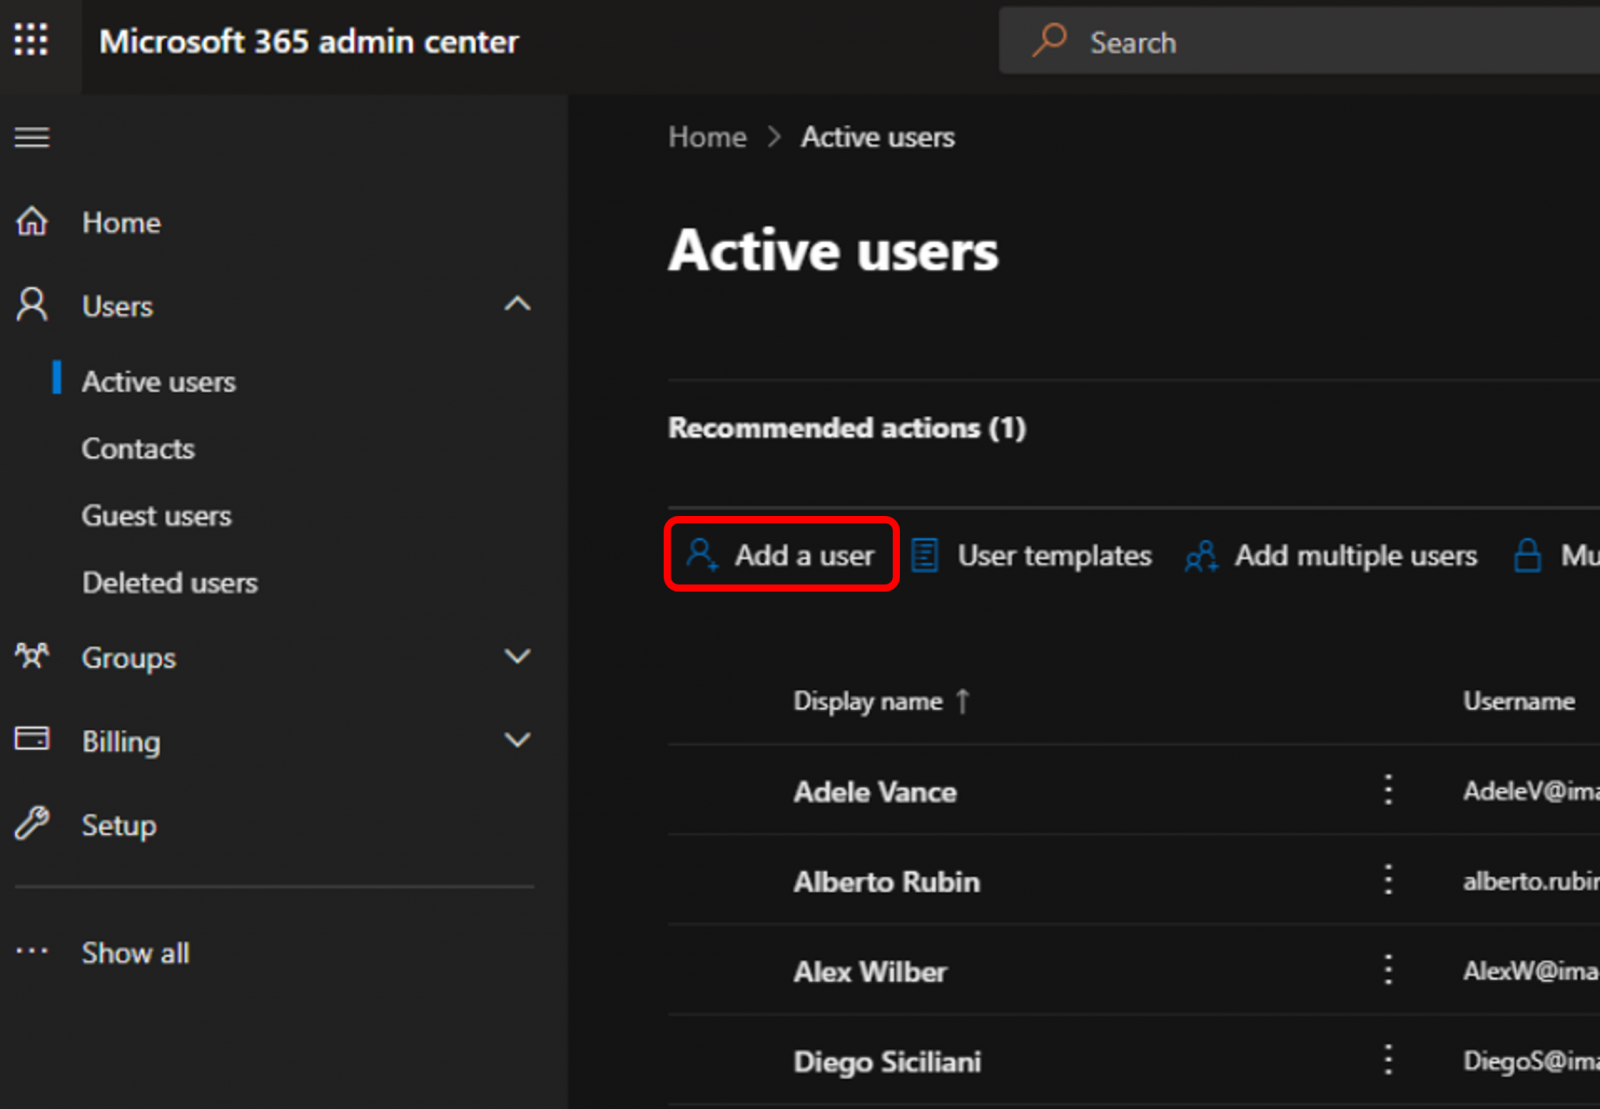
Click "Add a user" and name it "imagicle":
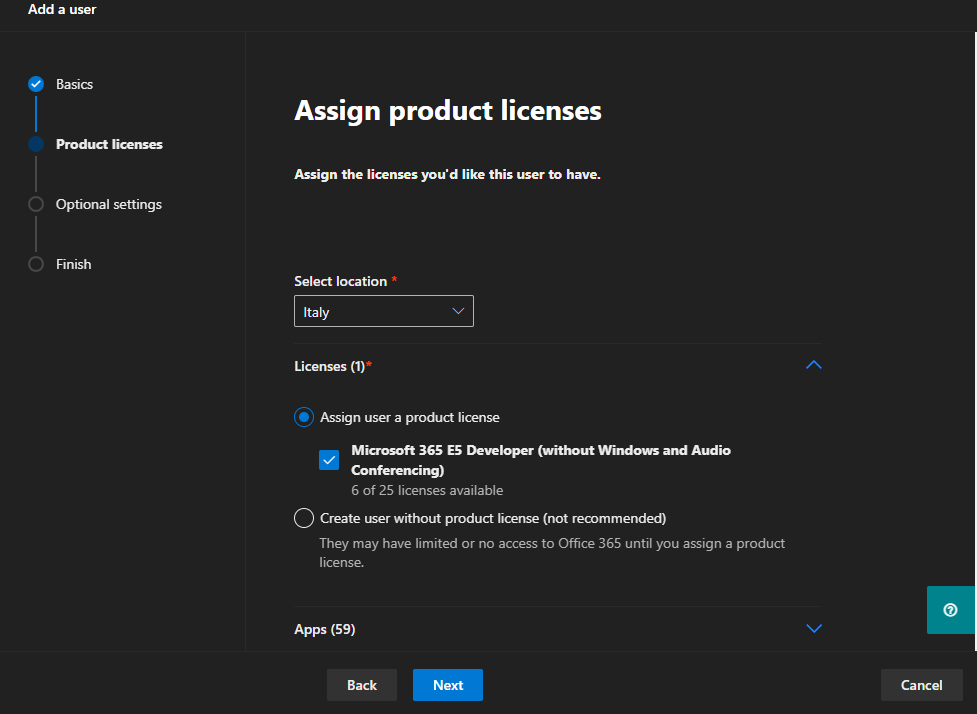
Hit Next to display "Product licenses" page. Please assign an E3 user license at least, as per below sample:
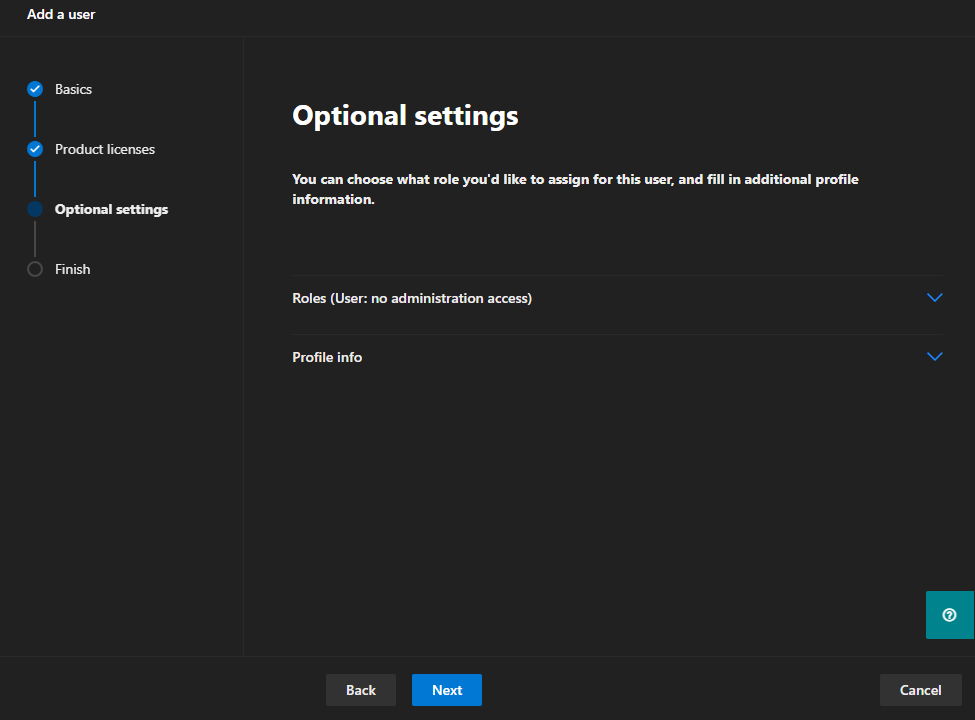
Hit next to assign a permission level to new user. Simple "User" role is enough:
Hit Next to display a User's summary page. Please review entered data.
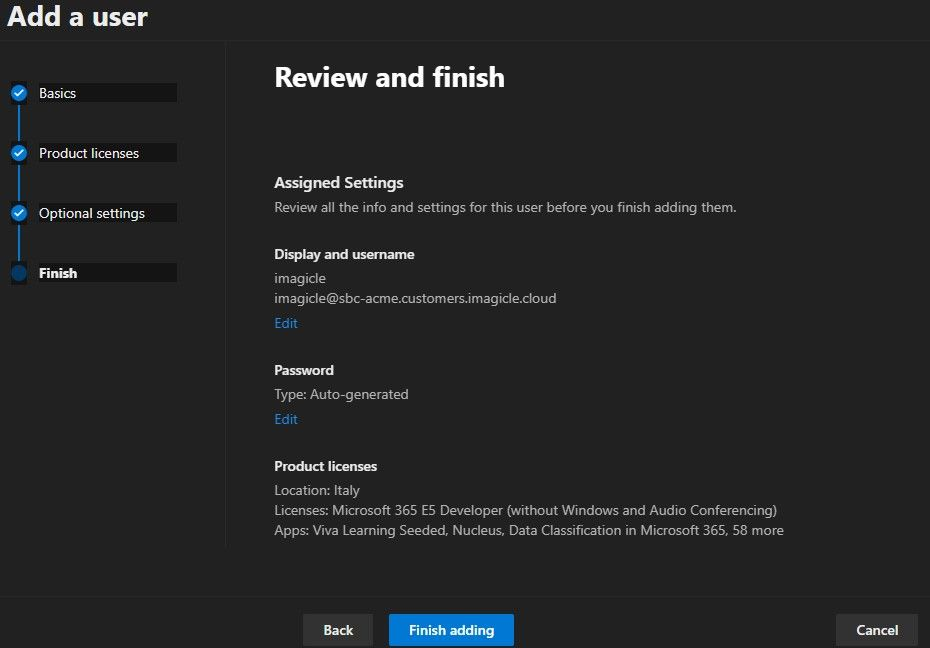
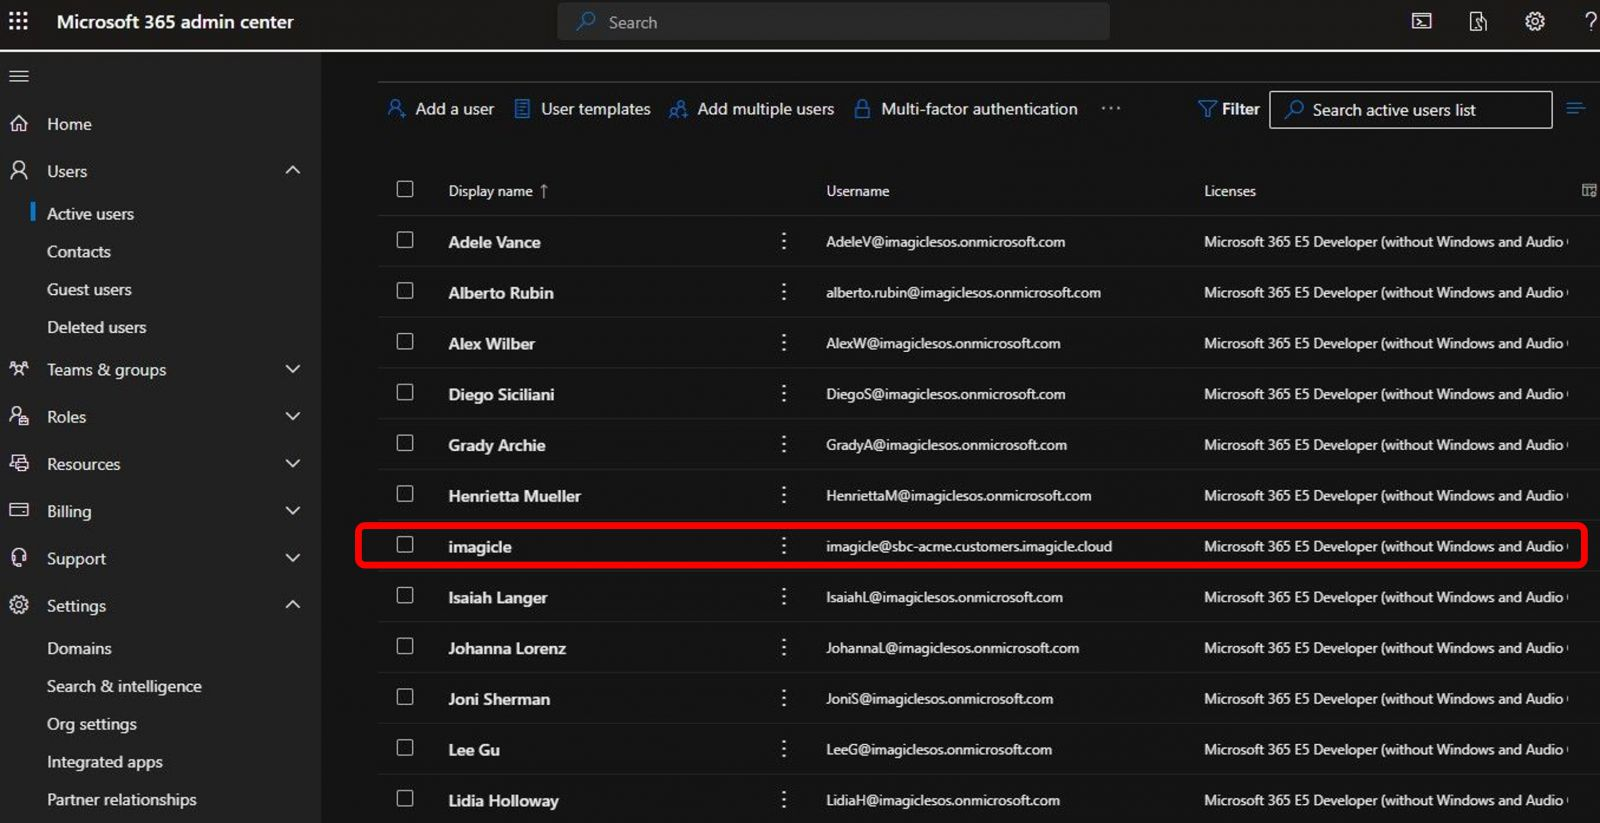
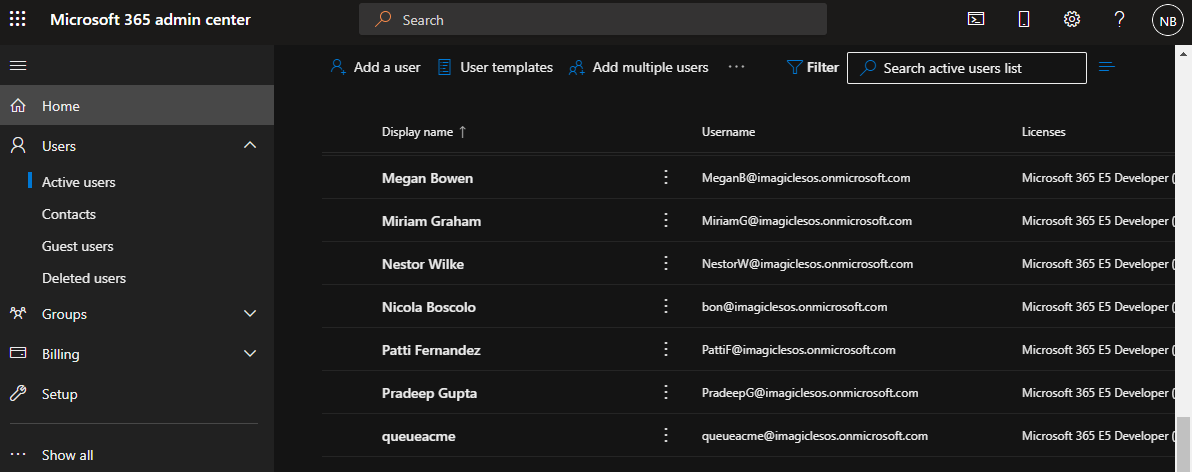
If all correct, please hit "Finish adding" to actually save new user. It subsequently appears in Active Users list. See below:
Enterprise Voice enablement for operators
If not yet done, please install MS Teams PowerShell module by issuing the following commands from PowerShell running as Administrator:
Install-Module MicrosoftTeams
Import-Module MicrosoftTeams
Connect-MicrosoftTeamsPlease enter Tenant Administrator credentials, when requested.
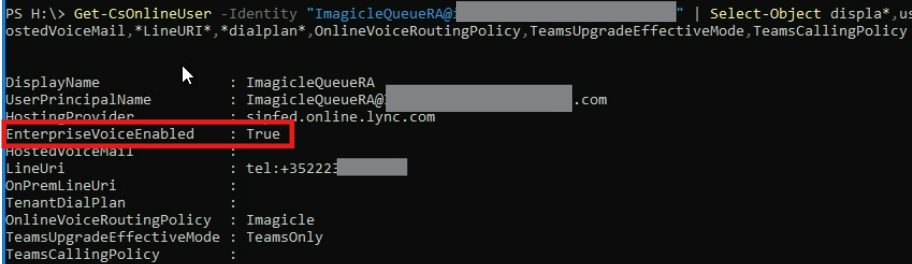
Now, for each operator who should use the Imagicle UCX Console, you must make sure it has Enterprise Voice enabled. Enter the following command, replacing <user.account@doman> with proper user’s UPN:
Get-CsOnlineUser -Identity <user.account@domain> | Select-Object displa*,userprin*,HostingProvider,EnterpriseVoiceEnabled,HostedVoiceMail,*LineURI*,*dialplan*,OnlineVoiceRoutingPolicy,TeamsUpgradeEffectiveMode,TeamsCallingPolicyThe result should be similar to below screenshot:
If you find some operators with EnterpriseVoiceEnabled set to False, please issue the command Set-CsOnlineUser to enable the policy.
Common Voice Route to forward calls to Imagicle Cloud
Please enter the following command:
$FormatEnumerationLimit=-1
Get-CsTenant | fl *Domain*
The results should include a VerifiedDomains line, containing the new domain added at the beginning of this procedure. See below sample:

If new domain does not appear in the list, please repeat Get-CsTenant command until it shows up.
Now you need to perform additional PS commands to enable the configuration of a common routing policies to transfer calls to Imagicle Cloud SBC and, in turns, to Imagicle queues and Auto Attendant services.
Please enter below command:
Set-CsOnlinePstnUsage -Identity Global -Usage @{Add="Imagicle_RT"}where Global is the default Voice Routing Policy.
If your operators are using a different VRP, please repeat the same command to allow operators to transfer calls to +28xxxxx numbers (other Imagicle queues/autoatt and Camp-on)
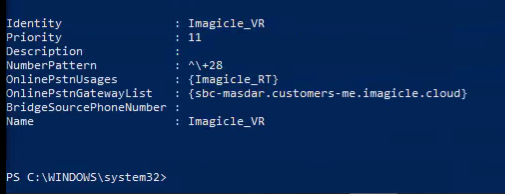
Then you can issue the following command, where you need to replace sbc-companyname with the domain configured in previous paragraph. Remember the "us" or "me" prefixes, to be added respectively for North America and Middle-East.
New-CsOnlineVoiceRoute -Identity "Imagicle_VR" -NumberPattern "^\+28" -OnlinePstnGatewayList sbc-companyname.customers.imagicle.cloud -OnlinePstnUsages "Imagicle_RT"The result should be similar to below screenshot sample:
If you get an error "Cannot find specified Gateway", please, check the FQDN you typed and ensure the previous steps (Office365 user creation) was successfull.
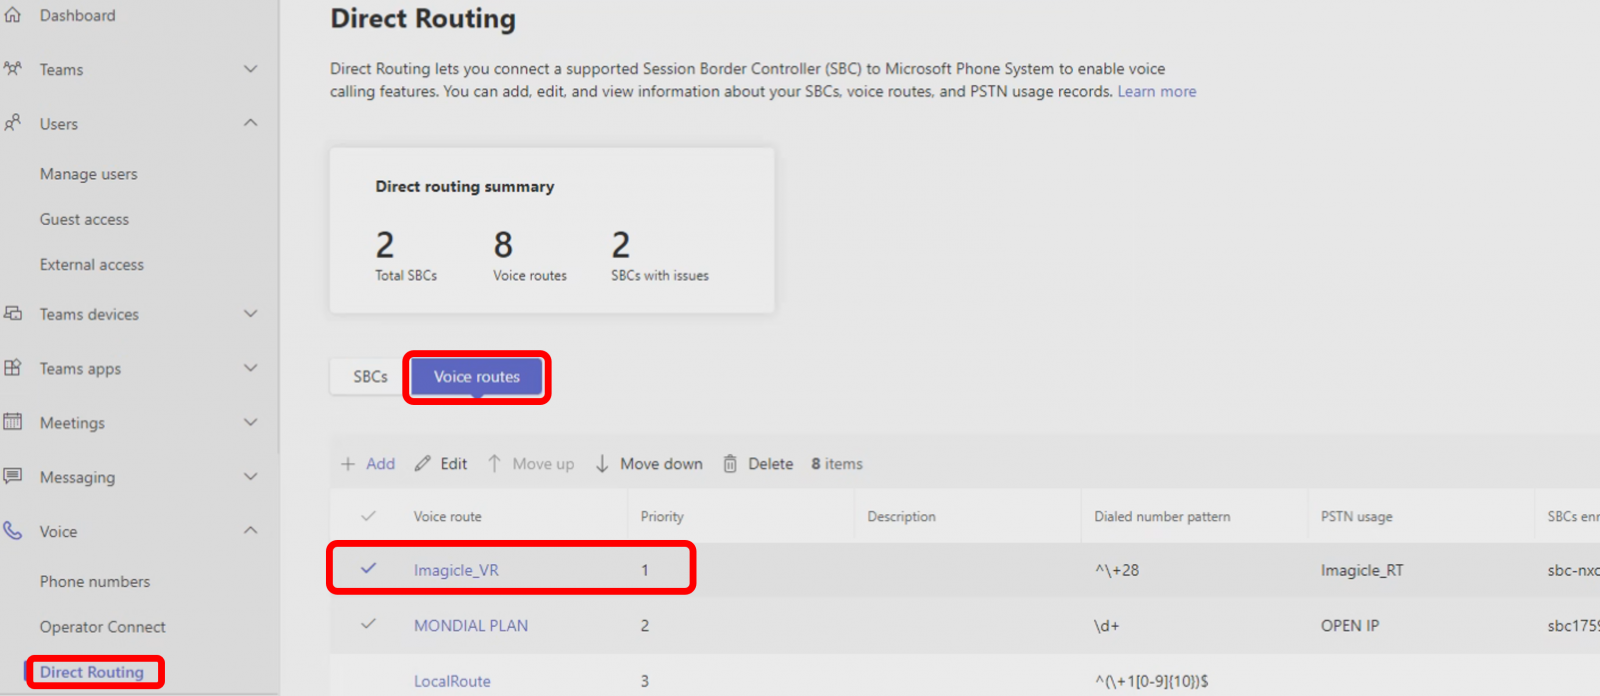
Now you must define a Voice Routing Policy, associated to previously defined Online PSTN Usage:
New-CsOnlineVoiceRoutingPolicy -Identity "Imagicle" -OnlinePstnUsages "Imagicle_RT"Now login as administrator to Microsoft Teams Admin Center and go to Voice ⇒ Direct Routing ⇒ Voice routes and Move up Imagicle_VR entry to the top priority 1 position, to make sure this special rule is always engaged for calls to be routed to Imagicle Cloud instance:
Resource Account creation
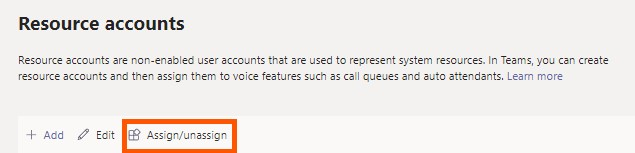
Please remain logged in to MS-Teams admin center and, under "Org-wide settings" menu, locate and select "Resource accounts" and hit "Add" button to fill the rightmost form. See below:

Display name: A name identifying the specific Imagicle queue or auto attendant service
Username: can be the same as display name @<company_domain>
Resource account type: Select "Auto attendant"
Hit "Save and go back to Microsoft admin portal's Home page. New Resource account should appear in overall MS Active Users' list. See below sample:
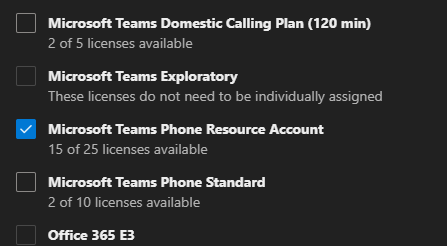
Now select new Resource account user from above list and assign it to a Microsoft Teams Phone Resource Account license:
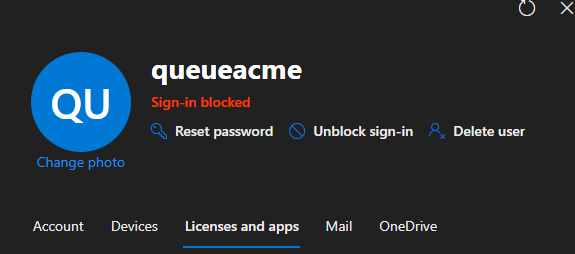
This Resource account virtual user has, by default, sign-in feature disabled. This is fine. No need to enable it:
Please launch once again the PowerShell as administrator and enter the following command to associate Resource Account user to previously defined Voice Routing Policy:
Grant-CsOnlineVoiceRoutingPolicy -Identity <resourceAccount> -PolicyName "Imagicle"<resourceAccount>: it is the newly created Resource Account, including the domain (e.g., queueacme@imagiclesos.onmicrosoft.com)
Now you can verify correct Resource Account creation by issuing the following command:
Get-CsOnlineUser -Identity <resourceAccount> | Select-Object displa*,userprin*,HostingProvider,EnterpriseVoiceEnabled,HostedVoiceMail,*LineURI*,*dialplan*,OnlineVoiceRoutingPolicy,TeamsUpgradeEffectiveMode,TeamsCallingPolicy<resourceAccount>: it is the newly created Resource account, including the domain (e.g. queueacme@imagiclesos.onmicrosoft.com)
If the command fails, please wait few minutes and try again. Eventually the result should be similar to below sample:
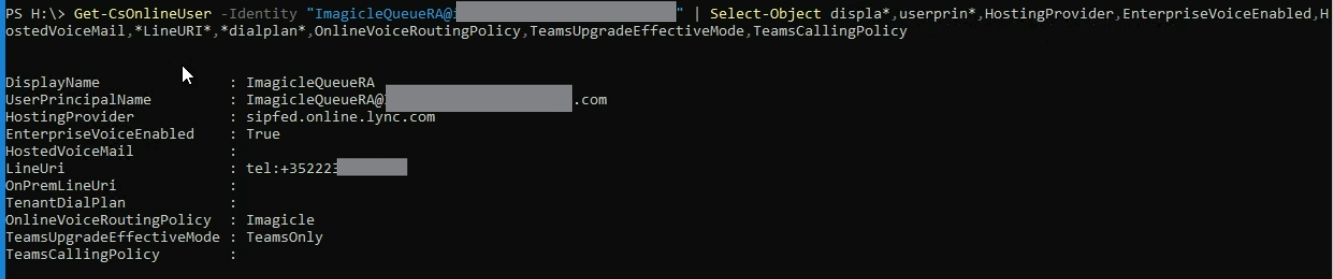
Please, note that:
EnterpriseVoiceEnabled is True, since we have just associated the Microsoft Teams Phone Resource Account license to the user
OnlineVoiceRoutingPolicy is populated with “Imagicle” VRP.
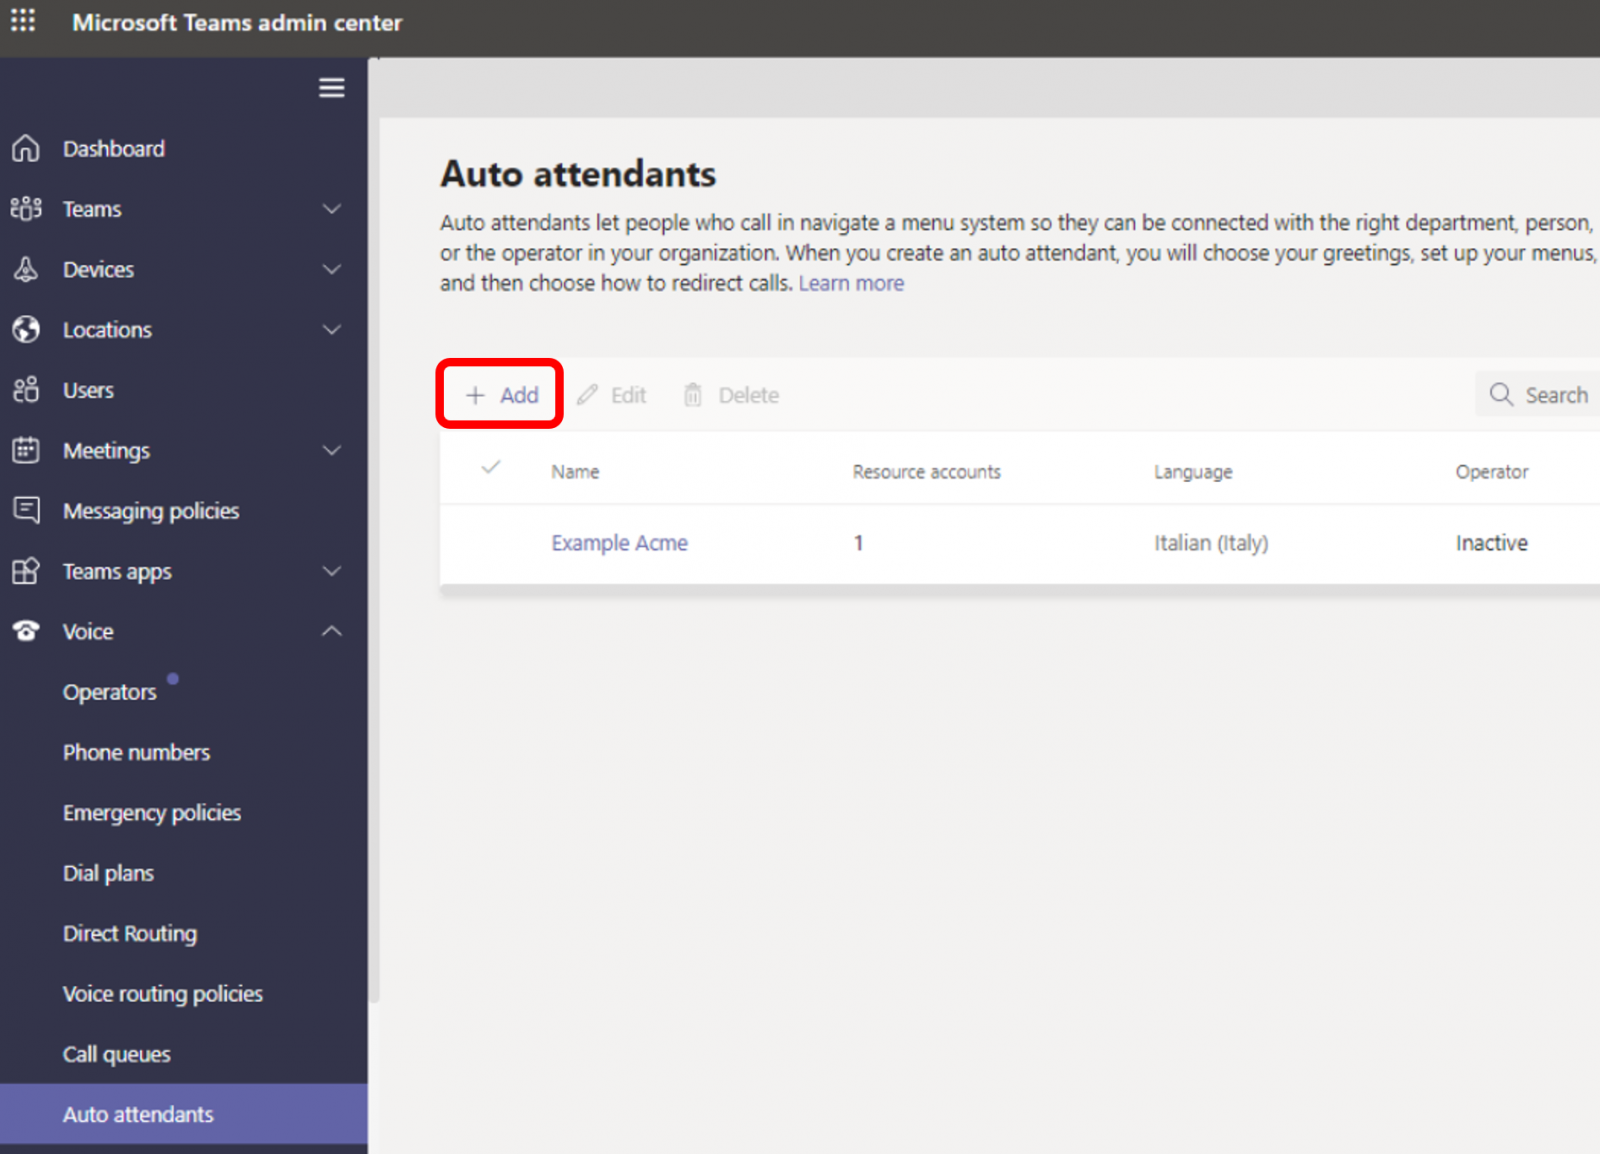
Microsoft Auto Attendant creation
Imagicle leverages Microsoft Teams native Auto Attendants to allow the routing of inbound calls to Imagicle Queues/Auto Attendant services. Microsoft actually does not allow direct routing of calls, so the Auto attendant is used as a simple ingress point to redirect calls via SIP to Imagicle SBC. No additional configurations are applied on MS Auto Attendants.
Under "Voice" menu, locate and select "Auto attendants". See below:
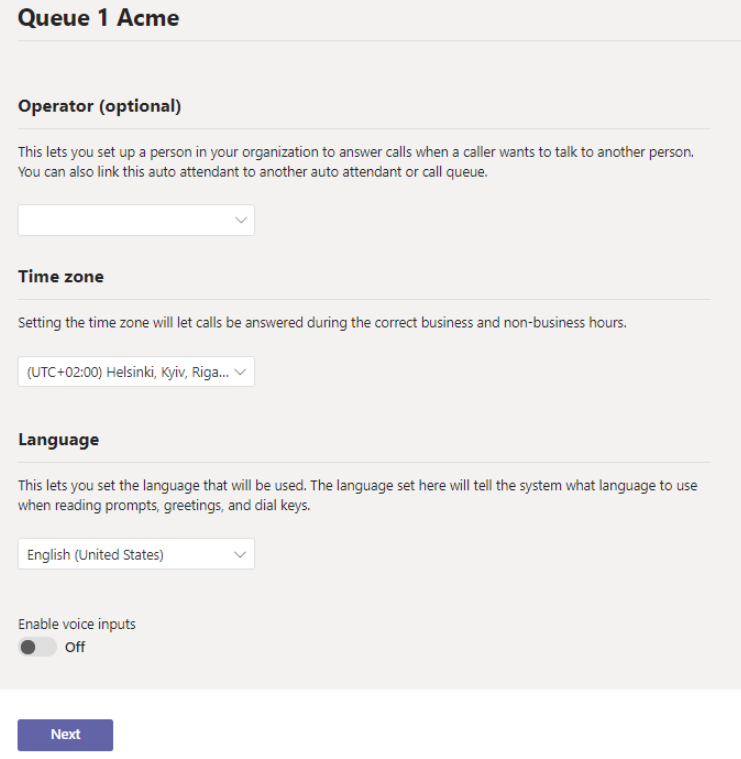
Click "Add" button and enter a name of your choice, like "Queue 1 <company_name>". Also add local timezone. See below sample:
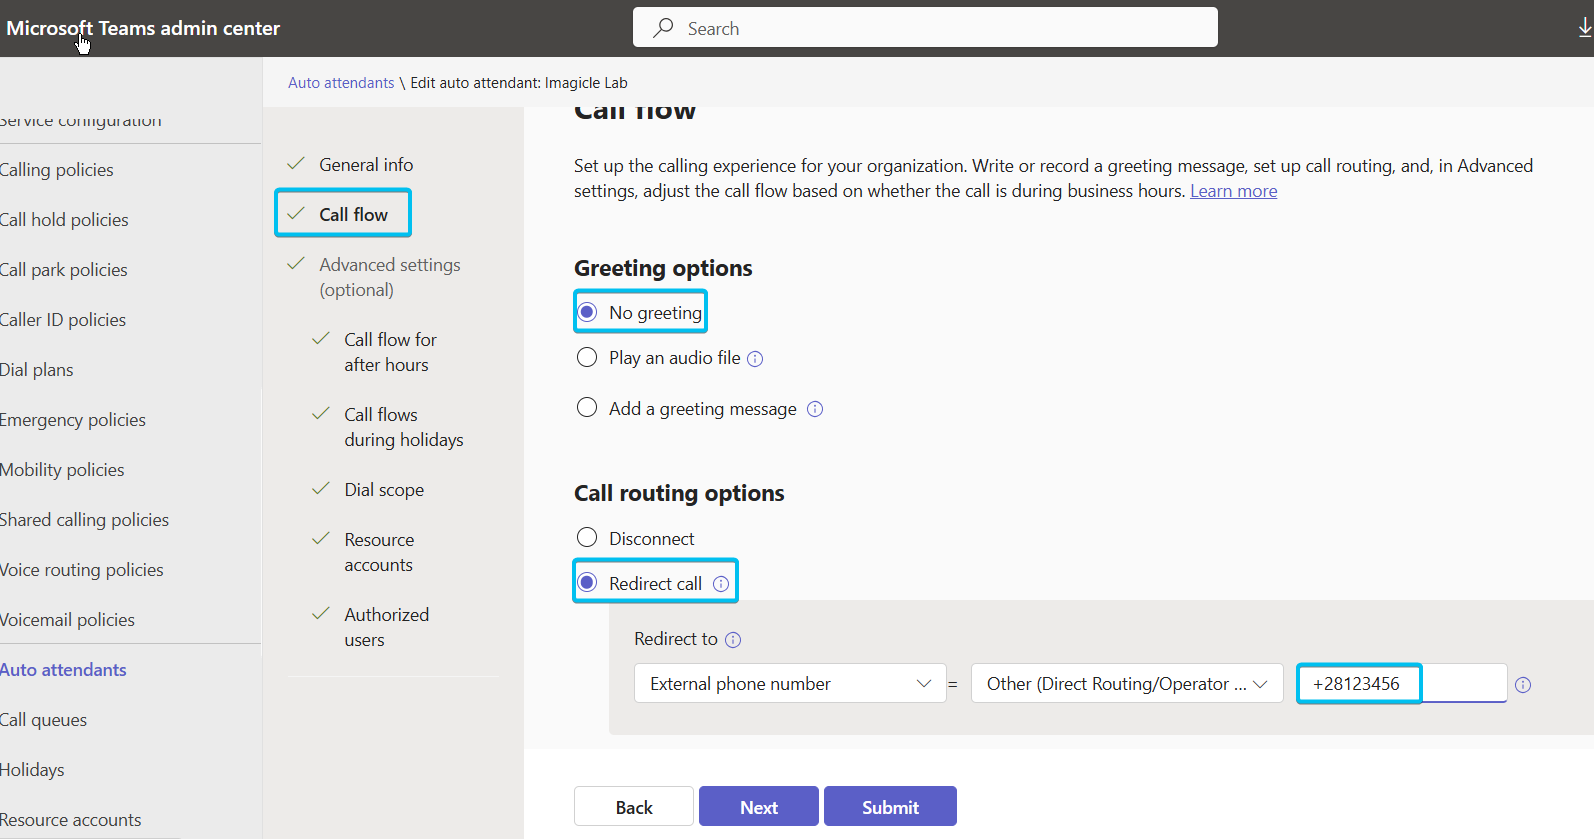
Hit Next to display "Call flow" window. Select "No greeting" and "Redirect call" options. In "Redirect to" fields, select External phone number = Other (Direct Routing/OperatorConnect) and add a Queue (or Autoattendant) service number of your choice applying +28 as prefix (example +123456 become +28123456)
Make sure that phone number does not match any existing user extension or other services numbers.
Now hit "Submit" to save the Auto attendant and go back to Auto Attendants list. Verify that new Auto attendant shows up in the list, as per below sample:

Direct Routing Architecture
If you are leveraging Direct Routing architecture, launch this command on PowerShell:
Set-CsPhoneNumberAssignment -Identity <resourceAccount> -PhoneNumber <phoneNumber> -PhoneNumberType DirectRouting<resourceAccount>: it is the newly created Resource account, including the domain (e.g., queueacme@imagiclesos.onmicrosoft.com)
<phoneNumber>: an available phone number DID within your dial plan. This is the PSTN phone number you can dial to reach the Imagicle queue
Then, go back to MS-Teams admin center and, under "Org-wide settings" ⇒ "Resource accounts", please select newly defined Resource account and hit "Assign/unassign" option. See below:
here the "Phone number type" should be "Direct Routing" and the "Assigned phone number" should be already filled out with number assigned via PowerShell command above. The only thing to do is to assign the previously defined auto attendant:
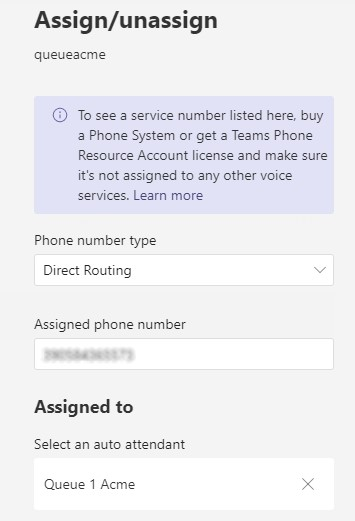
then, click on Save.
Microsoft Calling Plan
If you are leveraging Microsoft Cloud PSTN, go back to MS-Teams admin center and, under "Org-wide settings" ⇒ "Resource accounts", please select newly defined Resource account and hit "Assign/unassign" option. See below:

Fill the rightmost form with the following data:
Phone number type: "Calling Plan" (Microsoft Cloud PSTN)
Assigned phone number: a licensed phone number, reachable from PSTN. This is the phone number you can dial to reach the Imagicle queue.
Assigned to: select the previously defined auto attendant
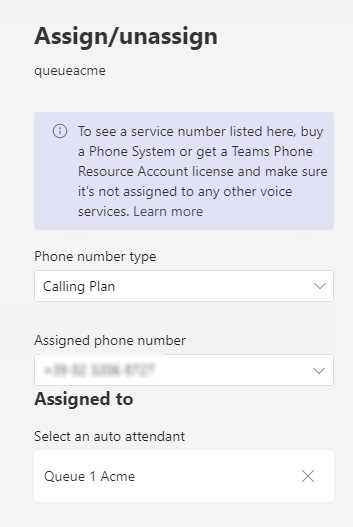
then, click on Save.
The configuration is completed. Please make sure that an Imagicle queue/auto attendant is already defined in the Imagicle UCX Cloud Suite. The number of the Imagicle queue/auto attendant must match that one configured in the "Then route the call → Redirect call" setting under the MS Teams auto attendant configuration (refer to section "Microsoft Auto attendant creation").
To check that everything is properly configured, you can try to call the PSTN number assigned to the MS Teams auto attendant. If you hear the Welcome Message configured on the Imagicle queue/auto attendant, it means that the call routing is working fine.
Please note that MS-Teams operators/agents configured in Imagicle queues should have a Microsoft 365 "E3” + Microsoft Teams Phone Standard OR a Microsoft 365 "E5” (it already includes the Phone Standard) user’s license.
To assign phone numbers to additional Imagicle queues/auto attendants, you need to repeat the procedure from "Microsoft Auto attendant creation" onward. Voice Route and Voice Routing Policy remain the same for your Tenant.