Contact Manager Entp. Web Directory
Imagicle Contact Manager Entp. allows the access to own directories from a web browser and from Jabber/Webex Desktop clients, thanks to specific web layouts suitable for both web accesses.
Menu item “Web Directory” allows to tweak click-to-call method, users' authentication and some layout options.
The access from a web browser can leverage two different layouts:
Web Directory → this is the old web layout, very basic, unwieldy and old-fashioned. We strongly suggest to use New Web Directory instead.
New Web Directory → modern web interface, including contacts display through cards, with pictures and customized background.
For the sake of simplicity, in this guide we just document New Web Directory access. Standard Web Directory is still available and configurable, sharing several settings with new one.
Dial Settings
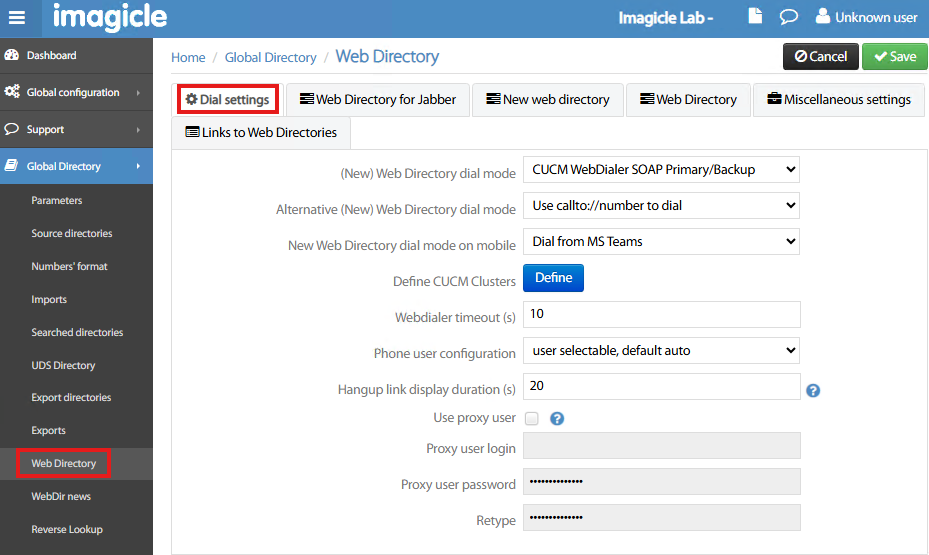
This section is dedicated to the click-to-call feature, to directly trigger an outbound call from the web interface. The following parameters can be tuned:
(New) Web Directory dial mode → Several call trigger options available:
CUCM WebDialer SOAP Primary/Backup → When you click on a phone number, a SOAP/XML URL is pushed to CUCM to instruct the IP Phone to initiate an outbound call. SOAP URL is pushed to primary CUCM node and, if not responding, to the backup node.
CUCM WebDialer SOAP Load Balancer → When you click on a phone number, a SOAP/XML URL is pushed to CUCM to instruct the IP Phone to initiate an outbound call. SOAP URL is pushed alternatively to both primary/backup CUCM nodes.
Use
tel://numberto dial → When you click on a phone number, this instruction triggers the PC softphone application associated to tel:// prefix. SeeWindows Settings > Apps > Default apps > Choose defaults by link type.Use
callto://numberto dial → Same as above, for callto:// prefix.Use
ciscotel://numberto dial → Same as above, for ciscotel:// prefix.Use
webex://numberto dial → Same as above, for webex:// prefix.Dial from MS Teams → When you click on a phone number, this instruction triggers a call from MS-Teams PC client.
Use copy of number in clipboard → When you click on a phone number, the number is copied in PC clipboard, to be used into any third-party softphone or CTI application.
Disabled → click-to-call feature is disabled on Web Directory.
Alternative (New) Web Directory dial mode → Here you can select an alternative click-to-call method, if main one is not available. Selectable trigger options are the same as above.
New Web Directory dial mode on mobile → Here you can select the click-to-call method while accessing to Web Directory from a smartphone device. Selectable trigger options are similar to previous above pull-down menus.
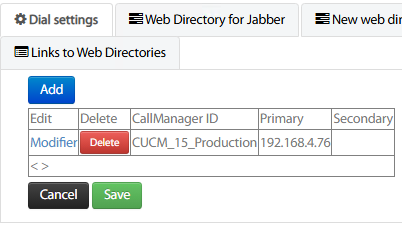
Define CUCM Clusters → Hit Define button to compile the list of CUCM clusters included in your Cisco IP telephony infrastructure. For each cluster, you can add a primary and a backup node. See below sample:
Webdialer timeout (s) → This is the time in seconds to wait for the outbound call to be triggered. Once timeout is expired, the Webdialer tries the alternative method (if enabled).
Phone user configuration → This pull-down menu provides different options to identify the phone device associated to the user:
User selectable, default auto → Upon click-to-call, the user is invited to select the phone device/profile in use. By default, the selection is automatic.
User selectable, default mobility → Upon click-to-call, the user is invited to select the phone device/profile in use. By default, the selection is by EM profile.
User selectable, default fixed IP phone(s) → Upon click-to-call, the user is invited to select the phone device/profile in use. By default, the selection is providing the list of phone devices associated to the Cisco End User.
Automatic detection → Phone device is automatically selected. No action required by the user.
User mobility → The user must manually select the phone device to be used. EM profile is automatically logged in to the phone.
User associated to a fixed IP phone(s) → Phone device is automatically selected. No action required by the user.
Hangup link display duration (s) → This parameter dictates for how long the hangup hyperlink is displayed once the call is triggered. The timeout is in seconds.
Use proxy user → If checked, all above SOAP/XML transactions are passing through a web proxy. Please enter username and password to engage proxy access.
Web Directory for Jabber
This section is specific for Web Directory access embedded in Cisco Jabber or Webex Desktop clients. It allows to choose authentication method and the behaviour for email selection:
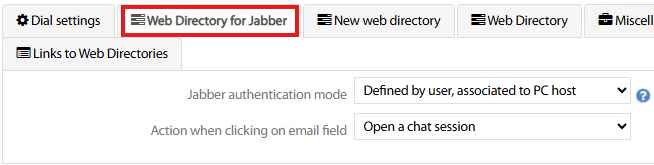
Jabber authentication mode → Five possible options in pull-down menu:
Defined by user, stored in cookie → The user configuration defined in the user config screen can be saved and retrieved by a cookie or user host.
Defined by user, associated to PC host → User authentication can be automated to avoid asking the user entering it. This is possible only if a proxy user have been defined.
Use Windows login as CUCM user Id → If the Windows login and CUCM credentials are identical, you can use Windows authentication by calling the Jabber gadget URL:
http://host/IPSGDIR/jabber/wpiMini.aspxwhich is not configured in anonymous authentication.URL parameter user= → In Jabber's gadget, you can set the URL as: http://host/IPSGDIR/jabber/?user=${UserID} to automatically fill username field.
HTTP header remote_user → In order to use authentication by user, the user proxy option must be enabled and credentials must be defined.
Action when clicking on email field → Search results on Jabber client include the email address of the contact. By clicking on it, you can either:
Send an email → Default email application on PC is opened.
Open a chat session → Jabber chat to selected contact is triggered.
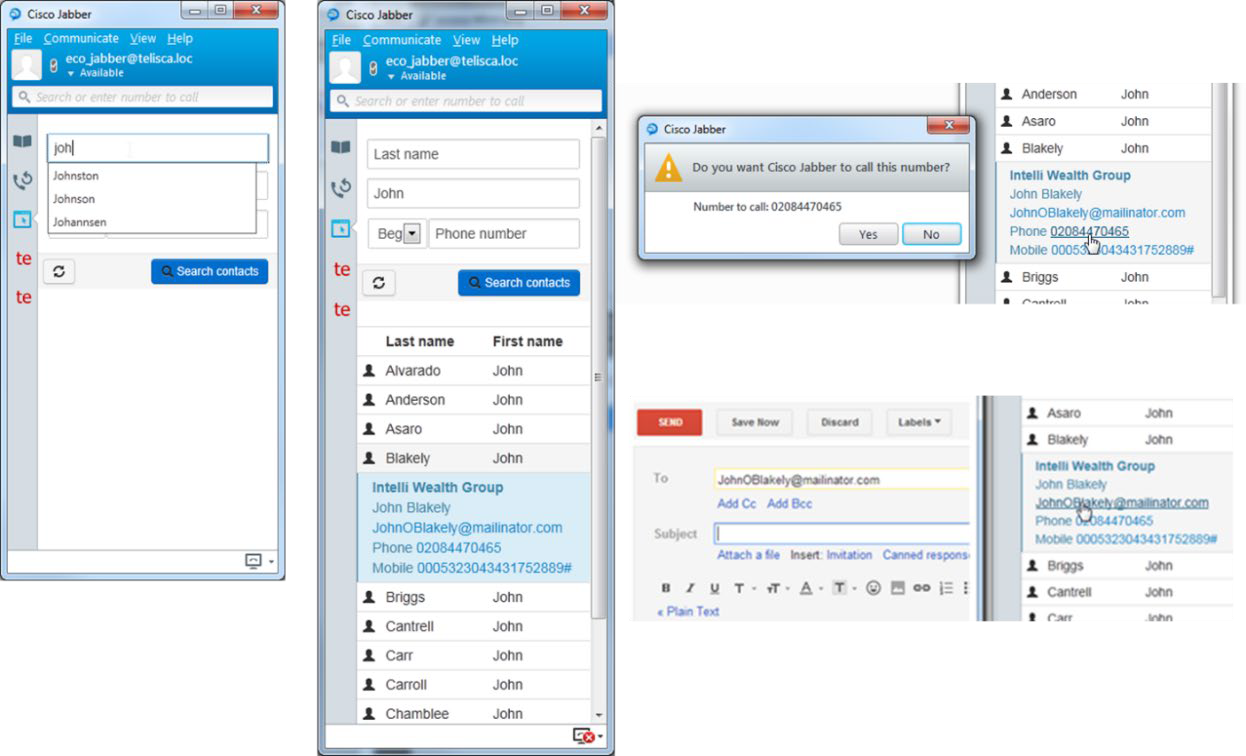
Web Directory gadget for Cisco Jabber Desktop client
New Web Directory
This section applies to New Web Directory feature and it allows to tweak users' authentication and various layout options. See below sample:
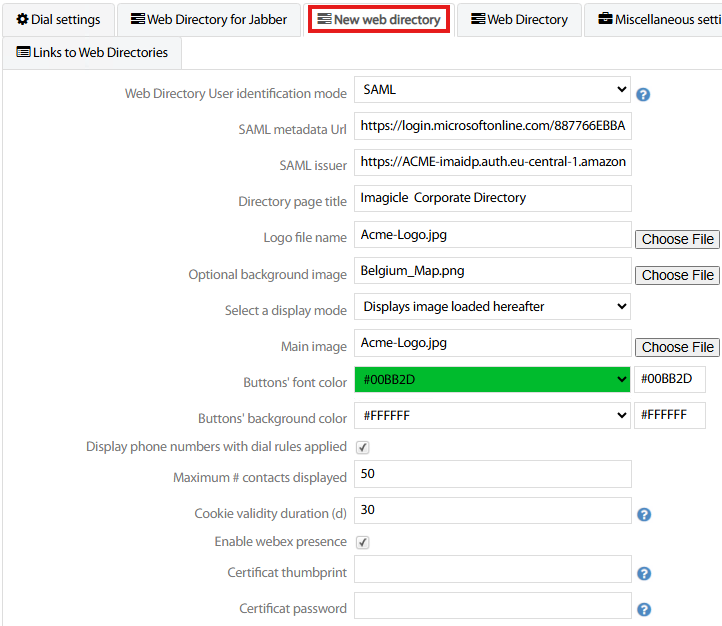
Web Directory User identification mode → Five possible options in pull-down menu:
CUCM → User’s authentication based on CUCM End user credentials.
Windows authentication if possible → If selected, Windows credentials should match CUCM credentials. Hence CUCM End Users must be provisioned from MS Active Directory.
Windows authentication only → Windows PC login credentials are supported.
User authentication → Local authentication.
SAML → MFA Authentication including SAML-based Single Sign On.
No authentication → Web Directory access does not require any authentication.
If Windows authentication is enabled, Windows login is used as CUCM userId. To allow an automatic user configuration, the CUCM userId must be synchronized on Active Directory. Morevover you need to define an Application User Proxy (part of 'Standard EM authentication' group) in the 'Dial Settings' tab.
SAML metadata URL → If above SAML option is selected, please add here the Metadata URL coming from your SSO IdP integration.
SAML issuer → If above SAML option is selected, please add here the IdP SAML issuer URL coming from your SSO integration.
Directory page title → Add here a title of your choice for Web Directory home page.
Logo file name → You can upload a customized logo, displayed on top-right corner of Web Directory.
Optional background image → You can upload a customized full-screen background image.
Select a display mode → An additional image can be displayed within Web Directory interface. It can be either a fixed image, uploaded as Main Image below, or it can be multiple weekly landscape pictures, all uploaded in this folder:
C:\inetpub\wwwroot\TWD\WWW\static\backend\custom-weekly
The filename should be ww.jpg where ww is the two-digit week number (from 1 to 53).
Main Image → You can upload here the fixed image displayed within Web Directory interface.
Buttons' font color → You can leave default color or you can select the font color from the pull-down palette menu. Relevant palette ID is displayed to the right.
Buttons' background color → You can leave default color or you can select the background color from the pull-down palette menu. Relevant palette ID is displayed to the right.
Display phone numbers with dial rules applied → If checked, contacts' number are displayed with normalization rules already applied, allowing click-to-call without any further manipulation.
Maximum # contacts displayed → This is the maximum number of returned contact cards/entries upon contacts search.
Cookie validity duration (d) → This is the validity period in days of authentication cookie. Please note that cookie is refreshed upon each connection. So, this period is relevant to no connections.
Enable Webex presence → If flagged, Webex Control Hub Rich Presence status icon is added to each Webex contact.
Certificat thumbprint → If the HTTPS Digital Certificate is installed within local Windows Store, then add here relevant thmbprint.
Certificat password → If a PFX Digital Certificate file has been copied in
c:\inetpub\wwwroot\TWD\CERTfolder, please add here relevant password.

Web Directory embedded in Cisco Webex Desktop client
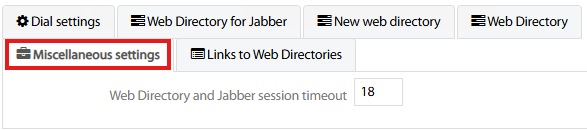
Miscellaneous Settings
Just one parameter is available here:
Web Directory and Jabber session timeout → This is the HTTP(S) session timeout in hours. Once it is expired due to inactivity, you must perform user’s authentication again to access directories.
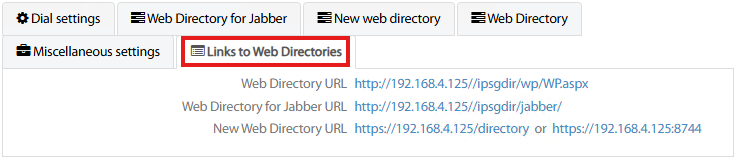
Links to Web Directories
This section reports the web URLs to access Web Directory pages:
Standard Web Directory URL → Old web interface
Web Directory for Jabber URL → Compact web interface to embed in softphone clients.
New Web Directory URL → Rich, recent Web Directory interface.