Each AIR service can have its own list of contacts to which calls can be transferred. The contacts may be people, offices, departments, services, or, more generally, any phone number that one wishes to be reachable through the AIR. The contact list is where the search is performed when someone calls the AIR and asks to speak with someone or something.
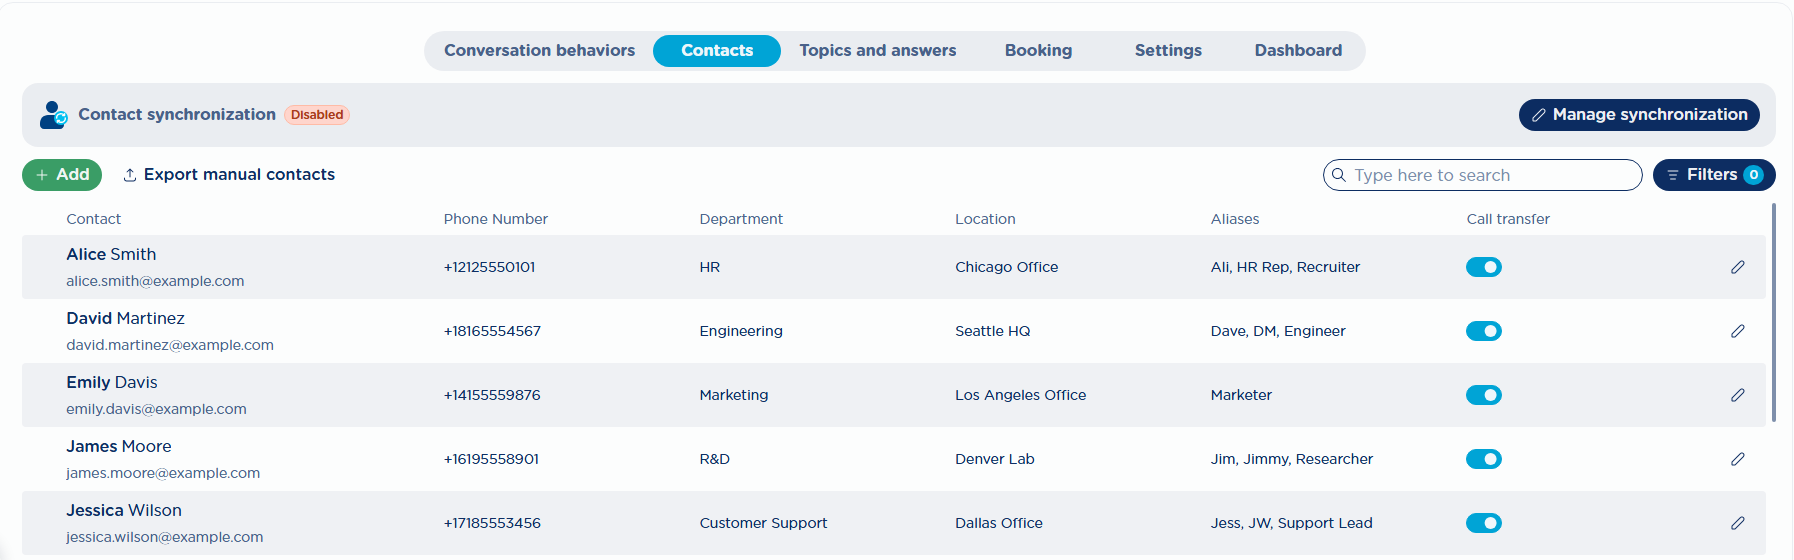
The contact list can be populated in three ways:
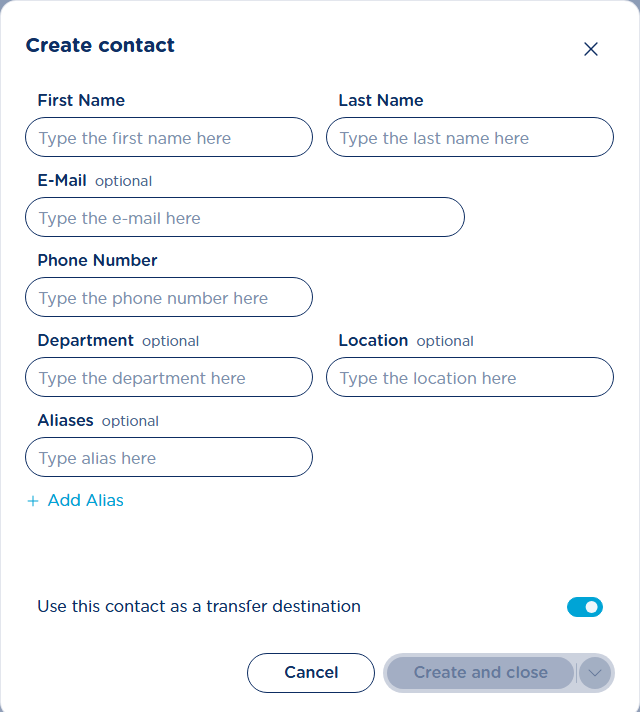
Manual contacts provisioning
Just hit the + Add button, fill the form and eventually click on “Create“.
Bulk provisioning from a CSV file
Please hit the + Add button and then select “Import CSV“. From the popup, you can download the template, fill it in, and then upload it by clicking on “Import CSV”.
Each time a new CSV is uploaded, it replaces all manually created contacts, including those created from the web page. It is therefore recommended to first perform an export (click “Export manual contacts”), apply the desired changes, and then re-upload the file.
The following are not allowed:
-
contacts without a phone number, since they would make no sense within the AIR, as they would not be callable
-
contacts without first and last name
-
duplicate contacts, where “duplicates” are defined as contacts having the same values for the fields FirstName, LastName, Department, and Location
The CSV file format includes the comma (,) as field separator, and double quotes (") as text qualifier. If these guidelines are not followed, the upload fails. Be careful, especially when using Excel to edit the CSV file.
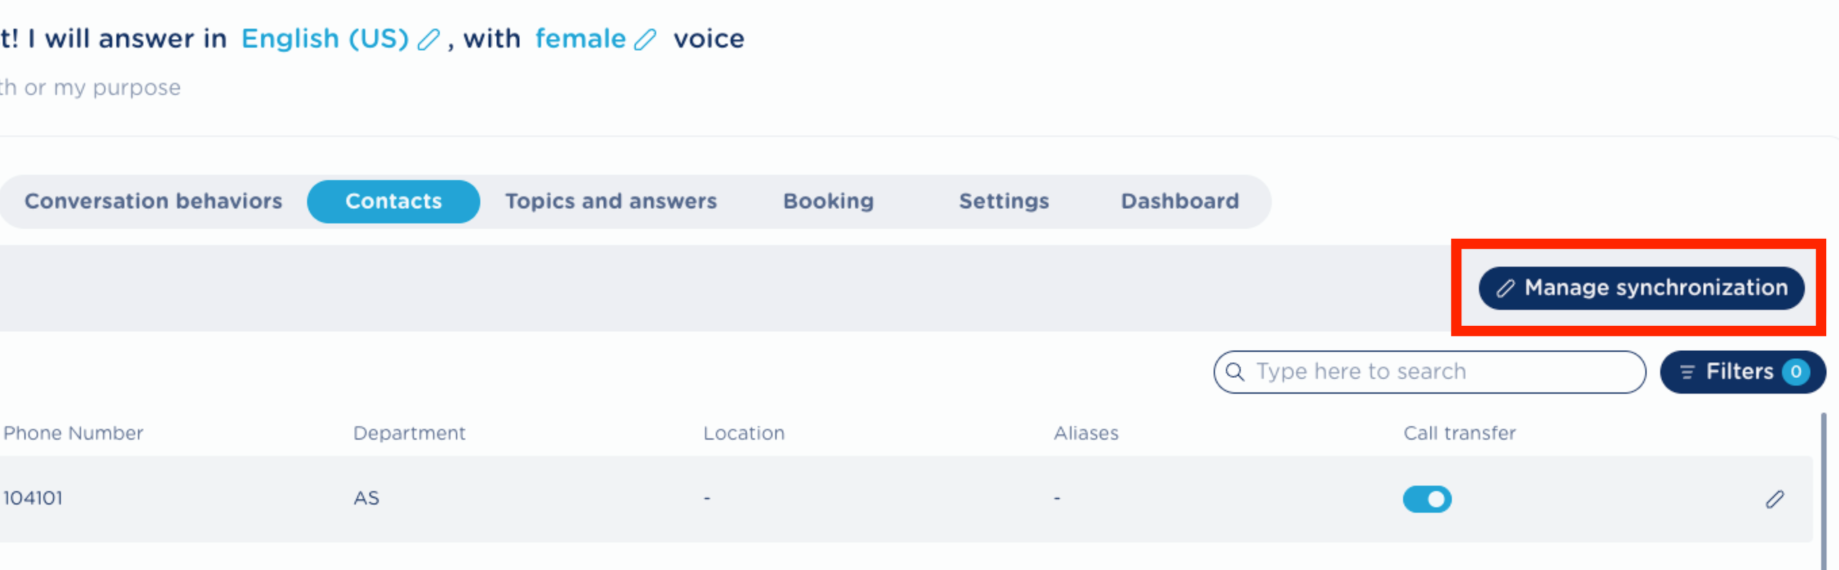
Contacts Synchronization against UCX Platform
Imagicle UCX Platform includes a users' database, which can be provisioned against Cisco Webex Control Hub or Entra ID. Imagicle AIR can in turns synchronize own contacts from UCX Platform by selecting “Manage synchronization” button. Please make sure contacts are already configured in the UCX Platform.
It is possible to select whether, by default, contacts imported through automatic sync are enabled for call transfer or not, using the option "Use new synced contacts as a transfer destination". If you want to enable/disable certain contacts, you can still manually select them one-by-one and enable/disable the corresponding flag.
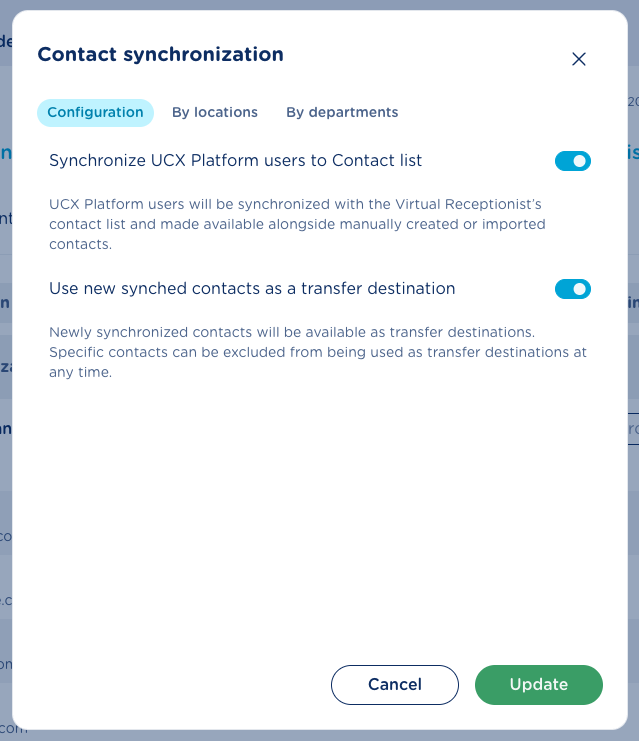
Filtering by locations/departments
The contact synchronization dialog includes two additional tabs to allow filtering imported contacts by departments and/or locations. See below screenshot sample:
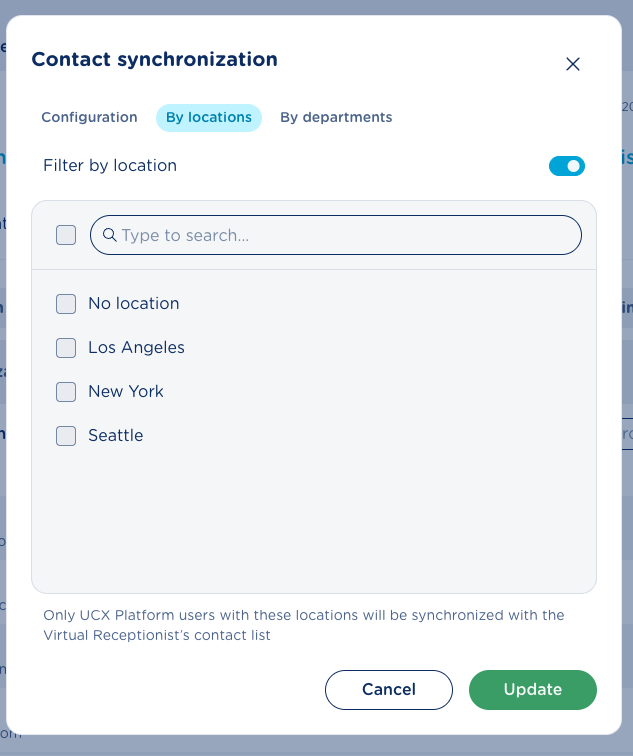
Just pick the locations and/or departments you wish relevant contacts to be imported in AIR. Both filters are applied using “AND” operator.
If you apply a filter for a specific department, synch users and later on the user changes department or the department filter is changed, users no longer matching the filter are automatically removed.
You can distinguish synchronized contacts from those manually created by the blue synchronization icon next to the contact’s name:

If synchronization is disabled after being enabled, all imported contacts (not those manually created or added from CSV) are deleted.
Contacts Search
You can search and filter contacts. The filter feature relates to synched/manually added contacts and call transfer flag status, while text search looks for matches across:
-
First name
-
Last name
-
Email (including domain and special characters like
.and@) -
Phone number (start matches only)
-
Department
-
Alias
-
Location
As soon as you start typing in the Search bar:
-
Results update automatically, starting from the first character
-
A loading spinner appears inside the search bar to show it’s working
-
Matched text is highlighted in the results
-
it is case-insensitive
-
it matches from the beginning of each word
-
you can enter a maximum of 12 space-separated words
-
the search uses AND logic (all words must match)

Edit Contacts
Contacts can be edited, and this can be done in different ways depending on how the contact has been created:
-
manually created contacts (from the web page or via CSV import): these contacts allow full editing of all available fields, either directly from the web page by clicking the corresponding icon:

or by exporting them to CSV (clicking “Export manual contacts”) and then uploading the updated file. Please note that the newly uploaded CSV completely replaces all manually created contacts.
-
synchronized contacts: these contacts allow editing of only certain fields. This can be done either by updating the values in the source system (Cisco Webex Control Hub or Entra ID), or directly from the web page (CSV export is not available).
The fields that can be modified are:-
Aliases: these are not synchronized with the remote source, so manual editing is the only way to populate or update them
-
“Use new synched contacts as a transfer destination” flag: by default, imported contacts have this set to true, but it can be manually modified. This can also be done inline, without opening the editing screen:

-
The “Call transfer” flags of synchronized contacts that are manually modified are not preserved if synchronization is disabled and then re-enabled.
Synchronized contacts cannot be manually deleted; they must be removed from the remote source.
General Concepts about Contacts
As mentioned earlier, a contact may represent different types of entities, not only people, but also offices, departments, or services. Below are the available fields and their meaning:
-
First name (*): The contact’s first name. If the contact is not a person but another entity (e.g., an office), the entire name can be entered in this field, while the Last name field can be filled with a simple dot (
.). This is required because both First name and Last name are mandatory fields. -
Last name (*): The contact’s last name. If the contact is not a person and the full name has already been entered in First name, this field can be filled with a simple dot (
.). This ensures the mandatory requirement is met. -
E-mail: The email address used if the contact does not answer a transferred call and the “Leave a message” feature is enabled. The message transcription is sent to this email address. It doesn’t need to be the personal address of the contact; for example, it can also be a shared mailbox managed by multiple people.
-
Phone number (*): The phone number to which the call is transferred.
-
Department: The contact’s department. Used together with Location for disambiguation in case of contacts with the same first and last name. It can also be used as a tag in the customization of related prompts (see message: “I ask the caller to confirm the transfer destination”).
-
Location: The contact’s location. Works the same way as Department for disambiguation and tagging in prompts.
-
Aliases: Up to three aliases can be associated with each contact. Useful if a contact may be referred to by different names.
-
Use this contact as a transfer destination (flag): If enabled, the contact is visible and searchable in the AIR service. If disabled, the contact remains “invisible” to users.
(*) mandatory field
Instead of directly comparing the transcription of the requested subject with the stored contacts, the AIR uses a phonetic search. This allows it to match words that sound similar, even if they are not spelled exactly the same.
When a user asks to speak with a contact, the search is not performed across all fields, but only on the following:
-
First name only
-
Last name only
-
First name + Last name
-
Last name + First name
-
Aliases only (if present)
Each AIR has a limit of 10K contacts that can be configured.
The Phone number, Department and Location are not used for search. Department and Location are only applied to disambiguate homonymous contacts (contacts with the same first and last name).
Example 1
Suppose we have the following homonymous contacts:
** Contact 1 **
-
First name: Mark
-
Last name: Brown
-
Department: Sales
-
Location: New York
** Contact 2 **
-
First name: Mark
-
Last name: Brown
-
Department: Administration
-
Location: Miami
If a user asks to speak with “Mark Brown”, two contacts are returned.
If the AIR is configured to list the found results (see option “When matching more than one contact”), it asks:
-
AIR: “Would you like to talk to Mark Brown from the Sales department in the New York office?”
-
Suppose the caller does not confirm → the AIR moves to the next contact
-
AIR: “Would you like to talk to Mark Brown from the Administration department in the Miami office?”
Example 2
Suppose we have the following homonymous contacts:
** Contact 1 **
-
First name: Mark
-
Last name: Brown
-
Location: New York
** Contact 2 **
-
First name: Mark
-
Last name: Brown
-
Department: Administration
If a user asks to speak with “Mark Brown”, two contacts are returned.
If the AIR is configured to list the found results, it asks:
-
AIR: “Would you like to talk to Mark Brown from the New York office?”
-
Suppose the caller does not confirm → the AIR moves to the next contact.
-
AIR: “Would you like to talk to Mark Brown from the Administration department?”
If a user performs a search and the match is made on an alias, and the AIR is configured to ask for confirmation, please note the following:
-
the confirmation prompt does not repeat the alias that was matched
-
the AIR can only use the following fields in the confirmation message:
-
First name
-
Last name
-
Department (only in case of homonyms or if explicitly configured)
-
Location (only in case of homonyms or if explicitly configured)
-
This means that if the caller searched using an alias, the confirmation prompt may use a name that the caller does not recognize. This can cause confusion, leading the caller to think an error occurred and not confirm the suggested contact.
If you believe this situation could cause confusion, it is better to configure additional contacts rather than relying on aliases.
Example
Suppose we have the following contact:
-
First name: Alice
-
Last name: Green
-
Phone number: 100
-
Alias: Marketing manager
If a user asks to speak with “Marketing manager”, the AIR returns this single contact.
If the AIR is configured to ask for confirmation (see option “When matching exactly one contact”), it prompts:
-
AIR: “Would you like to talk to Alice Green?”
This may confuse the caller, who might not know that Alice Green is the person holding the role “Marketing manager”. As a result, they could refuse the match.
If you believe this could be an issue, you can configure the contacts in the following way:
** Contact 1 **
-
First name: Alice
-
Last name: Green
-
Phone number: 100
** Contact 2 **
-
First name: Marketing manager
-
Last name: .
-
Phone number: 100
In this case, when the user asks for “Marketing manager”, only Contact 2 are returned, and the AIR asks for confirmation as follows:
-
AIR: “Would you like to talk to Marketing manager?”
The phrase spoken by the user to request a contact is processed through AI to extract the subject used for the search.
Examples
-
“I want to speak with James” → subject to search: James
-
“I want to speak with Charlotte from Cardiff office” → subject to search: Charlotte
(note that “from Cardiff office” is ignored) -
“I would like to speak with someone from sales” → subject to search: sales
-
“I would like to speak with support” → subject to search: support
-
“I want to speak with the Sales Manager” → subject to search: Sales manager
-
“I want to speak with Mr Brown” → subject to search: Brown
(note that “Mr” is ignored)
Keep these examples in mind when configuring contacts, as they directly impact search accuracy.
Best Practices
-
Avoid titles (e.g., Mr, Ms, Dr) in searchable fields
-
Avoid long phrases (e.g., “Dedicated support team for urgent issues”), since the match is performed on the entire value, not on parts of it
-
Do not include numbers in searchable fields, as search by phone number is currently not supported