Cisco Webex Calling SIP Routing to Imagicle Queues
Cisco Webex Calling™ Configurations from Control Hub
Imagicle UCX Cloud Suite leverages shared Cisco CUBE (or vCUBE) "Public SBC" deployed in Imagicle Cloud, to allow the Internet "OTT" Peering to Webex Calling MT cloud.
The following configuration procedure can be applied independently from the PSTN access in use. If you are leveraging on-prem PSTN (local CUBE) or Cloud-Connected PSTN, please consider the simplified alternative configuration based on Route List/Route Group, described here.
SIP Trunk Setup
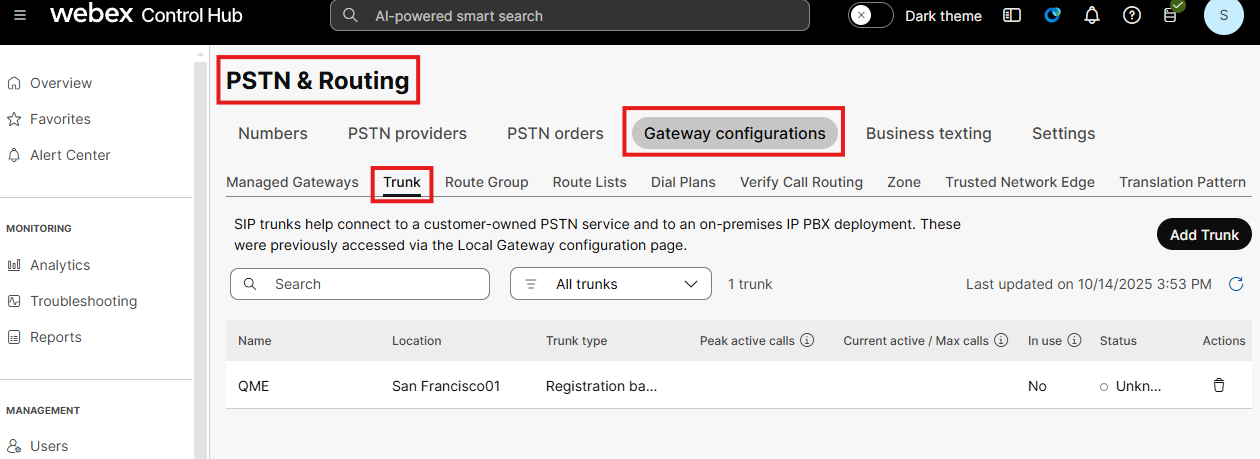
Please access to Webex Control Hub web portal to define the Secure SIP Trunk which allows to route Advanced Queuing and Auto Attendant calls from Webex Calling to Imagicle Cloud. Please access to Webex Control Hub web portal to define the Secure SIP Trunk which allows to route Advanced Queuing and Auto Attendant calls from Webex Calling to Imagicle Cloud. Please select PSTN & Routing ⇒ Gateway Configurations ⇒ Trunk:
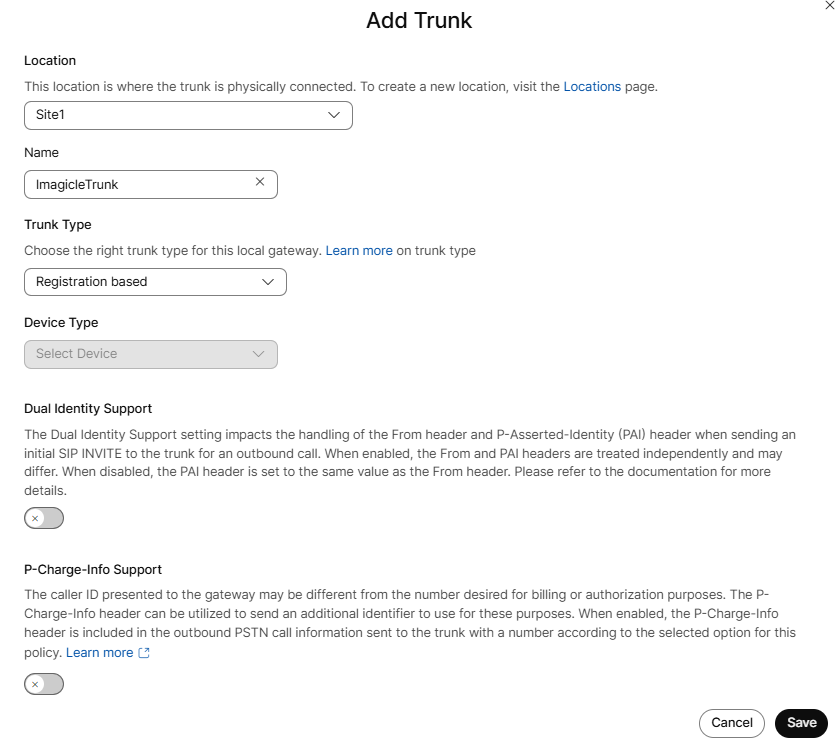
Hit "Add Trunk" and populate the following fields:
Location: select the location where incoming calls for Imagicle Queues/AutoAttendant should land from pull-down menu
Name: enter a name to identify the SIP Trunk. Max 12 characters.
Trunk Type: select "Registration based" from pull-down menu
Dual Identity Support: disabled
P-Charge-Info Support: disabled
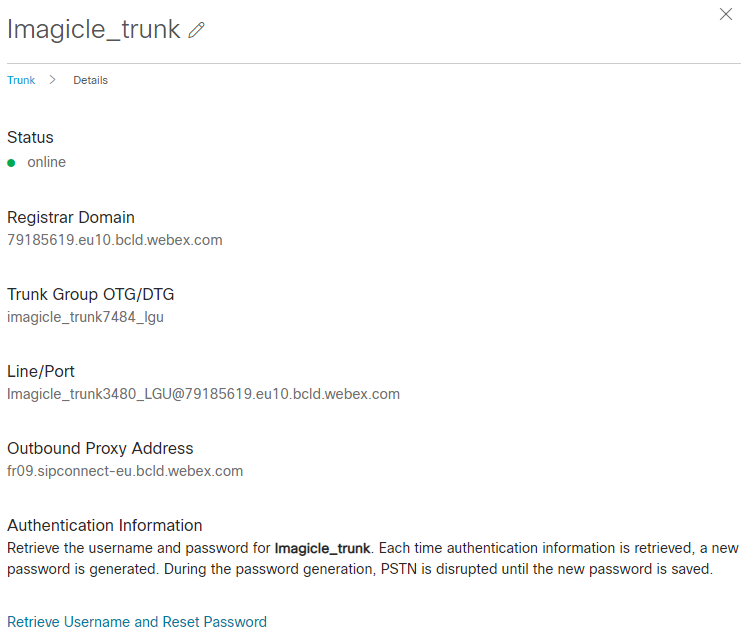
Hit Save to display a Trunk recap page:
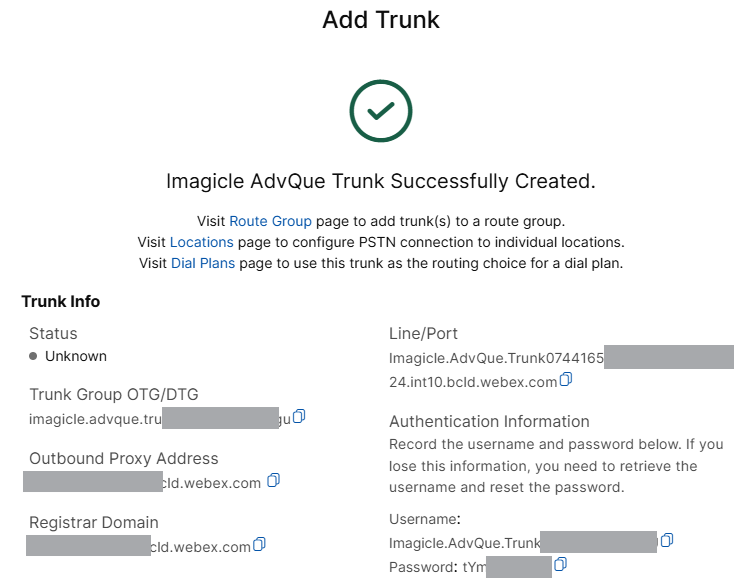
As you notice in above sample, Trunk Status is "Unknown". That's because the destination gateway (Imagicle Public SBC) hasn't been configured yet. Please take note of the following info available in above recap page and send them to wbx.onboarding@imagicle.com:
Registrar DomainTrunk Group OTG/DTGLine/PortOutbound Proxy AddressUsernamePassword
Imagicle Public SBC Configurations
Once accomplished above Trunk configuration, Webex Calling Cloud knows that there is an Imagicle UCX Cloud Suite somewhere in Internet and it is expecting to receive at least an "Option Ping" to declare the Trunk online and available.
Public SBC configuration is applied by Imagicle Cloud Services team, based on above Trunk parameters, retrieved in Trunk recap web page.
Once Imagicle CS has applied required SBC configurations, you can go back to Webex Control Hub web portal and check that SIP Trunk is Online: PSTN & Routing ⇒ Gateway Configurations ⇒ Trunk ⇒ Details:
Dial Plans Setup from Webex Control Hub
Please access again to Webex Control Hub web portal and select PSTN & Routing ⇒ Gateway Configurations ⇒ Dial Plans:
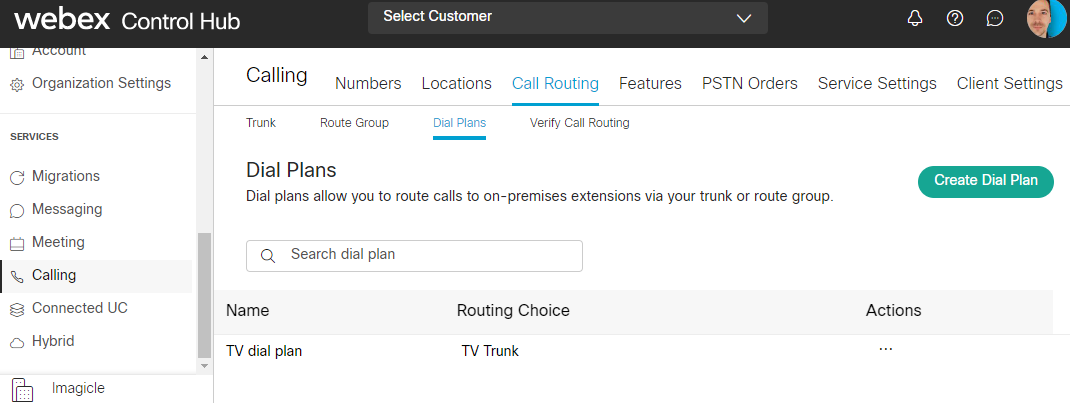
Now click on "Create Dial Plan" and add a name to it. Then select Imagicle Trunk from pull-down menu and finally add a PREFIX pattern to be used to route calls to Imagicle Queues and Auto Attendant Services (+28! in below sample). Please ask Imagicle team about the correct prefix to apply:

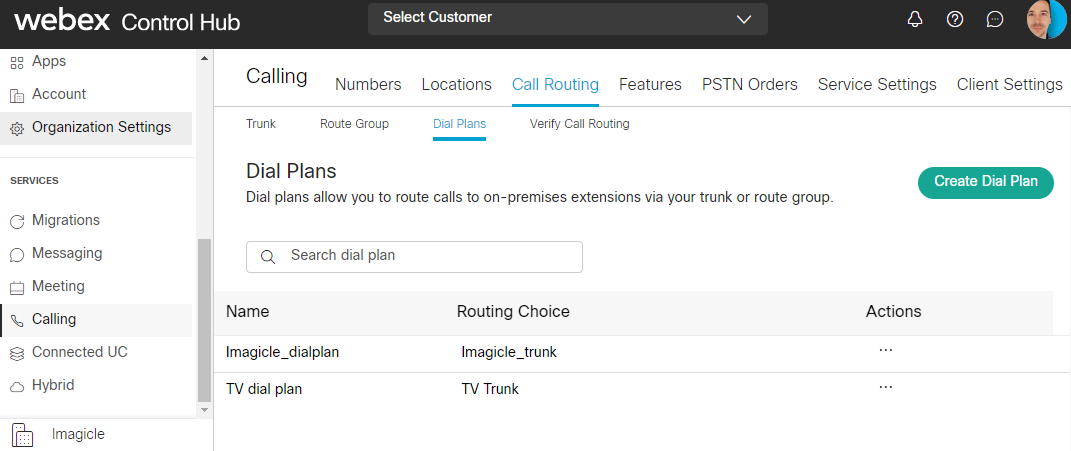
Hit <TAB> key and then click on "Save" button. Please check that new Dial Plan entry has been properly added to the overall Dial Plan list:
Please be aware that, from now on, all outbound calls performed by Webex Calling users, starting with above prefix, will be routed to Imagicle Public SBC via Secure SIP Trunk, independently from user's own Location or the Service who triggers the call.
WxC native Auto-Attendant Service for call routing to Imagicle services
This configuration allows to assign a PSTN DID number to an Imagicle Queue or Auto Attendant Service. Webex Calling Auto-Attendant Service is therefore used only to bridge PSTN numbers to the previously defined internal Dial Plan range (numbers starting with assigned prefix).
If you are leveraging a multi-location Webex Calling environment, you can also create an Auto-Attendant Service for each location, associating local branch numbers to handle local Imagicle queue/IVR services.
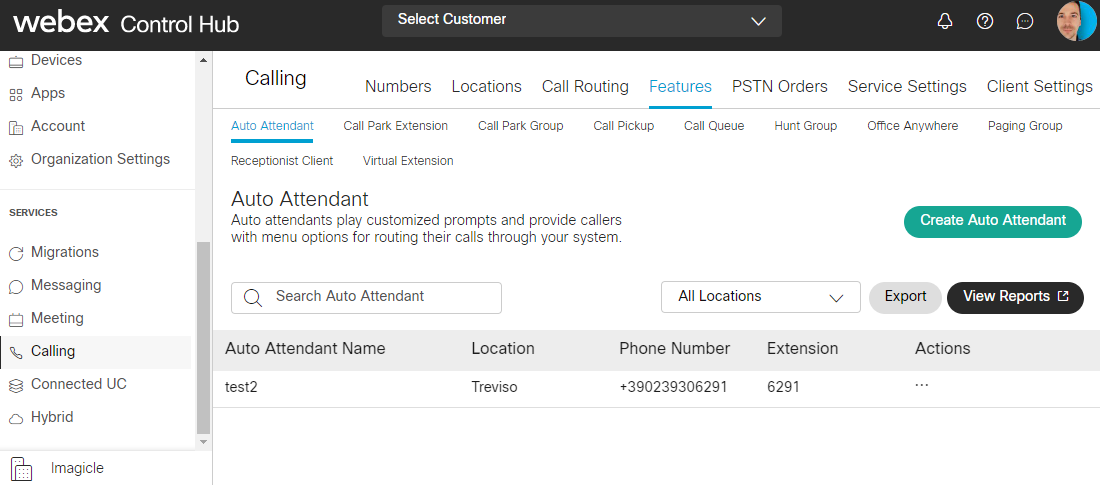
Please access again to Webex Control Hub web portal and select Calling Service ⇒ Features ⇒ Auto Attendant:
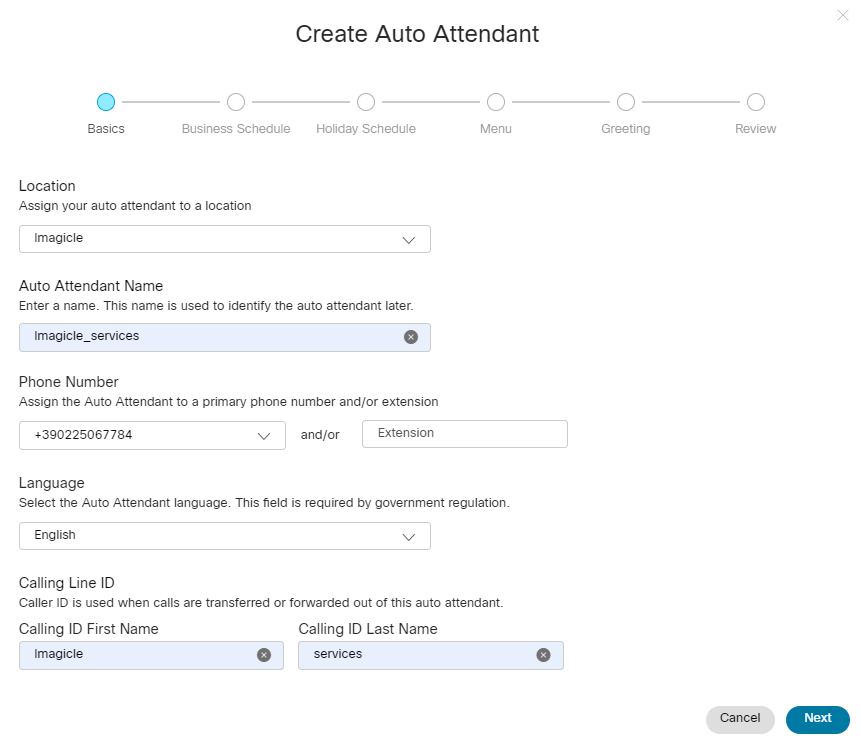
Please click on “Create Auto Attendant” and fill the form with Location (from pull-down menu), Auto Attendant name of your choice, PSTN Phone Number (from pull-down menu), Calling ID First Name & Last Name. These last two fields dictate the Caller ID that called number receives once a call is transferred from this Auto Attendant Service:
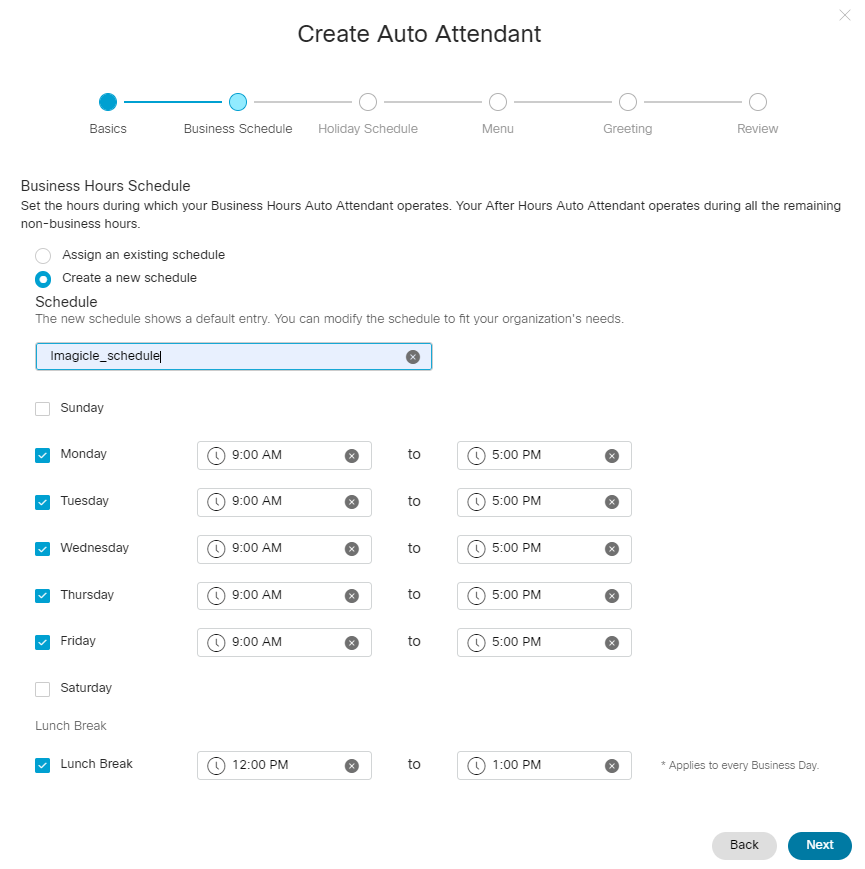
Hit Next and create a new Schedule with a name of your choice. Just keep all default values. This schedule config is actually ignored, so no need to worry about it.
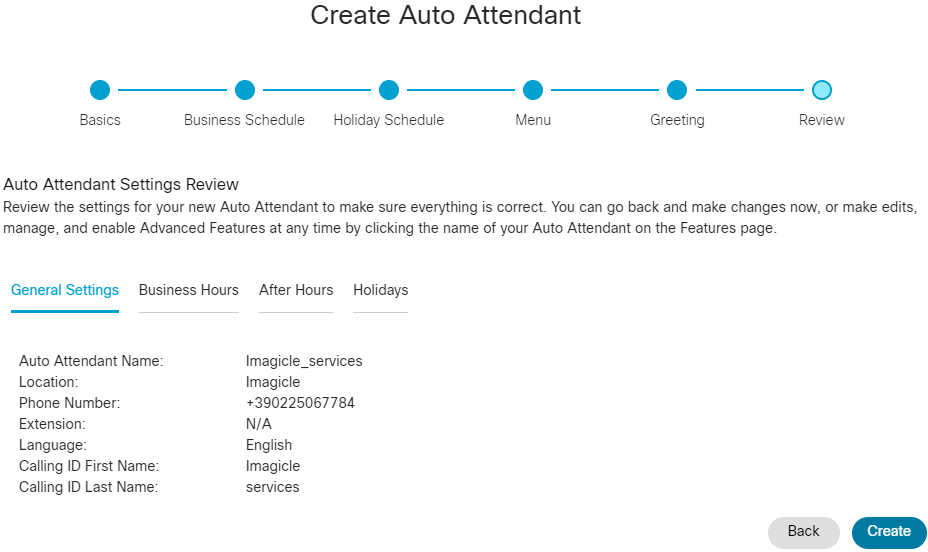
Hit Next three times to skip unused Holidays, Menu options and greetings (voice prompts) options. Eventually you reach the Auto Attendant recap page:
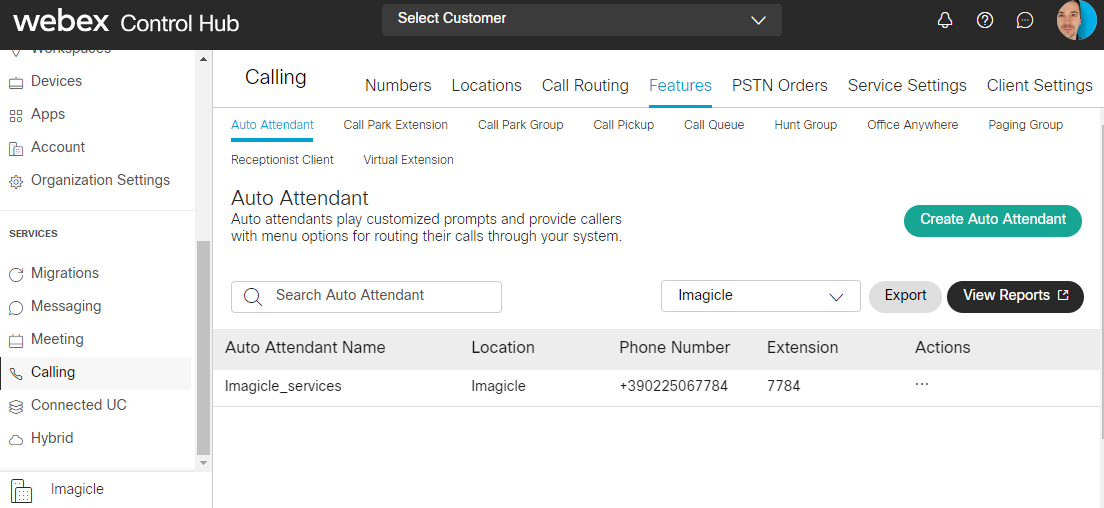
Hit Create to save and activate the Auto Attendant Service. Now, from Webex Control Hub menu, you can find newly created Auto Attendant Service:
Associate additional PSTN numbers to the same Auto Attendant Service
If your Imagicle Advanced Queuing/Auto Attendant configuration just include a single PSTN number mapped to a single Imagicle service, then you can skip this paragraph and go straight to "Call Forwarding Setup" paragraph.
Otherwise, you can add up to 10 additional PSTN phone numbers to the same Webex Calling Auto Attendant Service, to grant the access to additional Imagicle queues and IVR services.
Please click on newly created Auto Attendant service to display the Service Overview:
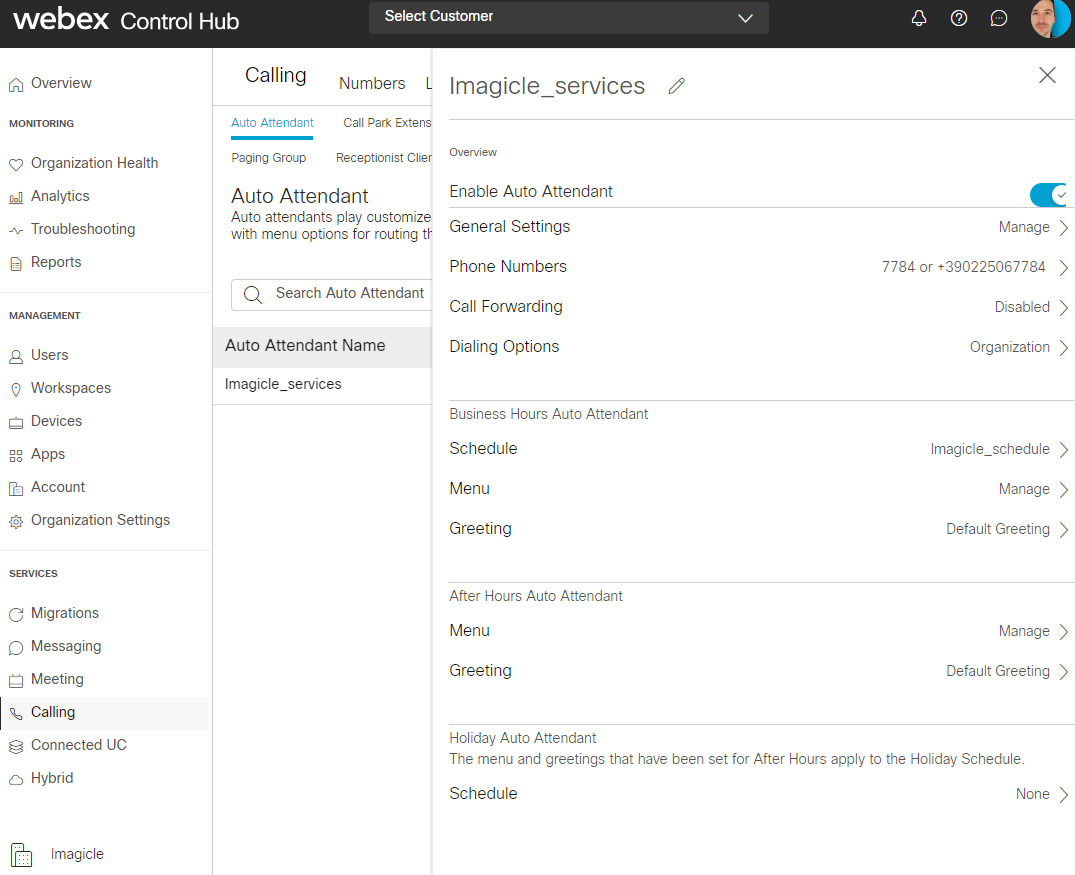
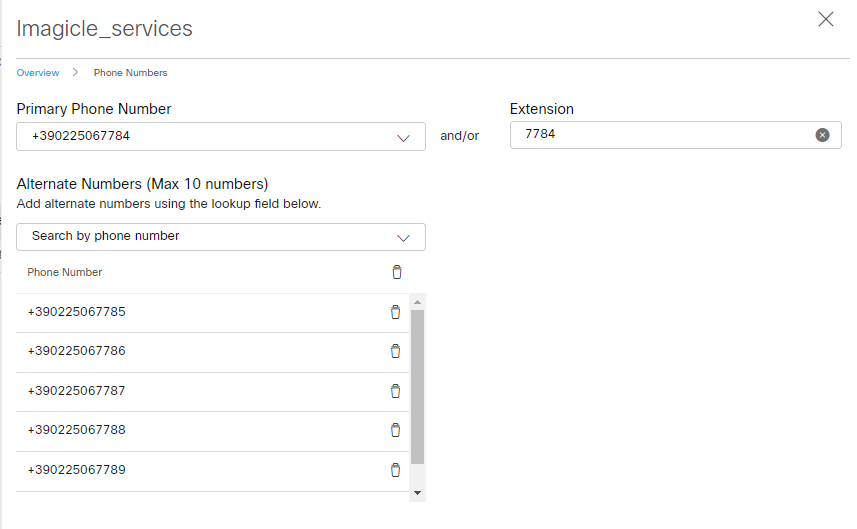
Now click on "Phone Numbers" to display the phone numbers currently associated to this Auto Attendant. Other than the Primary Phone Number, you can add up to 10 "Alternate Numbers". Once done, just hit Save:
Call Forwarding Setup
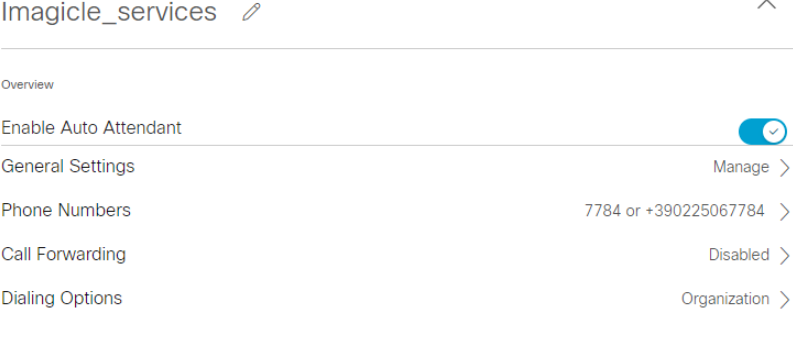
Please go back to Auto Attendant Service Overview and click on "Call Forwarding" (Disabled by default):
Call Forwarding window appears. First of all, please enable Call Forwarding by clicking on relevant soft-switch. Then select "Selectively Forward Calls" and enter a number of your choice, prepending previously defined Dial Plan prefix (+28 in below sample):
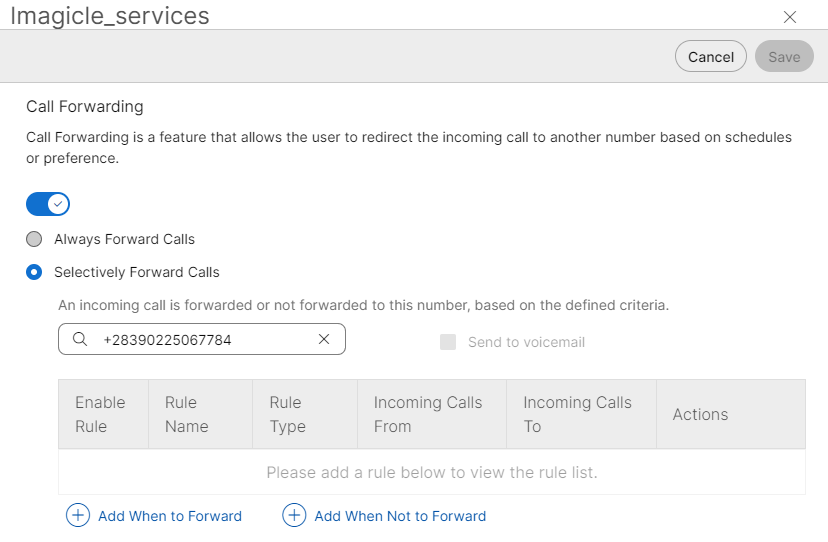
Now click on “Add When to Forward” to add forwarding rules:
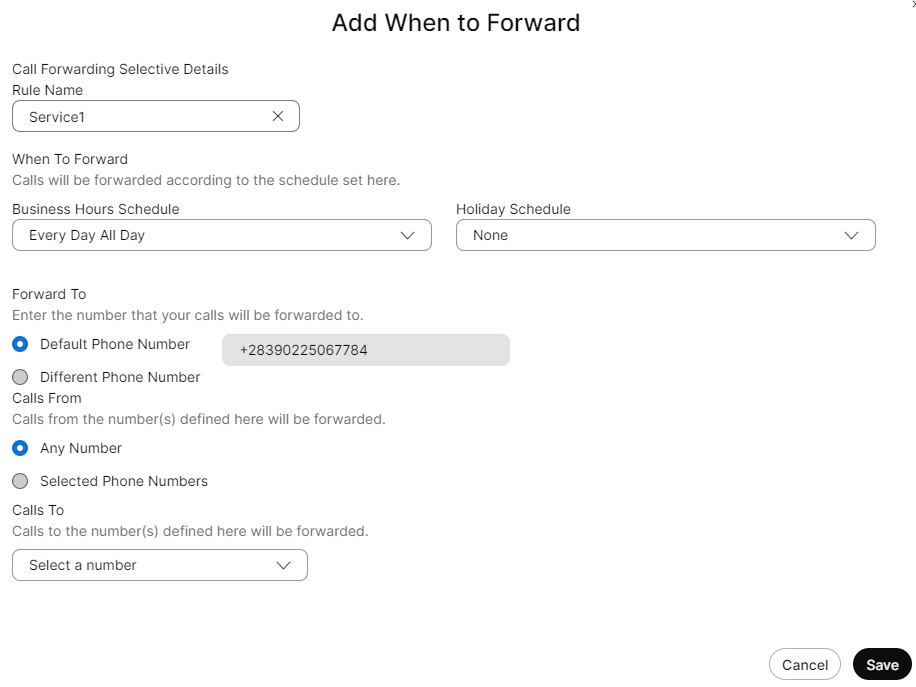
Please enter the following data:
Rule Name: name of your choice
When To Forward: leave the default "Every Day All Day” time table.
Forward To: pre-compiled with previous PREFIX+Phone Number. Just leave the Default
Call From: Select "Any number", unless you want to prevent the access to the specific service to some extensions
Calls To: Select the actual Primary PSTN Phone Number where Call Forwarding rule is applied
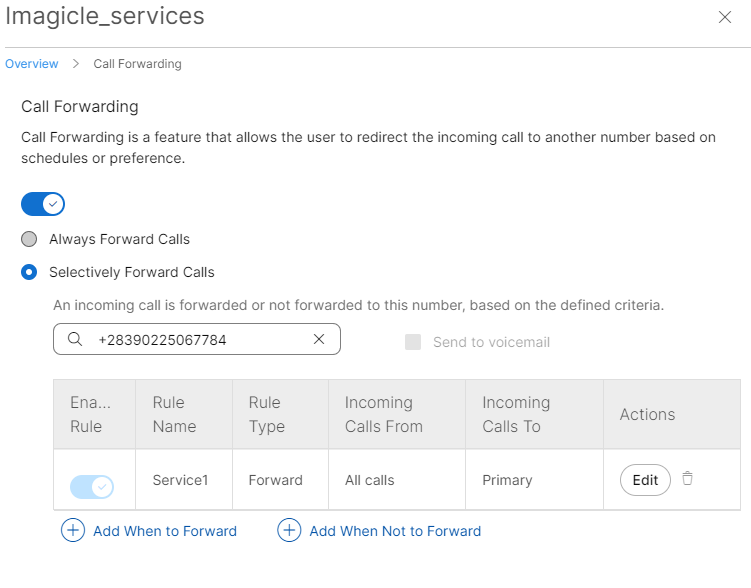
Hit Save. Rule appears in the Call Forwarding list:

From now on, you can keep on click "Add When to Forward" and add additional call forwarding rules for the previously added Alternate Numbers (if any). Please mind the following differences against first forwarding rule:
Forward To: select "Different Phone Number" and add one of the Alternate Numbers.
Calls To: This is the actual Alternate PSTN Phone Number where Call Forwarding rule is applied
After having applied a forward rule to all your PSTN numbers, you end up with a list such as below sample:
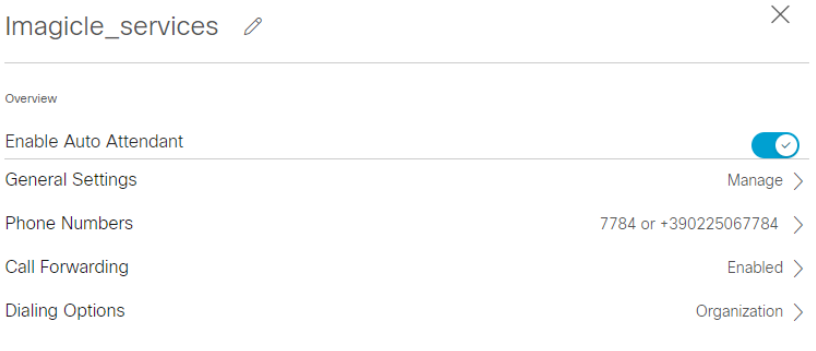
If you now go back to Auto Attendant Service Overview, you can see that Call Forwarding is Enabled:
From now on, every time Webex Calling receives a call on one of the PSTN numbers associated to the Auto Attendant Service, the call is automatically forwarded to Imagicle Public SBC through Secure SIP Trunk (including Dial Plan prefix). Imagicle SBC in turns forward the call to Imagicle UC Cloud Suite.
Additional setting
Service Settings
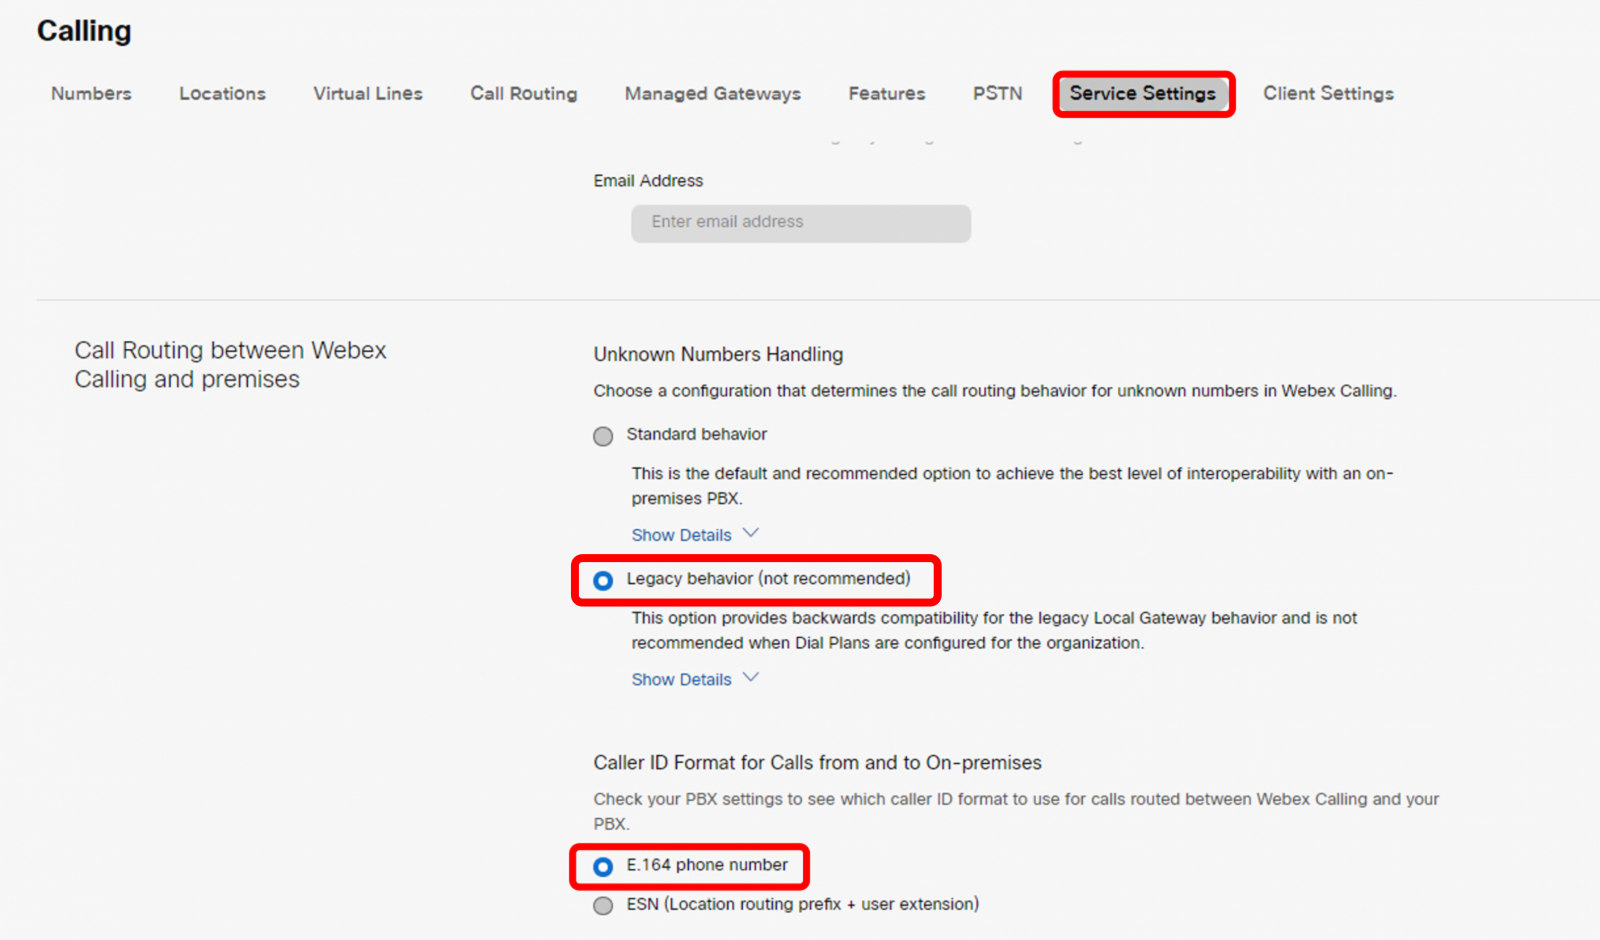
"Unknown Numbers Handling" section dictates how to route calls to unknown numbers, meaning those numbers not associated to a Webex device. This is valid also to route calls to user’s extension number without a PSTN number assigned.
By leaving this parameter to its default "Standard behavior", call routing is strictly tight to the dial plan, causing Imagicle Cloud to be kept in the loop once the call is transferred to the operator. As a consequence, additional latency and quality loss is added to call flow, becoming more and more annoying upon subsequent call transfers to other users.
That's why this parameter should be set to Legacy behavior to avoid a “604 Does not exist anymore” routing issue.
Moreover, to properly display queue name in Imagicle Attendant Console, please make sure the Caller ID Format is set to E.164 phone number.
Both parameters are available in Calling ⇒ Service Setting, as per below screenshot:
Call Park Settings
To leverage Imagicle Attendant Console call park feature, all operators must be configured as a member of a same Call Park Group. Call Park at extension level is not supported. More details available here.
Please note that parked calls are shared among all operators, thus visible in Attendant Console's "CALL PARKED" panel.
User's Settings
All Cisco Webex Calling registered users who actually need to leverage Imagicle Advanced Queuing application (as operators or calling/called parties) should have a specific license enablement and an extension number associated to relevant Location.
From Cisco Webex Control Hub, please go to Users Management and click on one specific user to display a License summary:
To display and/or amend a user's license, please click on "Edit Licenses":
Make sure that both "Webex Calling" and "Professional" flags are checked, then hit Next:
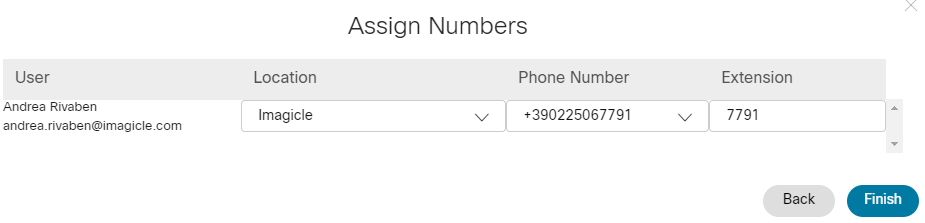
Please make sure that User is properly associated to own Location, with an extension number and +E.164 DID phone number.
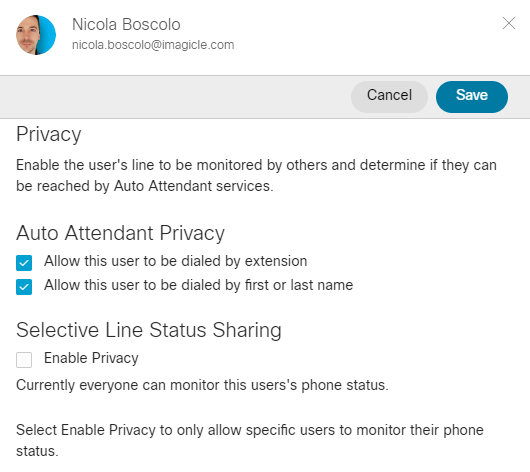
Finally, please make sure that User's Auto Attendant Privacy is disabled, as per below screenshot sample: