Self-hosted Microsoft Teams Call Recording Configuration
This procedure applies for those customers preferring to host the Imagicle Call Recording for Teams solution in their Azure cloud environment, so not leveraging the Imagicle cloud.
Please, notice that in this case, the customer will not benefit of some services provided with Imagicle managed cloud solution, including: automatic updates to the latest software release, automatic backup, disaster recovery.
Requirements
An Azure VM with Windows Server where to install Imagicle UCX Suite
Cloud Azure instance should include 2 vCPU and 8GB RAM. Imagicle recommends a “Standard_F4s_v2” instance type.
Admin-level access to MS Teams PowerShell
Admin-level access to Microsoft Azure web portal, through a user with a valid Azure subscription. This is required to create new Azure Bot.
To verify if the user has an Azure subscription, follow this procedure:
log into https://portal.azure.com
click on Subscriptions
check that at least one subscription is included in the subscription list
If no subscriptions are available, it is possible to create a free one, even if a credit card is required. No charges are applied. Otherwise, it is possible to be added as a "contributor" on an existing subscription; to do so, the user managing the subscription must add this user as a contributor.
Network requirements
Bandwidth : 150 kbits/s per participants of a recorded call, up to 4 channels, max per call 600 kbits/s
Ports :
from external :
HTTPS : TCP 9540 (default, can be configured)
Media : UDP 16384-32767 (default, can be configured, 1 UDP port per concurrent audio channel). At least a range of 1000 UDP ports are needed.
Bot Media signalization : TCP/UDP 10100 (default, can be configured)
internal
HTTPS monitoring : TCP 9640 (default, can be configured)
Connectivity to Imagicle UCX Cloud Platform with a customer-created FQDN
HTTPS : recorder.customer.com:443
Web proxy not supported to reach Microsoft Teams and Graph resources and UCX Suite
For NAT infrastructure : the NAT must be symmetric (incoming public IP address of webhook FQDN must match the Public IP Address used for outgoing traffic)
Microsoft domains/IP to be reached from Azure Cloud instance are summarized here.
Configuration Overview
To allow the recording of MS Teams users' conversations, you must associate each user to a Compliance Recording Policy, in turns connected to an Azure BOT, in turns connected to an Azure Application (App Registrations).
To enable an MS Teams user to leverage Imagicle Call Recording, the following tasks should be accomplished:
Add an Azure Application (App Registrations)
Define an Azure BOT (associated to above app)
Define a Compliance Recording Policy (associated to above app)
Associate above Compliance Recording Policy to all Call Recording users
If you need to record on-demand or pause/resume the call recording, you also need to go through two additional configurations (not required for the basic always-on scenario):
Custom domain definition
API authorization
Please bear in mind that Silence Suppression is not supported.
Mandatory configurations from MS Azure Web Portal
Azure App Registration
Please connect to https://portal.azure.com and login as Administrator
Select “App registrations” service and click on “New Registration”
Please compile the form as below sample, filling the Application name with “Imagicle Call Recording” and leaving all other data as default.
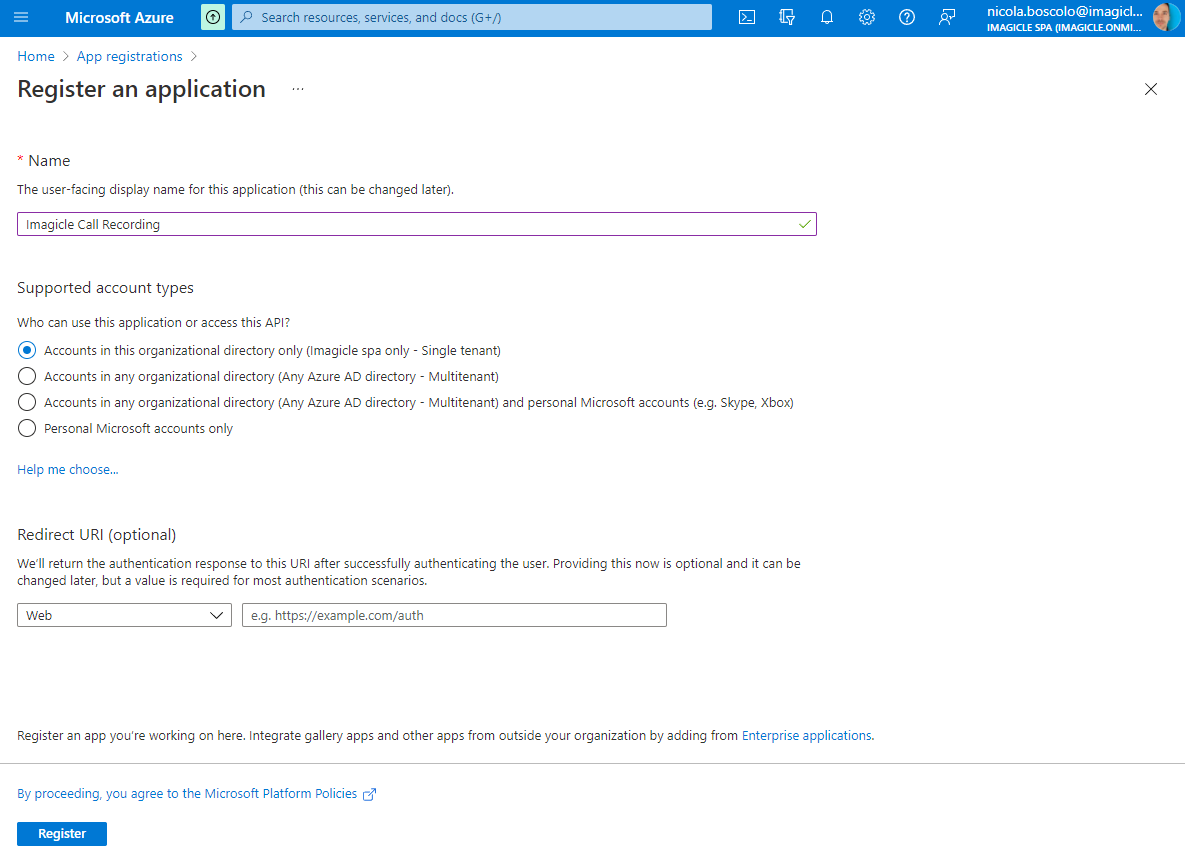
Hit "Register" to get the following resume page, including Application (client) and Directory (tenant) IDs.
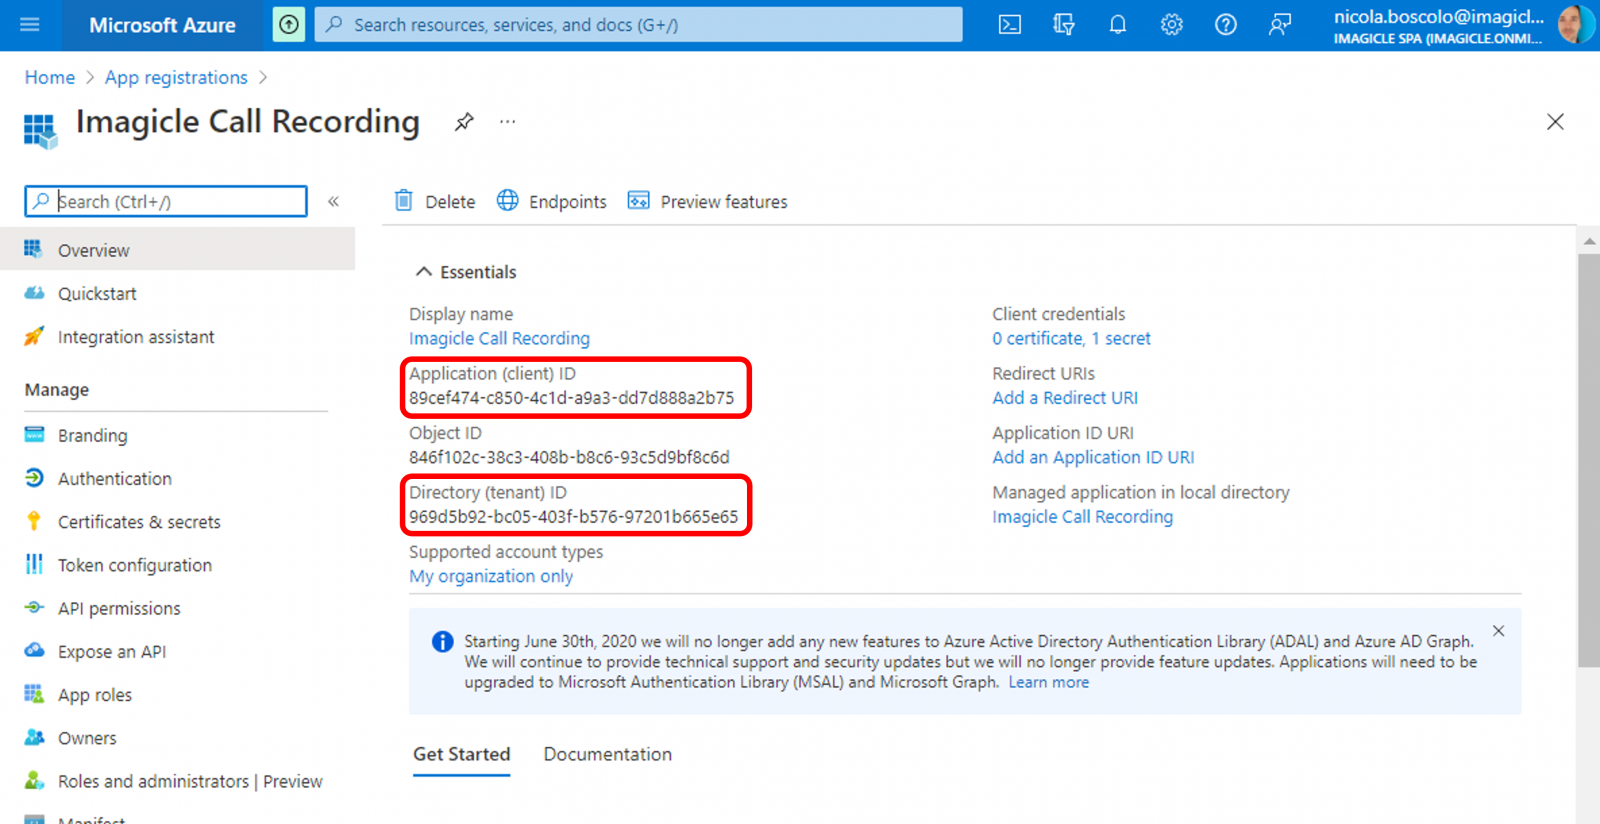
Please take note NOW of above Application ID and Directory ID. They are required later on in this procedure.
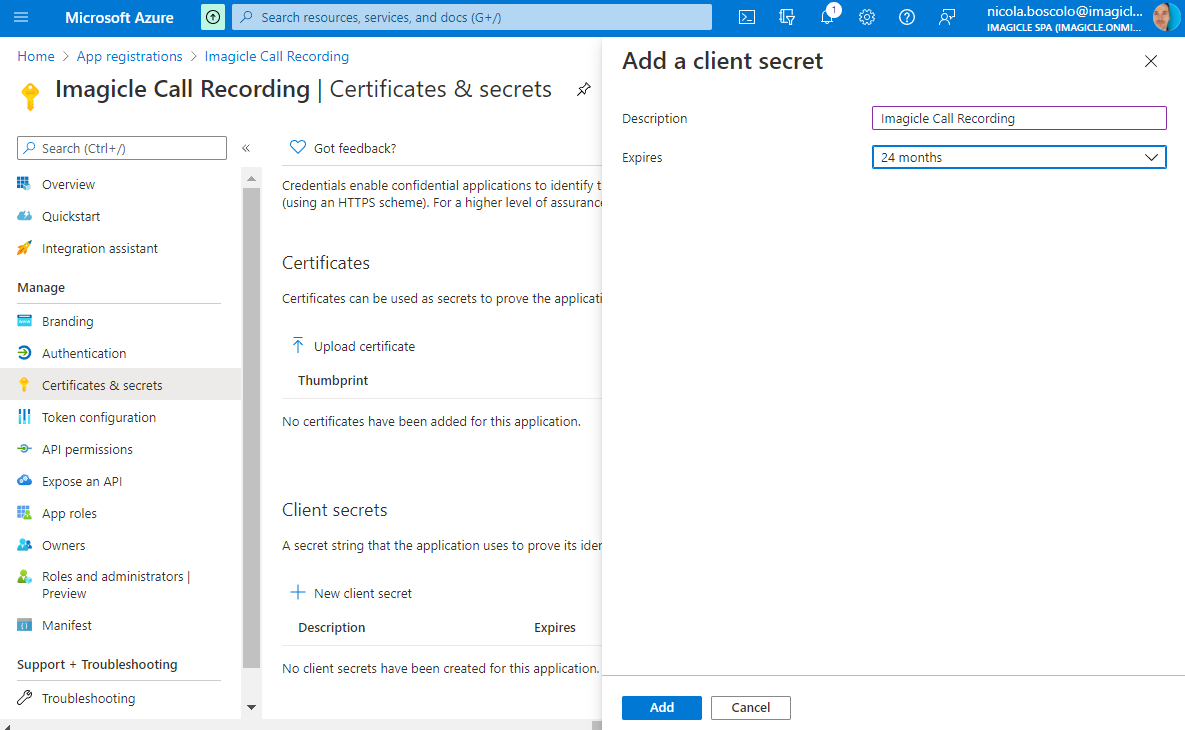
From "Manage" left panel, click on "Certificates & secrets" to define a new "Client Secret"
Client Secret
Please click on “New client secret” and choose an expiration period. We suggest to apply the longest one (24 months) or "Never".
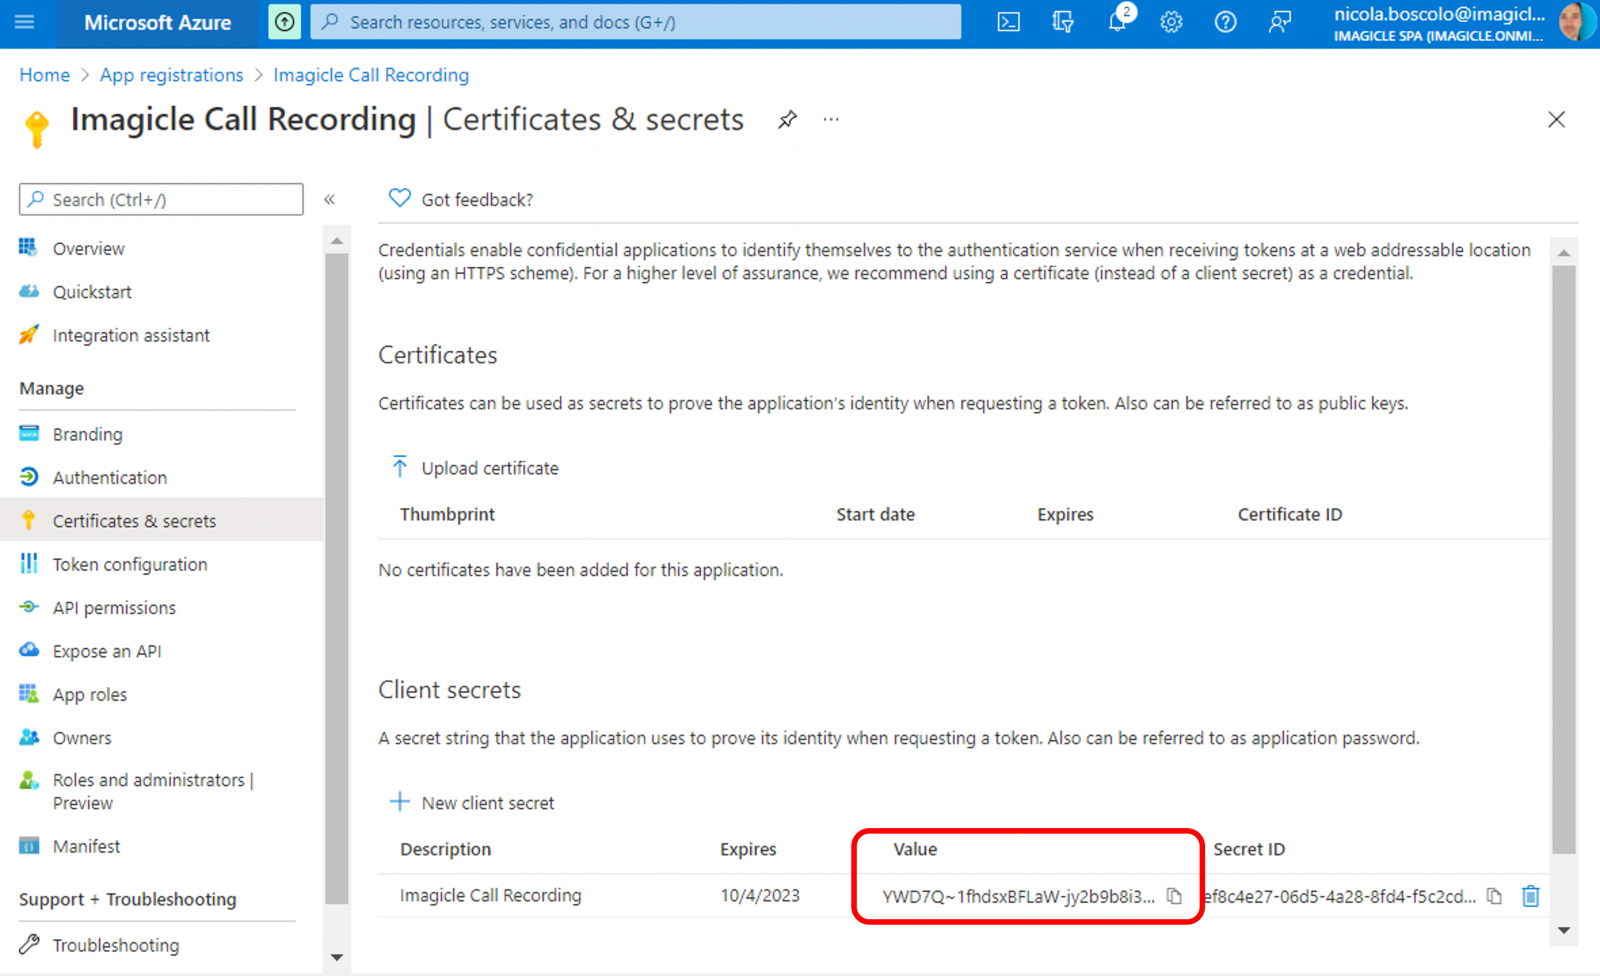
Please take note NOW of Client Secret "Value", available once new Client Secret as been created. It is required later on in this procedure and it won't be displayed anymore in the future.
Please set a reminder for Client Secret, so you can generate a new Client Secret before it expires. Once Client Secret is expired, you can just create a second Client Secret by following same procedure. You can transmit new Client Secret Value to Imagicle team, who is going to apply it in Imagicle UCXSuite. Then you can remove expired Client Secret.
API Permissions
Within newly created App Registration, now you need to add permissions to leverage Microsoft Graph APIs. From "Manage" left panel, please click on "API permissions" to get the following window:
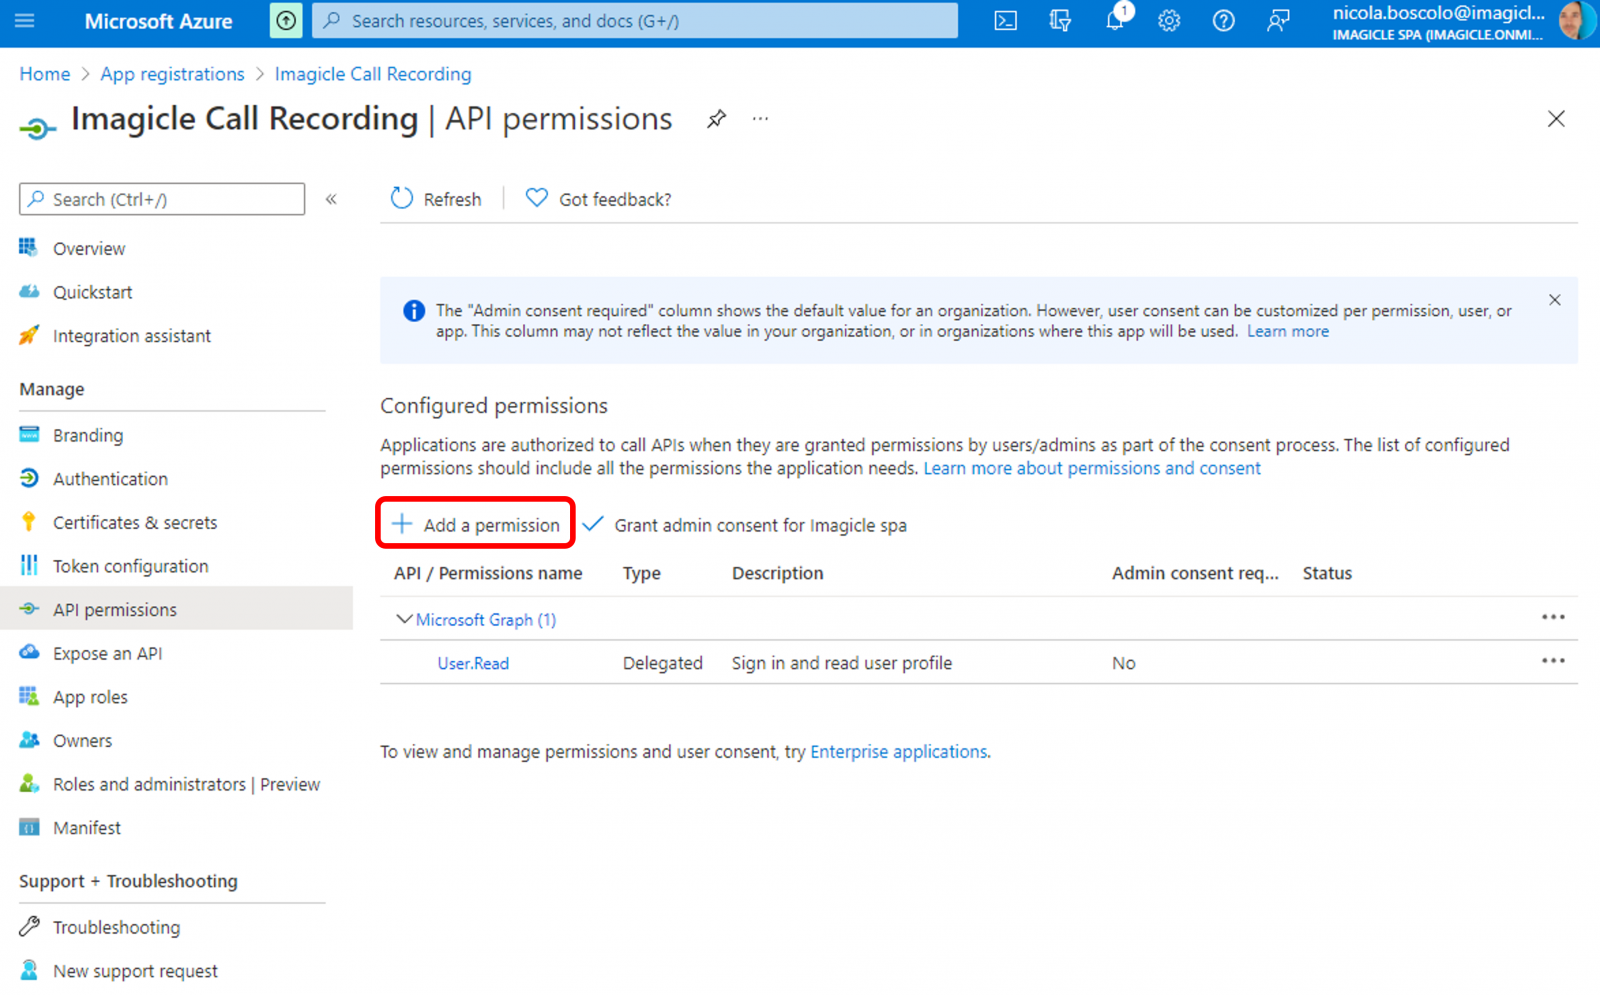
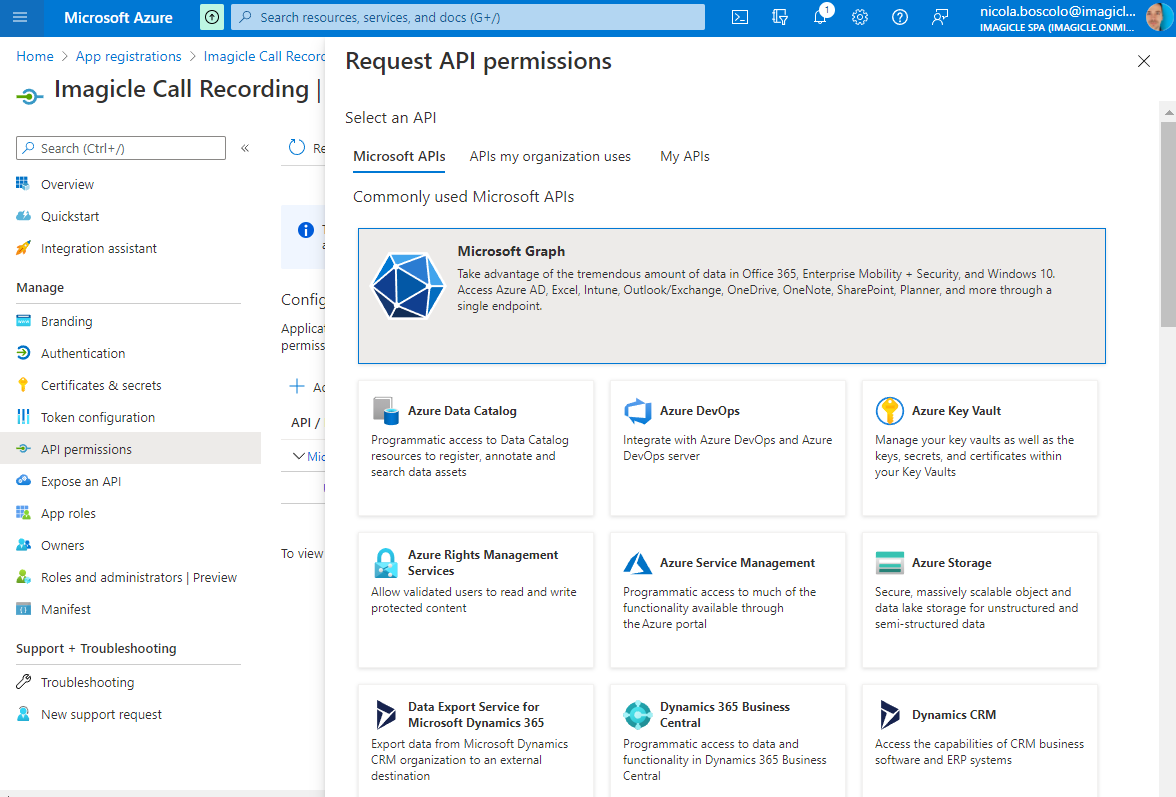
Click on "Add a permission" and select “Microsoft Graph”:
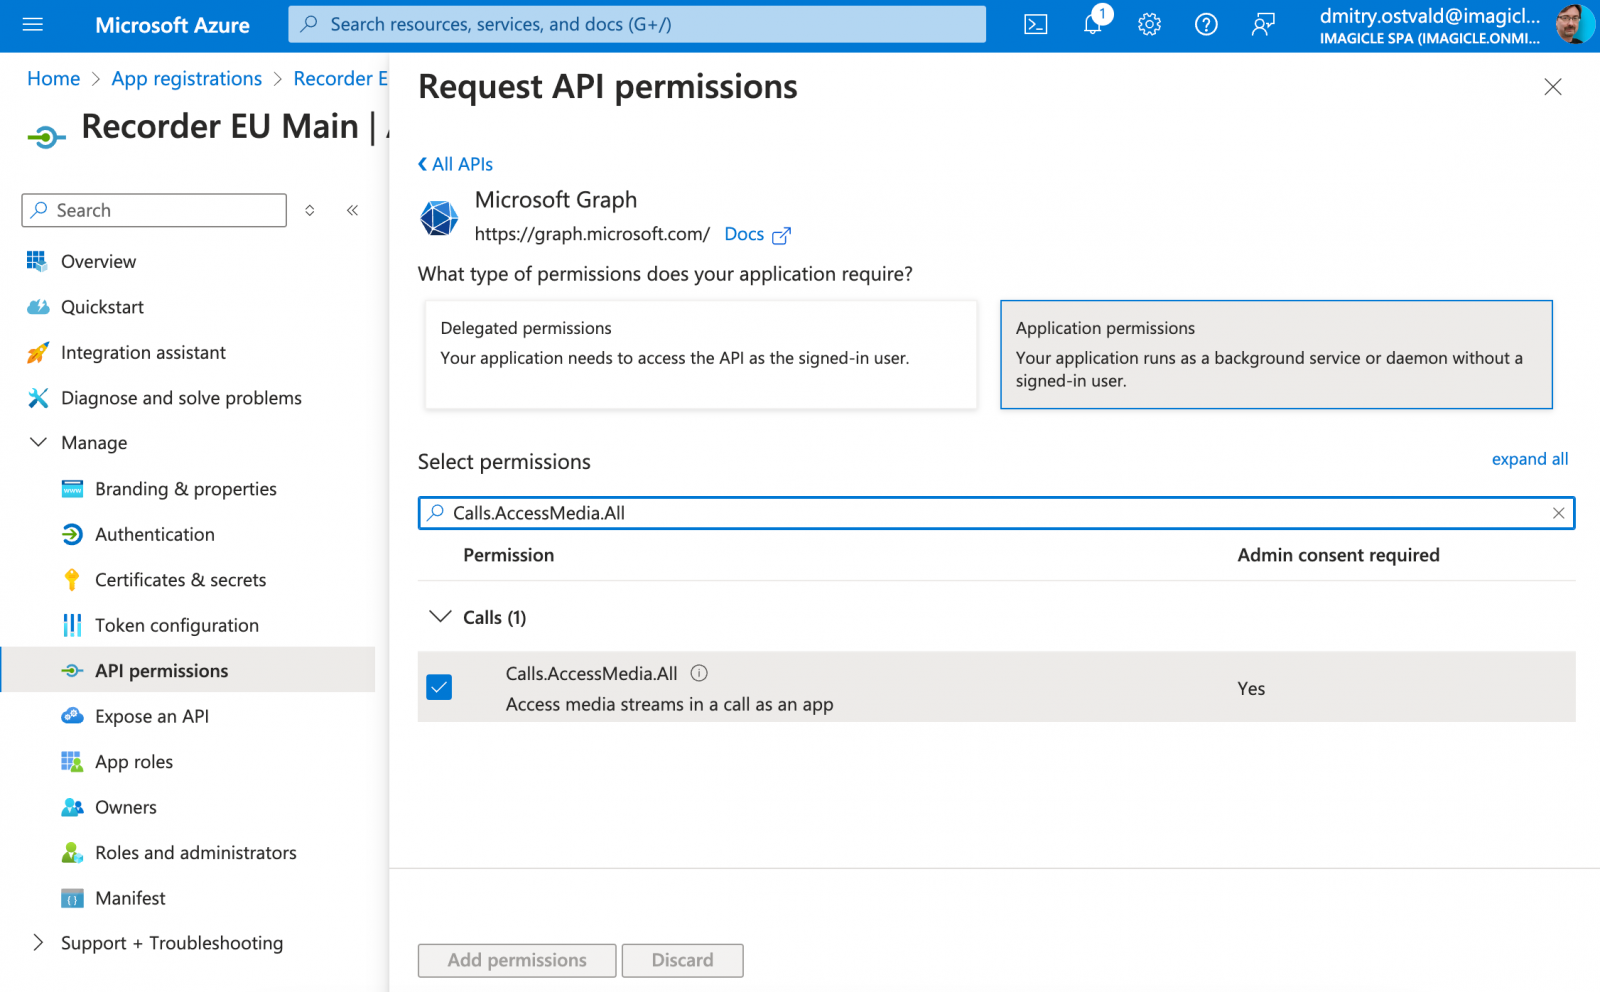
Now click on "Application permissions" and start searching for the following permissions:
Calls.AccessMedia.All
Calls.JoinGroupCall.All
User.Read.All
Tick each above permissions and finally hit "Add permissions"
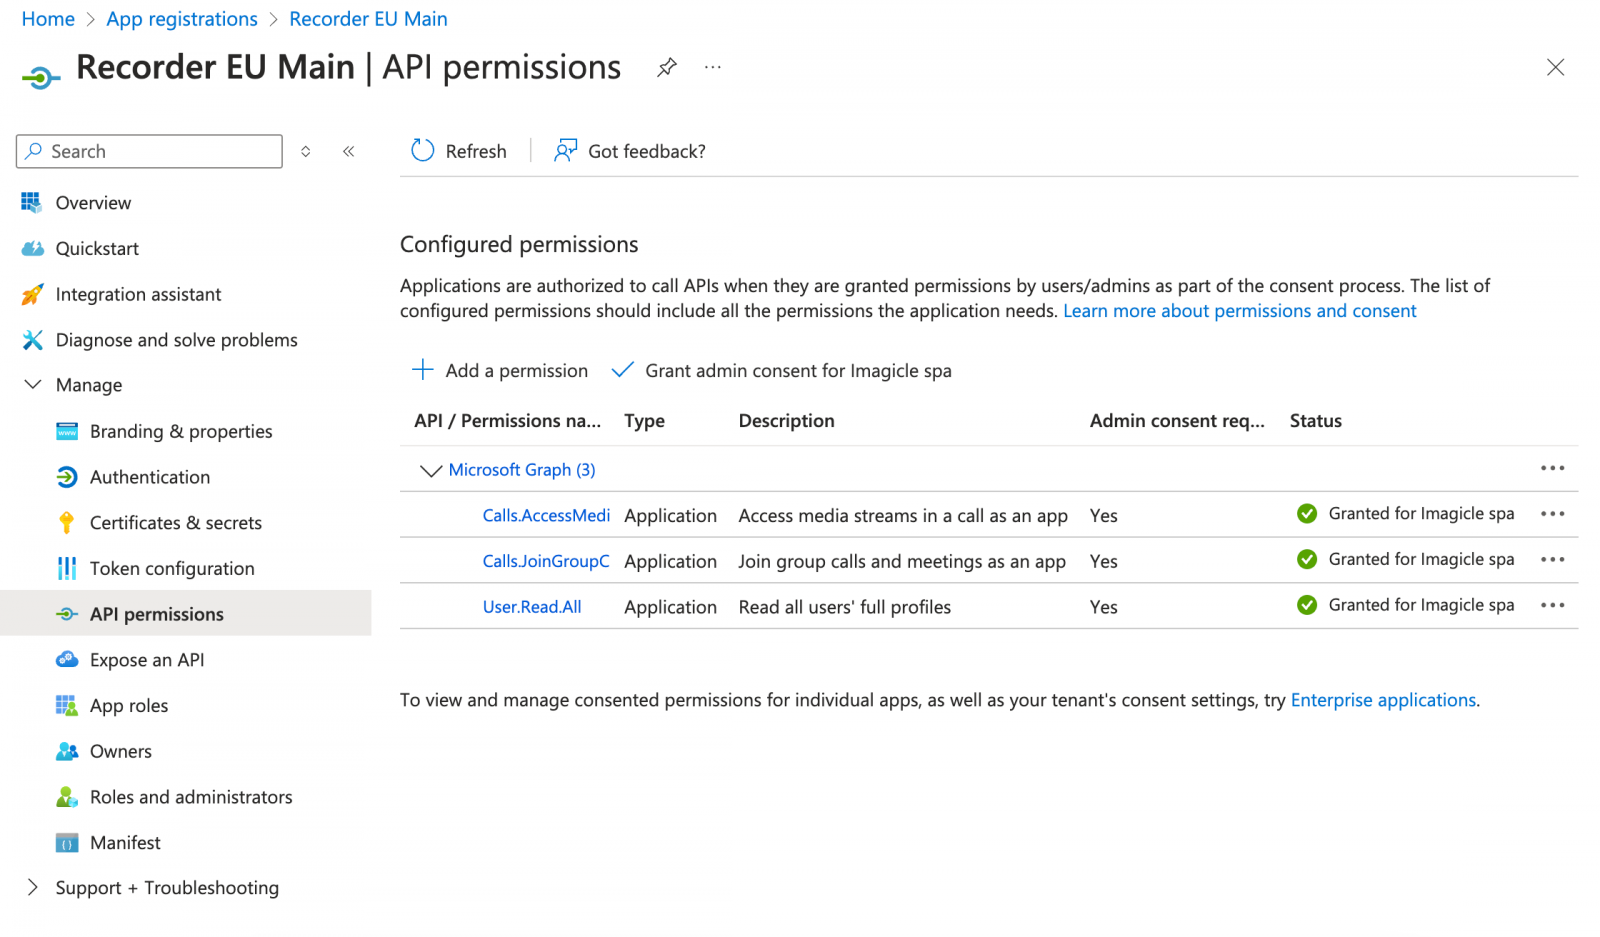
Once Microsoft Graph permission has been added, you need to select “Grant admin consent for <Company_Name>” from rightmost pull-down menu. You get a confirmation pop-up, where you need to click "Yes"
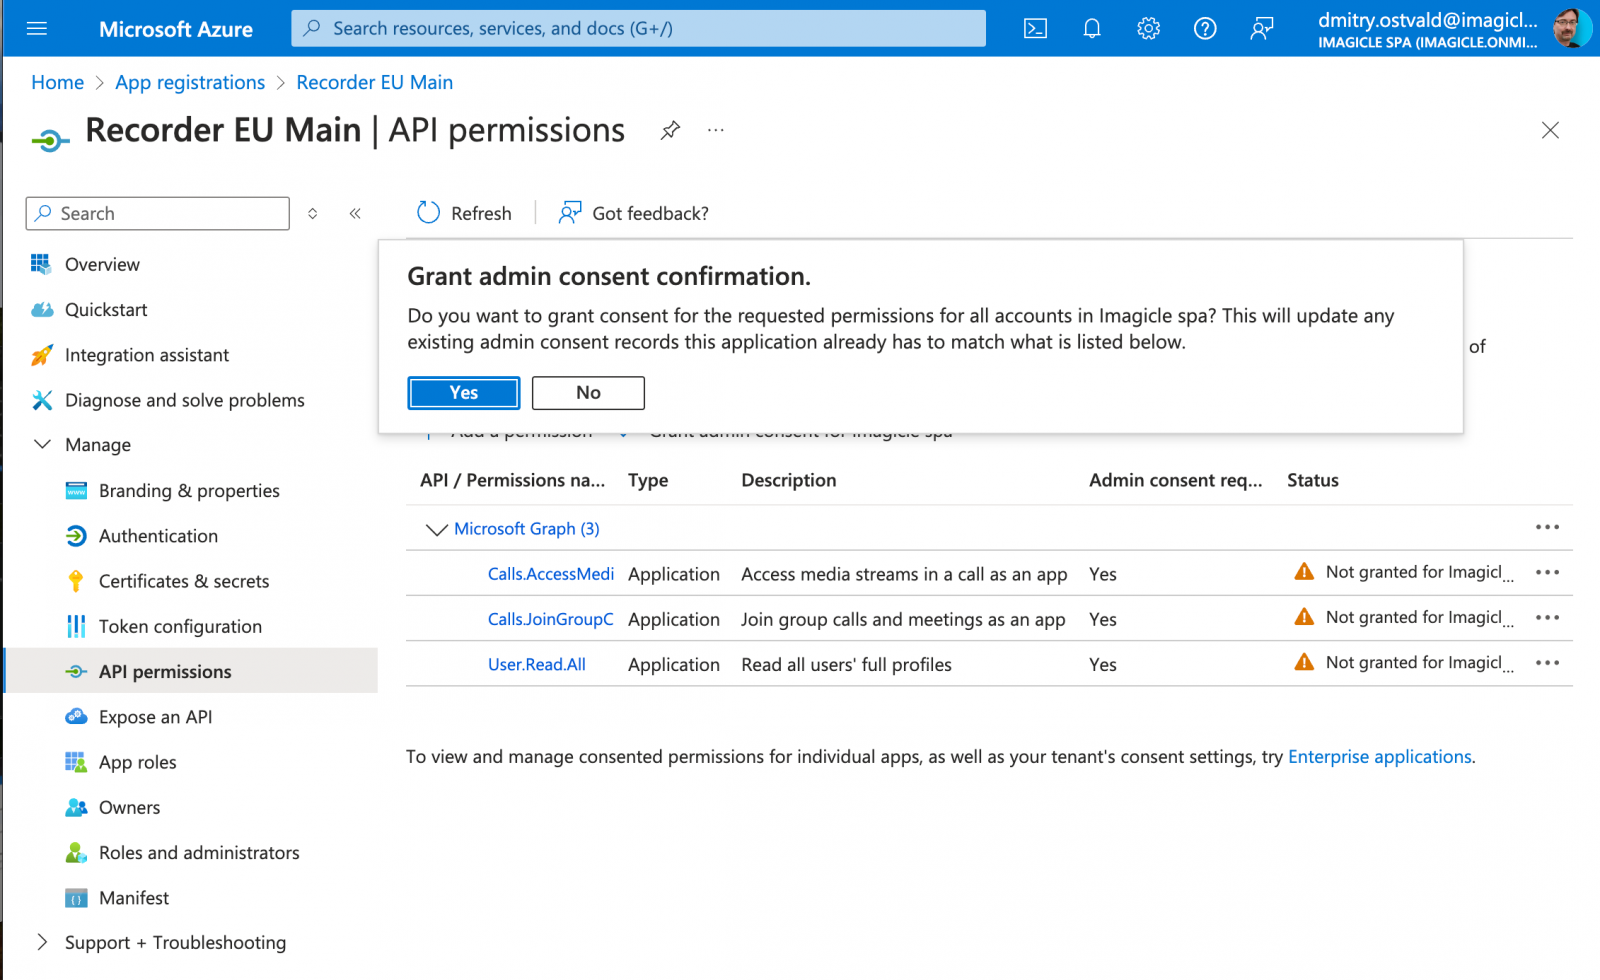
The following screenshot sample shows the actual API permissions summary page, if the procedure has been accomplished in the correct way:
Now click on left menu Manifest link and select "Microsoft Graph App Manifest (New), to display various Graph API parameters related to the Imagicle App registration:
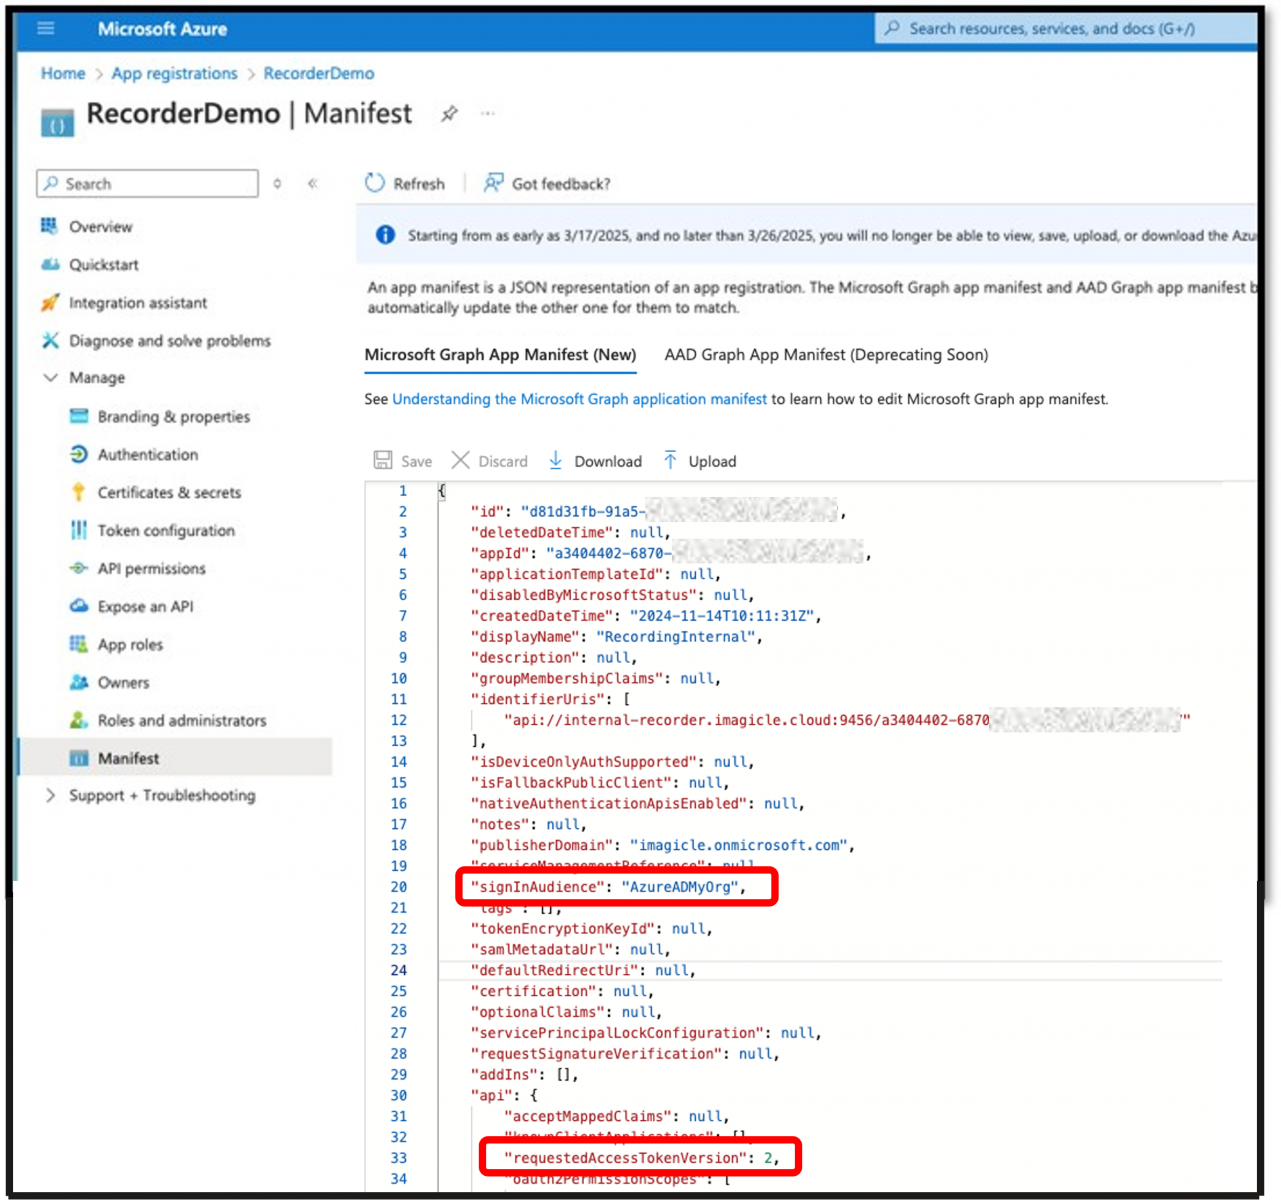
Please make sure that RequestedAccessTokenVersion is set to 2, and SignInAudience is set to "AzureADMyOrg" as above sample.
Azure BOT
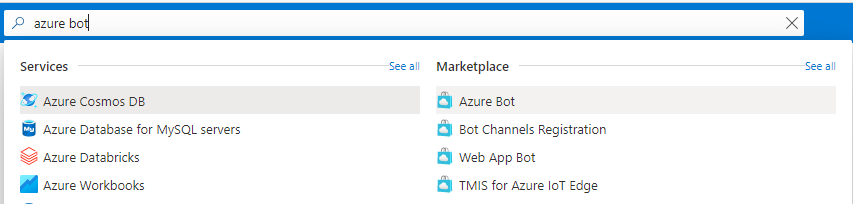
Please access to Microsoft Azure web portal as Administrator and search for Azure Bot from top search box, then click on the link available under the Marketplace section. See below:
Once selected, you need to create a new BOT by hitting "Create an Azure Bot" option. Please bear in mind that it is required a specific license subscription for this purpose and you might be required to enter a credit card number as pro-forma. No charges are applied to credit card account:
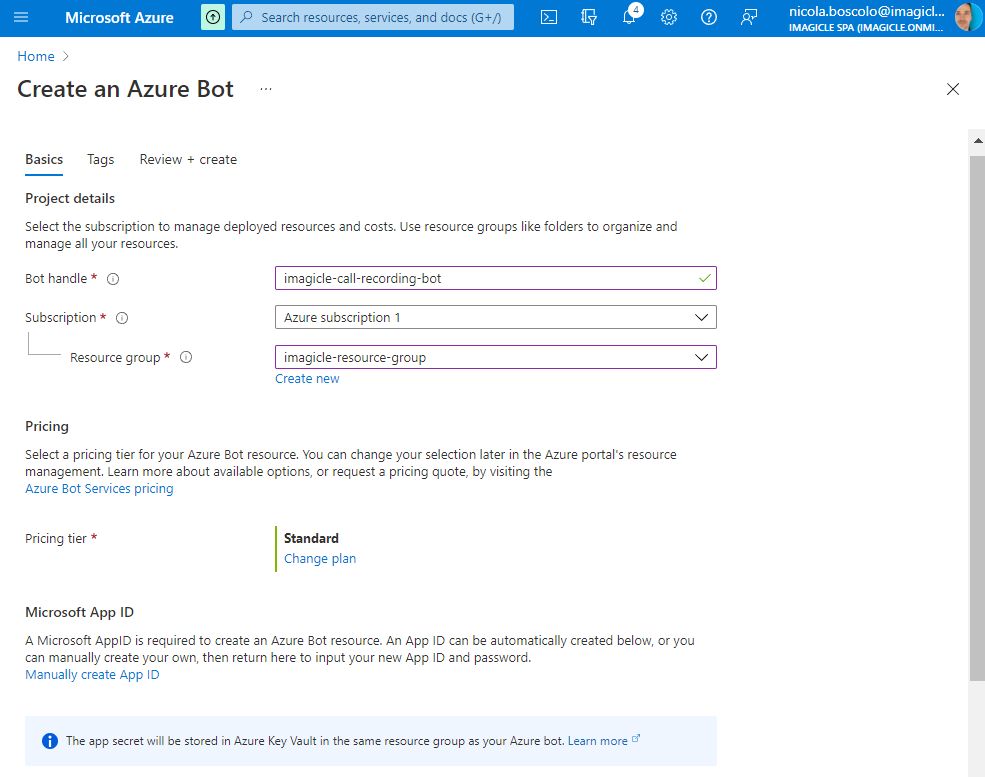
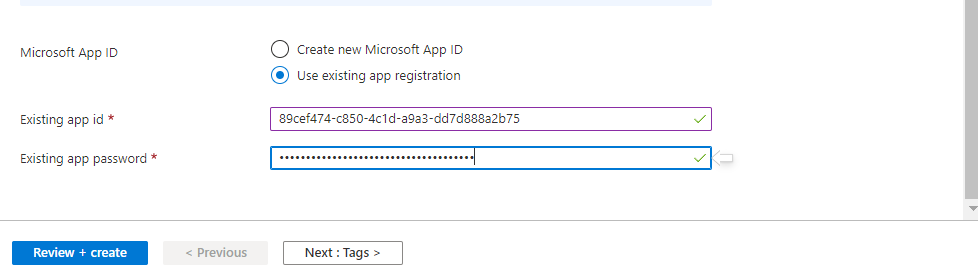
Please fill the following fields:
Bot handle: Unique name for recorder BOT ⇒ imagicle-call-recording-bot
Subscription: leave default value
Resource group: create a new group "imagicle-resource-group", if none is available
Pricing tier: Standard plan
Microsoft App ID: tick "Use existing app registration"
Existing app id: Paste here previously copied "Application ID" saved during App creation
Existing app password: Paste here previously copied "Client Secret" value, saved during Client Secret creation
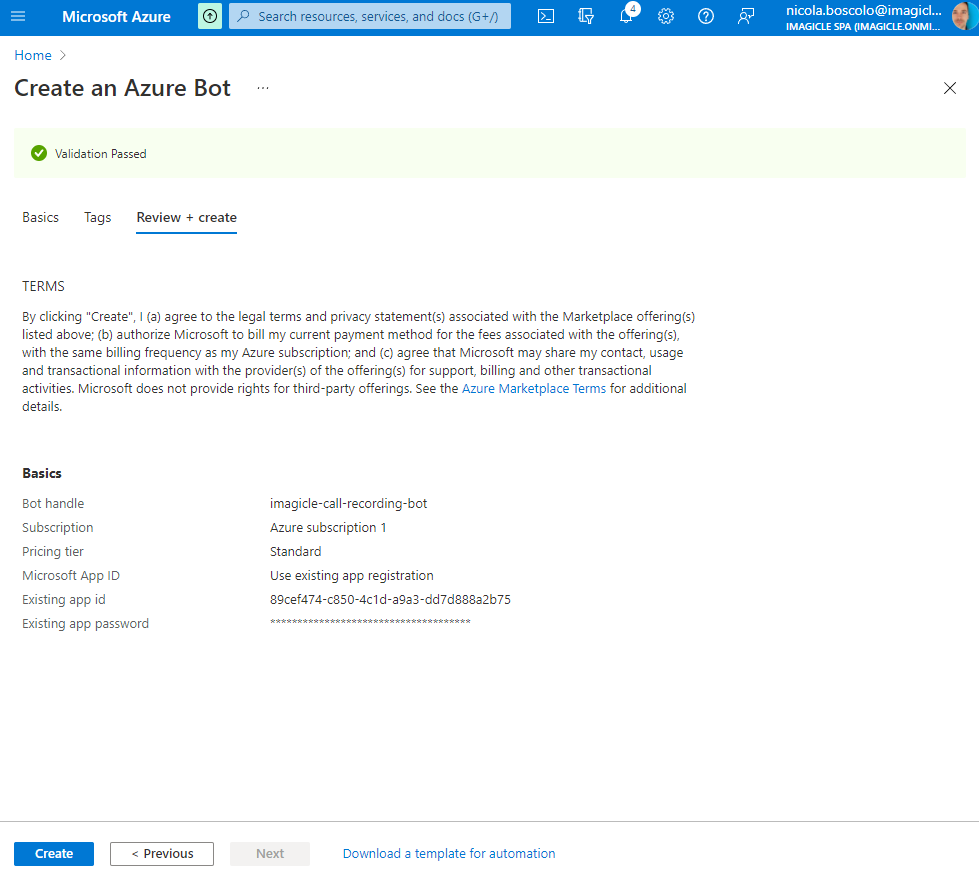
Now hit “Review + create” and double check all displayed data:
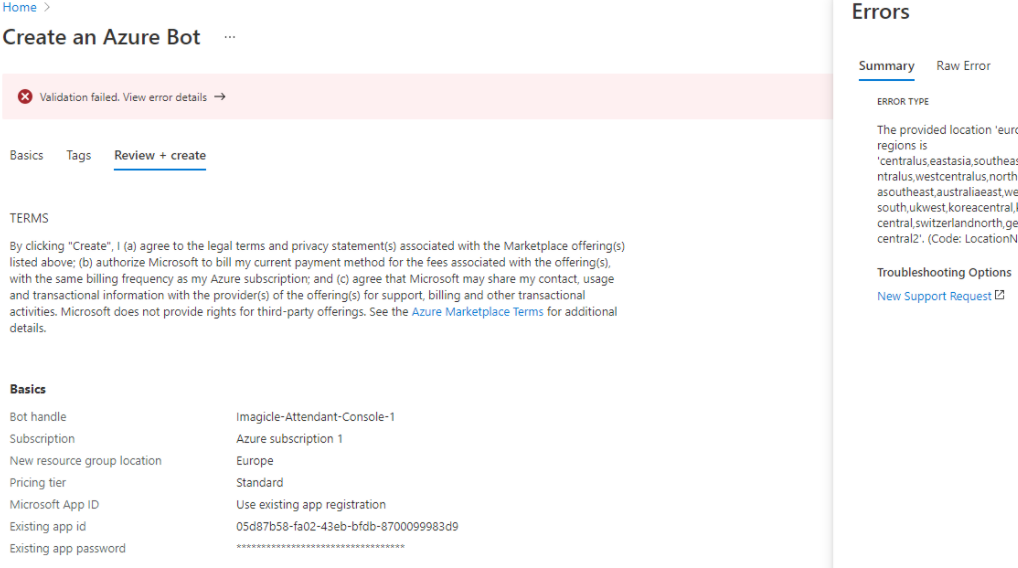
If otherwise you get the following error message, please hit "Previous" and review the Location you specified in Imagicle Resource group:
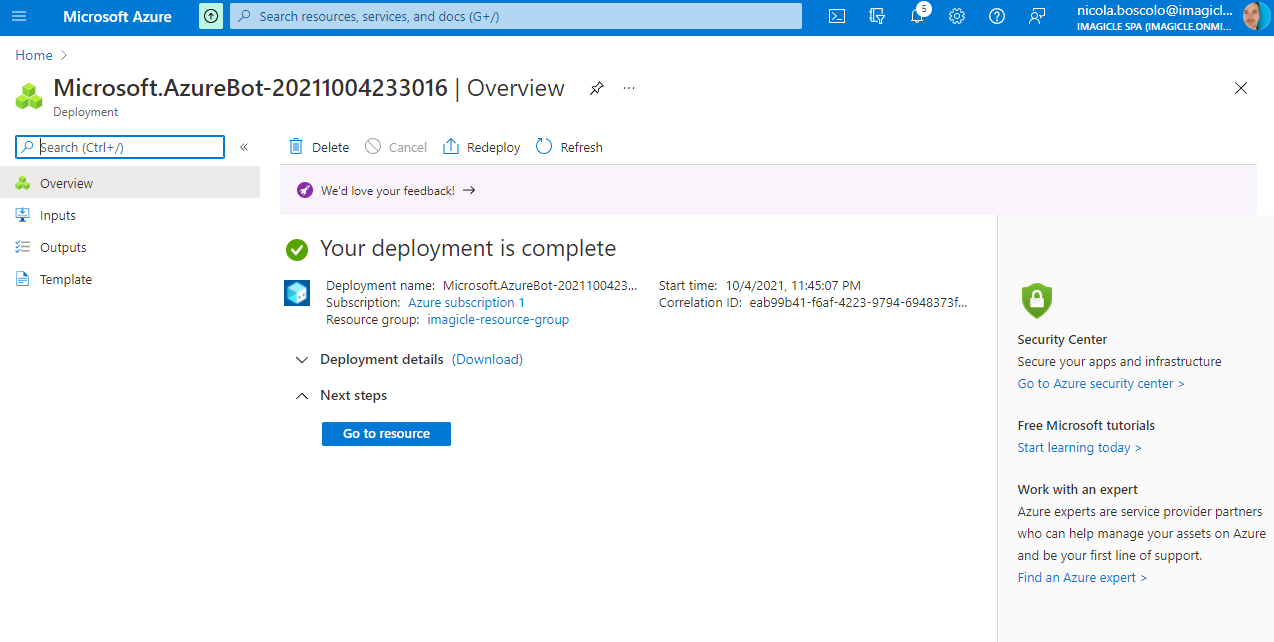
If data is correct, click on “Create”. You get below summary page, if the Bot deployment has been correctly accomplished:
Provide collected data to Imagicle Team
Before proceeding with the configuration, it is time to transfer the following collected data to Imagicle:
Customer name, as configured in public web URL
Bot name (case sensitive)
Application (Client) ID
Directory (Tenant) ID
Secret Value
Connect Bot to MS Teams Channel
Newly defined Bot is the native MS Teams interface that Imagicle Call Recording is using to collect recording streams from MS Teams clients. To achieve this goal, new Bot must be associated to MS Teams client by using a "Channel".
Search for Bot Services in the search box on the top, then click on the Bot Services link under "Services" section. Alternatively, Bot Services can be also found by opening top-right pull-down menu, then selecting All services ⇒ AI + machine learning option.
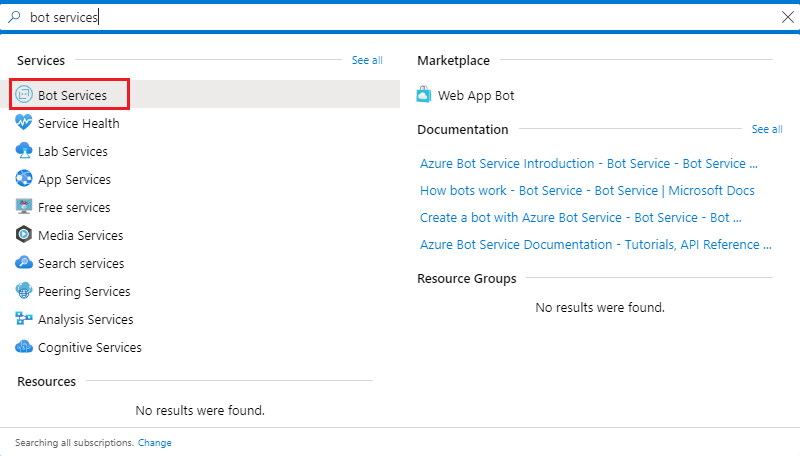
Select the previously defined imagicle-call-recording-bot
In below screenshot sample, "Channels" option is selected, pointing to Microsoft Teams channel:
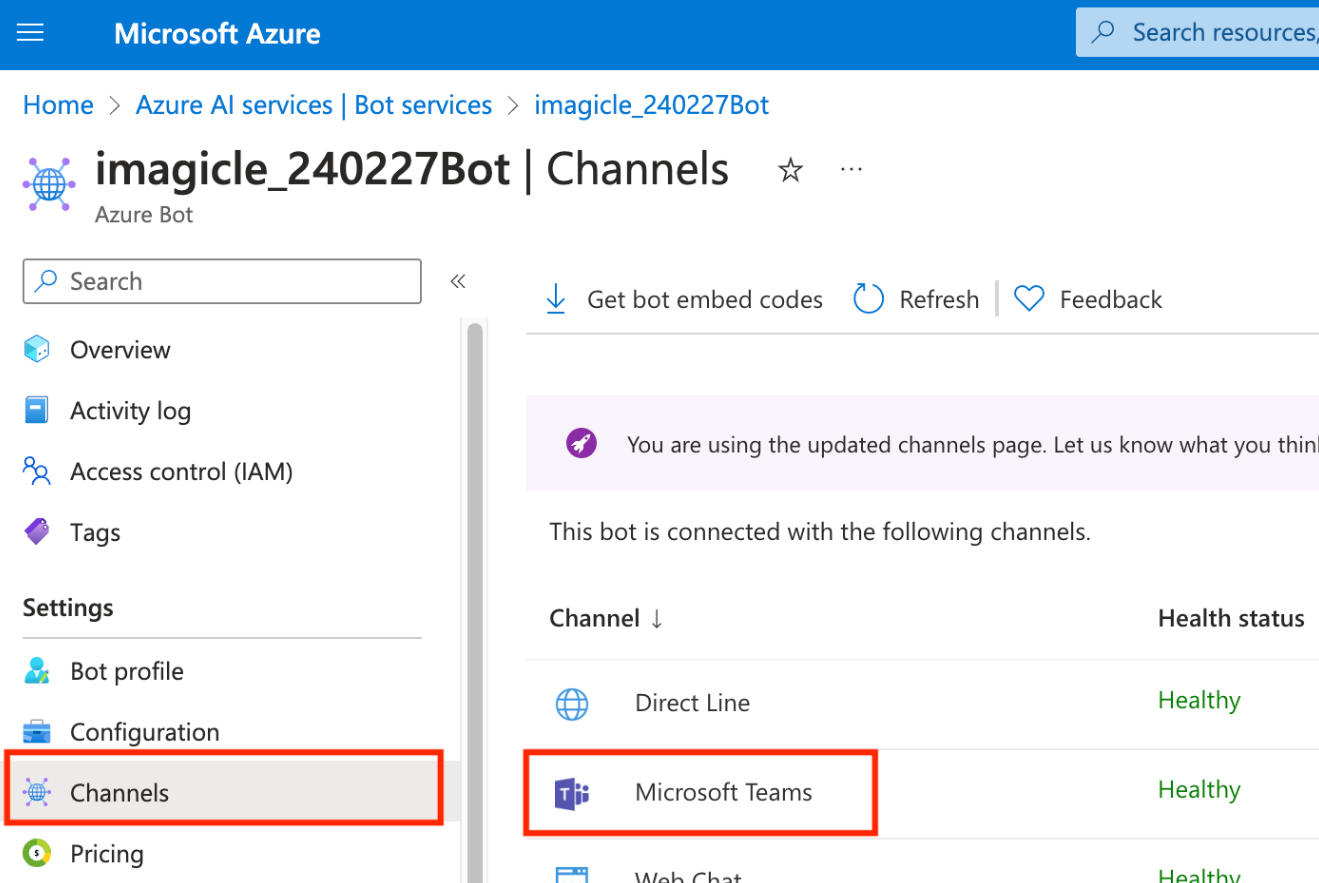
Once MS Teams channel is selected, a new configuration window appears, where you must select "Calling" tab:
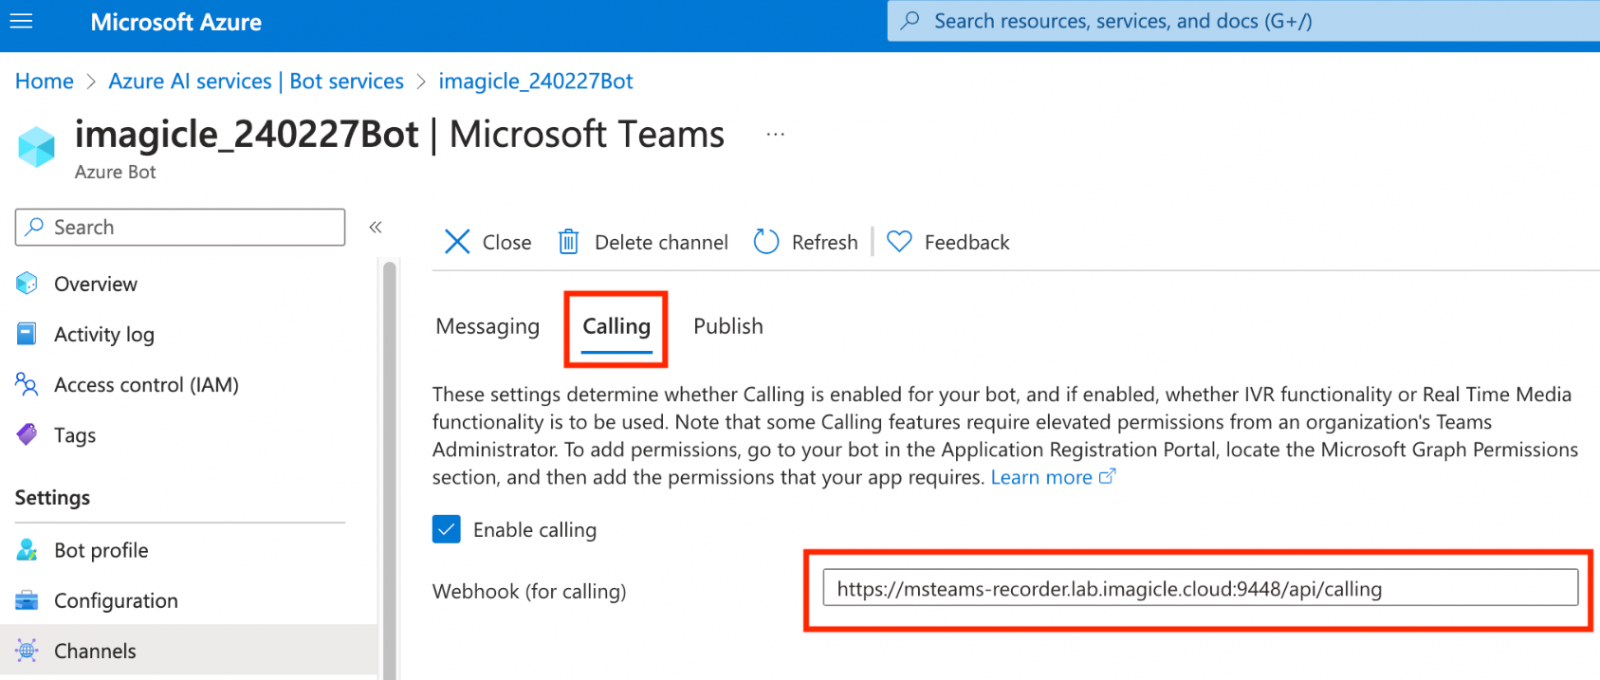
Please tick "Enable calling" flag and add a the Webhook URL (FQDN of the UCXSuite Azure VM)
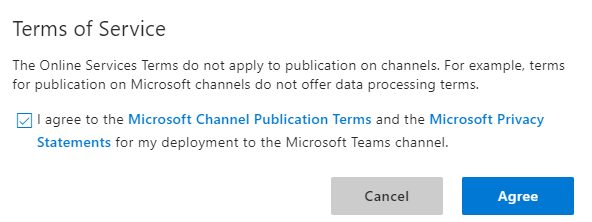
Typical URL syntax is the following, where FQDN “recorder.customer.com“ must be replaced by the VM FQDN created by the customer:XMLhttps://recorder.customer.com:9540/api/callingHit "Save" and accept Terms of Service by clicking on "Agree":
Mandatory configurations from MS Teams PowerShell
If not yet done, please install MS Teams PowerShell module by issuing the following commands from PowerShell running as Administrator:
Install-Module MicrosoftTeams -RequiredVersion 7.5.0 -Scope AllUsers -Force
Import-Module MicrosoftTeams
Connect-MicrosoftTeams
Please enter Tenant Admin account credentials, when requested.
If the install command above fails because of another version of Microsoft Teams module already installed, you first need to uninstall it executing the following command:
Uninstall-Module MicrosoftTeams -AllVersions -ForceRecording Policy Creation
Recording Policy is a group of rule policies which is assigned to each MS Teams user. The Recording Policy described in this paragraph allows a Call Recording user to record any conversation involving own MS-Teams client.
First of all, please enter the following PowerShell command:
New-CsOnlineApplicationInstance -UserPrincipalName <imagicle_call_recording@tenant.com> -DisplayName "Imagicle Call Recording" -ApplicationId <app-id>UserPrincipalName should be a new unique UPN within the Tenant. As a guideline, Imagicle suggests to enter a username like "imagicle_call_recording". You can't use an existing UPN associated to an MS Teams user.
ApplicationId corresponds to previously copied "Application ID" saved during App creation
Command output is similar to below sample:
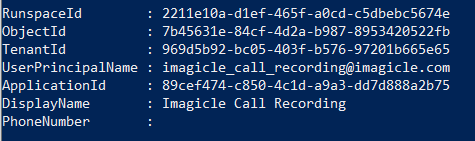
Please take note of "ObjectId" and "TenantId". They are required later on in this procedure.
"
New-CsOnlineApplicationInstance" command might fail with an error (read here for more details). Please make sure the user is associated to an online MS-Teams tenant.Please proceed by issuing the following commands, replacing red parameters according to your own data:
Sync-CsOnlineApplicationInstance -ObjectId <object-id> -ApplicationId <app-id>object-id is the ObjectId of the Online Application Instance obtained at the previous step.
ApplicationId corresponds to previously copied "Application ID" saved during App creation
New-CsTeamsComplianceRecordingPolicy -Identity <Recording-policy-imagicle>Recording-policy-imagicle is the actual name assigned to new Recording Policy, to be used in following PS commands.
Set-CsTeamsComplianceRecordingPolicy -Identity <Recording-policy-imagicle> -Description "Imagicle Recorder CRP" -Enabled $true -ComplianceRecordingApplications @(New-CsTeamsComplianceRecordingApplication -Parent <Recording-policy-imagicle> -Id <object-id> -RequiredBeforeMeetingJoin 0 -RequiredBeforeCallEstablishment 0 -RequiredDuringMeeting 0 -RequiredDuringCall 0)Recording-policy-imagicle is the actual name assigned to new Recording Policy, to be used in following PS commands
Recording-policy-description "Imagicle Recorder CRP".
object-id is the ObjectId of the Online Application Instance obtained at the previous step.
Please wait few seconds and then execute the following command to display new Recording Policy data summary:
Get-CsTeamsComplianceRecordingPolicy Recording-policy-imagicle
Now it's time to assign newly defined Recording Policy to a single Call Recording user, by executing the following command, including user's UPN, as many times as the number of users to enable:
Grant-CsTeamsComplianceRecordingPolicy -Identity <user@tenant.com> -PolicyName recording-policy-imagicleUser's UPN in MS Teams is case-sensitive!
If you wish to disable the audio prompt to notify remote party about ongoing audio recording, please execute the following command:
Set-CsTeamsComplianceRecordingPolicy -Identity <Recording-policy-imagicle> -DisableComplianceRecordingAudioNotificationForCalls $trueOnce done, you can double check proper Recording Policy association to a user by issuing the following command:
Get-CsOnlineUser <user@tenant.com> | ft sipaddress, tenantid, TeamsComplianceRecordingPolicyOptional configurations for on-demand recording and real-time control
The configurations described in this section are required only if you need on-demand recording or if you wish to enable the real-time recording controls on Imagicle Teams application (a specific tab is displayed for this purpose).
In particular the following configurations enables the Imagicle app to SSO and call recording control from the embedded app.
Custom domain definition
Please access to Microsoft Entra Admin Center web portal and go to Settings ⇒ Domain names ⇒ Add custom domain:
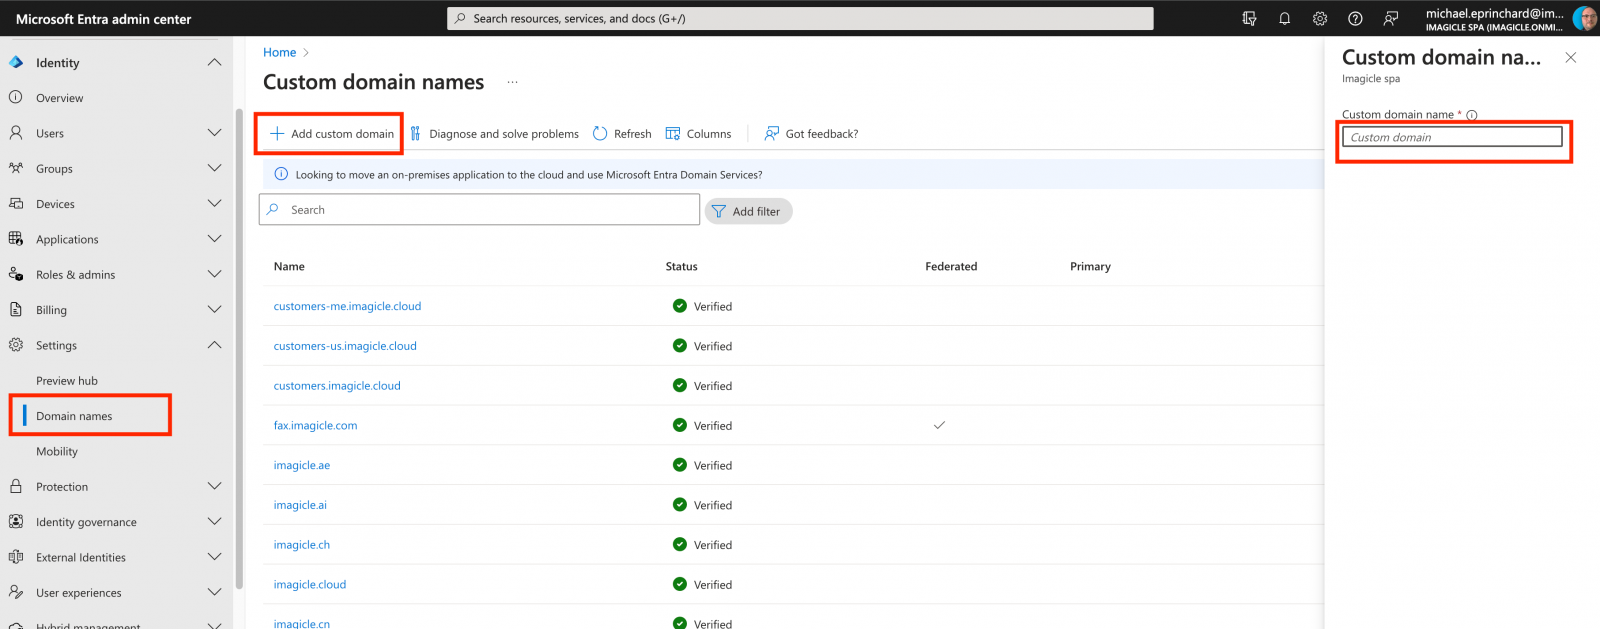
Enter a Custom domain name, based on Azure Bot’s Webhook URL provided by Imagicle team. See below sample, where FQDN “recorder.customer.com“ must be replaced by the VM FQDN created by the customer:
recorder.customer.comClick on "Add domain" to pop-up the following page:
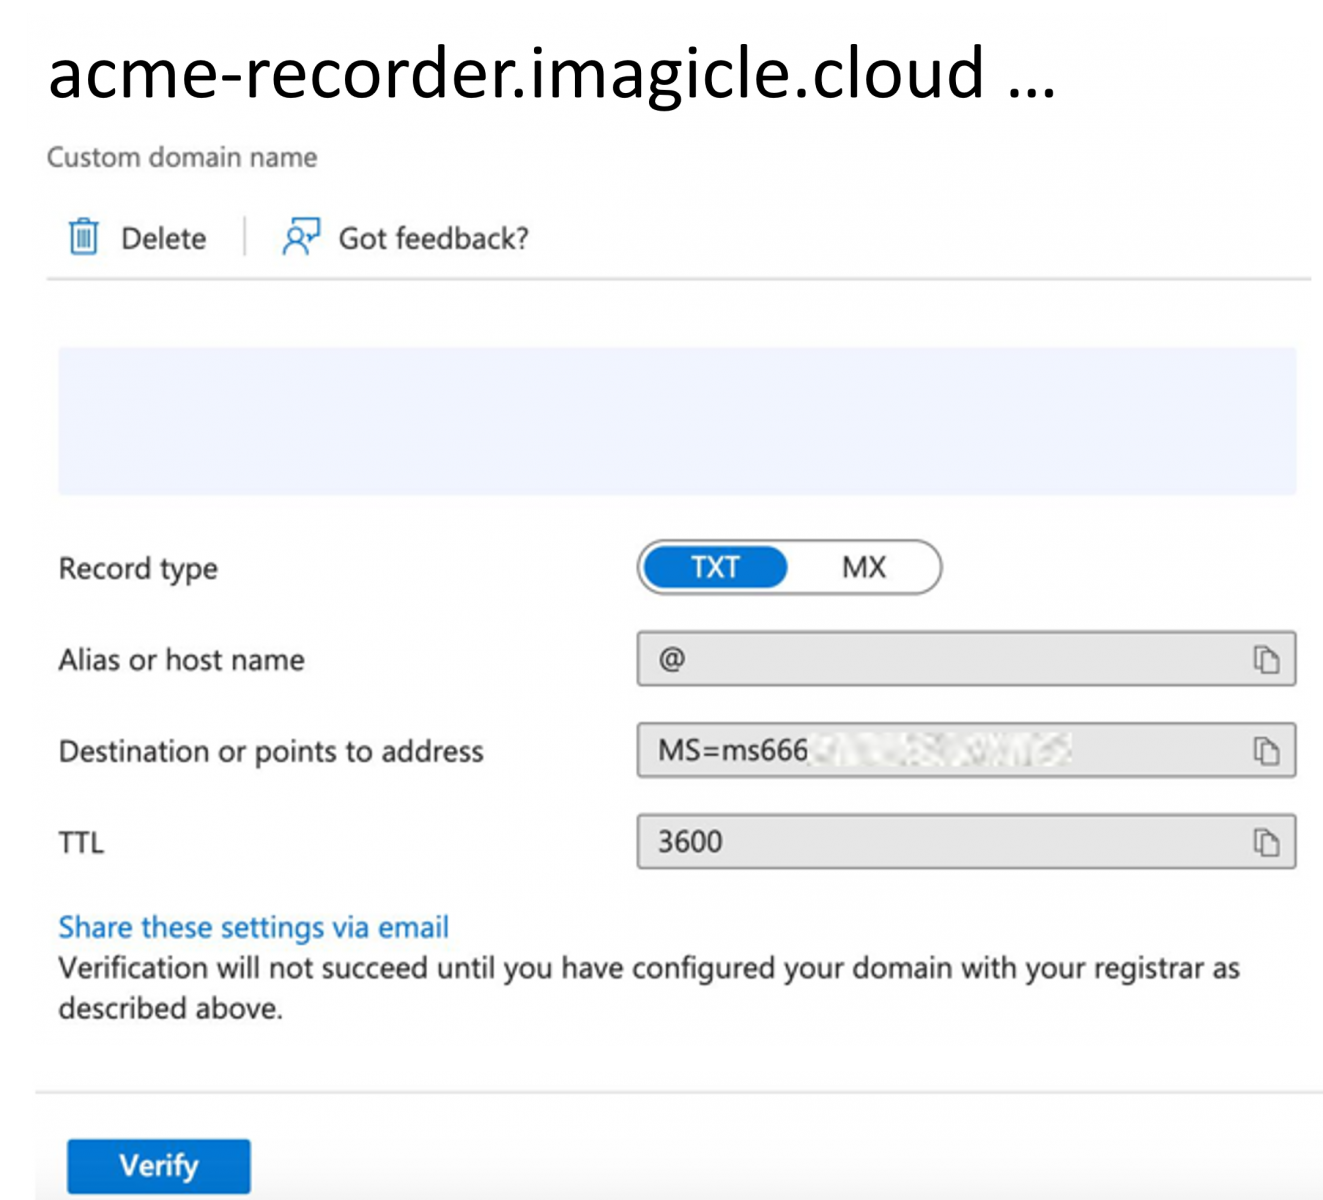
Please copy the "Destination or points to address" and provide it to the Imagicle Team.
Once Imagicle confirms that relevant TXT DNS entry has been created, you can hit "Verify" button and proceed with Azure BOT creation. Do not verify domain prior to Imagicle confirmation (it would fail).
API Authorization
To allow the Imagicle Teams Application to leverage SSO and on-demand recording, some API exposure roles must be set.
Within Imagicle Call Recording App Registration, please click on "Expose an API" from left panel:
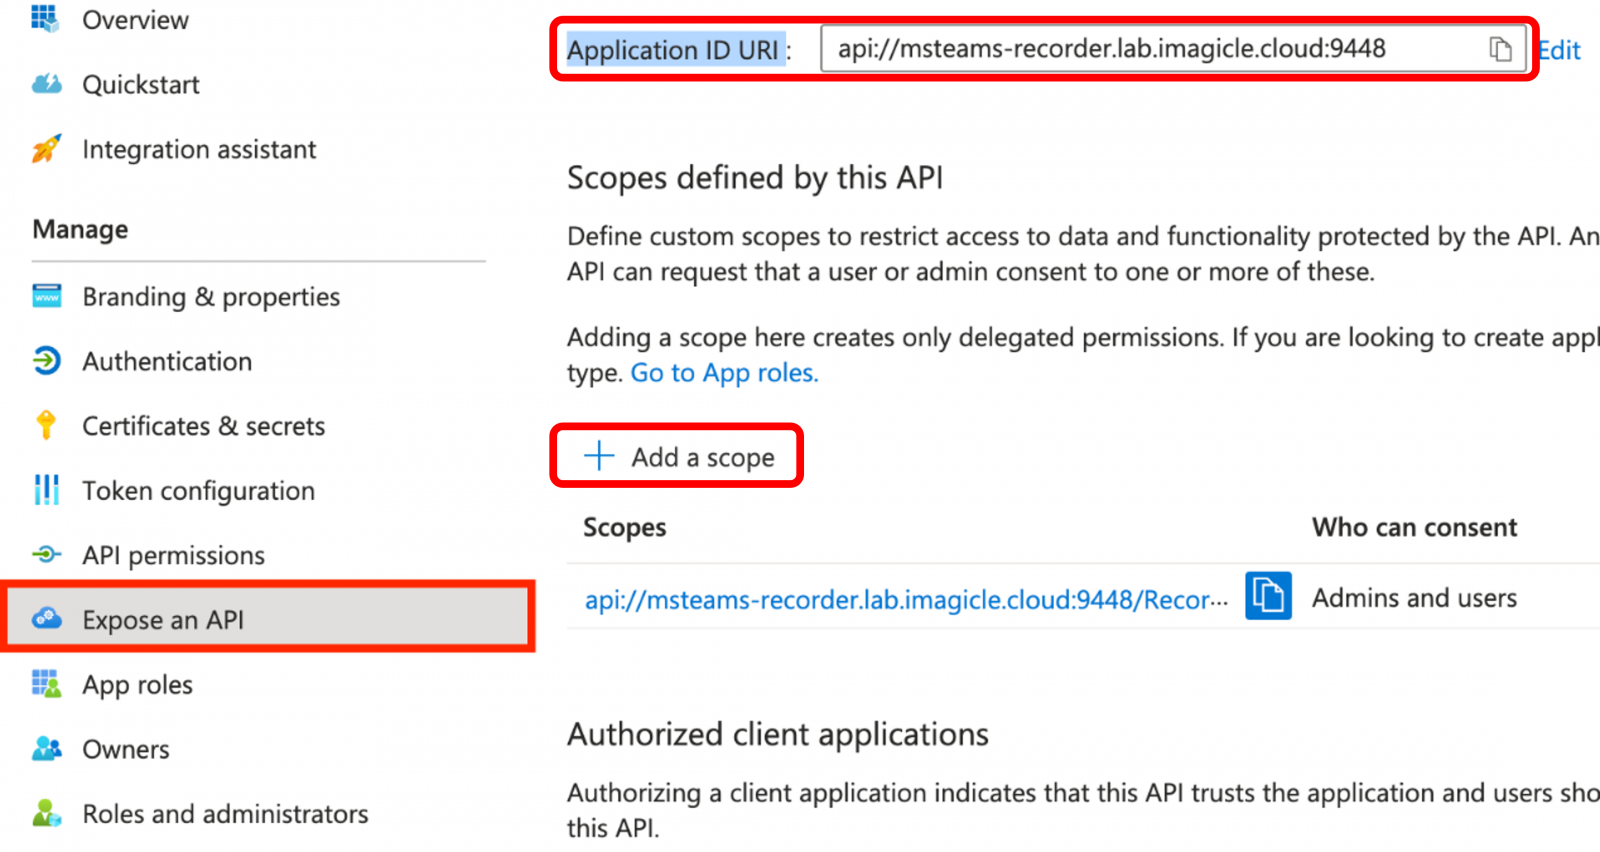
Populate Application ID URI with the unique API URI provided by Imagicle team. Typical URI syntax is the following, where FQDN “recorder.customer.com“ must be replaced by the VM FQDN created by the customer:
XMLapi://recorder.customer.com:9540/xxxx-xxxx-xxxxThen click on "Add a scope" to pop-up relevant window on the right side:
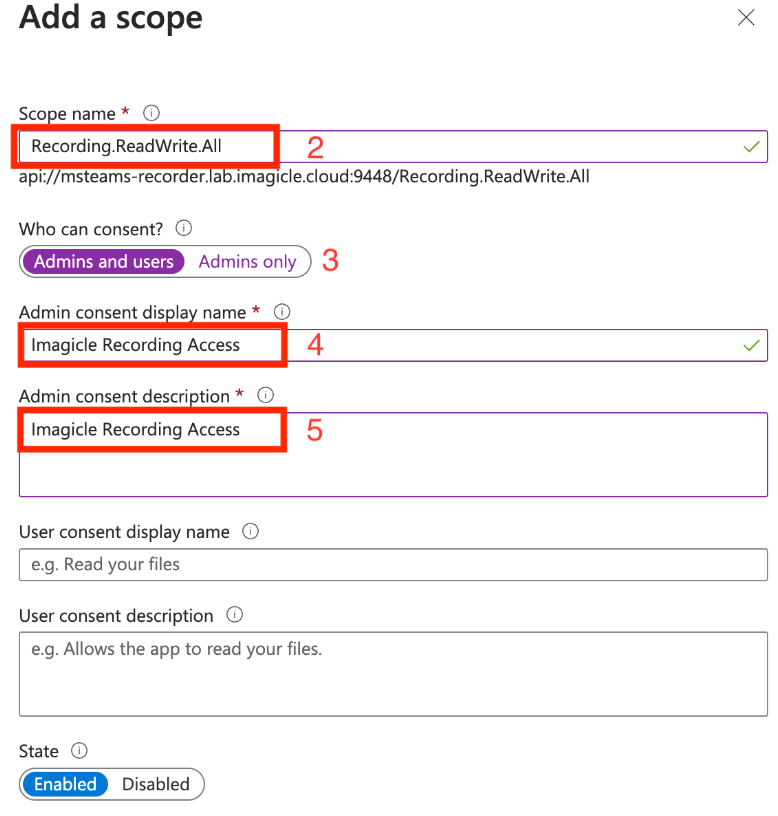

In above panel:
Complete the scope name by : Recording.ReadWrite.All (2)
Change value of who can consent to : Admins and Users (3)
Change Admin consent display name and description to a value you want explaining the goal of the scope (4 and 5)
Validate by clicking on "Add scope" button (6)
Now click on "Add a client Application":
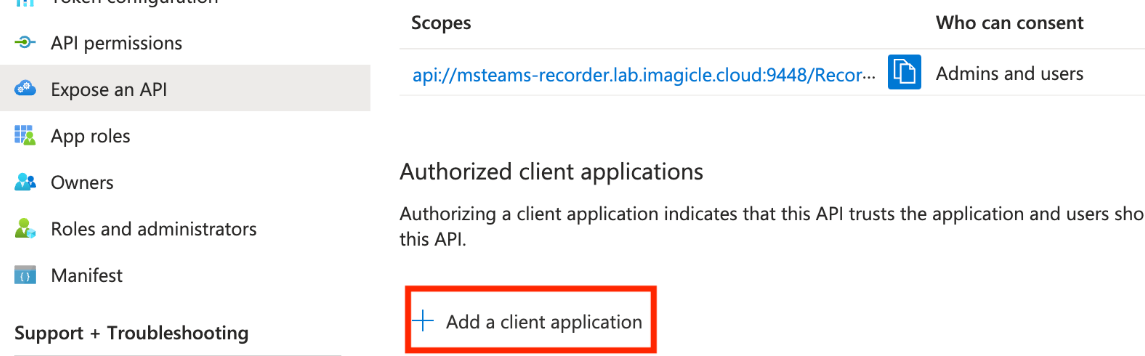
The following panel pops-up on the right side:
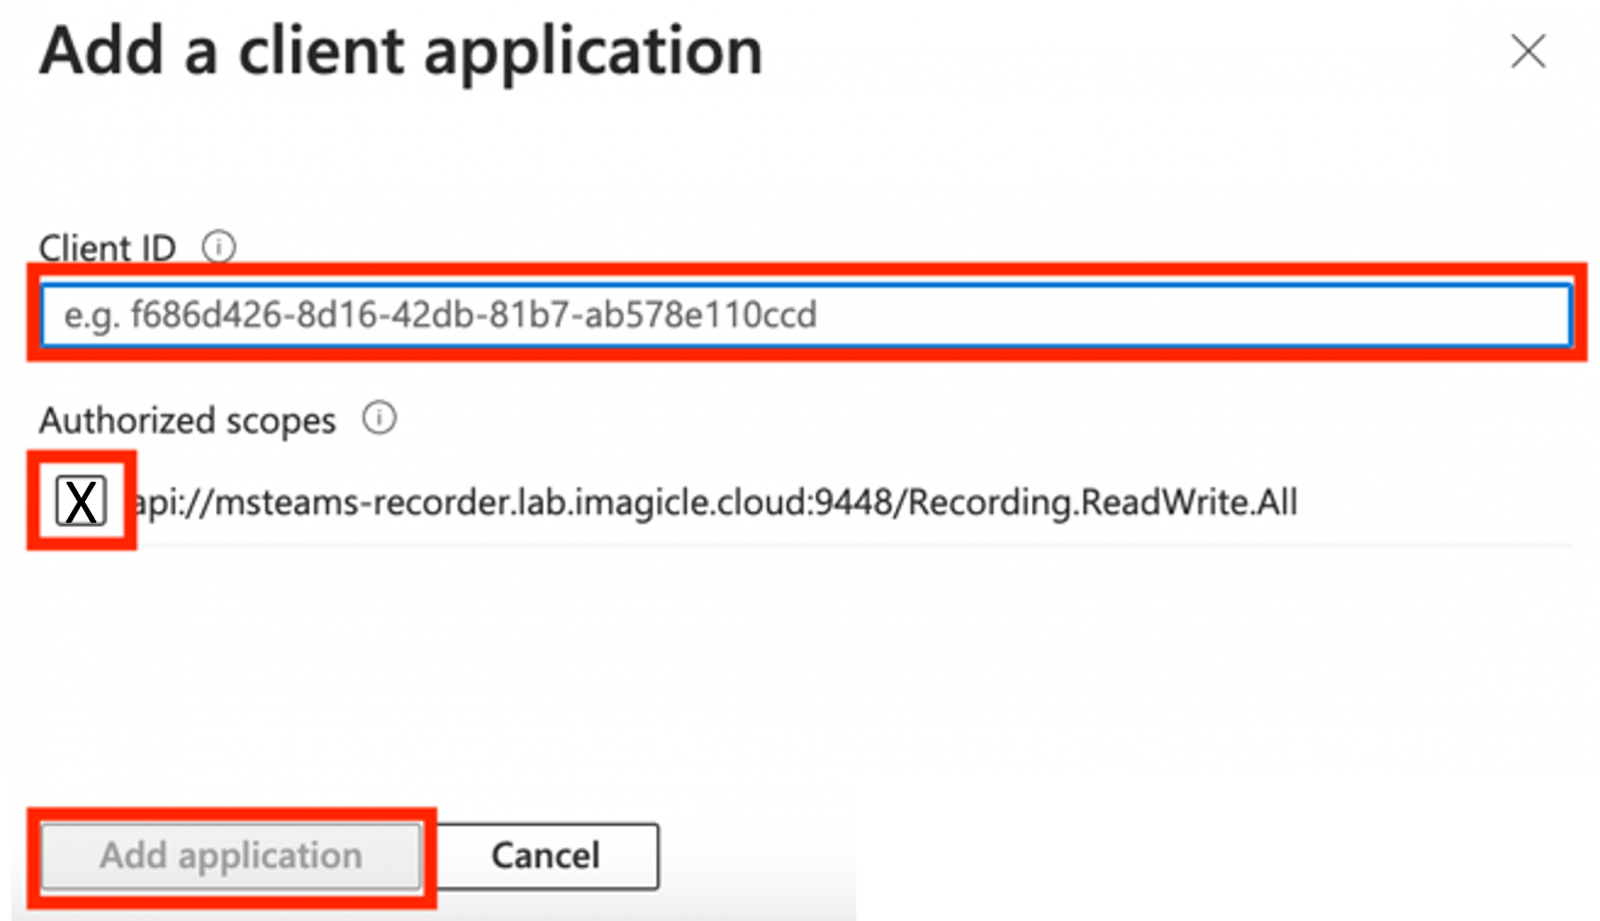
Two application IDs must be added :
1fec8e78-bce4-4aaf-ab1b-5451cc387264 (for Teams mobile and desktop application)
5e3ce6c0-2b1f-4285-8d4b-75ee78787346 (for Teams web application)
Please check the "Authorized scopes" option and finally validate each AppID by clicking on "Add application"
Imagicle UCX Suite configurations
Please access to Imagicle web portal as Administrator and create a local "service" user account with Call Recording "Complete management" permissions (level 10) and System's "Complete users management" permissions (level 9). This account is used to retrieve recording audio streams from MS-Teams cloud.
Please set "PBX username" field with same value of "email" field, in each Imagicle recording-enabled user.
Provide Service Account credentials to Imagicle Team
Please transmit this data to Imagicle:
Username and password of local "service" user, manually defined from Imagicle web portal.
Troubleshooting
If calls are not recorded, likely something went wrong in BOT configuration. You can easily test proper BOT association to MS Teams user by directly calling it from MS Teams client itself. If BOT doesn't answer the call, it means BOT is misconfigured.
To call BOT, just select "Calls" tab in MS Teams client and search for it by App's “Display name”, as shown in below screenshot:
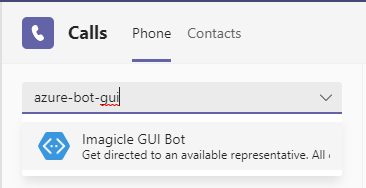
If BOT correctly answers the call and calls are still not recorded, then please double check Recording Policy and make sure it is correctly associated to the user.
Other useful commands
To list all users enabled for call recording, that is, having the compliance recording policy applied (named 'Recording-policy-imagicle' in the example below):
Get-CsOnlineUser -Filter {TeamsComplianceRecordingPolicy -eq "Recording-policy-imagicle"} | Select UserPrincipalName To disable a user for call recording, removing the assigned compliance recording policy:
Grant-CsTeamsComplianceRecordingPolicy -Identity user@tenant.com -PolicyName $null