Secure Call Recording on CUCM
Imagicle Call Recording can record Encrypted calls, i.e. calls which are placed with Secure SIP (SIP/TLS) for the signaling and SRTP for the audio stream. Please note this requires with CuCM versions 11.0 or newer.
Requirements
Secure calls recording supports Built-in-Bridge phone and gateway forking, Automatic/manual Dial-in recording.
However, please consider that calls established in SRTP are recorded at phone level (leveraging its Built-in Bridge), even if "Gateway Preferred" option is selected as recording preferred method on CUCM (see this Cisco article).
Secure Call Recording Configurations
To record secure calls, you need to:
Configure Enterprise Parameters for SRTP.
Load the Imagicle Call Recording certificate on CuCM, categorized as CallManager-trust
Create a SIP Trunk Security Profile which references the Imagicle Certificate
Create a SIP trunk which points to the Imagicle Application Suite machine, port 5071, and uses the SIP Trunk Security Profile
Warning: if a firewall is set between the CallManager nodes and the Application Suite servers, the TCP port 5071 must be allowed on both sides.
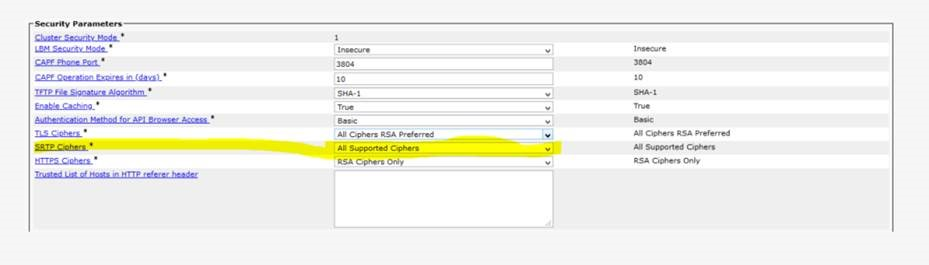
Configure Enterprise Parameters for SRTP
The longest cipher key length supported by Imagicle Call Recording for SRTP voice encryption is 128 bit. Therefore, the SRTP cipher set configured on CUCM shall allow such key length.
On CUCM admin portal:
Select System -> Enterprise Parameters
Move to the "Security Parameters" section and ensure the parameter SRTP Ciphers allows AES-128 bit cipher algorithm (hence choose "All Supported Ciphers").
Download the Imagicle Call Recording Certificate from UCX Suite
Up to 2020.Winter.2 release
When Imagicle Call Recording service starts, it creates a security certificate which is valid for the UCX Suite server on which it was generated. It must be downloaded from the web interface, and loaded onto CuCM.
To get the Imagicle Call Recording certificate:
Login to Imagicle web interface as Administrator
Click on Recording, then Global Settings
Expand the "Secure Recording" section
Click on the Download button to download the Imagicle Call Recording certificate and save it to your PC. The file extension is .pem.
From 2020.Spring.1 release and above
Please follow the procedure highlighted here.
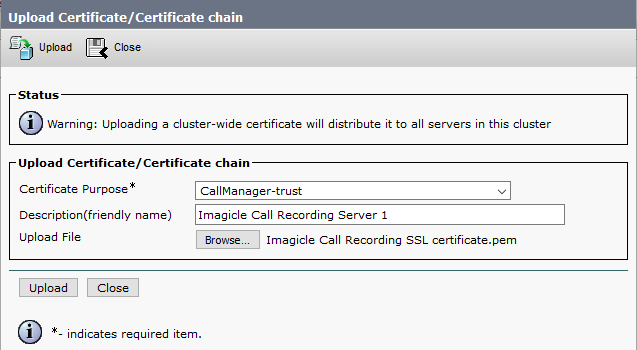
Upload Imagicle Call Recording Certificate on CUCM
Log on CuCM as Administrator
Select OS Administration
From the menu, choose Security, Certificate Management
Press the "Upload Certificate / Certificate chain" button
As certificate purpose, choose "Callmanager-trust"
Enter a description, then select the Call Recording Certificate from your PC and upload it
Press "Close" to go back to the certificate list.
Press "Find" to list the certificates. Locate the Imagicle certificate you just uploaded.
Take note of the certificate Common Name for later use. By default, the certificate Common Name will match the computer name of the machine on which it was generated.

Changing the Computer Name will invalidate the certificate. If you change the UCX Suite server FQDN, you need to regenerate the Call Recording certificate.
Warning: The digital certificate will last 5 years from the day it was generated, which is the day the product was installed. If required, the certificate can be re-generated for additional 5 years, by following this procedure.
Creating a SIP Trunk Security Profile with Encryption
From the Cisco Unified CM Administration menu, select System ⇒ Security ⇒ Sip Trunk Security Profile.
Add a new item with the following properties:
Incoming Transport Type: TLS
Outgoing Transport Type: TLS
Incoming port: 5071
Accept Out of Dialog Refer: enabled
Accept Unsolicited Notification: enabled
X.509 Subject Name: enter previously noted Imagicle Call Recording Certificate Common Name.
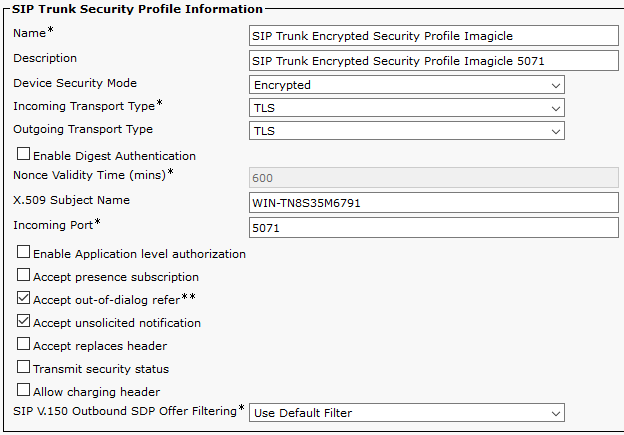
Please mind the certificate name. Do not enter the certificate description. Do not enter the full Subject Name. Enter the Common Name.
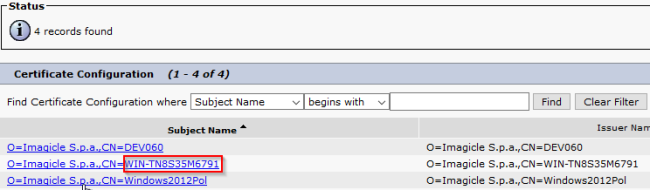
If you are unsure, select System ⇒ Security ⇒ Certificate, and press the Find button. Locate the Imagicle certificate. The Common Name is displayed in the Subject Name column, just after CN=
If you need to manage multiple Call Recording nodes, you must specify in the X.509 Subject Name of the SIP Trunk security profile the list of the involved certificates CN (one for each Imagicle server), separated by comma.
For instance: WIN-TN8S35M6791,WIN-TN3V45K2V27
Creating a SIP Trunk for Secure Recording
A Secure SIP Trunk is a standard trunk with the following properties:
A descriptive name, such as CallRecording_SIP_Trunk_Encrypted
SRTP Allowed enabled
Run On All Active Unified CM Nodes enabled
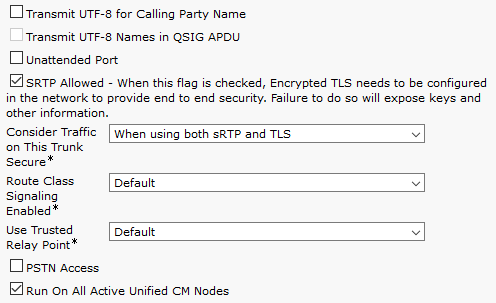
Destination Address: the IP Address/FQDN of the Imagicle UCX Suite server
Destination Port: 5071
SIP Trunk Security Profile: reference the one you just created
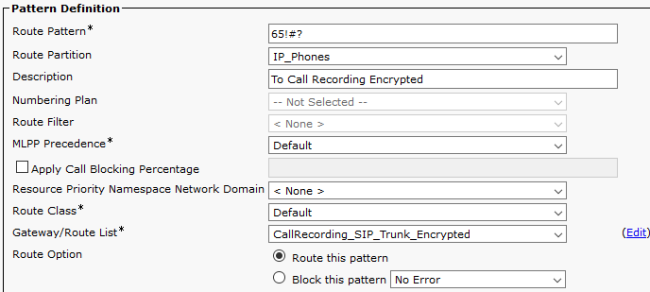
Route Pattern to the SIP Trunk
Create a new Route Pattern pointing to the the Imagicle Call Recording SIP Trunk for secure calls. Make sure you did not select the Call Recording SIP Trunk for standard calls.
The pattern should match the Pilot number in the Recording profile you are going to create.
Call Recording Profile for Encrypted Calls
Create a new Call Recording Profile for encrypted calls. Assign a Pilot number of your choice, and a suitable CSS. The CSS must allow the phones to reach the Route pattern you just created.

IP Phone Configuration
The IP Phone configuration to record secure calls is similar to the non-secure call recording. Just select the Call Recording Profile for Encrypted Calls. Please refer to non-secure calls configuration page of this guide.
Remember to enable IP phones for call recording even if you chose the "Gateway preferred" option in the line settings you need to record (the voice gateway cannot fork SRTP streams).
Troubleshooting Secure Calls
Before testing any other recording technology, try to record a Dial-In call.
Choose two phones supporting Encrypted calls, say 101 and 102. Place a call from 101 to 102 and check that a lock appears on the display, meaning that the conversation is encrypted
On Imagicle Application Suite, create a user with Primary Extension 101 and the permission to use Call Recording, which is the default
Place a call from 101 to a number matching the Secure Call Recording Route pattern
You should hear a beep, or, in case of permission mismatch, a message informing that the calling number is not entitled for voice recording.
If the call does not seem to reach the Call Recording application, most probably there is a problem with the certificate. Ensure you referenced the correct certificate Common Name.
How to detect a certificate problem
If you suspect a certificate problem, you can check the detailed error in the Call Recording voip stack log file.
To enable detailed voip logging:
Edit the this file: <installation dir>\StonevoiceAS\Apps\Recorder\Settings\Recorder.Opal.config.xml
Add the following line:
<?xml version="1.0" encoding="utf-8"?> <configuration> <preference key="logging.level" value="4" /> </configuration>
Restart Imagicle Call Recording service
Once the logs are enabled:
Try to record a new call, for example dialing the Call Recording pilot number
Using your favorite editor, open the log file: <installation dir>\Var\Log\Recorder.Service\Recorder.Opal_<current date>.log
Look for a line similar to: Accept: error in state=SSLv3 read client key exchange A
This means that the TLS certificate exchange failed. Please review the above steps.
Mixed environments
Call Recording can manage on its secure SIP trunk only recordings done by secure IP phones.
If you need to record both secure and unsecure devices in the same insatllation, you need to:
define two SIP trunks for each Call Recording server (the regular one and the secure one, as described above);
configure secure IP phones to record using the secure SIP trunk;
configure unsecure IP phones to record using the unsecure SIP trunk;
that basically requires to define on CUCM:
2 different partitions;
2 different CSS (including the 2 different partitions);
2 different route lists (one for the secure SIP trunks, one for the unsecure SIP trunks);
2 different route patterns (with the same number/pattern and different partitions and CSS) for each recording pilot number/prefix you need to manage;
if recording is leveraging Built-in Bridge, 2 different recording profiles, to engage respectively the secure and unsecure route list.