Synchronize Users against Cisco Webex Control Hub
Imagicle UCX Cloud Suite can import users, HG (native Hunt Group), CQ (native Call Queue), AA (native Auto Attendant), VL (Webex Virtual Line) and WS (Workspace) from Webex Control Hub, thanks to available Cisco Webex (XSI) APIs for this purpose.
Webex Calling “Customer Assist” (CX) queues are not imported, due to Webex API lack. If you want to monitor such traffic within Call Analytics, you need to manually add relevant pilot numbers in Imagicle Users' DB.
Provided Webex APIs allow to import users from multiple Webex Organizations, if required.
Before configuring such import connector, please mind below requirements:
Imagicle UCX Cloud Suite must be in place, with a valid license subscription.
Imagicle UCX Cloud Suite must be authenticated against Imagicle Cloud Services, as described in this article.
UCX Platform admin user must be already configured, to allow the Webex integration.
A Full Admin user belonging to Webex customer's organization
Integration Procedure
Please follow this KB article to enable the integration between UCX Platform and Webex Cloud and allow users' synch. Once Webex users are imported in UCX Platform, they become available in UCX Cloud Suite too.
Please be aware that Webex Users' provisioning is involving Imagicle Cloud to cache the list of imported users, updated 4 times a day, to lately improve provisioning speed and provide an always up-to-date Users' database.
Enabling Webex Users' Synch from Imagicle Web Portal
Once above procedure has been accomplished, you can proceed with actual Webex Cloud users' synch enablement.
Please access to Imagicle UCX Suite web portal as Administrator and go to ADMIN ⇒ User Management ⇒ Synchronize users with an external data source » ⇒ Configure Data Sources >>
Select "Cisco Webex" to get the following three options:
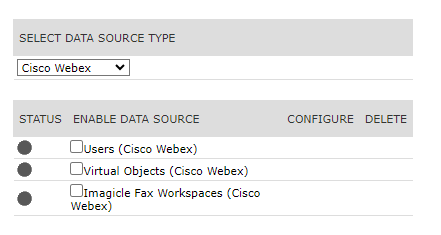
Depending on the Imagicle apps you wish to leverage in your Webex environment, one or multiple options can be selected:
Cisco Webex Users: For UCX Console, Advanced Queuing, Auto Attendant, Call Recording and Contact Manager usage. This connector just imports Webex users from Control Hub.
Cisco Webex Virtual Objects: For Call Analytics, Call Recording and Hotel Services. This connector imports Webex Virtual Lines, Hunt Groups, Workspaces, native Queues (except Customer Assist queues) and Auto Attendants from Control Hub.
Cisco Webex Fax Workspaces: For Digital Fax. This connector imports fax-related Workspaces associate to Imagicle Customer Managed Devices from Control Hub.
If relevant "STATUS" indicator goes green, then it means Imagicle UCX Cloud Suite can reach Webex Cloud. Otherwise, please check below table for most typical error messages appearing underneath the red STATUS indicator:
Issue | Error message |
ClientID/secret wrong configured | Client ID or Client Secret are misconfigured |
Suite not enabled on Imagicle Cloud to users sync | UC Suite is not enabled in the Imagicle Cloud to synchronize users. Check OAuth2 token enablement. |
the Imagicle Cloud is not reachable (on-prem UC Suite only) | Imagicle Cloud unreachable |
Other | An unexpected error occurred while checking Imagicle Cloud connection |
If you get the following error:

Please make sure:
Proper subscription license(s) have been activated.
UCX on-prem/Cloud Suite has been Cloud authenticated and relevant credentials have been entered here.
Proxy Support
If your Imagicle on-prem UCX Suite can reach Internet through a proxy, please configure it by following this KB article. Webex import connector supports proxy configuration.
Running manual synch
You can manually initiate users', virtual users' and workplaces' provisioning from Administration → Users Management → Synchronize users with an external data source » and finally hit “Run Now” button. See below:
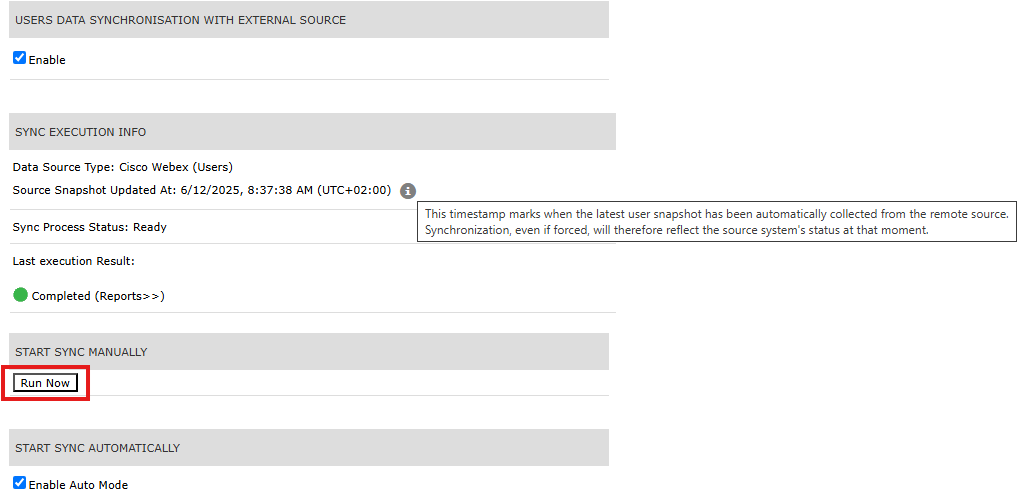
Two important details are available in this page:
Data Source Type: reports the list of active Webex sync adapters.
Source Users Updated At: reports the last time the information of the synchronized users have been updated in Imagicle internal cache.
If you try to run the synch while the internal cache is still under provisioning or under a periodic update, you might get the following warning:
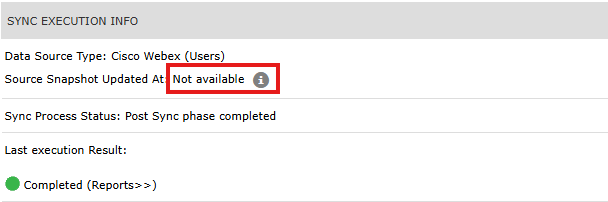
Please run the synch once Source Snapshot Updated reports the date/time of last cache update.
Configuring Synchronization Rules
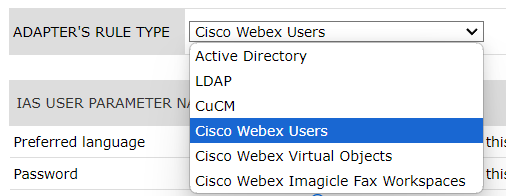
Please access to Imagicle UCX Suite web portal as Administrator and go to ADMIN ⇒ User Management ⇒ Synchronize users with an external data source » ⇒ Configure Synch Rules >>
Select either one of the three "Cisco Webex" options, as per below screenshot:
The sync service uses the Webex Calling user's email as primary key..
For all other users' fields, they are imported from a fixed Webex field or you can choose from which Webex field to populate them.
Users Synch Rules
See below table including Webex Users specific field mapping:
UCX Suite Display Name | Mapping criteria | Synched from | Example Value |
Preferred language | Only when adding, set this value | EN, IT, FR, DE, AR, etc. | |
Password | Only when adding, set this value | P@ssw0rd! | |
Active Directory username | Import every time from source | username Webex id | john.smith Max 255 chars |
Domain | Import every time from source | domain coming from Email field | |
Single Sign-On (SSO) ID |
| Webex Mail | |
Conversational AI Username |
| Webex Mail | |
First Name | Import every time from source | firstname | John |
Last Name | Import every time from source | lastname | Smith Max 255 chars |
User PIN | Only when adding, set this value | 1234 | |
First extension number* |
| ESN = location.routingPrefix + webexCalling.extension Phone Number = webexCalling.countryCode + webexCalling.number | 33 + 6623 or +447259856623 |
First extension number Alias* |
| Extension = webexCalling.extension Phone Number = webexCalling.countryCode + webexCalling.number ESN = location.routingPrefix + webexCalling.extension Work Phone = workPhone email = Webex Mail | 6623 or +447259856623 or 33 + 6623 or +44984664564 or Max 255 chars |
Published Directory Number |
| Extension = webexCalling.extension Phone Number = webexCalling.countryCode + webexCalling.number ESN = location.routingPrefix + webexCalling.extension Work Phone = workPhone email = Webex Mail | 6623 or +447259856623 or 33 + 6623 or +44984664564 or Max 255 chars |
Enable billing for first extension number | Only when adding, set this value | = False = True | |
Cdr User Id |
| commonIdentityId | Max 255 chars |
Device name |
| nativeUserId | Max 255 chars |
Preferred Device name |
| nativeUserId | Max 255 chars |
PBX Username |
| nativeUserId commonidentityid | Max 255 chars |
| Webex Mail | ||
Department |
| Organization Name = organization.name Location Name = location.name Department = department | Sales Max 255 chars |
Recording Group name |
| Organization Name = organization.name Location Name = location.name Department = department | Sales Max 255 chars |
Cost Center |
| Organization Name = organization.name Location Name = location.name Department = department | Sales Max 255 chars |
Office Location |
| Organization Name = organization.name Location Name = location.name Department = department | France Max 255 chars |
Number of masked digits in Call Analytics | Only when adding, set this value | 3 | |
Enable billing for voicemail number | Only when adding, set this value | = False = True | |
VoiceMail Number |
| *55 + ESN (location.routingPrefix + webexCalling.extension) | *55 + 33 + 6623 |
VoiceMail Address |
| Webex Mail | |
Do not keep sent voicemails | Only when adding, set this value | = False = True | |
Home Phone |
| workPhone | +44984664564 |
Mobile Business Number |
| mobilePhone | +44702465646 |
User address |
| Default mapping***: {streetAddress}, {postalCode} {locality}, {region} - {country} | 102 Edith Groove,SW1 London, Greater London - United Kingdom |
Fax Number |
| faxNumber | +44984664564 |
Fax Group Username |
| Fax Number = faxNumber Organization Name = organization.name Location Name = location.name Department = department | Sales Max 255 chars |
Fax Company Name |
| organization.name | ACME Inc. |
Fax Default Priority (0/1/2) |
| 0, 1, 2 | |
Enable billing for fax number | Only when adding, set this value | = False = True | |
Fax: enable send | Only when adding, set this value | = False = True | |
Fax: enable receive | Only when adding, set this value | = False = True | |
Enable Fax2Email | Only when adding, set this value | = False = True | |
Fax to email address |
| Webex Mail | |
Fax2Email attach fax | Only when adding, set this value | = False = True | |
Disable caller lookup on phone | Only when adding, set this value | = False = True | |
Rich Presence SIP URI |
| Webex Mail | |
Microsoft URI |
| Webex Mail | |
Webex URI |
| Webex Mail | |
Send email notifications | Only when adding, set this value | = False = True | |
Attach recording file to email notifications | Only when adding, set this value | = False = True | |
Is a room | Only when adding, set this value | = False = True | |
Picture |
| AvatarURL** | Max 200KBytes size (default) |
Imagicle supports overlapping extension numbers by selecting to import ESN instead of Extension Number. ESN includes a location prefix + Webex Calling Extension, so Imagicle Advanced Queuing can transfer calls to overlapping operators' internal numbers, without having to leverage +E.164 Phone Numbers.
** AvatarURL points to a server on Webex Cloud, which should be reachable by Imagicle UCX Suite to retrieve each picture through a http request. User images can be in the most common formats, e.g. png, jpg, jpeg and bmp.
*** User address mapping can be changed on request. Please contact Imagicle for further details.
User's title attribute (title) is also importable from Webex Control Hub. Please contact Imagicle if you wish to add this information into a custom field.
Virtual Objects Synch Rules
UCX Suite Display Name | Mapping criteria | Synched from | Example Value |
Username | "<acronym of type>_<phonenumber> or <ESN> or <name>" | the acronym of type is set by identifying the type returned from Imagicle API and it can assume the following values:
After underscore is added:
| HG_4589921, HG_test, CQ_394914524886 WS_78373977 Max 20 chars |
Preferred language | Only when adding, set this value | EN, IT, FR, DE, AR, etc. | |
Password | Only when adding, set this value | P@ssw0rd! | |
Active Directory username | Import every time from source | username coming from Email field or from Webex id | john.smith Max 255 chars |
Domain | Import every time from source | empty | |
Single Sign-On (SSO) ID |
| empty | |
Conversational AI Username |
| Webex Mail | |
First Name | Import every time from source | empty | |
Last Name | Import every time from source | name | Max 255 chars |
User PIN | Only when adding, set this value | 1234 | |
First extension number* |
| ESN = location.routingPrefix + webexCalling.extension Phone Number = webexCalling.countryCode + webexCalling.number | 33 + 6623 or +447259856623 |
First extension number Alias* |
| Extension = webexCalling.extension Phone Number = webexCalling.countryCode + webexCalling.number ESN = location.routingPrefix + webexCalling.extension Work Phone = workPhone email = Webex Mail | 6623 or +447259856623 or 33 + 6623 or +44984664564 or Max 255 chars |
Enable billing for first extension number | Only when adding, set this value | = False = True | |
Cdr User Id |
| commonIdentityId | Max 255 chars |
Device name**** |
| empty | |
Preferred Device name |
| nativeUserId | Max 255 chars |
PBX Username |
| nativeUserId commonidentityid | Max 255 chars |
Department |
| Organization Name = organization.name Location Name = location.name | Sales Max 255 chars |
Recording Group name |
| Organization Name = organization.name Location Name = location.name | Sales Max 255 chars |
Cost Center |
| Organization Name = organization.name Location Name = location.name | Sales Max 255 chars |
Office Location |
| Organization Name = organization.name Location Name = location.name | France Max 255 chars |
Number of masked digits in Call Analytics | Only when adding, set this value | 3 | |
Enable billing for voicemail number | Only when adding, set this value | = False = True | |
VoiceMail Number |
| ||
VoiceMail Address |
| empty | |
Do not keep sent voicemails | Only when adding, set this value | = False = True | |
Home Phone |
| workPhone | +44984664564 |
Mobile Business Number |
| mobilePhone | +44702465646 |
User address |
| Default mapping***: {streetAddress}, {postalCode} {locality}, {region} - {country} | 102 Edith Groove,SW1 London, Greater London - United Kingdom |
Fax Number |
| faxNumber | +44984664564 |
Fax Group Username |
| Fax Number = faxNumber Organization Name = organization.name Location Name = location.name | Sales Max 255 chars |
Fax Company Name |
| organization.name | ACME Inc. |
Fax Default Priority (0/1/2) |
| 0, 1, 2 | |
Enable billing for fax number | Only when adding, set this value | = False = True | |
Fax: enable send | Only when adding, set this value | = False = True | |
Fax: enable receive | Only when adding, set this value | = False = True | |
Enable Fax2Email | Only when adding, set this value | = False = True | |
Fax to email address |
| Webex Mail | |
Fax2Email attach fax | Only when adding, set this value | = False = True | |
Disable caller lookup on phone | Only when adding, set this value | = False = True | |
Rich Presence SIP URI |
| Webex Mail | |
Microsoft URI |
| Webex Mail | |
Webex URI |
| Webex Mail | |
Send email notifications | Only when adding, set this value | = False = True | |
Attach recording file to email notifications | Only when adding, set this value | = False = True | |
Is a room | Only when adding, set this value | = False = True | |
Picture |
| AvatarURL** | Max 200KBytes size (default) |
Imagicle supports overlapping extension numbers by selecting to import ESN instead of Extension Number. ESN includes a location prefix + Webex Calling Extension, so Imagicle Advanced Queuing can transfer calls to overlapping operators' internal numbers, without having to leverage +E.164 Phone Numbers.
** AvatarURL points to a server on Webex Cloud, which should be reachable by Imagicle UC Suite to retrieve each picture through a http request. User images can be in the most common formats, e.g. png, jpg, jpeg and bmp.
*** User address mapping can be changed on request. Please contact Imagicle for further details.
**** WS device name can't be imported through Webex XSI APIs, but it can be manually retrieved from Control Hub: Workspace ⇒ Calling ⇒ Call experience ⇒ Call recording ⇒ Show call recording platform information ⇒ External Identifier.
Fax Workspaces Synch Rules
UCX Suite Display Name | Mapping criteria | Synched from | Example Value |
Username | <WSF>_<phonenumber OR ESN OR name> | WSF is the acronym for Imagicle Fax Workspaces. After underscore is added:
| WSF_4589921 Max 20 chars |
Preferred language | Only when adding, set this value | EN, IT, FR, DE, AR, etc. | |
Password | Only when adding, set this value | P@ssw0rd! | |
Active Directory username | Import every time from source | username coming from Email field or from Webex id | john.smith Max 255 chars |
Domain | Import every time from source | empty | |
Single Sign-On (SSO) ID |
| empty | |
Last Name | Import every time from source | name | Max 255 chars |
Cdr User Id |
| commonIdentityId | Max 255 chars |
Device name**** |
| nativeUserId | Max 255 chars |
Preferred Device name |
| nativeUserId | Max 255 chars |
PBX Username |
| nativeUserId commonidentityid | Max 255 chars |
Department |
| Organization Name = organization.name Location Name = location.name | Sales Max 255 chars |
Recording Group name |
| Organization Name = organization.name Location Name = location.name | Sales Max 255 chars |
Cost Center |
| Organization Name = organization.name Location Name = location.name | Sales Max 255 chars |
Office Location |
| Organization Name = organization.name Location Name = location.name | France Max 255 chars |
Home Phone |
| workPhone | +44984664564 |
Mobile Business Number |
| mobilePhone | +44702465646 |
User address |
| Default mapping***: {streetAddress}, {postalCode} {locality}, {region} - {country} | 102 Edith Groove,SW1 London, Greater London - United Kingdom |
Fax Number |
| phoneNumber or ESN | +44984664564 |
Fax Group Username |
| Fax Number = faxNumber Organization Name = organization.name Location Name = location.name | Sales Max 255 chars |
Fax Company Name |
| organization.name | ACME Inc. |
Fax Default Priority (0/1/2) |
| 0, 1, 2 | |
Enable billing for fax number | Only when adding, set this value | = False = True | |
Fax: enable send | Only when adding, set this value | = False = True | |
Fax: enable receive | Only when adding, set this value | = False = True | |
Enable Fax2Email | Only when adding, set this value | = False = True | |
Fax to email address |
| Webex Mail | |
Fax2Email attach fax | Only when adding, set this value | = False = True | |
Send email notifications | Only when adding, set this value | = False = True | |
Attach recording file to email notifications | Only when adding, set this value | = False = True |
*Imagicle supports overlapping extension numbers by selecting to import ESN instead of Extension Number. ESN includes a location prefix + Webex Calling Extension, so Imagicle Advanced Queuing can transfer calls to overlapping operators' internal numbers, without having to leverage +E.164 Phone Numbers.
** AvatarURL points to a server on Webex Cloud, which should be reachable by Imagicle UC Suite to retrieve each picture through a http request. User images can be in the most common formats, e.g. png, jpg, jpeg and bmp.
*** User address mapping can be changed on request. Please contact Imagicle for further details.
**** WS device name can't be imported through Webex XSI APIs, but it can be manually retrieved from Control Hub: Workspace ⇒ Calling ⇒ Call experience ⇒ Call recording ⇒ Show call recording platform information ⇒ External Identifier.
User's title attribute (title) is also importable from Webex Control Hub. Please contact Imagicle if you wish to add this information into a custom field.
Remarks
Only users having a phone line assigned on Control Hub have the extension number populated on the Imagicle suite. Users without a valid line result in UCX users with blank extension number.
If Webex user's email is changed, at the next synchronization relevant UCX Suite user is removed and another UCX Suite user is created with the new Active directory username and Domain values, losing the old users configurations and data.
User changes done on Control Hub might take take up to 24 hours to reflect into the suite users leveraging the synchronization. Consider this if you are planning a go-live or cutover involving Imagicle services.
To record WxC MT calls using UCX Cloud Suite native recording engine, the “PBX Username” field must be synchronized using “Import every time from source (Control Hub External Identifier)” option.
To import WxC MT native recordings into UCX Cloud Suite, the “PBX Username” field must be synchronized using “Import every time from source (Control Hub User Id)” option.