Scenario 1
-
A new entry, having the first name, last name and the phone number of a contact, is added into an Advanced Directory phonebook.
-
The purpose of that addition is to display the caller's name instead of the phone number on the called extension.
-
ECC profile is applied to the line of the called phone or to a translation pattern in CUCM.
When that contact makes a call from his number, to the phone line were ECC is applied, the name is not displayed.
Troubleshooting steps:
-
Check if the contact number added in the directory entry exactly corresponds to the number displayed on the phone when it is ringing.
-
Check if ECC profile is correctly triggered by DN or TP configuration. Each ECC query appears in the following UCX Suite web menu: Phone Lock ⇒ Call History
-
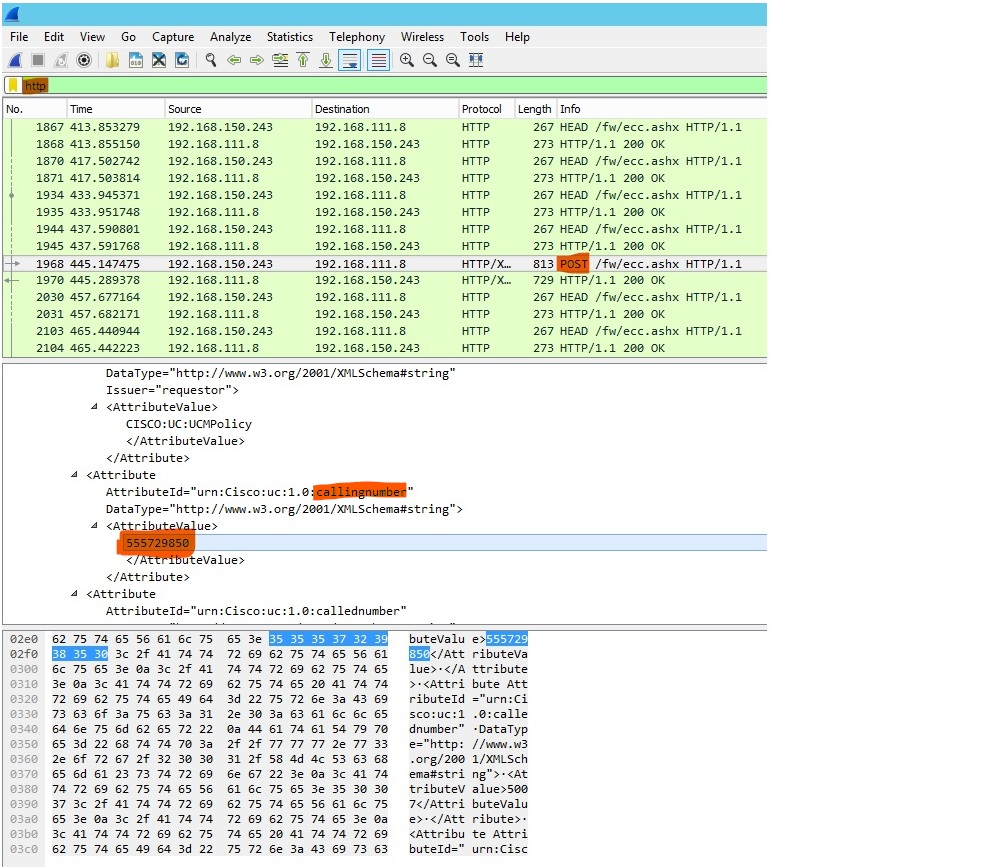
If the above are configured properly and the number is still not resolved, then Wireshark should be used for further troubleshooting:
-
Filter HTTP traffic by typing "http" in the filter bar.
-
Look for the post request received from CUCM.
-
In the second window, expand all the subsections of Hypertext transfer protocol.
-
Locate the caller phone number under the "calling number" attribute.
-
Make sure that the number is the same as the one introduced in the Advanced Directory phonebook.
-
If the number does not have the same format, there are two options:
-
Modify Advanced Directory entry to match the calling number.
-
Or modify the PBX and number plan parameters, available through UCX Suite web menu: admin ⇒ System Parameters ⇒ Numbering plan parameters. If the incoming number includes a "9" (typical dial-out prefix), then the default behavior should be modified to strip "9" at the beginning of the number. See here for further details.
Scenario 2
-
Can’t access to Advanced Directory service from IP Phone
Troubleshooting steps:
-
Check Advanced Directory Licenses are active on UCX Suite and relevant services are running;
-
Access to UCX Suite web portal as administrator and select ADMIN ⇒ Support menu. Hit the button “Details” to retrieve the list of phone devices imported from CUCM. Search for user’s phone and verify it is properly associated to a local UCX Suite user. Hit “TEST” button and check results. If test fails, please check for "URL authentication" on CUCM’s Phone Device properties or Enterprise Parameters.
Scenario 3
-
Can’t click-to-call from user’s UCX Suite web portal, to initiate a call on desktop IP phone.
Troubleshooting steps:
-
Access to UCX Suite web portal as administrator and select ADMIN -->Support menu. Hit the button “Details” to retrieve the list of phone devices imported from CUCM. Search for user’s phone and verify it is properly associated to a local UCX Suite user. Hit “TEST” button and check results. If test fails, please check for "URL authentication" on CUCM’s Phone Device properties or Enterprise Parameters.

Scenario 4
-
Standard “Contacts” button on Jabber Desktop/Mobile does not retrieve any contact or it retrieves contacts from other companies (applies to HCS-SA architectures).
Troubleshooting steps:
-
Check that proper Jabber XML file has been associated to Jabber phone device;
-
Access to UCX Suite web portal as administrator and check that contact segregation is activated;
-
Please check that own company’s contacts are properly imported and segregated into a specific locked department directory.
Scenario 5
-
Can’t access external Contact Manager phonebooks using relevant gadget button on Jabber Desktop/Mobile
Troubleshooting steps:
-
Check PC’s or smartphone’s network configurations; make sure UCX Suite server is reachable from the devices on TCP port 80;
-
Check Contact Manager license is active on UCX Suite and relevant services are running;
Scenario 6
-
Can’t click-to-call from Jabber Desktop’s Contact Manager gadget.
Troubleshooting steps:
-
Make sure that “tel:” prefix is correctly associated to Jabber client and not used by other third party applications.
Scenario 7
-
I can initiate a call from Contact Manager phonebook on IP Phone or Jabber, because the called number is wrong.
Troubleshooting steps:
-
Number mismatch due to missing Incoming Calls Prefix: If the voice gateway or CUCM requires a “9” (or another prefix) before the calling number, same prefix must be specified in UCX Suite admin web portal: ADMIN ⇒ System Parameters ⇒ Numbering Plan Parameters ⇒ Outgoing Calls Prefix.
Scenario 8
-
Can’t initiate a call from call registry’s in/out/missed calls list on IP Phone, due to wrong dialed number
Troubleshooting steps:
-
Number mismatch due to missing Outgoing Calls Prefix: If “9” (or another prefix) is needed to dial out, same prefix must be specified in UCX Suite admin web portal: ADMIN ⇒ System Parameters ⇒ Numbering Plan Parameters ⇒ Outgoing Calls Prefix.
Scenario 9
-
“OneDesktop” Jabber tool is installed on my PC, but I can’t initiate a call using “clip-to-dial”
Troubleshooting steps:
-
Check that OneDesktop icon appears on bottom-right PC screen (notification area). The icon turns blue if a valid Contact Manager license is included. Else it remains grey.
-
Right-click on OneDesktop icon in notification area and select “Options”. You can view and change keystroke sequence, just in case this is used by another application.
Scenario 10
-
When a call arrives to an Imagicle queue and Contact Manager's contact lookup is enabled, Caller ID does not appear on Attendant Console or phone display.
Troubleshooting steps:
-
That means call is coming from a contact not included into any Contact Manager phonebook or calling party is included into a Department or Personal directory not accessible to operator. Check that the involved operator is properly configured with department field (or tenant’s name in case of HCS-SA scenario).
-
Make sure that calling number perfectly matches an Contact Manager contact entry.
Troubleshooting Caller ID issues
Some Imagicle Services are stopped
Please check in the Windows Service Manager that the following services are running (start | Run | services.msc):
"ImagicleService Host", "Imagicle AXL service", "Imagicle Phone Control"
No UCX Suite user can be associated to the IP Phone
Please check that in UCX Suite such user exists, and that his/her properties which are used to associate the IP phone are correctly set (primary extension, MAC address, Pbx username). Please verify the device association in the UCX Suite diagnostic page (Main | Support |PBX Devices:Details). From this page you can also test the popup through a button.
A message should be displayed on the associated IP device.
The phone IP address is not available in the UCX Suite database
Please check the device IP address through the UCX Suite diagnostic page.
If it is missing, please check that AXL is correctly configured (and doublecheck the password)
Enabling AXL
The AXL service must be running on the CUCM node configured on the UCX Suite (On CUCM9.1: CiscoUnified Serviceability --> Tools --> Service Activation --> Cisco AXLWeb Service).
You can restart such service on the CuCM through Cisco Unified Serviceability.
The IP Phone cannot be controller by the UCX Suite through TAPI
Please check the flag on the UCX Suite diagnostic webpage in the "Detected by TAPI" column. You could also look for the device and line in the Windows TAPI snap-in (running "tapimgmt.msc"). If the device is not listed there, you need to associate theIP phone to the ImagicleCTI application user in CUCM.
Another helpful tool is "Phone.exe", located in <StonevoiceAS install dir>\Troubleshooting
Failed IP Phone authorization
Please execute a test from the UCX Suite diagnostic page (see above). If the "authorization error" message is displayed in the webpage, please check the "URL authentication" on the IP phone and set it on the CuCM in the IP Phone properties (or in the Enterprise Parameters) like this:
http://[APP_SUITE_IP]/fw/authenticate.asp
Calling number is not matched
This can have several causes.
a) The calling number is not listed in any directory available to the UCX Suite user associated to the phone. It can be listedin a directory which is owned by another user or associated to a specific department. Check that the contact is available to the user searching for it through the directories button on the IP phone.
b) Number mismatch because of the Incoming Prefix
If the voice gateway or the PBX adds a ‘0' (o another prefix) before the calling number, that prefix must also be specified in the UCX Suite (Administration ⇒ System Parameters ⇒ Numbering Plan Settings) as Incoming Prefix.
WARNING: some CuCMconfigurations cause the calling number to be displayed on the IP Phone to be different to the one received by Contact Manager in the TAPI signaling. Please check the true number through the Call History of the IP phone, which, usually, is the same number seen through TAPI.
Other information can be gatherer enabling debug logs in Contact Manager, placing a test call and looking in this file: varlogApplicationSuite.Core.ServiceSpeedy.log.txt
for a line similar to:
DEBUG { 32}[LookupAgent] FormatDetailsOfCallerNumber(user=nome_utente,CLI=034567890123):Search returned no contact in 52 ms.
This tells the user associated to the Ip device to the calling number received by Contact Manager (CLI), and to the number of matches int he directories.
When the call arrives, the Display name has already been set by the PBX in the signaling
In this case, by design, Contact Manager does not send the popup to the phone. You can force the popup to be sent anyway through a hidden parameter. Contact Manager Caller ID service does not rely on the calling number length(as the Imagicle Attendant Console does).
The popup http message is too long
The maximum body size for the message supported by Cisco IP Phones is 512 bytes. This case can be verified through Contact Manager logs and it is triggered when you add too many custom fields to the information to be displayed or if a First Name/Last Name is too long. In this case you have to disable some additional filed or to shorten the contact data.
The free online CSS cleaner tool helps you to organize style for websites.