Contact Manager Entp. Export Directories
This menu item allows to leverage the content of one or multiple Contact Manager directories to update an external, standard directory server. So Imagicle Contact Manager Entp. acts as the Master contact source to feed multiple directory services owned by the customer.
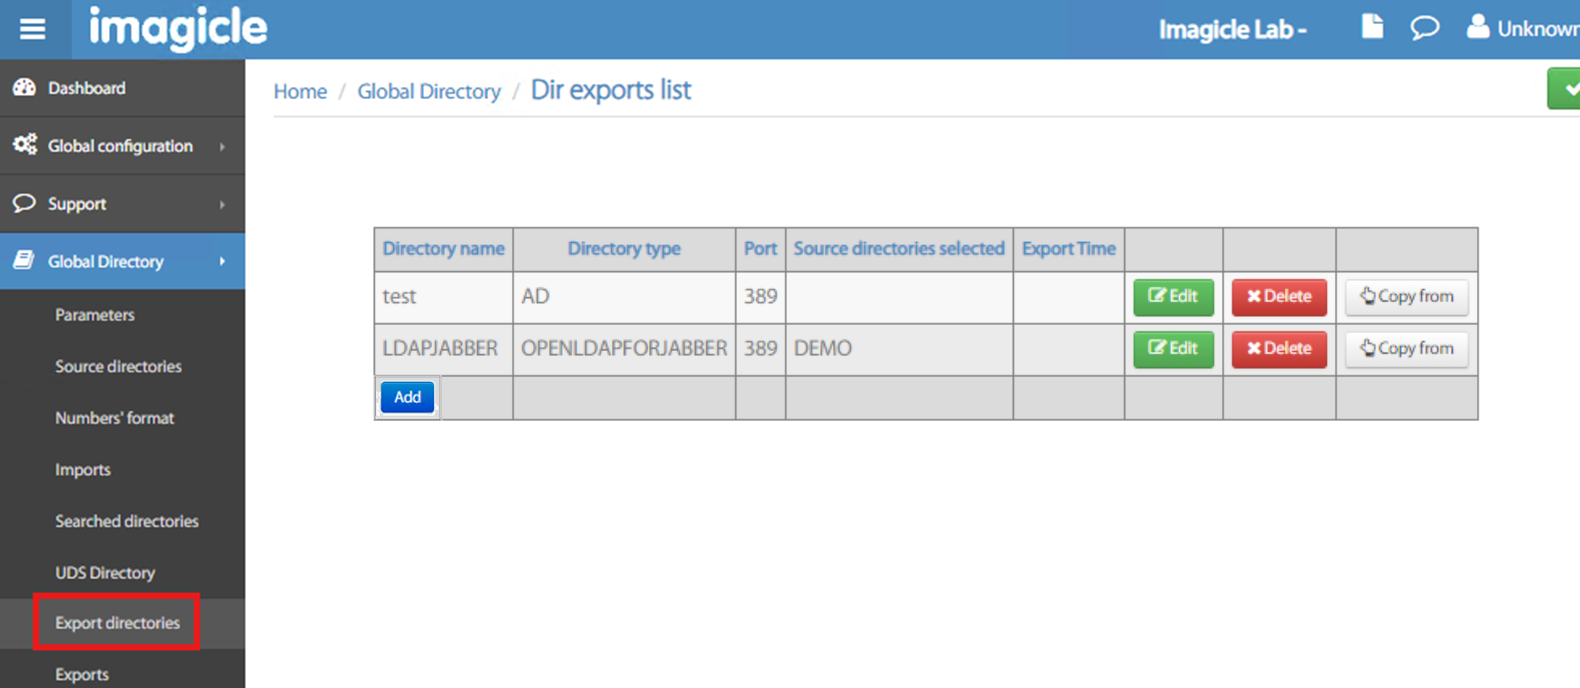
You can click Edit to amend an existing export entry and display below block menu.
If otherwise you click Add to add a new export directory, the following web form is displayed:
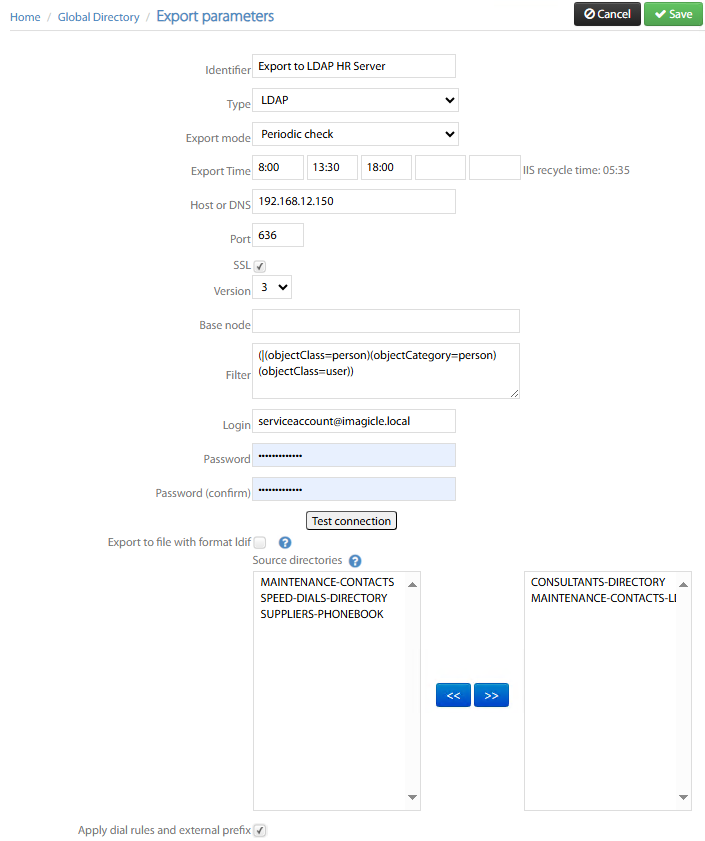
Identifier → Name of your choice identifying the target export server/service
Type → Target external directory server type. Multiple options available:
AD → MS Active Directory
LDAP → Generic LDAP server
CUCM → to provision Cisco UCM and Unity End Users
TEXT → Populates a text file
XLSX → Populates an Excel file
OPENLDAP INTEGRE → OpenLDAP server
CONTACT MANAGER → Imagicle UCX Suite’s Contact Manager app (LDAP Export for Meta Connector)
Import mode → Choose from pull-down menu how to push data in target directory:
Manual → Target directory push must be manually triggered
Periodic check → Directory push is performed at a specific time, up to 5 different time slots.
After import → After source directory import is completed.
Import time (hh:mm) → If above “Periodic check” is selected, then the automatic import is triggered up to five times per day, at the configured time slots.
Host or DNS → This is the IP/FQDN of the export target directory server
Port → TCP port to communicate with target directory server
SSL → To be flagged to establish an encrypted SSL session with target server
Version → SSL version in use
Base node → AD/LDAP path including domain and OU where to push contacts
Filter → Optional filter to apply while pushing AD/LDAP contacts.
Login → Service account username, with write permissions within chosen AD/LDAP Organization Unit.
Password → Service account password
A useful Test connection button allows to immediately test target export server reachability and login credentials. If the test is successful, the message “Bind success” is displayed.
Export to file with format ldif → By flagging this option, the chosen directory is exported into an LDIF standard file, which can be used to manually feed the external target directory.
Source directories → Please select from left list the source directory(ies) you wish to export to the target directory server, and move them to the right list.
Apply dial rules and external prefix → If checked, phone numbers normalization is applied during export, as per global Numbers' Format table.
Once the form has been compiled and tested, don’t forget to Save it, to proceed with the next paragraph.
Export Directory Detailed Configurations
The following block menu appears:
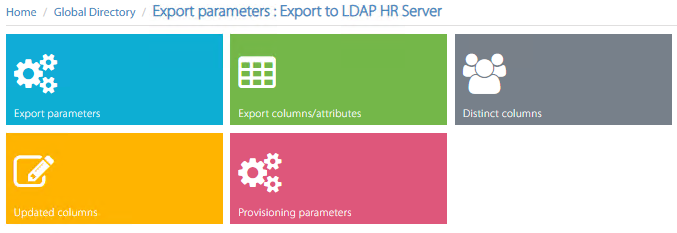
Here is a description of the available configurations within each block:
Export parameters
This menu option recalls above export parameters form, where you can amend target directory server.
Export columns/attributes
In this section, you can define the structure of your AD import, by adding all the attributes to import, with relevant internal column name. AD/LDAP export type includes a Default values structure, including most common attributes. See below:
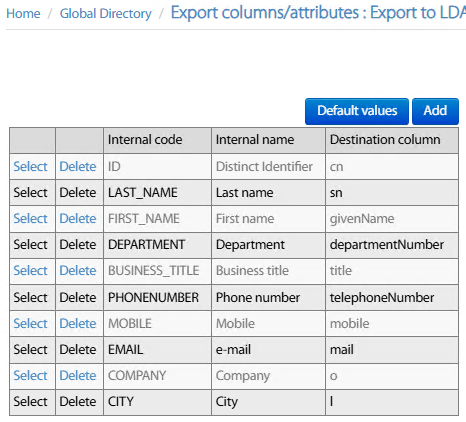
You can Select any existing row and modify field mapping. You can also remove unused attributes by clicking Delete. Finally, you can Add more AD/LDAP attributes, with relevant field mapping. For each row, the following setting must be applied:
Internal name → Choose from pull-down menu the Source Directory attribute you wish to export.
Predefined attribute → Pull-down menu including target AD/LDAP most common attributes.
Free attribute/field → If required target AD/LDAP attribute is not included in the predefined list, you can manually add it here. This option also allows to concatenate multiple source attributes into a single target destination field, like
[LOCATION];[CITY];[COUNTRY].
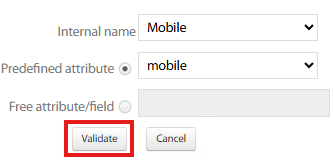
Hit Validate to save new/amended attribute. Once all fields have been added, you can Save.
Distinct Columns
Source distinct
It might happen that different source directories include some duplicated contacts. To avoid same contact duplication in the target export directory, you can select how duplicated contacts are merged or joint through the Distinct/merge/join mode pull-down menu:
ALL → If the contact included in the first source directory (in the defined order) includes empty attributes, then same attributes from second source are exported.
FIRST → Only the contact in the first source directory is exported. Any following duplicates are ignored.
TEL → If the contact included in the first source directory (in the defined order) includes empty phone numbers, then same phone numbers from second source are exported.
Other available parameters:
Phone number minimum length → This is the minimum number of digits for considering a valid phone number.
Exclude contacts existing in selected source directory → You may want to export contacts that are included in the first source directory but not in the second (they might include common contacts). It is possible by defining an export that concatenates the first and the second source directory and subsequently exclude contacts that are in the second directory. Second source directory is selected from pull-down menu.

Export Distinct
This feature allows to recognize if an exported contact is already included into the target external directory and therefore decide what to do with it.
To avoid same contact duplication in the target export directory, you can select how to deal with existing contacts from Update mode pull-down menu:
DISABLED → Completely disables the export
UPDATE → Only those contacts included in both in the source and the destination directory are updated
ADD UPDATE → Existing + new contacts in source are exported to destination directory target
ADD DEL → Contacts not found in source are deleted from target directory
ADD UPDATE DEL → Existing + new contacts in source are exported to destination directory target; contacts not found in source are deleted from target directory
Other parameter:
Updated attribute → Choose from:
ALL → Above Update mode is applied to all exported contact attributes
TEL → Above Update mode is applied to phone numbers contact attributes only

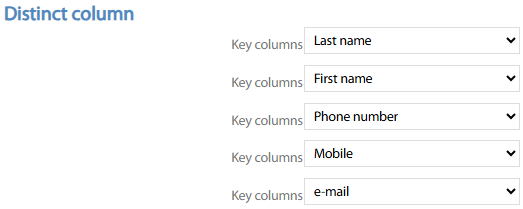
Distinct Column
This feature allows the application to correctly identify a matching contact between the source and the destination directory. Here, you select the source columns that identify a unique contact and that can be compared to the matching columns in the destination. Therefore, the columns selected here must also be included in the corresponding table in the Export Columns/attributes section.
Example: you can use the email distinct column to compare your source contacts who have the same email address as in the mapped export column in the destination. And decide if the destination needs to be updated, created or deleted if the email address is not found.
Updated Columns
This menu option allows, starting from the list of attributes included in Export columns/attributes, to remove or add new attributes to be updated during the contacts export to target external directory. You can start by hitting All selected attribute button to populate the list. Then you can click on Delete besides each row, to remove the attribute. See below sample:
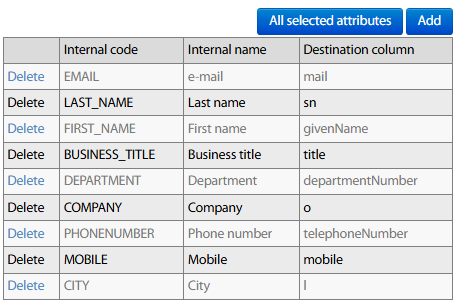
If otherwise you wish to add a new attribute to be exported, just hit Add and select new attribute from pull-down menu.
Provisioning parameters
This menu item allows to define a mask to create a unique ID from multiple directories' attributes. This ID is used to populate CN and sAMAccountName AD/LDAP key attributes, or for CUCM userID. The syntax to be used in UserId creation mask field can include the following two sample rules:
[FIRST_NAME,1] means, the first digit of the first name attribute value.
[LAST_NAME];[COMPANY] means that key is based on LastName and, if empty, company name is used instead.
This mask must no be changed after an export has already occurred, otherwise duplicated contacts are created. Use *** keyword if you do not want to update this attribute.
In create mode, this attribute is set to null.
List of support variables : TITLE, LAST_NAME, FIRST_NAME, BUSINESS_TITLE, DEPARTMENT, LOCATION, COMPANY, PHONENUMBER, MOBILE, FAX, OTHER_PHONE, EMAIL, ADDRESS, ZIP_CODE, CITY, COUNTRY, OTHER, OTHER2, ASSISTANT_PHONE, ASSISTANT_NAME, ASSISTANT_ID, BACKUP_NAME, BACKUP_PHONE, BACKUP_ID,MGR_NAME, MGR_PHONE, MGR_ID, ID.
WARNING: For H350 objects, only one field must be entered, without truncation.
Another important field within this menu item is Type object. This is the AD/LDAP Object Class associated to each exported contact. Default value is inetOrgPerson.
You can combine multiple Object Classes like commObject, SIPIdentity, h323Identity