Skype for Business Configuration
Architecture
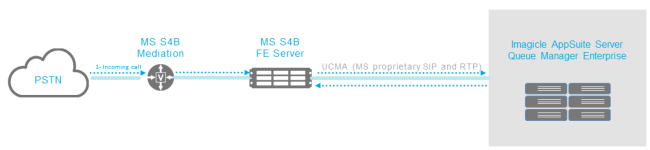
Since Spring 2017, Imagicle Queue Manager Enterprise provides native integration with Microsoft Lync / Skype for Business, as a Trusted UCMA Application registered on Front End Server.
Native Integration Requirements
- Microsoft Lync Server 2013 or Microsoft Skype for Business Server 2015/2019
- Imagicle Application Suite must be installed on Windows Server 2008 R2 with SP1 64 bit or newer (32 bit not supported).
- The Imagicle AppSuite server must be joined to the Microsoft Lync/SfB Active Directory domain.
Configuration Task List
The main configuration steps are:
- Configure once the Imagicle Application Suite machine
- Configure once Microsoft Lync/Skype for Business server
- Configure once Queue Manager Enterprise Trusted Application
- Configure call routing on Microsoft Lync/Skype for Business
1. Imagicle Server Configuration
Imagicle server needs to be configured once, through these steps:
- Install UCMA Runtime 4.0
- Join Active Directory Domain
- Install Certificate
Install UCMA Runtime 4.0
Imagicle Queue Manager Enterprise with Microsoft Lync / SfB native integration needs Microsoft UCMA version 4.0 runtime installed. You must download it here and install it on Imagicle Application Server.
Note: Microsoft UCMA version 4.0 is compatible with Microsoft Lync 2013 and Microsoft SfB 2015. Do not install newer versions of Microsoft UCMA.
Note: while QME requires UCMA 4.0, presence integration with Microsoft Lync / SfB requires UCMA 3.0, that is not replaced by UCMA 4.0. So, if you plan to use both QME and Presence, you have to install UCMA 4.0 Runtime first, then UCMA 3.0 Runtime.
Join Active Directory Domain
Imagicle Server must be joined to the Microsoft Lync / SfB Server domain in order to integrate Queue Manager Enterprise as UCMA Trusted Application.
Install your Certificate
Imagicle Queue Manager Enterprise Trusted Application needs to establish a secure Mutual Transport Layer Security (MTLS) connection to Microsoft Lync / SfB Front End Server. Hence, you have to get a Web Server certificate from the network Certification Authority and install it as a computer certificate on the Application Suite server.
Certificate enrollment
-
Log in to the Imagicle Application Server as an administrator with permission to Enroll for a Web Server Certificate (e.g. a Domain Administrator)..
- Click the Start button, then Run, type cmd.exe, right click over Command Prompt and click on Run as administrator
- In the Command prompt shell, type mmc.exe.
- Open the File menu and select Add/Remove snap-in.
- In the Add or Remove Snap-ins window, select Certificates, and click Add.
- Choose Computer Account, and click Next.
- Choose Local Computer, and then Finish.
- Click OK on the Add or Remove Snap-ins window.
- Expand Certificates.
- Expand Trusted Root Certification Authorities and click Certificates. Make sure the root certificate is present for the Enterprise Certificate Authority in the domain.
- Right-click Personal and select All Tasks, then Request New Certificate.
- Click Next.
- If prompted to select a Certificate Enrollment Policy, select one under the category of Configured by your administrator. Click Next.
- Select Web Server (If Web server is unavailable see the WebServer certificate section), and click the link for More information is required to enroll for this certificate. Click here to configure settings.
- Click the Subject tab.
- For Microsoft Lync Server 2010/2013/SfB:
- Under the Subject Name section, change the Type to Common Name, and change the Value of the Fully Qualified Domain Name of the Microsoft Lync / SfB Server Pool (e.g. sfb.mydomain.com), and then click Add.
- Under the Alternative Name Section, change the Type to DNS, and change the Value to the Fully Qualified Domain Name of the Microsoft Lync / SfB Server Pool (e.g. sfb.mydomain.com), and then click Add.
- Again, under the Alternative Name Section, leave the Type specified as DNS, and change the Value to the Fully Qualified Domain Name of the server hosting the Imagicle Application Suite (e.g. ias.mydomain.com).
- Click Add.
- Click the General tab.
- Type OCSConnector for the Friendly Name, then click Apply, and OK.
- On the Certificate Enrollment window, click Enroll.
- Verify that the STATUS is Succeeded, and click Finish.
WebServer certificate
If there is no available WebServer certificate, you have to create it.
- On the CA computer, click Start, type certtmpl.msc, and then press ENTER.
- In the contents pane, right-click the Web Server template, and then click Properties.
- Click the Security tab, and then click Add.
- Click Object Types
- Flag Computers checkbox
- In Enter the object names to select, type the name of Imagicle Application Suite Server, and then click OK.
- In Permissions, click Enroll under Allow, and then click OK.
2. Microsoft Lync / Skype for Business Server Configuration
A trusted application requires an entry in the Microsoft Lync / SfB Server topology document that specifies the computers on which the application runs. The main steps to configure Microsoft Lync / SfB Server are:
- Create a Trusted Application Pool for Imagicle Server
- Create a Trusted Application for Imagicle Queue Manager Enterprise
- Enable modification to the topology
On a Microsoft Lync / SfB Server node open the "Lync / SfB Server Management Shell" and execute all commands explained in this section.
Create a Trusted Application Pool for Imagicle Server
First of all, the Imagicle Server must be configured as a Trusted Application Pool server within Microsoft Lync / SfB topology. You can skip this step if you have already configured a Trusted Application Pool to activate Presence integration through Trusted Application End Point.
To check whether a Trusted Application Pool already exists for Imagicle AppSuite server, execute command:
Get-CsTrustedApplicationPool -Identity fqdn-ImagicleApplicationServer
If you get an error, the Trusted Application Pool does not exist. You can create it executing the following command:
New-CsTrustedApplicationPool -Identity fqdn-ImagicleApplicationServer -Site site-ImagicleApplicationServer -registrar fqdn-sfbRegistrar
Create a Trusted Application for Imagicle Queue Manager Enterprise
To configure Queue Manager Enterprise as a Trusted Application within Microsoft Lync / SfB, execute the following command:
New-CSTrustedApplication -ApplicationId ImagicleQME -TrustedApplicationPoolFqdn fqdn-ImagicleApplicationServer -Port 14002
This will return a result similar to:
Identity: fqdn-ImagicleApplicationServer/urn:application:ImagicleQME
ComputerGruus: {fqdn-ImagicleApplicationServer sip:fqdn-ImagicleApplicationServer@yourdomain.com;opaque=srvr:ImagicleQME:atifA-VpOFO2x9rrBUEoPQAA}
ServiceGruu: sip:fqdn-ImagicleApplicationServer@yourdomain.com;opaque=srvr:ImagicleQME:atifA-VpOFO2x9rrBUEoPQAA
Protocol: Mtls
ApplicationId: urn:application:ImagicleQME
TrustedApplicationPoolFqdn: fqdn-ImagicleApplicationServer
Port: 14002
LegacyApplicationName: ImagicleQME
Copy the ServiceGruu information and paste into a temporary text file - this will be required later, in step "Queue Manager Enterprise Trusted Application Configuration".
Copy also ApplicationId, that is needed to execute the next command. Choose a SIP address (like sip:imagicleqme@yourdomain.com) and a Display Name (like Imagicle ACD) to be assigned to Queue Manager Enterprise, and execute the following command:
New-CSTrustedApplicationEndpoint -TrustedApplicationPoolFqdn fqdn-ImagicleApplicationServer -ApplicationId urn:application:ImagicleQME -SipAddress sip:imagicleqme@yourdomain.com -DisplayName "Imagicle ACD"
Enable modification to the topology
To apply all above modifications, execute command:
Enable-CsTopology
3. Queue Manager Enterprise - Trusted Application Configuration
The Trusted Application configuration returned some values that must be inserted into Imagicle Queue Manager Enterprise. Login into Imagicle Application Suite web portal as a user with global administrative privilege for Queue Manager Enterprise. Go to ACD, Skype for Business Settings web page and fill all the following fields:
- Skype for Business server: enter the fully qualified domain name of Microsoft Lync / SfB server
- Application Contact Uri: enter the SIP URI used to configure the Trusted Application (e.g. sip:imagicleqme@yourdomain.com)
- Application GRUU: enter the ServiceGruu value returned by New-CSTrustedApplication command
- Certificate Name: enter the Friendly Name of the certificate installed on Imagicle server
- Application Host: it must matche the value used for the Identity parameter in New-CsTrustedApplicationPool command
- Application Port: it must match the Port value returned by New-CSTrustedApplication command
By pressing Save button, configuration will be saved and applied.
Call routing on Microsoft Lync/Skype for Business
In order to route calls from Microsoft Lync / SfB Front End Server to Imagicle Queue Manager Enterprise, Imagicle provides SfbImagicleRouting, that is an MSPL script to be installed as Server Application into Lync / SfB Front End server.
SfbImagicleRouting intercepts SIP INVITE requests processed by the Microsoft Lync / SfB Front End Server. It will compare the destination number of each request with a list of telephone number prefixes configured in a given file. If a match is found, the call will be re-routed to the corresponding destination configured in the same file. Otherwise, the call will be ignored by SfbImagicleRouting and routed according to Microsoft Lync / SfB dial plan.
The configuration steps are:
- Install SfbImagicleRouting as Server Application on Front End Server
- Configure routing to Imagicle Queue Manager Enterprise
- Verify Server Application Call Routing
Install SfbImagicleRouting as Server Application on Front End Server
Login into Imagicle Application Suite web portal as a user with global administrative privilege for Queue Manager Enterprise. Go to ACD, Skype for Business Settings web page and click button to download "MSPL routing script".
Move the downloaded zip archive to Microsoft Lync / SfB Front End Server and extract its content in a folder, e.g. C:\SfbImagicleRouting.
Open the "Lync / SfB Server Management Shell" and execute the following command (pay attention to adjust both the FQDN of Front End node and the -ScriptName parameter value with the folder where you extracted SfbImagicleRouting (e.g. C:\SfbImagicleRouting):
New-CsServerApplication -Identity "Service:Registrar:fqdn-sfbRegistrar/SfbImagicleRouting" -Uri "http://www.imagicle.com/sfbimagiclerouting" -ScriptName "C:\SfbImagicleRouting\SfbImagicleRouting.am" -Enabled $true -Critical $false
In order to assign the correct priority to SfbImagicleRouting Server Application, execute the following command (pay attention to adjust the FQDN of Front End node):
Get-CsServerApplication -Identity Service:Registrar:fqdn-sfbRegistrar/UserServices
This will return a result similar to:
Identity   : Service:Registrar:fqdn-sfbRegistrar/UserServices
Priority   : 4
Uri        : http://www.microsoft.com/LCS/UserServices
Name       : UserServices
...
Copy the Priority value into the next command to execute (pay attention to adjust the FQDN of Front End node):
Set-CsServerApplication -Identity "Service:Registrar:fqdn-sfbRegistrar/SfbImagicleRouting"-Priority 4
As a result, the SfbImagicleRouting Server Application will have an higher priority than UserService Server Application (i.e. when processing a SIP request, the Front End Server will execute SfbImagicleRouting application before UserService application).
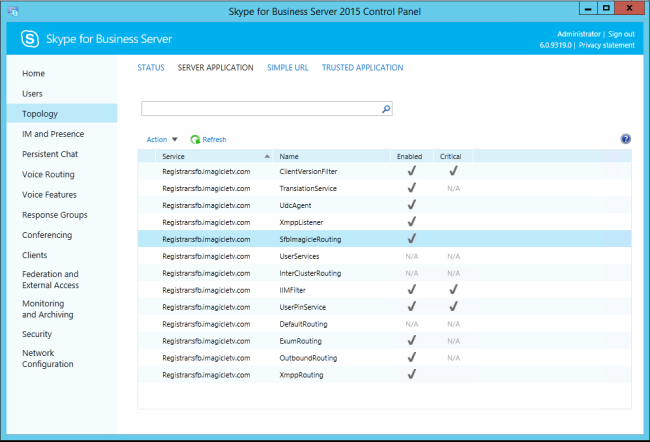
Open the "Lync / SfB Server Control Panel" and select Topology, Server Application: in the Server Application list, check that SfbImagicleRouting is positioned just above UserService application:
Configure routing to Imagicle Queue Manager Enterprise
On Microsoft Lync / SfB Front End server, go to the same folder where SfbImagicleRouting has been extracted (e.g. C:\SfbImagicleRouting) and open file SfbImagicleRouting.csv with a text editor.
This is a simple CSV file where you must add a line (leaving untouched the first line) for each numbering range you need to route to Queue Manager Enterprise.
For each numbering range you need to route to Queue Manager Enterprise, add a line made of:
- Prefix: the telephone number prefix that has to be matched within call's destination number
- the comma character
- GRUU: the ServiceGruu of the Trusted Application which the call will be routed to. Insert the value returned by New-CSTrustedApplication command
For example, given a file like this:
Prefix,EndPointGruu

80,sip:fqdn-ImagicleApplicationServer@yourdomain.com;opaque=srvr:ImagicleQME:atifA-VpOFO2x9rrBUEoPQAA

81,sip:fqdn-ImagicleApplicationServer@yourdomain.com;opaque=srvr:ImagicleQME:atifA-VpOFO2x9rrBUEoPQAA
SfbImagicleRouting will route to the Trusted Application identified by the specified GRUU all calls whose destination number starts with 80 or with 81.
Verify Server Application Call Routing
In order to verify that SfbImagicleRouting is properly triggered by Microsoft Lync / SfB Front End, place a call from a Lync / SfB client to a number that is expected to be routed to Queue Manager Enterprise.
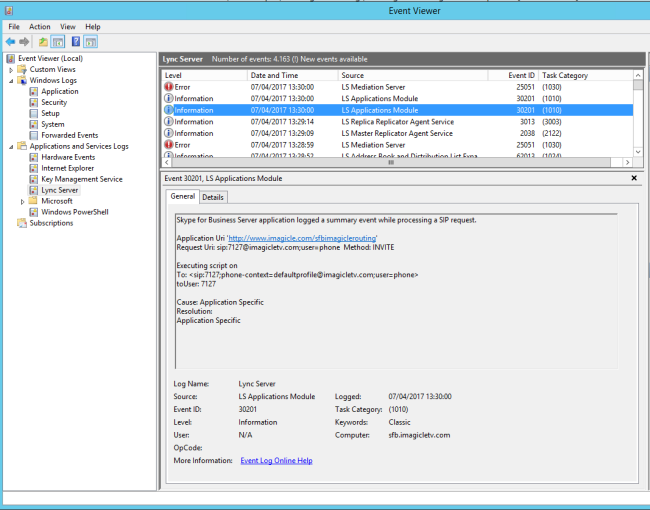
Then open Microsoft Windows Event Registry; in the left side panel, select "Lync Server" section, you should find either 1 or 2 entries with Source "LS Applications Module".
The first event logs basic call information, such as the destination number. This means that Microsoft Lync / SfB Front End is properly executing SfbImagicleRouting Server Application.
If this event does not exist, it means that Microsoft Lync / SfB Front End is not executing SfbImagicleRouting. Please, review paragraph "Installation".
If there is just one event with Source "LS Applications Module", it means that the called destination number did not match any prefix configured in SfbImagicleRouting.csv file. Please, review paragraph "Configure routing".
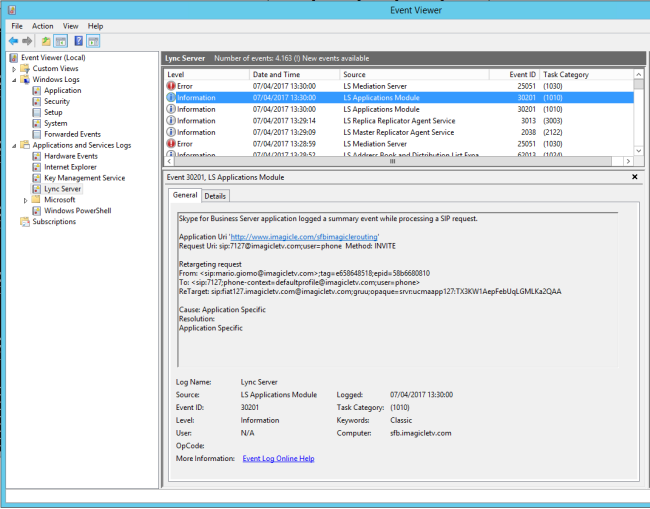
Otherwise, the second event logs the final destination to which the call has been routed by SfbImagicleRouting and ensures that SfbImagicleRouting is being properly executed and has been correctly configured.
|
||

| This article was: |
| Prev | Next | |
| Configuration Task List | Default global waiting queues settings |