Product Configuration
Gateway management
You need to add the gateways to send the IVR behaviours. The IVR Manager sends the proper commands for the gateway to execute the behaviour through an hidden telnet connection. So the following parameters are needed for each gateway:
- IP address or DNS name: must be unique
- Username (leave blank if not used in the telnet account)
- Password (leave blank if not used in the telnet account). Passwords are shown in clear text while editing, but are hidden in the gateway list.
- enable password of the gateway
The provided username and password needs to give access level 15 to the gateway.
Leave the Zone combo box at default (Global) at this stage. When you click insert, the data you entered will be validated and the gateway will be added to the list below the input form. You'll be able to edit the gateway details from this list.
Note: the input form is optimized for keybord usage. You can move between the input boxes pressing the TAB key. When you press Enter, the gateway will be added and the focus will return to the top in put box. This simplifies entering a long list of gateways.
Audio files management
You also need to upload the audio messages to include in the IVR behaviours. A simple web form let upload any .wav files converting in the appropriate voice gateway compatible ones.
.wav files (PCM format) will be converted to .au (raw format, 8 bits, 8 kHz, mono). The label is required and will be visible during audio file selection in other pages. Optionally, if the message contains speech, you can also enter the transcript of what is said in the audio file for your reference.
The file name must be unique.
Pressing the "play" icon will download the audio file, to be opened with your favourite media player.
From this page you can also delete any audio file, as long as it is not in use by any behavior in the system.
IVR behaviors management
IVR Manager basic elements are behaviors and schedules.
- Behaviors define the call flow and relative parameters (such as audio files to be prompted and involved numbers/extensions)
- Schedules define when applying certain behaviors.
Behaviors define how the IVR will respond to incoming calls.
You have to create a different behavior for every different call handling procedure you want to implement, for example a day behavior and a separate night behavior.
Through the behaviours submenu of IVR Manager, you can manage the behaviours. Click "Create New Behavior" to add a new one. A list with a detailed description of the call flow implemented by the each behaviour will be displayed.
Example:
Basic Auto-Attendant provides autoanswer to incoming calls prompting welcome_msg message, then it tries to connect the call to the agent. If the agent is busy or does not answer within the alert_time seconds (default: 35 seconds), the script prompts the Busy message and retries.
Select the script to use as template for the behavoiur you want; you'll customize the behavoiour selecting audio files and destination numbers in the next step.
You need to decide a name for your new behaviour.
The behaviour name must be unique.
In our example, set "day" as behavior name to configure the script as the normal opening hours IVR: select the audio messages and the agent/operator to be connected.
Create another behavior with name "night" to configure the script with the normal office closed IVR: select the Night standard script, the office closed audio message and (optionally) the voicemail number for keeping the message.
You have configured a very basic sample of day and night behavior for your company attendant. Next section will show how to schedule the automatic change between those.
Schedule behaviors (dispatchers)
Schedule behaviors means create a set of rules for defining when to activate a certain behavior. Start creating a "dispatcher", which is the element including those rules based on dates and hours.
Dispatchers allow you to switch between different behaviors from a single entry point. After a dispatcher is configured, it can be assigned to one or more gateways to provide an entry point for the incoming calls. You cannot use behaviours without a dispatcher.
The name of the dispatcher is used to uniquely identify the "service" on the Cisco gateway it is loaded onto. The string "sv_" is always prepended to the dispatcher's name on the gateway.
The dispatcher name must be unique.

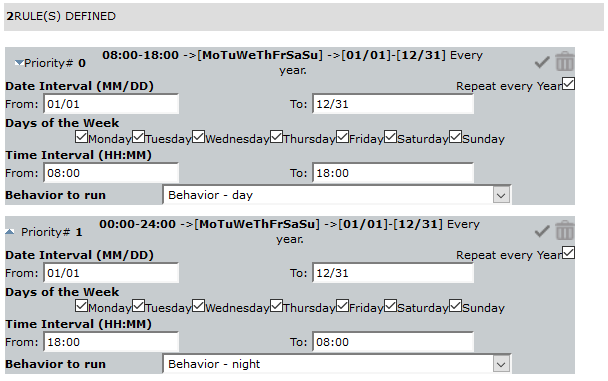
The dispatcher configuration allows setting of Date interval, Days of the week and time interval for a certain behavior to be selected.
Leaving the intervals at default will always be running the selected behavior (as matching any date/time): this is used when only one behavior is needed (no different day and night ones).
You can define as many rules as needed, for e.g. two rules for day and nights: rules are matched top-down. When there is more than a rule, the highest one is checked first. If it does not match with current date and time the second one is checked. When a rule is matched, the selected behavior is run. To change the priority of a rule, move it up or down with the arrows at the top left of its panel.
If no rule is matched, the default behavior (pass-through) will automatically be applied to avoid the voice gateway not managing the call.
Note: dispatcher is what you need to associate to the voice gateway configuration under the dial peers sections. See Cisco Gateway configuration section for details.
See below a typical day and night rules configuration:
Please mind the following:
- A single dispatcher can point to different beahviours
- The same behaviuor can be used in different dispatchers
- A dispatcher cannot point to other dispatchers
- Behaviors can be also be activated manually, but only if referenced in a dispatcher
Associatiation to gateways
The "Assign to gateways" menu of IVR Manager allows the created dispatchers to be associated to the Cisco gateway to apply the IVR to. Here you can choose which dispatchers will be loaded onto each gateway individually. This selection is preliminary to the actual sending of the configuration.
You must ensure that all the dispatchers that are referenced by a dial-peer on a Cisco gateway are also explicitly assigned to that gateway in this page.
All the behaviors that are referenced by a dispatcher will be loaded automatically, without the need to assign them explicitly. You can also edit configuration details that are specific to a dispatcher when it is loaded onto a specific gateway.

In the "To" combo box, select the voice gateways to send the dispatcher(s) to, leave < ALL > to send to all configured gateways in the "Gateway management" previous section.
In the "Assign" combo box, select the dispatchers to be sent to the selected gateways, then click on the "Assign" button
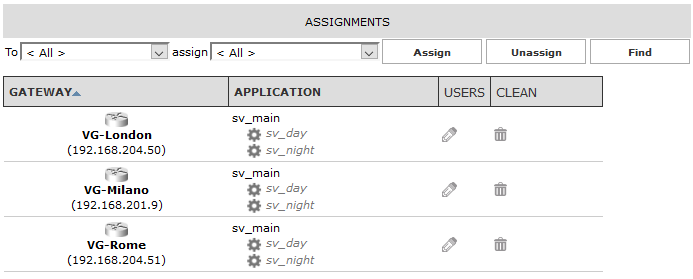
This way the main dispatcher will be sent to both London and Rome gateway for local execution. Each gateway will apply the set of rules configured in the dispatchers for running the day and night behaviors based on the local time: if they are in different time zones, the local time will be successfully applied and, as per our example, the day behavior will start at local 8:00 and night at 18:00 as we would expect to.
Next section will show the page to control the IVR Manager for sending the commands to the selected voice gateways.
Sending configuration to gateways
The sending configuration menu trigger the execution of the telnet sessions to the selected gateways for sending the needed commands to apply the configured dispatcher.
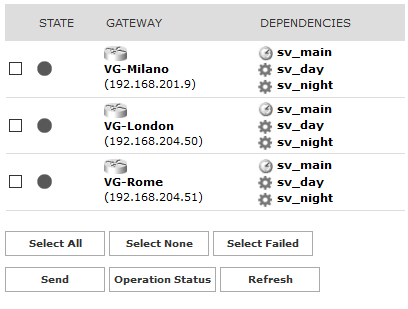
Select one, more or all gateways and click on send: the uploading configuration page will appear, showing the operation in progress.
You can see the log of the operation by clicking the gateway icon. It is possible to check the list of the commands being sent by the log files.
At the end of the sending operation, the status will be updated:
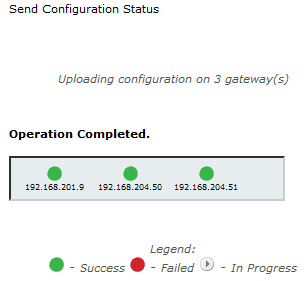
The sending page is automatically updated with the last status of the sending command operation:
The IVR Manager has been successfully configured and commands being sent to the gateway. The next section shows how applying the configured dispatcher to the Cisco gateways for answering calls to specific numbers/incoming calls.
|
||

| This article was: |
| Prev | Next | |
| Configuration Task List | PBX Configuration |