Fax-to-Email configuration for inbound faxes
Fax to Email configuration
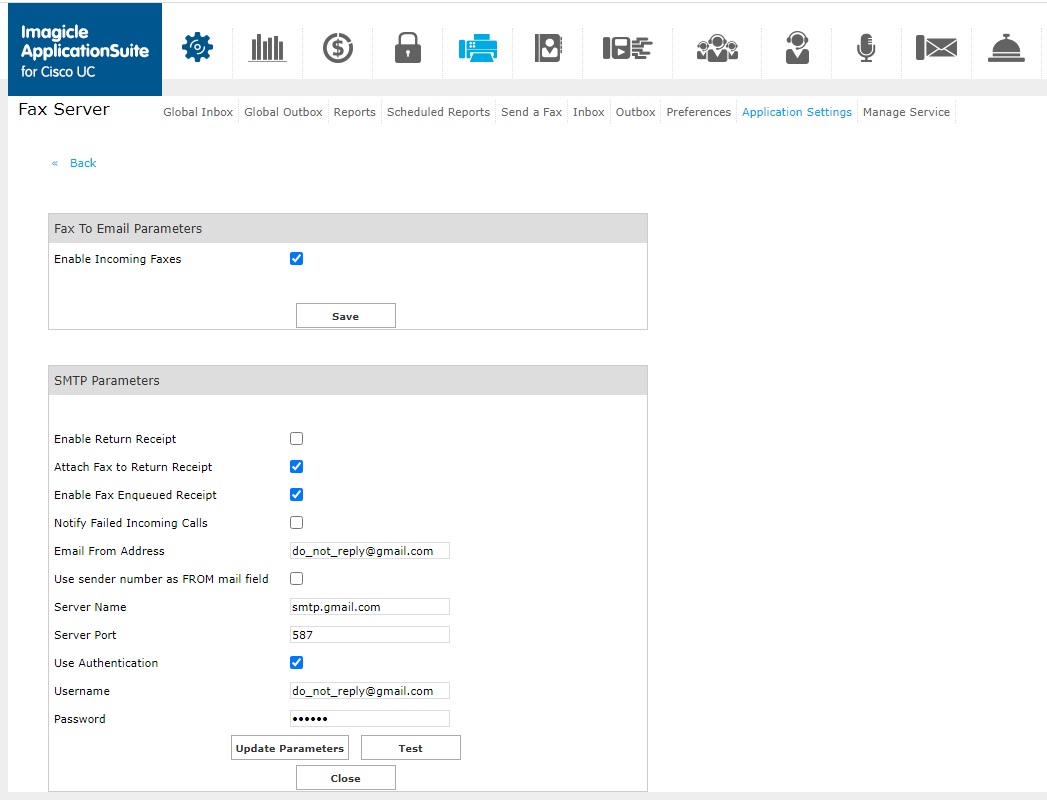
From Digital Fax "Application Settings" page press the "Set »" button near "Incoming Faxes". Here flag the "Enable Incoming Faxes" checkbox to enable fax reception at global level.
Moreover, you can set the following parameters:
- Enable Return Receipt: this flag enables overall email notifications from Digital Fax application
- Attach Fax to return Receipt: checkbox to enable fax document attachment to incoming faxes notifications
- Enable Fax Enqueued Receipt: if this option is enabled, whenever a fax is added to the outgoing queue a receipt is sent to the sending user
- Notify Failed Incoming Calls: When an incoming fax has been notified by the PBX but not enough or partial data is received, an email notification is sent to the fax recipient. By default, a fax without body is simply ignored
- Use sender number as FROM mail field: if flagged, above email address will include sender fax number
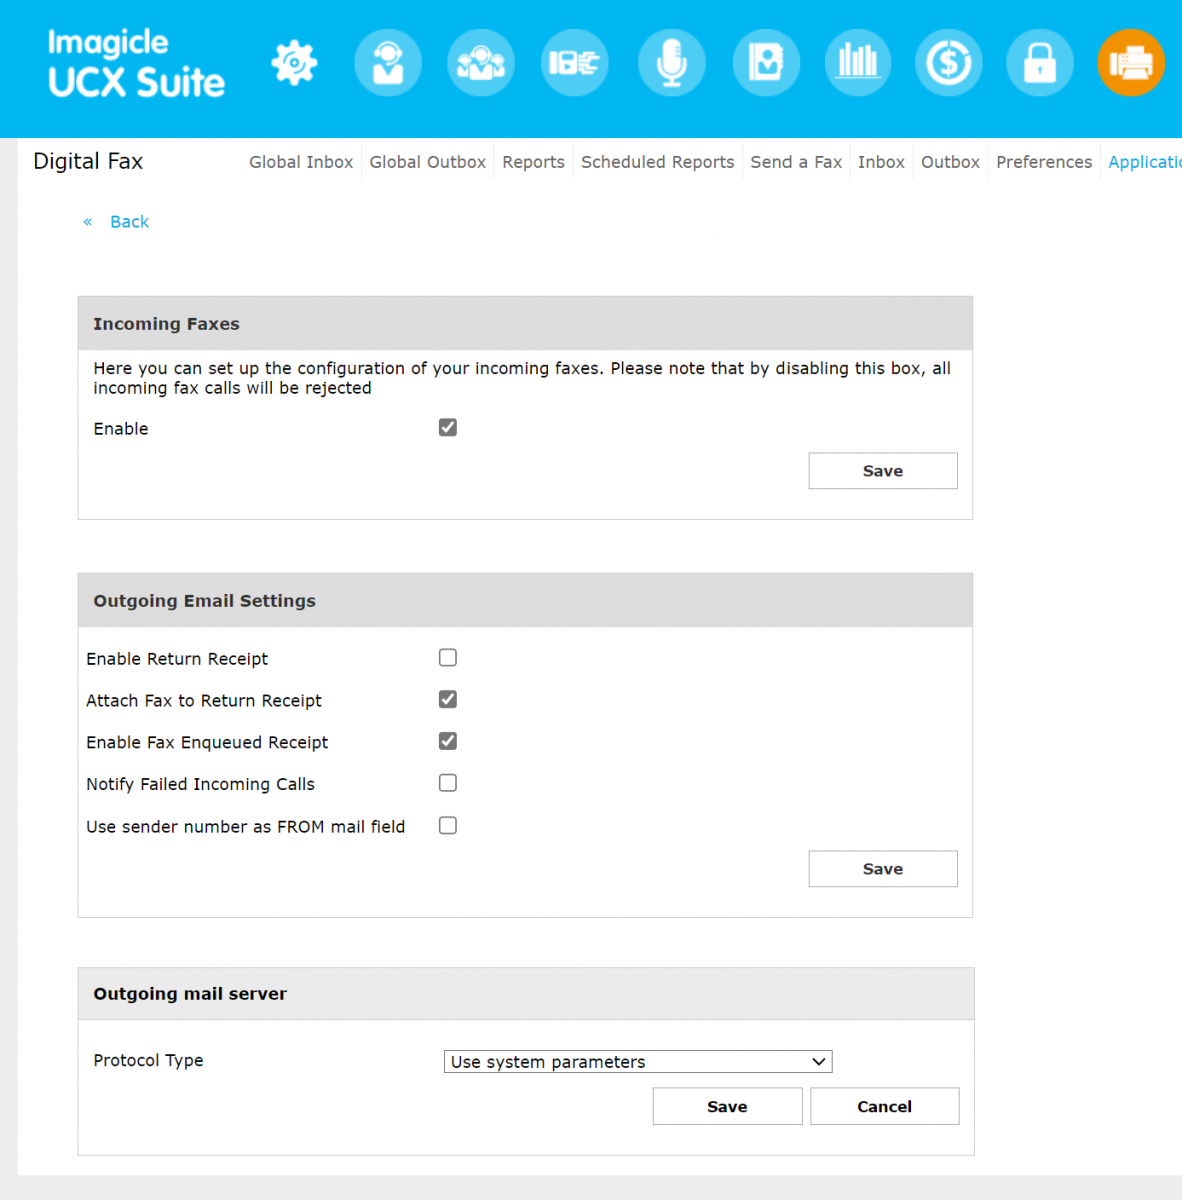
If you wish to leverage the same protocol and the same originating email address for sending fax-to-email notifications, please leave the Protocol Type set to "Use system parameters". In this case, Imagicle UCX Suite leverages the configuration highlighted in this KB article and the flag "Enable Outgoing Mail" must be checked.
Otherwise, you can choose to leverage SMTP protocol and apply below configurations:
SMTP Protocol
Outgoing Email Settings are the same as previous paragraph. When you select "Use specific SMTP server" from Protocol Type pull-down menu, you get an additional form to be filled with SMTP-related data:
- Email From Address: This is the fax2email originating address used by Digital Fax to send email notifications. If SMTP server allows anonymous relay, here you can specify a dummy email address on company's domain
- Server Name: This is the IP address/FQDN of your SMTP server/relay
- Server Port: Dictates which protocol you are going to use to communicate with SMTP server. Any TCP port is accepted. Standard preferred ports are:
- SMTP AUTH: Port 25
- SMTP SSL: Port 465
- SMTP StartTLS: Port 587
- Use Authentication: Flag this field if your SMTP server does not support anonymous relay
- Username: if above authentication flag is checked, add the userID associated to SMTP fax to email address
- Password: if above authentication flag is checked, add password to login to SMTP fax to email address
- Proxy: If a Proxy is in place, please select it. More info here.
Note that by clicking the "Test connection" button, configuration is saved.
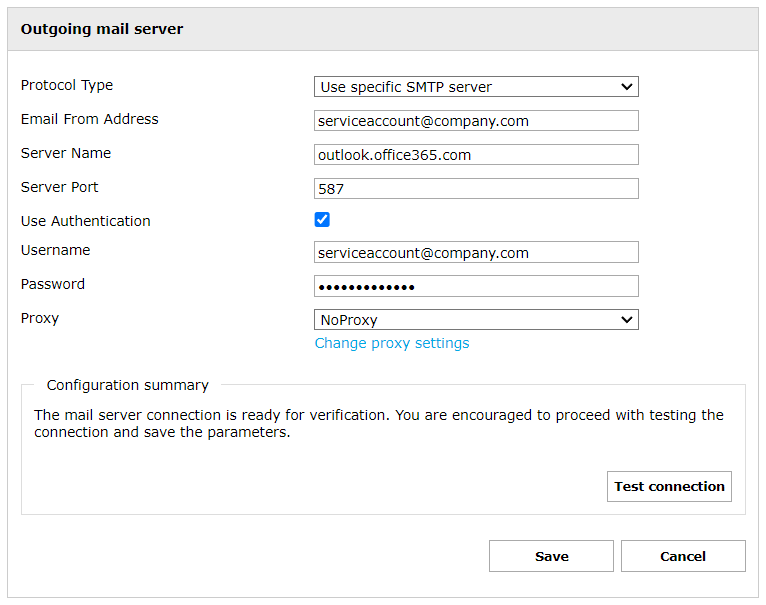
Warning: Do not enter here the same account you used for Email-to-fax configuration. Doing so can lead to unpredictable loops if Digital Fax tries to send a fax to wrong addresses or to people who set an out-of-office autoreply message.
Configuration for GMAIL - SMTP
Below the specific GMAIL SMTP configuration:
Note: If you are experiencing fax sending failures when using SMTP protocol, please access to Imagicle UCX Suite via RDP and edit the following file: C:\Program Files (x86)\StonevoiceAS\Apps\StoneFax\Server\System\StoneFax.ini
Please locate [SMTP_Parameters] section and make sure that the following parameter is properly set: SMTPEnabled=1
Fax Service Configuration
To access to this dialog, start Digital Fax and click the "Set" button next to "Service Configuration" on the "Application Settings" page. Various fax service parameters can be configured:
- The number of times that Digital Fax will try to send a fax
- The time span between retries
- The maximum number of fax that can be sent at the same time. Note that this number cannot be greater than the number of ports you are licensed to use.
Reserving Fax Ports for Incoming Faxes
If your company usually has more incoming fax than the outgoing, you may want to reserve some lines for receiving. Say that you have 12 ports. You may set the "Max Concurrent Outgoing Faxes" value to 8. This way, a minimum of 4 ports will be always available to incoming fax calls. If you have no outgoing faxes, then you could receive up to 12 faxes at the same time.
Company Info
The values specified in this dialog will be showed on all the cover pages. The TSID will override the calling number on the small banner put on the top of each fax page. Remember to also enter a valid Fax Administrator email address, to which any problem or significant fax event will be notified.
Data Retention
In this section it is possible to specify values for fax data retention.
It is possible to both configure automatic faxes and call details records deletion from Inbox/Outbox in case they are older than a defined number of days, specifying the Maximum lifetime (in days) of historical data.
That is, older data will be periodically deleted.
NOTE. Setting one of these two parameters to zero (0) disables faxes/call details records automatic deletion.
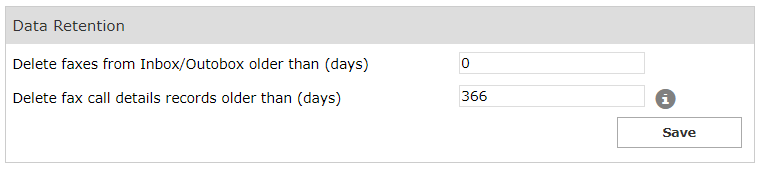
NOTE. The "Delete fax call details records older than (days)" setting may impact on the database size.
Selecting an attachment format for Email To Fax
Incoming faxes can be forwarded to the users' mail boxes either in TIF or PDF format. You do not need to restart Digital Fax for the change to be applied. If you enable incoming fax storage, the format of the stored documents will be the same as the ones sent by email.
The conversion to PDF format for incoming faxes is performed by an internal library - there is no need to install external programs to have this feature.
Supported File Types
Email To Fax and Web To Fax load documents on the server and convert them to fax format (black and white Tiff G4). Digital Fax is able to convert to fax these file types without installing any third party application:
- Office documents: .doc, .docx, .xls, .xlsx
- Standard documents: .txt, .rtf
- Images: .bmp, png, .jpg/.jpeg, .tif/.tiff (single page and b/w multipage)
- Adobe: .PDF
To enable additional file types, please refer to the Advanced Configuration section.
Reference number
Digital Fax assigns a unique reference number to each fax it receives or sends.
A small banner with that number is impressed on the top of each fax page.
The number can also be used to search for the fax in the web interface through the inbox and outbox pages.
The default format for the reference number is like this:
2013.00000912
i.e. the current year followed by a dot and a sequential number padded on 8 digits. The number is reset to 0 every year.
This format is not suitable for cluster installations. If you need to edit the format of the reference number, please ask Imagicle Technical Support.
|
||

| This article was: |
| Prev | Next | |
| EPIC Integration Module | Fax Service Configurations |