Migrating SQL Database to a different SQL instance (including commercial, internal, external)
Applies to:
Any UC Suite where a DB migration is needed.
Description:
This article describes how to install, configure, or migrate the UC Suite SQL server database to a new SQL Server instance (either commercial, internal or external). The latter can be deployed on the same VM or an external SQL cluster. This procedure should be applied when upgrading from a UC Suite version that is older or equal to Summer 2019 to a newer one.
IMPORTANT: Starting from Imagicle 2023.Spring.1 release, MS-SQL Server 2008/2008R2 is supported only for updating an existing installation to Spring 2023, but you can't deploy a new Imagicle instance with such old MS-SQL version. Starting from 2023.Summer.1 release, MS-SQL 2008/2008R2 is not supported anymore and therefore a MS-SQL update is mandatory.
How-to:
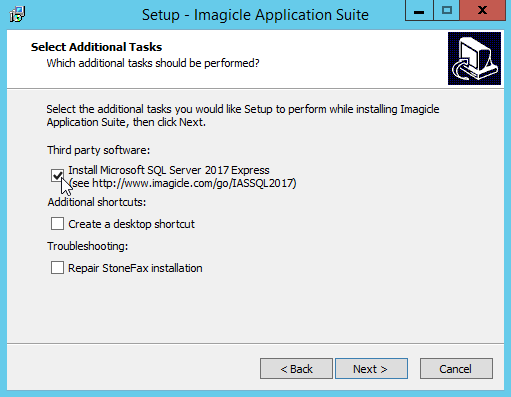
Installing the new SQL Server 2017 Express
The new SQL Server 2017 Express local instance can be automatically installed along with the UC Suite by selecting "Install Microsoft SQL server 2017 Express" option during the setup.
Installing SQL Server standard or enterprise
You can install SQL Server standard or enterprise on a separated server or on the same Imagicle server, if supported you can upgrade (in place) the existing SQL Server express instance or you can install a new instance. During the setup remember to add the Full-text search feature to the installation.
If using a new instance, track the new instance name (you will need it later).
Database migration from an old to a new instance (One Imagicle VM)
- before starting the migration activity, stop all the Imagicle services on the VM you need to upgrade by logging through Remote desktop and running <UC Suite_Installation_Folder>*\Temp\SV-StopAllService.bat as administrator
- once all the services are stopped, launch the “Microsoft Data Migration Assistant” which can be downloaded using the following link: https://www.microsoft.com/en-us/download/details.aspx?id=53595
- Click on “+” to create a new project, choose Migration for Project type and choose “SQL server” for both Source and target server type. then click on “Create”.

- a. On source details you need to specify the source server name followed by the source Imagicle SQL instance name (default IMAGICLE for versions lesser than Summer 2019 that has SQL server express 2008). On target details specify the target server name followed by the SQL instance name(default IMAGICLE2017 for version greater or equal to Summer 2019 ).
- If you are not sure about the source Imagicle instance name you can login to the web interface of both Imagicle VMs and navigate to Admin→Support→Database Server→Server Name, after the backslash the SQL instance is reported.

- In order to have the right server name open the command prompt and type hostname.
- Please note that if the SQL server is external, command hostname has to be executed on the external server.
b. Choose “SQL server Authentication” as authentication type.
- For SQL 2008 (UC Suite version less or equal than Summer 2019):
- Username: sa
- Default password: SvBillyBlues$
- For SQL 2017 (UC Suite version greater or equal than Summer 2019)
- Username: sa
- Default password:SvB1llyBlues$
For any other SQL versions, or if the defaults has been changed, please check with the database administrator for the right credentials.
c. Connection properties must be left unchecked by default, unless a secure connection is used, in that case Encrypt connection option must be flagged.
After filling the information, please click on the “next” button.

- a. Specify a shared folder that is accessible by the service account running on both the source and the target SQL server instance:
- Service account running source SQL server instance must have write privileges on this network location
b. Service account running on target SQL server instance must have read privileges on this network location.
Note that the network location can be located on the same VM if both SQL instances are co-located.
6. Finally specify a shared location to backup both the data and log files from the original SQL server and restore it on the target machine. The shared folder should have a size at least double that of the original database.

How to determine if the service has access to the shared folder
To check if the service has access to the shared folder, go to windows services, scroll down to the “SQL server” service and check the log on user used:

make sure that user has read and write access to the shared folder created earlier:
a. Right click the folder and click on properties
b. Under “Sharing tab” click on advanced sharing
c. If it’s not done already click on “share this folder” and then on “permissions”
d. Add the user used to run the “sql server” service and assign read and write permissions.
How to determine the SQL database size
In order to determine the database size used by the Imagicle application suite, you need to open to the Imagicle web portal:
-
Navigate to Admin→Support→Main info
- Scroll down to “Database size”.

- a. Check the Windows user login you want to use in order to start the migration.
- Pay attention if the source and destination server names are different, or in general if the hostname command output is different from the server name reported in
- Admin→Support→Database Server, select only the login related to the destination server (in this case WIN-QTB0133DIOH) and leave the rest of the logins unchecked).
b. Click on “Start migration”

- if the migration is successful the following message is displayed with the duration it took to complete.

- a. Run the “Imagicle AS database configuration” wizard and follow the indicated steps.
b. When prompted, specify the new database instance name and its credentials.
c. After completing the wizard, log in to the Imagicle web interface and check under admin→support→Database Server that the new SQL instance name is appearing.
Database migration from an old to a new instance (Imagicle Cluster)
- In case the database is shared between the Imagicle nodes, then it is required to run only step 9 from the previous section
- In case each node has his own local database, then all the steps of the previous section needs to be repeated.
|
||

| This article was: |
| Prev | Next | |
| Powershell.exe error during the update to Summer 2020 and the... | How to enable the automatic DB maintenance |